道路千万条,安全第一条!
魔方结构解析
从魔方的外观来看,可以有多种方式来表达它的组成,从而也有多种方式来形成一个魔方。如:
- 由六个面组成
- 由若干层组成
- 由多个方块组成
无论哪种方式,都可以制作魔方。只是,不同的方式对后续的其它操作会有影响,有些方式甚至会导致利用已有的特性无法直接表达。因此,在这项选择上小纠结一下,理出最易于理解和实施(往往也容易自以为是)的方案是有益的。
这里我们选择“由多个方块组成”的方式来形成魔方。
于是得到魔方的基本结构为:一个魔方由多个魔方格(cube)组成,一个魔方格由多个版面(block)组成。
一些基本要素的表示
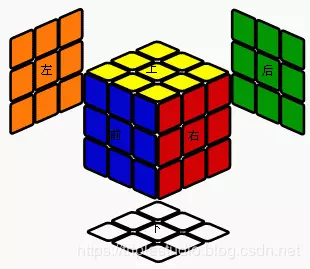
六个方向表示:上(up)、下(down)、左(left)、右(right)、前(front)、后(back)
六种颜色表示:黄色(yellow)、白色(white)、橙色(orange)、红色(red)、蓝色(blue)、绿色(green)
初始的魔方组成形式为:上黄,下白,左橙,右红,前蓝,后绿。

绘制魔方格
一个魔方格也有六个方向,每个方向一个版面。在魔方中,一个魔方格可见的只有 1 至 3 个版面。
为了处理方便,每一个魔方格我们总是从前面来看它,从而上、下、左、右、前、后对于每一个魔方格而言都是确定的位置。
版面的绘制
首先,定义版面(block)的基础样式:
.block {
    position: absolute;
    margin: 0 auto;
    border:solid 2px black;
    border-radius:3px;
    /* 宽高包含边框 */
    box-sizing:border-box;
    /* 旋转原点 */
    transform-origin:0 0 0;
}
一个版面,默认总是“前面”,我们通过旋转将其旋转到指定的方向,每个方向确定的规则如下:
上:为绕 x 轴逆向 90 度,即 rotateX(-90deg)
下:y 轴的 top属性增加一格后绕 x 轴逆向 90 度
左:绕 y 轴 90 度,即 rotateY(90deg)
右:x 轴的 left 属性增加一格后绕 y 轴 90 度
前:本尊不用动
后:z 轴向后平移一格即可,即 translateZ(size px)
为此,我们通过 javascript 定义一个 Block 类,接收方向、颜色与一格大小作为参数,实现动态绘制版面。
<script>
/** 版面 block 类
 * direct 方向
 * color  颜色
 * size   边长大小
**/
function Block(direct, color, size){
    this.direct = direct;
    this.color = color;
    this.size = size;
    // 绘制过的 UI 元素对象
    this.Element = null;

    // 在父容器中绘制
    this.DrawIn = function(cubeElement){
        var e = this.Element || document.createElement('div');
        e.style.width = this.size + "px";
        e.style.height = this.size + "px";

        var top = (this.direct == 'down' ? this.size : 0);
        var left = (this.direct == 'right' ? this.size : 0);

        e.style.top = top + "px";
        e.style.left = left + "px";
        e.style.backgroundColor = this.color;

        var rx = (this.direct == 'up' || this.direct == 'down' ? -90 : 0);
        var ry = (this.direct == 'left' || this.direct == 'right' ? 90 : 0);;
        var tz = (this.direct == 'back' ? this.size : 0);

        e.style["transform"] = "rotateX(" + rx + "deg) rotateY(" + ry + "deg) translateZ(-" + tz + "px)";
        e.className = "block";
        this.Element = e;
        cubeElement.appendChild(e);
    };
}

function onload(){
    var blockLeft = new Block('left', 'red', 50);
    var blockTop = new Block('up', 'yellow', 50);
    var blockRight = new Block('right', 'green', 50);

    blockLeft.DrawIn( document.querySelector(".wrap") );
    blockTop.DrawIn( document.querySelector(".wrap") );
    blockRight.DrawIn( document.querySelector(".wrap") );
}
</script>
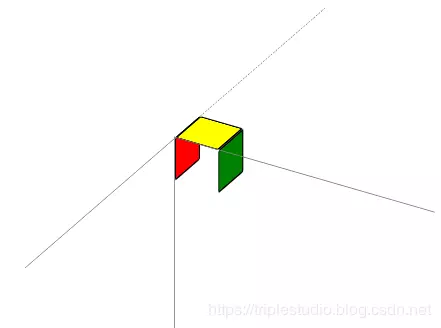
效果如下:

魔方格的绘制
有了版面的绘制,魔方格可以看到是版面的一个集合,我们根据需要组合版面即可。
首先,我们定义一个魔方格的基础样式 cube:
.cube {
    position: absolute;
    /* 子元素版面是需要三维空间的 */
    transform-style: preserve-3d;
}
为了动态绘制魔方格,我们定义一个魔方格的 Cube 类,指定大小,以及指明所需要各版面的方向及颜色即可。为了能将魔方格排列成魔方,可以为魔方格设置一个其位于魔方这个三维体的坐标位置,默认坐标总是(0,0,0)。而魔方的三维坐标我们定义如下:
自左向右为 x 坐标,以三阶为例可取值:0,1,2
自上向下为 y 从标,以三阶为例可取值:0,1,2
自前向后为 z 坐标,以三阶为例可取值:0,1,2
/** 魔方格 Cube 类
 * blockSize 为魔方格的边长代表大小
 * directColorArray 为指定方向与颜色的数组
 *                  形式为 [direct,color,direct,color,...]
 * x,y,z 为在魔方中的坐标,未指定时默认为0,0,0
**/
function Cube(blockSize, directColorArray, x, y, z){
    this.x = x | 0;
    this.y = y | 0;
    this.z = z | 0;
    this.blockSize = blockSize;
    this.blocks = [];
    /* 根据参数建立 Block 对象 */
    for(var i=0; i < directColorArray.length / 2; i++){
        this.blocks.push(new Block(directColorArray[ i*2 ], directColorArray[ i*2 + 1 ], this.blockSize));
    }

    // 绘制过的 UI 元素对象
    this.Element = null;

    // 在父容器中绘制
    this.DrawIn = function(boxElement, x, y, z){
        this.x = this.x | x;
        this.y = this.y | y;
        this.z = this.z | z;
        var e = this.Element || document.createElement('div');
        e.style.width = this.blockSize + "px";
        e.style.height = this.blockSize + "px";
        e.style["transform"] = "translate3d(" + (x * this.blockSize) + "px," + (y * this.blockSize) + "px,-" + (z * this.blockSize) + "px) ";
        e.className = "cube";

        for(var i=0; i < this.blocks.length; i++) {
            this.blocks[i].DrawIn(e);
        }

        this.Element = e;

        boxElement.appendChild(e);
    };
}
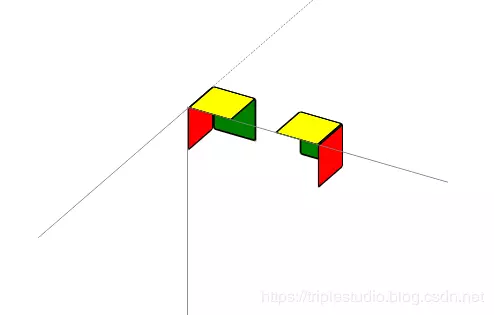
以下代码,绘制两个魔方格:
function onload(){
    var cube1 = new Cube(50, ['left', 'red', 'up', 'yellow', 'back', 'green']);
    var cube2 = new Cube(50, ['right', 'red', 'up', 'yellow', 'back', 'green']);

    cube1.DrawIn( document.querySelector(".wrap") );
    cube2.DrawIn( document.querySelector(".wrap"), 2, 0, 0 );
}
效果如下:

形成魔方
同样,为了包裹起整个魔方,我们定义一个魔方的基础样式,magicBox:
.magicBox {
    position: absolute;
    transform-style: preserve-3d;
}
接下来,再定义一个 MagicBox 的类,根据魔方初始的摆放格局“上黄,下白,左橙,右红,前蓝,后绿”,我们可以根据指定的维度自动生成其所需要的魔方格,所有的魔方格,均通过平移的方式放置到所属的坐标。
/** 魔方 MagicBox 类
 * dimension 阶数
 * blockSize 每小格大小
 **/
function MagicBox(dimension, blockSize){
    this.dimension = dimension;
    this.blockSize = blockSize;
    this.cubes = [];

    this.MakeDefaultCubes = function(){
        this.cubes = [];
        for(var x=0; x < this.dimension; x++){
            for(var y=0; y < this.dimension; y++){
                for(var z=0; z < this.dimension; z++){
                    var cube = this.MakeDefaultCube(x, y, z);
                    if(cube){
                      this.cubes.push(cube);
                    }
                }
            }
        }
    };

    /* 根据魔方格在阶数中的位置生成魔方格,魔方内部的格子忽略 */
    this.MakeDefaultCube = function(x, y, z){
        var max = this.dimension - 1;
        var dc = [];
        if(x == 0) dc.push("left", "orange"); else if(x == max) dc.push("right", "red");
        if(y == 0) dc.push("up", "yellow"); else if(y == max) dc.push("down", "white");
        if(z == 0) dc.push("front", "blue"); else if(z == max) dc.push("back", "green");
        if(dc.length == 0) return null;
        var cube = new Cube(this.blockSize, dc, x, y, z);
        return cube;
    }

    // 构造时自动产生初始魔方格
    this.MakeDefaultCubes();
    // 绘制过的 UI 元素对象
    this.Element = null;
    // 在父容器中绘制
    this.DrawIn = function(domElement){
        var e = this.Element || document.createElement('div');
        e.style.width = (this.dimension * this.blockSize) + "px";
        e.style.height = (this.dimension * this.blockSize) + "px";
        e.className = "magicBox";

        for(var i=0; i < this.cubes.length; i++) {
            this.cubes[i].DrawIn(e);
        }
        this.Element = e;
        domElement.appendChild(e);
    };
}
通过以下代码绘制一个三阶魔方:
var magicBox = new MagicBox(3, 50);
magicBox.DrawIn( document.querySelector(".wrap") );
效果如下:

附本文完整 HTML 页面
以下为本文完整的代码文档,复制到记事本中,保存为.html即可在谷歌浏览器中运行。
<!DOCTYPE html>
<html>
<head>
    <meta charset="utf-8" />
    <title>CSS3 魔方</title>
    <!-- 样式部分全写这里 -->
    <style>
    .wrap {
        transform-style: preserve-3d;
         300px;  height: 300px;
        position: relative;  /* 定位起点元素 */
        border-top:solid 1px gray;  /* x 轴 */
        border-left:solid 1px gray;  /* y 轴 */
        /* 倾斜一点方能见立体效果 */
        transform: rotateX(-30deg) rotateY(-30deg);
    }

    /* z 轴正方向 */
    .zaxis_p {
        position:absolute;
        width : 300px;
        height:1px;
        border-top:solid 1px gray;
        /* xy面上,90度立起来就是 z */
        transform: rotateY(-90deg);
        /* 立起来的旋转点 */
        transform-origin:0 0 0;
    }

    /* z 轴负方向 */
    .zaxis_n {
        position:absolute;
        width : 300px;
        height:1px;
        border-top:dashed 1px gray; /*(虚线)*/
        transform: rotateY(90deg);
        transform-origin:0 0 0;
    }

    .block {
        position: absolute;
        margin: 0 auto;
        border:solid 2px black;
        border-radius:3px;
        /* 宽高包含边框 */
        box-sizing:border-box;
        transform-origin:0 0 0;
    }

    .cube {
        position: absolute;
        /* 子元素版面是需要三维空间的 */
        transform-style: preserve-3d;
    }

    .magicBox {
        position: absolute;
        transform-style: preserve-3d;
    }

    </style>

<script>
/** 版面 block 类
 * direct 方向
 * color  颜色
 * size   边长大小
**/
function Block(direct, color, size){
    this.direct = direct;
    this.color = color;
    this.size = size;
    // 绘制过的 UI 元素对象
    this.Element = null;

    // 在父容器中绘制
    this.DrawIn = function(cubeElement){
        var e = this.Element || document.createElement('div');
        e.style.width = this.size + "px";
        e.style.height = this.size + "px";

        var top = (this.direct == 'down' ? this.size : 0);
        var left = (this.direct == 'right' ? this.size : 0);

        e.style.top = top + "px";
        e.style.left = left + "px";
        e.style.backgroundColor = this.color;

        var rx = (this.direct == 'up' || this.direct == 'down' ? -90 : 0);
        var ry = (this.direct == 'left' || this.direct == 'right' ? 90 : 0);;
        var tz = (this.direct == 'back' ? this.size : 0);

        e.style["transform"] = "rotateX(" + rx + "deg) rotateY(" + ry + "deg) translateZ(-" + tz + "px)";
        e.className = "block";
        this.Element = e;
        cubeElement.appendChild(e);
    };
}

/** 魔方格 Cube 类
 * blockSize 为魔方格的边长代表大小
 * directColorArray 为指定方向与颜色的数组
 *                  形式为 [direct,color,direct,color,...]
 * x,y,z 为在魔方中的坐标,未指定时默认为0,0,0
**/
function Cube(blockSize, directColorArray, x, y, z){
    this.x = x | 0;
    this.y = y | 0;
    this.z = z | 0;
    this.blockSize = blockSize;
    this.blocks = [];
    /* 根据参数建立 Block 对象 */
    for(var i=0; i < directColorArray.length / 2; i++){
        this.blocks.push(new Block(directColorArray[ i*2 ], directColorArray[ i*2 + 1 ], this.blockSize));
    }

    // 绘制过的 UI 元素对象
    this.Element = null;

    // 在父容器中绘制
    this.DrawIn = function(boxElement, x, y, z){
        this.x = x | this.x;
        this.y = y | this.y;
        this.z = z | this.z;
        var e = this.Element || document.createElement('div');
        e.style.width = this.blockSize + "px";
        e.style.height = this.blockSize + "px";
        e.style["transform"] = "translate3d(" + (this.x * this.blockSize) + "px," + (this.y * this.blockSize) + "px,-" + (this.z * this.blockSize) + "px) ";
        e.className = "cube";

        for(var i=0; i < this.blocks.length; i++) {
            this.blocks[i].DrawIn(e);
        }

        this.Element = e;

        boxElement.appendChild(e);
    };
}

/** 魔方 MagicBox 类
 * dimension 阶数
 * blockSize 每小格大小
 **/
function MagicBox(dimension, blockSize){
    this.dimension = dimension;
    this.blockSize = blockSize;
    this.cubes = [];

    this.MakeDefaultCubes = function(){
        this.cubes = [];
        for(var x=0; x < this.dimension; x++){
            for(var y=0; y < this.dimension; y++){
                for(var z=0; z < this.dimension; z++){
                    var cube = this.MakeDefaultCube(x, y, z);
                    if(cube){
                      this.cubes.push(cube);
                    }
                }
            }
        }
    };

    /* 根据魔方格在阶数中的位置生成魔方格,魔方内部的格子忽略 */
    this.MakeDefaultCube = function(x, y, z){
        var max = this.dimension - 1;
        var dc = [];
        if(x == 0) dc.push("left", "orange"); else if(x == max) dc.push("right", "red");
        if(y == 0) dc.push("up", "yellow"); else if(y == max) dc.push("down", "white");
        if(z == 0) dc.push("front", "blue"); else if(z == max) dc.push("back", "green");
        if(dc.length == 0) return null;
        var cube = new Cube(this.blockSize, dc, x, y, z);
        return cube;
    }

    // 构造时自动产生初始魔方格
    this.MakeDefaultCubes();
    // 绘制过的 UI 元素对象
    this.Element = null;
    // 在父容器中绘制
    this.DrawIn = function(domElement){
        var e = this.Element || document.createElement('div');
        e.style.width = (this.dimension * this.blockSize) + "px";
        e.style.height = (this.dimension * this.blockSize) + "px";
        e.className = "magicBox";

        for(var i=0; i < this.cubes.length; i++) {
            this.cubes[i].DrawIn(e);
        }
        this.Element = e;
        domElement.appendChild(e);
    };
}

function onload(){
    /* 版面绘制示例
    var blockLeft = new Block('left', 'red', 50);
    var blockTop = new Block('up', 'yellow', 50);
    var blockRight = new Block('right', 'green', 50);

    blockLeft.DrawIn( document.querySelector(".wrap") );
    blockTop.DrawIn( document.querySelector(".wrap") );
    blockRight.DrawIn( document.querySelector(".wrap") );
    */

    /* 魔方格绘制示例
    var cube1 = new Cube(50, ['left', 'red', 'up', 'yellow', 'back', 'green']);
    var cube2 = new Cube(50, ['right', 'red', 'up', 'yellow', 'back', 'green']);

    cube1.DrawIn( document.querySelector(".wrap") );
    cube2.DrawIn( document.querySelector(".wrap"), 2, 0, 0 );
    */

    //* 魔方绘制示例
    var magicBox = new MagicBox(3, 50);
    magicBox.DrawIn( document.querySelector(".wrap") );
    //*/
}
</script>
</head>

<body style="padding:300px;" onload="onload()">
  <div class="wrap">
    <div class="zaxis_p"></div>
    <div class="zaxis_n"></div>
  </div>
</body>

</html>
关注微信公众号“时间维度”,让我们走过一段时空交织的时光。