服务作为Android四大组件之一,是一种可在后台执行长时间运行操作而不提供界面的应用组件。服务可由其他应用组件启动,而且即使用户切换到其他应用,服务仍将在后台继续运行。需要注意的是服务并不会自动开启线程,所有的代码都是默认运行在主线程当中的,所以需要在服务的内部手动创建子线程,并在这里执行具体的任务,否则就有可能出现主线程被阻塞住的情况。
Android多线程编程
异步消息机制
关于多线程编程其实和Java一致,无论是继承Thread还是实现Runnable接口都可以实现。在Android中需要掌握的就是在子线程中更新UI,UI是由主线程来控制的,所以主线程又称为UI线程。
Only the original thread that created a view hierarchy can touch its views.
虽然不允许在子线程中更新UI,但是Android提供了一套异步消息处理机制,完美解决了在子线程中操作UI的问题,那就是使用Handler。先来回顾一下使用Handler更新UI的用法:
public class MainActivity extends AppCompatActivity {
    private static final int UPDATE_UI = 1001;
    private TextView textView;

    private Handler handler = new Handler(Looper.getMainLooper()){
        @Override
        public void handleMessage(@NonNull Message msg) {
            if(msg.what == UPDATE_UI) textView.setText("Hello Thread!");
        }
    };

    @Override
    protected void onCreate(Bundle savedInstanceState) {
        super.onCreate(savedInstanceState);
        setContentView(R.layout.activity_main);
        textView = findViewById(R.id.tv_main);
    }

    public void updateUI(View view) {
        // new Thread(()-> textView.setText("Hello Thread!")).start(); Error!
        new Thread(()->{
            Message message = new Message();
            message.what = UPDATE_UI;
            handler.sendMessage(message);
        }).start();
    }
}
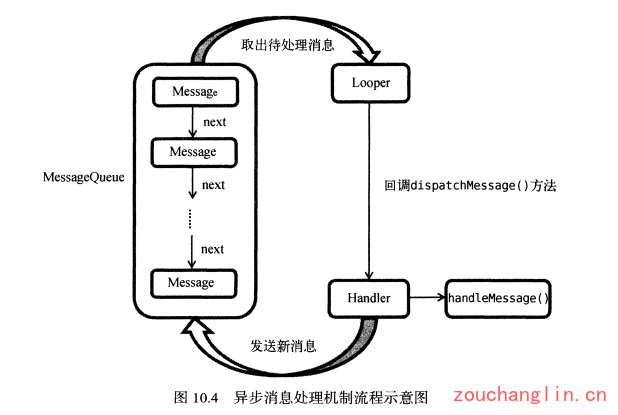
使用这种机制就可以出色地解决掉在子线程中更新UI的问题,下面就来分析一下Android异步消息处理机制到底的工作原理:Android中的异步消息处理主要由4个部分组成:Message,Handler,MessageQueue和Looper。
1、Message:线程之间传递的消息,它可以在内部携带少量的信息,用于在不同线程之间交换数据。
2、Handler:处理者,它主要是用于发送和处理消息的。发送消息一般是使用Handler的sendMessage()方法,而发出的消息经过一系列地辗转处理后,最终会传递到Handler的handleMessage()方法中。
3、MessageQueue:消息队列,它主要用于存放所有通过Handler发送的消息。这部分消息会一直存在于消息队列中,等待被处理。每个线程中只会有一个MessageQueue对象。
4、Looper是每个线程中的MessageQueue的管家,调用Looper的loop()方法后,就会进入到一个无限循环当中,然后每当发现 MessageQueue 中存在一条消息,就会将它取出,并传递到Handler的handleMessage()方法中。每个线程中也只会有一个Looper对象。
异步消息处理整个流程:首先需要在主线程当中创建一个Handler 对象,并重写handleMessage()方法。然后当子线程中需要进行UI操作时,就创建一个Message对象,并通过Handler将这条消息发送出去。之后这条消息会被添加到MessageQueue的队列中等待被处理,而Looper则会一直尝试从MessageQueue 中取出待处理消息,最后分发回 Handler 的handleMessage()方法中。由于Handler是在主线程中创建的,所以此时handleMessage()方法中的代码也会在主线程中运行,于是我们在这里就可以安心地进行UI操作了。整个异步消息处理机制的流程如下图所示:
AsyncTask
不过为了更加方便我们在子线程中对UI进行操作,Android还提供了另外一些好用的工具,比如AsyncTask。AsyncTask背后的实现原理也是基于异步消息处理机制,只是Android帮我们做了很好的封装而已。首先来看一下AsyncTask的基本用法,由于AsyncTask是一个抽象类,所以如果我们想使用它,就必须要创建一个子类去继承它。在继承时我们可以为AsyncTask类指定3个泛型参数,这3个参数的用途如下:
Params:在执行AsyncTask时需要传入的参数,可用于在后台任务中使用。
Progress:后台任务执行时,如果需要在界面上显示当前的进度,则使用这里指定的泛型作为进度单位。
Result:当任务执行完毕后,如果需要对结果进行返回,则使用这里指定的泛型作为返回值类型。
public class MainActivity extends AppCompatActivity {
    private static final String TAG = "MainActivity";
    private final int REQUEST_EXTERNAL_STORAGE = 1;

    @Override
    protected void onCreate(Bundle savedInstanceState) {
        super.onCreate(savedInstanceState);
        setContentView(R.layout.activity_main);
    }

    public void startDownload(View view) {
        verifyStoragePermissions(this);
        ProgressBar progressBar = findViewById(R.id.download_pb);
        TextView textView = findViewById(R.id.download_tv);
        new MyDownloadAsyncTask(progressBar, textView).execute("http://xxx.zip");
    }


    class MyDownloadAsyncTask extends AsyncTask<String, Integer, Boolean> {
        private ProgressBar progressBar;
        private TextView textView;

        public MyDownloadAsyncTask(ProgressBar progressBar, TextView textView) {
            this.progressBar = progressBar;
            this.textView = textView;
        }

        @Override
        protected Boolean doInBackground(String... strings) {
            String urlStr = strings[0];
            try {
                URL url = new URL(urlStr);
                HttpURLConnection conn = (HttpURLConnection) url.openConnection();
                InputStream inputStream = conn.getInputStream();
                // 获取文件总长度
                int length = conn.getContentLength();
                File downloadsDir = new File("...");
                File descFile = new File(downloadsDir, "xxx.zip");
                int downloadSize = 0;
                int offset;
                byte[] buffer = new byte[1024];
                FileOutputStream fileOutputStream = new FileOutputStream(descFile);
                while ((offset = inputStream.read(buffer)) != -1){
                    downloadSize += offset;
                    fileOutputStream.write(buffer, 0, offset);

                    // 抛出任务执行的进度
                    publishProgress((downloadSize * 100 / length));
                }
                fileOutputStream.close();
                inputStream.close();
                Log.i(TAG, "download: descFile = " + descFile.getAbsolutePath());
            } catch (IOException e) {
                e.printStackTrace();
                return false;
            }
            return true;
        }

        // 在主线程中执行结果处理
        @Override
        protected void onPostExecute(Boolean aBoolean) {
            super.onPostExecute(aBoolean);
            if(aBoolean){
                textView.setText("下载完成,文件位于..xx.zip");
            }else{
                textView.setText("下载失败");
            }
        }

        // 任务进度更新
        @Override
        protected void onProgressUpdate(Integer... values) {
            super.onProgressUpdate(values);
            // 收到新进度,执行处理
            textView.setText("已下载" + values[0] + "%");
            progressBar.setProgress(values[0]);
        }

        @Override
        protected void onPreExecute() {
            super.onPreExecute();
            textView.setText("未点击下载");
        }
    }
}
1、onPreExecute():方法会在后台任务开始执行之前调用,用于进行一些界面上的初始化操作,比如显示一个进度条对话框等。
2、doInBackground():方法中的所有代码都会在子线程中运行,我们应该在这里去处理所有的耗时任务。任务一旦完成就可以通过return语句来将任务的执行结果返回,如果 AsyncTask的第三个泛型参数指定的是Void,就可以不返回任务执行结果。注意,在这个方法中是不可以进行UI操作的,如果需要更新UI元素,比如说反馈当前任务的执行进度,可以调用publishProgress()方法来完成。
3、onProgressUpdate():当在后台任务中调用了publishProgress()方法后,onProgressUpdate()方法就会很快被调用,该方法中携带的参数就是在后台任务中传递过来的。在这个方法中可以对UI进行操作,利用参数中的数值就可以对界面元素进行相应的更新。
4、onPostExecute():当后台任务执行完毕并通过return语句进行返回时,这个方法就很快会被调用。返回的数据会作为参数传递到此方法中,可以利用返回的数据来进行一些UI操作,比如说提醒任务执行的结果,以及关闭掉进度条对话框等。
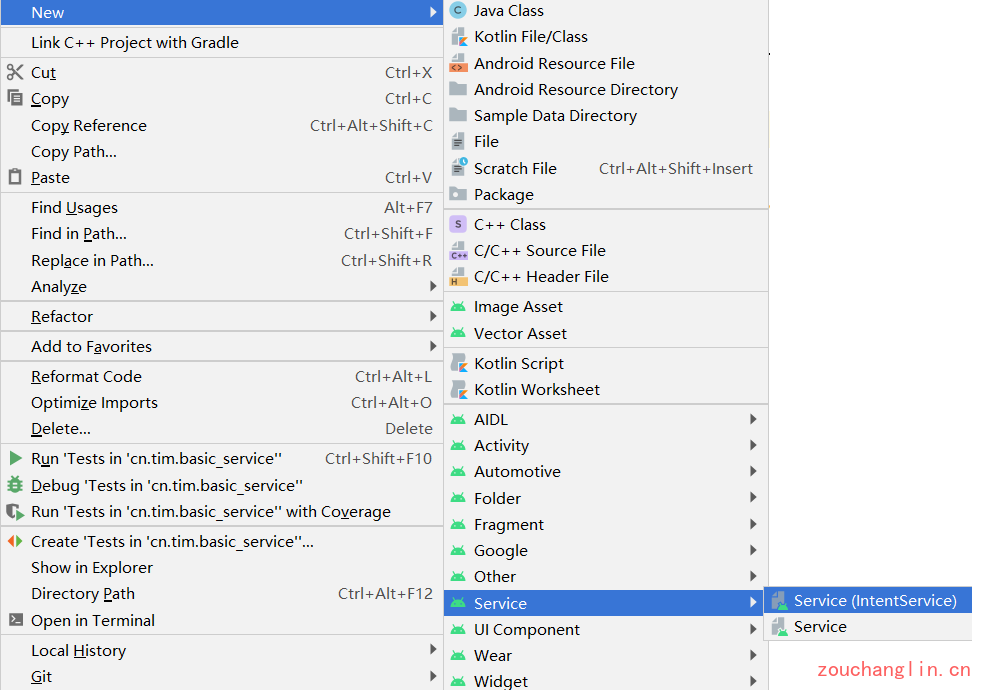
服务的基本用法
服务首先作为Android之一,自然也要在Manifest文件中声明,这是Android四大组件共有的特点。新建一个MyService类继承自Service,然后再清单文件中声明即可。
服务的创建与启动
MyService.java:
public class MyService extends Service {
    private static final String TAG = "MyService";

    public MyService() {

    }

    @Override
    public IBinder onBind(Intent intent) {
        Log.i(TAG, "onBind: ");
        // TODO: Return the communication channel to the service.
        throw new UnsupportedOperationException("Not yet implemented");
    }
}
AndroidManifest.xml:
<?xml version="1.0" encoding="utf-8"?>
<manifest xmlns:android="http://schemas.android.com/apk/res/android"
    package="cn.tim.basic_service">
    <application
        android:allowBackup="true"
        android:icon="@mipmap/ic_launcher"
        android:label="@string/app_name"
        android:roundIcon="@mipmap/ic_launcher_round"
        android:supportsRtl="true"
        android:theme="@style/AppTheme">

        <service
            android:name=".MyService"
            android:enabled="true"
            android:exported="true" />

        <activity android:name=".MainActivity">
            <intent-filter>
                <action android:name="android.intent.action.MAIN" />
                <category android:name="android.intent.category.LAUNCHER" />
            </intent-filter>
        </activity>
    </application>

</manifest>
可以看到,MyService的服务标签中有两个属性,exported属性表示是否允许除了当前程序之外的其他程序访问这个服务,enabled属性表示是否启用这个服务。然后在MainActivity.java中启动这个服务:
// 启动服务
startService(new Intent(this, MyService.class));

服务的停止(销毁)
如何停止服务呢?在MainActivity.java中停止这个服务:
Intent intent = new Intent(this, MyService.class);
// 启动服务
startService(intent);
// 停止服务
stopService(intent);
其实Service还可以重写其他方法:
public class MyService extends Service {
    private static final String TAG = "MyService";

    public MyService() {
    }

    // 创建
    @Override
    public void onCreate() {
        super.onCreate();
        Log.i(TAG, "onCreate: ");
    }

    // 启动
    @Override
    public int onStartCommand(Intent intent, int flags, int startId) {
        Log.i(TAG, "onStartCommand: ");
        return super.onStartCommand(intent, flags, startId);
    }

    // 绑定
    @Override
    public IBinder onBind(Intent intent) {
        Log.i(TAG, "onBind: ");
        // TODO: Return the communication channel to the service.
        throw new UnsupportedOperationException("Not yet implemented");
    }

    // 解绑
    @Override
    public void unbindService(ServiceConnection conn) {
        super.unbindService(conn);
        Log.i(TAG, "unbindService: ");
    }

    // 销毁
    @Override
    public void onDestroy() {
        super.onDestroy();
        Log.i(TAG, "onDestroy: ");
    }
}

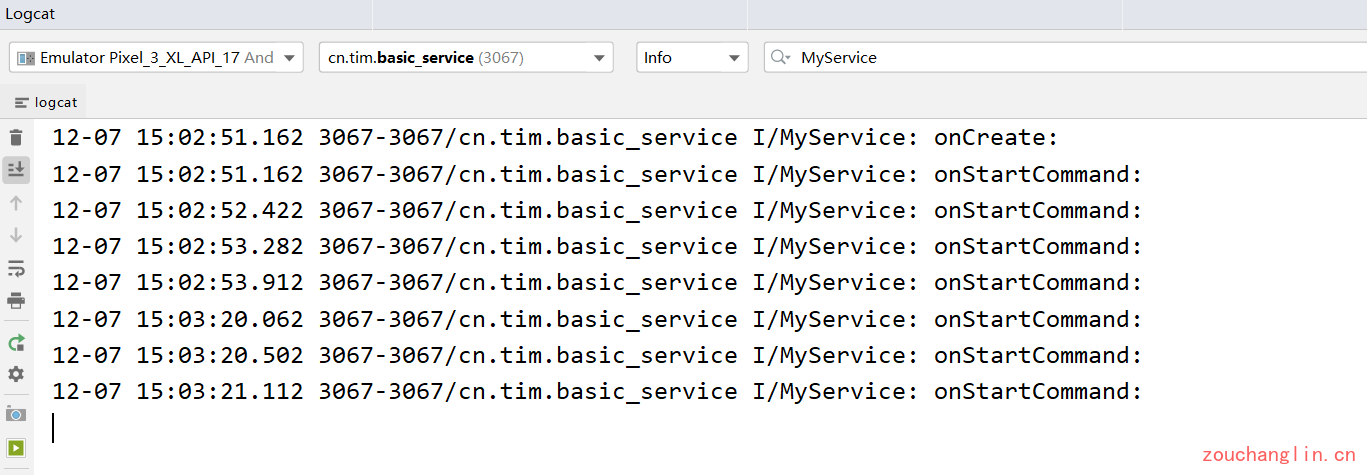
其实onCreate()方法是在服务第一次创建的时候调用的,而 onStartCommand()方法则在每次启动服务的时候都会调用,由于刚才我们是第一次点击Start Service按钮,服务此时还未创建过,所以两个方法都会执行,之后如果再连续多点击几次 Start Service按钮,就只有onStartCommand()方法可以得到执行了:
服务绑定与解绑
在上面的例子中,虽然服务是在活动里启动的,但在启动了服务之后,活动与服务基本就没有什么关系了。这就类似于活动通知了服务一下:你可以启动了!然后服务就去忙自己的事情了,但活动并不知道服务到底去做了什么事情,以及完成得如何。所以这就要借助服务绑定了。
比如在MyService里提供一个下载功能,然后在活动中可以决定何时开始下载,以及随时查看下载进度。实现这个功能的思路是创建一个专门的Binder对象来对下载功能进行管理,修改MyService.java:
public class MyService extends Service {
    private static final String TAG = "MyService";

    private DownloadBinder mBinder = new DownloadBinder();

    static class DownloadBinder extends Binder {
        public void startDownload() {
            // 模拟开始下载
            Log.i(TAG, "startDownload executed");
        }

        public int getProgress() {
            // 模拟返回下载进度
            Log.i(TAG, "getProgress executed");
            return 0;
        }
    }

    public MyService() {}

    // 创建
    @Override
    public void onCreate() {
        super.onCreate();
        Log.i(TAG, "onCreate: ");
    }

    // 启动
    @Override
    public int onStartCommand(Intent intent, int flags, int startId) {
        Log.i(TAG, "onStartCommand: ");
        return super.onStartCommand(intent, flags, startId);
    }

    // 绑定
    @Override
    public IBinder onBind(Intent intent) {
        Log.i(TAG, "onBind: ");
        return mBinder;
    }

    // 解绑
    @Override
    public void unbindService(ServiceConnection conn) {
        super.unbindService(conn);
        Log.i(TAG, "unbindService: ");
    }

    // 销毁
    @Override
    public void onDestroy() {
        super.onDestroy();
        Log.i(TAG, "onDestroy: ");
    }
}
MainActivity.java如下:
public class MainActivity extends AppCompatActivity {

    private MyService.DownloadBinder downloadBinder;

    ServiceConnection connection = new ServiceConnection() {
        @Override
        public void onServiceConnected(ComponentName name, IBinder service) {
            downloadBinder = (MyService.DownloadBinder) service;
            downloadBinder.startDownload();
            downloadBinder.getProgress();
        }

        @Override
        public void onServiceDisconnected(ComponentName name) {

        }
    };

    @Override
    protected void onCreate(Bundle savedInstanceState) {
        super.onCreate(savedInstanceState);
        setContentView(R.layout.activity_main);
    }

    public void aboutService(View view) {
        int id = view.getId();
        Intent intent = new Intent(this, MyService.class);
        switch (id){
            case R.id.start_btn:
                startService(intent);
                break;
            case R.id.stop_btn:
                stopService(intent);
                break;
            case R.id.bind_btn:
                // 这里传入BIND_AUTO_CREATE表示在活动和服务进行绑定后自动创建服务
                bindService(intent, connection, BIND_AUTO_CREATE);
                break;
            case R.id.unbind_btn:
                unbindService(connection);
                break;
        }
    }
}
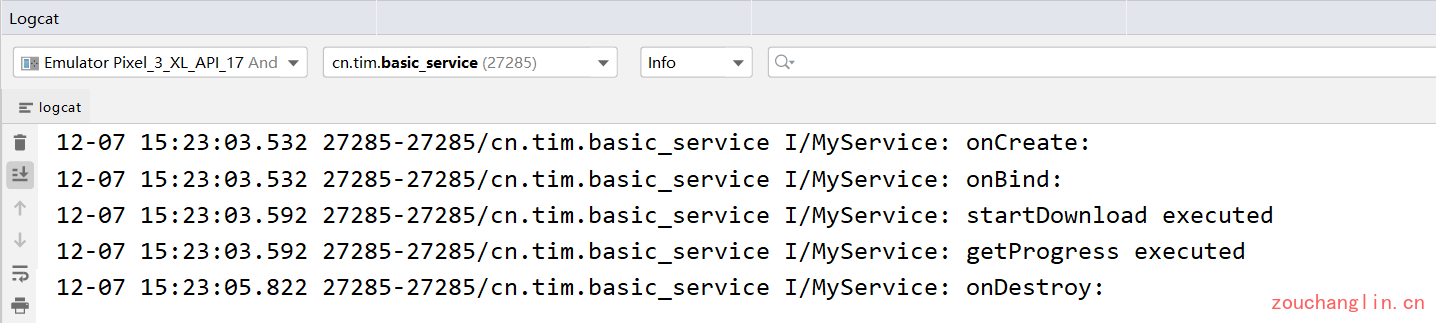
这个ServiceConnection的匿名类里面重写了onServiceConnected()方法和 onServiceDisconnected()方法,这两个方法分别会在活动与服务成功绑定以及解除绑定的时候调用。在 onServiceConnected()方法中,通过向下转型得到DownloadBinder的实例,有了这个实例,活动和服务之间的关系就变得非常紧密了。现在我们可以在活动中根据具体的场景来调用DownloadBinder中的任何public()方法,即实现了指挥服务干什么服务就去干什么的功能(虽然实现startDownload与getProgress实现很简单)。
需要注意的是,任何一个服务在整个应用程序范围内都是通用的,即 MyService不仅可以和MainActivity绑定,还可以和任何一个其他的活动进行绑定,而且在绑定完成后它们都可以获取到相同的DownloadBinder实例。
服务的生命周期
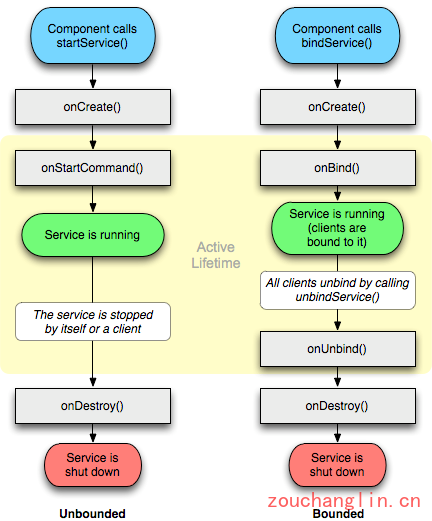
一旦调用了startServices()方法,对应的服务就会被启动且回调onStartCommand(),如果服务未被创建,则会调用onCreate()创建Service对象。服务被启动后会一直保持运行状态,直到stopService()或者stopSelf()方法被调用。不管startService()被调用了多少次,但是只要Service对象存在,onCreate()方法就不会被执行,所以只需要调用一次stopService()或者stopSelf()方法就会停止对应的服务。
在通过bindService()来获取一个服务的持久连接的时候,这时就会回调服务中的 onBind()方法。类似地,如果这个服务之前还没有创建过,oncreate()方法会先于onBind()方法执行。之后,调用方可以获取到onBind()方法里返回的IBinder对象的实例,这样就能自由地和服务进行通信了。只要调用方和服务之间的连接没有断开,服务就会一直保持运行状态。
那么即调用了startService()又调用了bindService()方法的,这种情况下该如何才能让服务销毁掉呢?根据Android系统的机制,一个服务只要被启动或者被绑定了之后,就会一直处于运行状态,必须要让以上两种条件同时不满足,服务才能被销毁。所以,这种情况下要同时调用stopService()和 unbindService()方法,onDestroy()方法才会执行。
服务的更多技巧
上面讲述了服务最基本的用法,下面来看看关于服务的更高级的技巧。
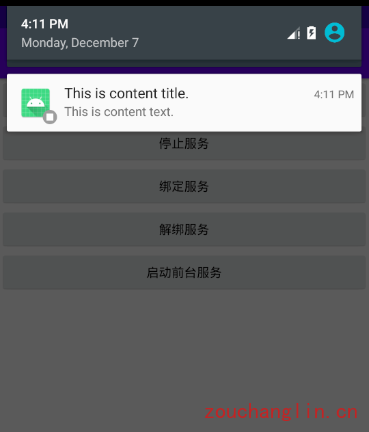
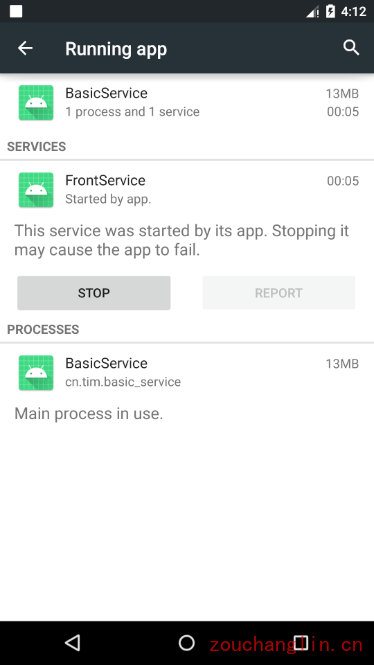
使用前台服务
服务几乎都是在后台运行的,服务的系统优先级还是比较低的,当系统出现内存不足的情况时,就有可能会回收掉正在后台运行的服务。如果你希望服务可以一直保持运行状态,而不会由于系统内存不足的原因导致被回收,就可以使用前台服务。比如QQ电话的悬浮窗口,或者是某些天气应用需要在状态栏显示天气。
public class FrontService extends Service {
    String mChannelId = "1001";

    public FrontService() {
    }

    @Override
    public IBinder onBind(Intent intent) {
        // TODO: Return the communication channel to the service.
        throw new UnsupportedOperationException("Not yet implemented");
    }

    @Override
    public void onCreate() {
        super.onCreate();
        Intent intent = new Intent(this, MainActivity.class);
        PendingIntent pi = PendingIntent.getActivity(this, 0, intent, 0);
        Notification notification = new NotificationCompat.Builder(this, mChannelId)
                .setContentTitle("This is content title.")
                .setContentText("This is content text.")
                .setWhen(System.currentTimeMillis())
                .setSmallIcon(R.mipmap.ic_launcher)
                .setLargeIcon(BitmapFactory.decodeResource(getResources(),
                        R.mipmap.ic_launcher))
                .setContentIntent(pi)
                .build();
        startForeground(1, notification);
    }
}
使用IntentService
服务中的代码都是默认运行在主线程当中的,如果直接在服务里去处理一些耗时的逻辑,就很容易出现ANR的情况。所以需要用到多线程编程,遇到耗时操作可以在服务的每个具体的方法里开启一个子线程,然后在这里去处理那些耗时的逻辑。就可以写成如下形式:
public class OtherService extends Service {
    public OtherService() {}

    @Override
    public int onStartCommand(Intent intent, int flags, int startId) {
        new Thread(()->{
            // TODO 执行耗时操作
        }).start();
        return super.onStartCommand(intent, flags, startId);
    }
	...
}
但是,这种服务一旦启动之后,就会一直处于运行状态,必须调用stopService()或者stopSelf()方法才能让服务停止下来。所以,如果想要实现让一个服务在执行完毕后自动停止的功能,就可以这样写:
public class OtherService extends Service {
    public OtherService() {}

    @Override
    public int onStartCommand(Intent intent, int flags, int startId) {
        new Thread(()->{
            // TODO 执行耗时操作
            stopSelf();
        }).start();
        return super.onStartCommand(intent, flags, startId);
    }
	...
}
虽然这种写法并不复杂,但是总会有一些程序员忘记开启线程,或者忘记调用stopSelf()方法。为了可以简单地创建一个异步的、会自动停止的服务,Android 专门提供了一个IntentService类,这个类就很好地解决了前面所提到的两种尴尬,下面我们就来看一下它的用法:
MyIntentService.java
public class MyIntentService extends IntentService {
    private static final String TAG = "MyIntentService";
    private int count = 0;
    public MyIntentService() {
        super("MyIntentService");
    }

    @Override
    protected void onHandleIntent(Intent intent) {
        count++;
        Log.i(TAG, "onHandleIntent: count = " + count);
    }
}
MainActivity.java:
for (int i = 0; i < 10; i++) {
    Intent intent = new Intent(MainActivity.this, MyIntentService.class);
    startService(intent);
}
参考资料:《第一行代码》
原文地址:《后台默默的劳动者,探究服务》