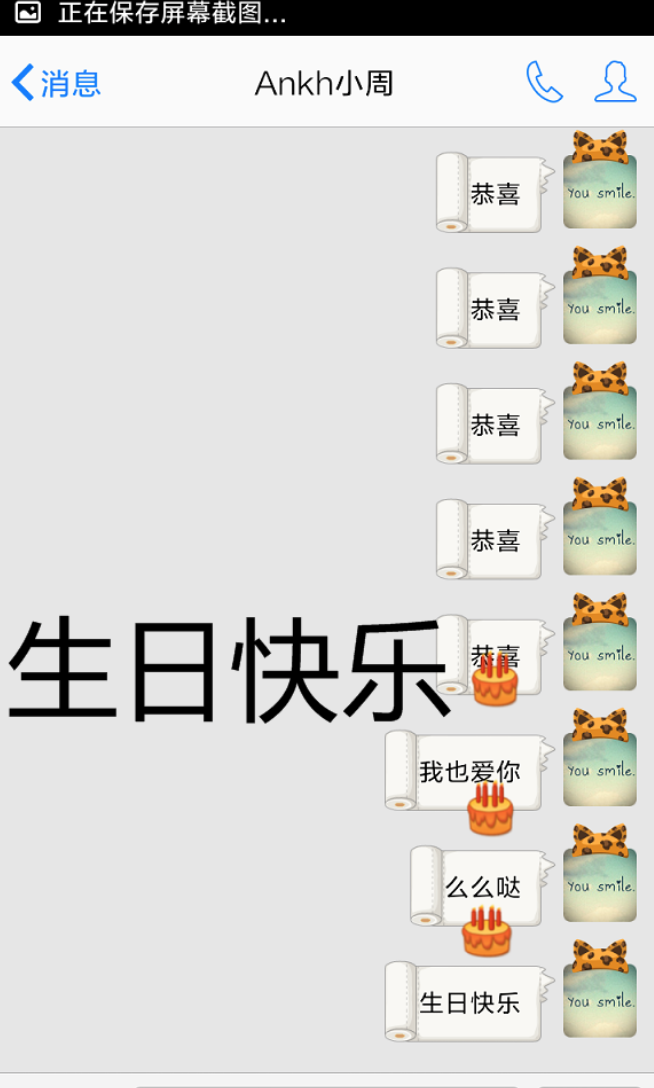
我们是使用新版qq的过程中,当我们给对方发送“生日快乐”,“天冷了”等词汇时,会出现特效图片从手机屏幕上方一直往下跳动,如下图所示,当输入生日快乐时,会有蛋糕的图片从上往下蹦跳,直到最后跳出屏幕底部,这样的设计增加了聊天时的趣味性,同时在想这个动画的实现原理,这让我想到了在平时工作中不太常用,但功能很强大的UIDynamic(物理仿真),自己做了一个很简单的小demo,模拟了qq聊天特效图片的动画。

demo基本效果如下:

在开始代码实现之前,先给大家再介绍一下UIDynamic。
UIDynamic是从iOS7开始引入的技术,属于UIkit框架,主要包括3个类:
<1>UIDynamicAnimator Class: 通过这个类,实例化仿真器,管理仿真行为,在创建仿真器时,需要制定参照视图(Reference view),本案例中就是self.view.
<2>UIDynamicBehavior Class:仿真动画的仿真行为;
<3>UIDynamicItem Protocol:执行仿真行为的仿真元素的协议,UIView默认遵守该协议;
其中,UIDynamicBehavior又可以分为以下几种行为:
• UIAttachmentBehavior 吸附行为
• UICollisionBehavior 碰撞行为
• UIDynamicItemBehavior 动力元素行为
• UIGravityBehavior 重力行为
• UIPushBehavior 推动行为
• UISnapBehavior 捕捉行为
其中UIDynamicItemBehavior这个类比较特殊,使用来给仿真元素设置相关的动力学参数,通过这些参数,实现模拟真实世界中物体的运动轨迹和形态,主要属性如下:
@property (nonatomic, readonly, copy) NSArray* items;
@property (readwrite, nonatomic) CGFloat elasticity; // Usually between 0 (inelastic) and 1 (collide elastically) 弹性系数 在0~1之间
@property (readwrite, nonatomic) CGFloat friction; // 0 being no friction between objects slide along each other 摩擦力系数
@property (readwrite, nonatomic) CGFloat density; // 1 by default 跟size大小相关,计算物体块的质量。
@property (readwrite, nonatomic) CGFloat resistance; // 0: no velocity damping 阻力系数
@property (readwrite, nonatomic) CGFloat angularResistance; // 0: no angular velocity damping 旋转阻力
@property (readwrite, nonatomic) BOOL allowsRotation; // force an item to never rotate  是否能旋转
要现实仿真动画,首先需要创建仿真器,添加仿真行为,再通过创建仿真元素来响应和执行仿真行为,其关系如下图所示:

、
通过上图我们可以发现,同一个仿真元素可以响应和执行多个仿真行为,这样就可以实现更为丰富的动画效果,但是也可能造成不同行为之间的效果冲突,我做的这个小demo中主要用到重力行为和碰撞行为,另外使用了碰撞行为的代理协议(UICollisionBehaviorDelegate
),实现代码如下:
part1:创建仿真器、仿真行为,设置碰撞行为的边界,需要设置一个定时器,让仿真元素持续从屏幕上方下坠。
- (void)viewDidLoad {
    [super viewDidLoad];
    // Do any additional setup after loading the view, typically from a nib.

    //创建仿真器
    UIDynamicAnimator *animator = [[UIDynamicAnimator alloc]initWithReferenceView:self.view];

    //仿真行为,重力行为 items是执行重力仿真行为的元素组成的集合
    UIGravityBehavior *gravity = [[UIGravityBehavior alloc]init];

    //将行为添加给仿真器
    [animator addBehavior:gravity];

    //设置重力加速度
    gravity.magnitude = 3;

    self.gravity = gravity;

    //创建碰撞行为
    UICollisionBehavior *collision = [[UICollisionBehavior alloc]init];

    //创建动力元素行为
    UIDynamicItemBehavior *itemBehavior = [[UIDynamicItemBehavior alloc]init];
    //设置弹性系数
    itemBehavior.elasticity = 0.6;

    //设置摩擦力
    itemBehavior.friction = 0.2;

    //设置阻力
    itemBehavior.resistance = 0;

    //添加动画行为
    [animator addBehavior:itemBehavior];

    self.itemBeha = itemBehavior;

    //设置属性让边缘检测行为生效,将坐标系的边界设置为边缘
    collision.translatesReferenceBoundsIntoBoundary = YES;

    self.collision = collision;

    //设置代理

    collision.collisionDelegate = self;

    //设置碰撞边界

    [self addNewView:CGRectMake(060, 580, 120, 25) andBundary:collision];
    [self addNewView:CGRectMake(100, 480, 100, 25) andBundary:collision];
    [self addNewView:CGRectMake(140, 240, 90, 25) andBundary:collision];
    [self addNewView:CGRectMake(030, 390, 100, 25) andBundary:collision];
    [self addNewView:CGRectMake(200, 340, 90, 25) andBundary:collision];
    [self addNewView:CGRectMake(280, 150, 100, 25) andBundary:collision];

    //给仿真器添加碰撞行为
    [animator addBehavior:collision];

    //赋值给一个全局变量,防止出了括号就没销毁
    self.animator = animator;

    //开启定时器
    [self setTimer];


}
part1.1 添加边界的方法封装
-(void)addNewView:(CGRect)frame andBundary:(UICollisionBehavior*)collision{

    //设置边界的相关属性
    UIView *bundaryView = [[UIView alloc]init];

    bundaryView.frame = frame;

    bundaryView.layer.cornerRadius = 5;

    bundaryView.backgroundColor = CZRandomColor;

    //添加到当前视图中
    [self.view addSubview:bundaryView];

    //添加到碰撞行为中
    [collision addBoundaryWithIdentifier:[NSString stringWithFormat:@"xx%d",++k] fromPoint:CGPointMake(frame.origin.x , frame.origin.y) toPoint:CGPointMake(frame.origin.x+frame.size.width, frame.origin.y)];
}
part2:定时器设置
-(void)setTimer{

    self.timer = [NSTimer scheduledTimerWithTimeInterval:1.8 target:self selector:@selector(roll) userInfo:nil repeats:YES];


}
part3:在定时器的执行方法中设置仿真元素的相关属性,并将仿真元素添加到仿真行为中
-(void)roll{

    //设置一个随机数
    int i = arc4random_uniform(420);


    //添加view
    UIView *colorball =[[UIView alloc]init];

    //设置圆角
    colorball.layer.cornerRadius = 10;

    colorball.backgroundColor = CZRandomColor;

    colorball.alpha = 0.8;

    //设置大小
    colorball.frame = CGRectMake(i, 10, 20, 20);

    [self.view addSubview:colorball];

    //将仿真元素添加到仿真行为中
    [self.collision addItem:colorball];

    [self.gravity addItem:colorball];

    [self.itemBeha addItem:colorball];

    //为了实现一段时间清除仿真元素,在此处设置一个计数
    num++;

    self.num =num;

    CZLog(@"%@",@(num));

    [self bundaryDispare];
}
part4:在屏幕中的仿真元素积累到一定数量,设置屏幕底部边界失效,并在0.3秒后再次开启。
-(void)bundaryDispare{

    if (self.num==10) {

        //当屏幕中的小球到一定数量时,弹出提示框
        UILabel *tipLabel = [[UILabel alloc]init];

        tipLabel.backgroundColor = [UIColor blackColor];

        tipLabel.center = self.view.center;

        tipLabel.width = 200;

        tipLabel.height = 50;

        tipLabel.layer.cornerRadius = 20;

        //裁剪提示框
        tipLabel.layer.masksToBounds = YES;
        tipLabel.alpha = 0;

        tipLabel.textAlignment = NSTextAlignmentCenter;

        tipLabel.text = @"你的小球太多了~";

        tipLabel.textColor = [UIColor whiteColor];

        //添加到view中
        [self.view addSubview:tipLabel];

        //设置提示框的提示效果
        [UIView animateWithDuration:2 animations:^{
            tipLabel.alpha = 0.8;
        } completion:^(BOOL finished) {
            [UIView animateWithDuration:1 animations:^{
                tipLabel.alpha = 0;
            } completion:^(BOOL finished) {
                [tipLabel removeFromSuperview];
            }];
        }];

        //关闭定时器
        [self.timer setFireDate:[NSDate distantFuture]];

        //边界失效
        self.collision.translatesReferenceBoundsIntoBoundary = NO;

        //此时的小球数为0
        num = 0;

        //延迟打开边界
        dispatch_after(dispatch_time(DISPATCH_TIME_NOW, (int64_t)(0.3 * NSEC_PER_SEC)), dispatch_get_main_queue(), ^{

            self.collision.translatesReferenceBoundsIntoBoundary = YES;

            //再次开启定时器
            [self.timer setFireDate:[NSDate distantPast]];
        });
    }


}
part5:调用UICollisionBehaviorDelegate方法实现仿真元素的弹动并下坠到下一个边界(即实现qq聊天图片特效)
//使用代理方法
-(void)collisionBehavior:(UICollisionBehavior *)behavior beganContactForItem:(id<UIDynamicItem>)item withBoundaryIdentifier:(id<NSCopying>)identifier atPoint:(CGPoint)p{

    //1.5秒后移除identifier对应的边界
    dispatch_after(dispatch_time(DISPATCH_TIME_NOW, (int64_t)(1.5 * NSEC_PER_SEC)), dispatch_get_main_queue(), ^{

        [behavior removeBoundaryWithIdentifier:identifier];
    });
}

-(void)collisionBehavior:(UICollisionBehavior *)behavior endedContactForItem:(id<UIDynamicItem>)item withBoundaryIdentifier:(id<NSCopying>)identifier{

    //根据identifier获取边界路径
    UIBezierPath *path = [behavior boundaryWithIdentifier:identifier];

    //根据边界路径再次添加边界
    dispatch_after(dispatch_time(DISPATCH_TIME_NOW, (int64_t)(2 * NSEC_PER_SEC)), dispatch_get_main_queue(), ^{
        [behavior addBoundaryWithIdentifier:identifier forPath:path];
    });
    }
可能还有一些我未发现的bug存在,欢迎大家交流讨论。