最近项目需要导出Excel,找来找去,微软有自己的Excel组件 using Microsoft.Office.Core;using Microsoft.Office.Interop.Excel;,但是有一个毛病,就是程序所在电脑安装Office,这个问题简直是致命的,因为导出服务我们要做在服务端,程序直接生成Excel,然后客户端路径去下载,所以我们不可能在部署服务的时候还要在服务器上安装office.最后终于发现有个NOPI库,可以很好的解决这个问题,现在就将项目的Excel 片段记录一下
NPOI,顾名思义,就是POI的.NET版本。那POI又是什么呢?POI是一套用Java写成的库,能够帮助开发者在没有安装微软Office的情况下读写Office 97-2003的文件,支持的文件格式包括xls, doc, ppt等。在本文发布时,POI的最新版本是3.5 beta 6。NPOI 1.x是基于POI 3.x版本开发的,与poi 3.2对应的版本是NPOI 1.2,
现在我们要做这样一个表格,设计到字体样式,合并单元格。

创建表头样式,列样式还有正文样式
 public static ICellStyle CreateHeaderStyle(IWorkbook book)
        {
            ICellStyle style = book.CreateCellStyle();
            //设置单元格的样式:水平对齐居中
            style.Alignment = HorizontalAlignment.Center;
            style.VerticalAlignment = VerticalAlignment.Center;
            //新建一个字体样式对象
            IFont font = book.CreateFont();
            //设置字体加粗样式
            font.Boldweight = short.MaxValue;
            font.FontHeightInPoints = 20;
            font.Boldweight = (short)FontBoldWeight.Bold;
            font.FontName = "微软雅黑";
            //使用SetFont方法将字体样式添加到单元格样式中
            style.SetFont(font);
            return style;
        }
        public static ICellStyle CreateTitleStyle(IWorkbook book)
        {
            ICellStyle cellStyle = book.CreateCellStyle();
            cellStyle.Alignment = HorizontalAlignment.Center;
            cellStyle.VerticalAlignment = VerticalAlignment.Center;
            IFont fontLeft = book.CreateFont();
            fontLeft.FontHeightInPoints = 15;
            fontLeft.Boldweight = (short)FontBoldWeight.Bold;
            fontLeft.FontName = "宋体";
            cellStyle.ShrinkToFit = true;
            cellStyle.SetFont(fontLeft);
            return cellStyle;
        }
        public static ICellStyle CreateContentStyle(IWorkbook book)
        {
            ICellStyle cellStyle = book.CreateCellStyle();
            IFont fontLeft = book.CreateFont();
            fontLeft.FontHeightInPoints = 15;
            fontLeft.FontName = "宋体";
            cellStyle.ShrinkToFit = true;
            cellStyle.SetFont(fontLeft);
            return cellStyle;
        }
一个Excel文件就是IWorkbook一个页就是 一个Isheet,行是IRow,一个单元格是ICell,知道这些就好办了。上面的就是创建各种样式,
创建表格,比较注意的一点就是xlsx 格式的文件需要new XSSFWorkbook(),创建xls格式的文件需要new HSSFWorkbook();
合并单元格 sheet.AddMergedRegion(new CellRangeAddress(0, 0, 0, 10))
创建行 IRow rowHeader = sheet.CreateRow(0);
创建页 ISheet sheet = book.CreateSheet(dt.TableName);
创建单元格 cell = rowTitle.CreateCell(i);
 #region 写Excel 文件
                //HSSFWorkbook book = new HSSFWorkbook();
                IWorkbook book = null;
                if (filepath.IndexOf(".xlsx") > 0) // 2007版本
                    book = new XSSFWorkbook();
                else if (filepath.IndexOf(".xls") > 0) // 2003版本
                    book = new HSSFWorkbook();
                ISheet sheet = book.CreateSheet(dt.TableName);
                //创建Excel 头,合并单元格10列
                sheet.AddMergedRegion(new CellRangeAddress(0, 0, 0, 10));
                IRow rowHeader = sheet.CreateRow(0);
                //在行中:建立单元格,参数为列号,从0计
                ICell cellHeader = rowHeader.CreateCell(0);
                //设置单元格内容
                cellHeader.SetCellValue("健康一体机检测报告");
                cellHeader.CellStyle = CreateHeaderStyle(book);
                rowHeader.Height = 650;
                rowHeader.RowStyle = CreateHeaderStyle(book);

                //创建Excel 列
                IRow rowTitle = sheet.CreateRow(1);
                rowTitle.Height = 500;
                ICell cell = null;
                for (int i = 0; i < 9; i++)
                {
                    cell = rowTitle.CreateCell(i);
                    cell.SetCellValue(dt.Columns[i].ColumnName);
                    cell.CellStyle = CreateTitleStyle(book);
                }
                cell = rowTitle.CreateCell(9);
                cell.SetCellValue("心电");
                sheet.AddMergedRegion(new CellRangeAddress(1, 1, 9, 23));
                cell.CellStyle = CreateTitleStyle(book);
                cell = rowTitle.CreateCell(24);
                cell.SetCellValue("血压");
                sheet.AddMergedRegion(new CellRangeAddress(1, 1, 24, 31));
                cell.CellStyle = CreateTitleStyle(book);
                cell = rowTitle.CreateCell(43);
                cell.SetCellValue("血氧");
                sheet.AddMergedRegion(new CellRangeAddress(1, 1, 32, 33));
                cell.CellStyle = CreateTitleStyle(book);
                cell = rowTitle.CreateCell(34);
                cell.SetCellValue("体温");
                sheet.AddMergedRegion(new CellRangeAddress(1, 1, 34, 35));
                cell.CellStyle = CreateTitleStyle(book);
                cell = rowTitle.CreateCell(36);
                cell.SetCellValue("血糖");
                sheet.AddMergedRegion(new CellRangeAddress(1, 1, 36, 37));
                cell.CellStyle = CreateTitleStyle(book);
                cell = rowTitle.CreateCell(38);
                cell.SetCellValue("尿液");
                sheet.AddMergedRegion(new CellRangeAddress(1, 1, 38, 48));
                cell.CellStyle = CreateTitleStyle(book);
                rowTitle = sheet.CreateRow(2);
                for (int i = 9; i <= 48; i++)
                {
                    cell = rowTitle.CreateCell(i);
                    cell.SetCellValue(dt.Columns[i].ColumnName);
                    cell.CellStyle = CreateTitleStyle(book);
                }

                for (int i = 0; i < 9; i++)
                {
                    sheet.AddMergedRegion(new CellRangeAddress(1, 2, i, i));
                }
                //开始写数据
                for (int i = 0; i < dt.Rows.Count; i++)
                {
                    IRow rowContent = sheet.CreateRow(i + 3);
                    rowContent.Height = 500;
                    for (int j = 0; j < dt.Columns.Count; j++)
                    {
                        cell = rowContent.CreateCell(j);
                        if (cell != null)
                        {
                            cell.SetCellValue(Convert.ToString(dt.Rows[i][j]));
                            cell.CellStyle = CreateContentStyle(book);
                        }
                    }
                }
                // 写入到客户端
                using (System.IO.MemoryStream ms = new System.IO.MemoryStream())
                {
                    book.Write(ms);
                    using (FileStream fs = new FileStream(filepath, FileMode.Create, FileAccess.Write))
                    {
                        byte[] d = ms.ToArray();
                        fs.Write(d, 0, d.Length);
                        fs.Flush();
                    }
                    book = null;
                }
                #endregion
知道这些基本上就可以创建一个稍微复杂的表格了,但是在这之前,必须要进行NOPI库的引入,
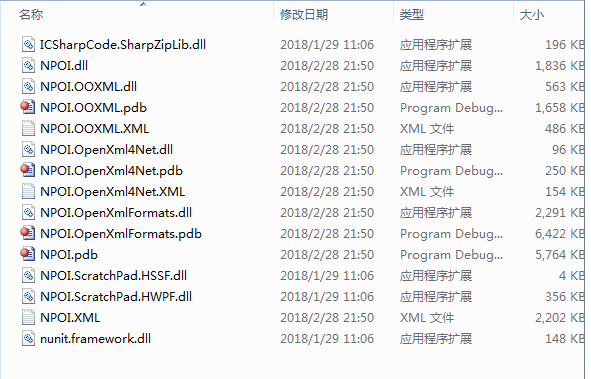
官方网站:http://npoi.codeplex.com/,里面下载最新的版本库,目前应该是2.3版本的。下载好之后,进入到npoi-master poi-mastersolutionvisualstudio,打开OOXML.sln,进行重新生成DLL,在npoi-master poi-mastersolutionLib这个目录。 如下所示

我们需要的是将NOPI.DLL ,NOPI.OOXML.DLL ,NOPI.OPENXML4NET.DLL,ICSharpCode.SharpZipLib.DLL.NPOI.OpenXmlFormats.dll这五个库进入到工程即可。现在将编译好的库供大家下载 https://files.cnblogs.com/files/techdreaming/nopi.zip