属于个人所创,转载请标明文章出处:
https:////www.cnblogs.com/tangZH/p/12356915.html
背景不多说,反正ndk加载gif比java上加载gif好很多很多,主要体现在内存占用与cpu消耗上。使用ndk加载占用内存更小,消耗的cpu更少。
要使用ndk加载,需要用到giflib库,Android源代码里面其实也用到了这个库。
一、下载giflib
https://sourceforge.net/projects/giflib/
二、构建so库
1、把需要用到的代码拷贝进来

2、实现我们的CMakeLists.txt
cmake_minimum_required(VERSION 3.4.1)

set(SOURCES)
file(GLOB_RECURSE SOURCES ${CMAKE_SOURCE_DIR}/*.cpp ${CMAKE_SOURCE_DIR}/*.c)

add_library(
        native-lib
        SHARED
        ${SOURCES})
set(LIBS)
list(APPEND LIBS log jnigraphics)

target_link_libraries(
        native-lib
        ${LIBS})
语法上就不多说了。
注意还需要用到log库和 jnigraphics库,一个是用来打印log,一个是用来图片解析的时候用到。
3、新建java类GifHandler,在里面新建本地方法,方便等会直接用快捷方式在native-lib里面生成
package com.example.gifndk;

import android.graphics.Bitmap;

public class GifHandler {
    static {
        System.loadLibrary("native-lib");
    }

    private volatile long gifInfo;

    public GifHandler(String path) {
        gifInfo = openFile(path);
    }

    public synchronized int getWidth() {
        return getWidthN(gifInfo);
    }

    public synchronized int getHeight() {
        return getHeightN(gifInfo);
    }

    public synchronized int getLength() {
        return getLengthN(gifInfo);
    }

    /**
     * @param bitmap
     * @param index  第几帧
     * @return
     */
    public long renderFrame(Bitmap bitmap, int index) {
        return renderFrameN(gifInfo, bitmap, index);
    }

    private native int getWidthN(long gifInfo);

    private native int getHeightN(long gifInfo);

    private native int getLengthN(long gifInfo);

    private native long renderFrameN(long gifInfo, Bitmap bitmap, int index);

    private native long openFile(String path);
}
通过这些方法获取宽度,高度,帧数,渲染,打开文件。
4、native-lib代码,这里编写我们的本地代码
首先需要引进的头文件有:
#include <jni.h>
#include <string>
#include "giflib/gif_lib.h"
#include <android/bitmap.h>
#include "gif.h"

//双引号是从本地项目找,找不到再从系统找,<>是直接从系统找
<android/bitmap.h>NDK中带的头文件,解析图片要用到。
gif.h我们自己新建的头文件,等会讲
首先看openFile方法
extern "C"
JNIEXPORT jlong JNICALL
Java_com_example_gifndk_GifHandler_openFile(
        JNIEnv *env,
        jobject /* this */, jstring path) {
    const char *path1 = env->GetStringUTFChars(path, 0);
    int err;
    GifFileType *gif = DGifOpenFileName(path1, &err);
    err = DGifSlurp(gif);
    env->ReleaseStringUTFChars(path, path1);
    return reinterpret_cast<jlong>(gif);
}
这个方法主要是获取到GifFileType的指针地址。
GifFileType里面有gif文件的各种信息。
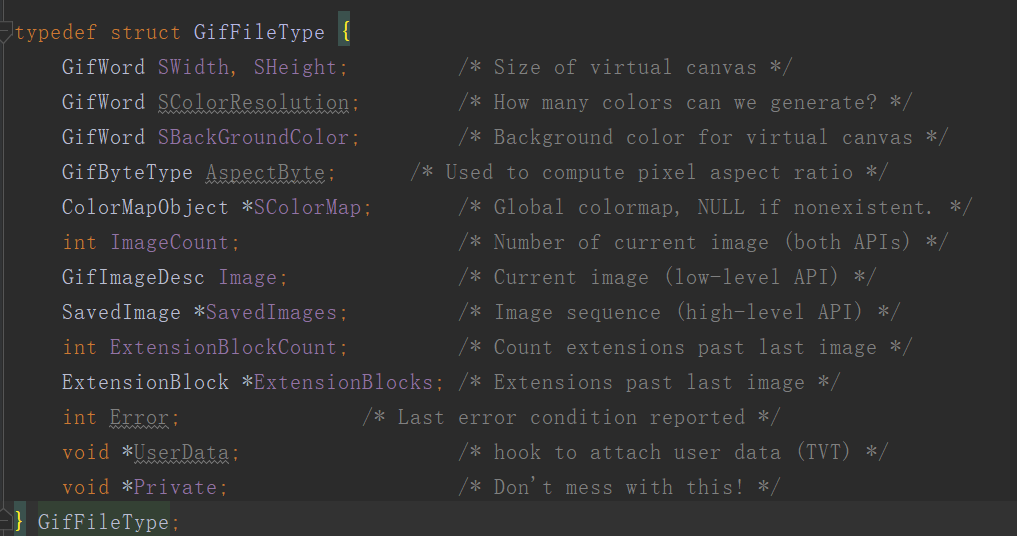
从注释也可以看出具体的含义。
顺便说一下UserData,这个其实相当于tag,类似于可以给一个view tag标识。
获取到到GifFileType之后便可以通过它获取宽度,高度,帧数,方法如下:
extern "C"
JNIEXPORT jint JNICALL
Java_com_example_gifndk_GifHandler_getWidthN(JNIEnv *env, jobject thiz, jlong gif_info) {
    return ((GifFileType *) gif_info)->SWidth;
}


extern "C"
JNIEXPORT jint JNICALL
Java_com_example_gifndk_GifHandler_getHeightN(JNIEnv *env, jobject thiz, jlong gif_info) {
    return ((GifFileType *) gif_info)->SHeight;

}

extern "C"
JNIEXPORT jint JNICALL
Java_com_example_gifndk_GifHandler_getLengthN(JNIEnv *env, jobject thiz, jlong gif_info) {
    return ((GifFileType *) gif_info)->ImageCount;
}
获取到相关信息后,我们就要进行渲染了。
先讲一下我们的原理,我们的原理是获取到信息。通过宽高构造一个bitmap,根据每一帧图片之间的间隔,拿这个bitmap去渲染,也就是通过这个延时时间循环去加载每一帧图片。
renderFrameN方法
extern "C"
JNIEXPORT jlong JNICALL
Java_com_example_gifndk_GifHandler_renderFrameN(JNIEnv *env, jobject thiz, jlong gif_info,
                                                jobject bitmap, jint index) {
    GifFileType *gifFileType = (GifFileType *) gif_info;
    //bitmap转成颜色矩阵
    void *pixels;
    AndroidBitmapInfo info;
    int err;
    if ((err = AndroidBitmap_getInfo(env, bitmap, &info)) < 0) {
        return -1;
    }
    //也可以不判断,这里的格式需要有透明通道
    if (info.format != ANDROID_BITMAP_FORMAT_RGBA_8888) {
        return -1;
    }
    //&pixels为指针的指针,即二维数组
    if ((err = AndroidBitmap_lockPixels(env, bitmap, &pixels)) < 0) {
        return -1;
    }
    //渲染
    long delay_time = drawFrame(gifFileType, &info, (int *) pixels, index);
    AndroidBitmap_unlockPixels(env, bitmap);
    return delay_time;
}
AndroidBitmap_lockPixels(env, bitmap, &pixels)这个方法必须调用,它会锁定图片内存,同时呢,成功的话pixels会指向图片的地址。
相应的,下面就必须解除锁定:AndroidBitmap_unlockPixels(env, bitmap)
核心方法是这一句,当然这一句需要我们自定义头文件,也就是上面说到的gif.h
long delay_time = drawFrame(gifFileType, &info, (int *) pixels, index);
gif.h如下:
#include "giflib/gif_lib.h"
#include <android/bitmap.h>

#ifndef GIFNDK_GIF_H
#define GIFNDK_GIF_H

#endif //GIFNDK_GIF_H
extern "C"
int drawFrame(GifFileType *gif, AndroidBitmapInfo *info, int *pixels, int frame_no);
drawFrame方法如下,关于gif文件格式,可以自行百度,后面有空再写:
#define delay(ext) (10 *((ext) -> Bytes[2] << 8 | (ext) ->Bytes[1]))


int drawFrame(GifFileType *gif, AndroidBitmapInfo *info, int *pixels, int frame_no) {
    GifColorType *color;
    //每一帧图片
    SavedImage *frame;
    //扩展快,定义一些行为
    ExtensionBlock *ext = 0;
    //描述文件
    GifImageDesc *frameInfo;
    //颜色表
    ColorMapObject *colorMap;
    int *line;
    int  x, y, j, loc;
    int *px;
    //获取这一帧
    frame = &(gif->SavedImages[frame_no]);
    //这一帧相关的描述文件,虽然描述文件已经在GifFileType里面声明了,但是没有赋值
    //所以需要用这种方式
    frameInfo = &(frame->ImageDesc);

    //这一帧的颜色列表
    if (frameInfo->ColorMap) {
        colorMap = frameInfo->ColorMap;
    } else {
        //没有的话就获取全局的颜色列表
        colorMap = gif->SColorMap;
    }

    //遍历这一帧的扩展块,找到具有GRAPHICS_EXT_FUNC_CODE标志位的,这个扩展快存放着对该帧图片的
    //处置方法,是不处理还是其他
    for (j = 0; j < frame->ExtensionBlockCount; ++j) {
        if (frame->ExtensionBlocks[j].Function == GRAPHICS_EXT_FUNC_CODE) {
            ext = &(frame->ExtensionBlocks[j]);
            break;
        }
    }
    //这时候px是二维指针
    px = pixels;
    //frameInfo->Top:从哪个y坐标开始(距离顶部的top),乘以每一行的字节,就是我们需要开始遍历的字节
    px = (int *) ((char *) px + info->stride * frameInfo->Top);
    //遍历y
    for (y = frameInfo->Top; y < frameInfo->Top + frameInfo->Height; ++y) {
        //行
        line = px;
        //遍历x
        for (x = frameInfo->Left; x < frameInfo->Left + frameInfo->Width; ++x) {
            //当前的这一点
            loc = (y - frameInfo->Top) * frameInfo->Width + (x - frameInfo->Left);
            //判断处置方法,拿到当前帧loc位置的字节,看是否等于扩展块中索引为3的字节,并且数值为1
            if (frame->RasterBits[loc] == ext->Bytes[3] && ext->Bytes[0]) {
                continue;
            }
            color =  &colorMap->Colors[frame->RasterBits[loc]];
            line[x] = ((255 & 0xff)<< 24) | ((color->Blue & 0xff)<< 16) | ((color->Green)<< 8) | (color->Red);
        }
        px = (int *) ((char *) px + info->stride);
    }
    return delay(ext);
}
那么接下来就是主工程的调用了。
    private void load() {
        gifHandler = new GifHandler(path);
        int width = gifHandler.getWidth();
        int height = gifHandler.getHeight();
        bitmap = Bitmap.createBitmap(width, height, Bitmap.Config.ARGB_8888);
        maxLength = gifHandler.getLength();

        long delayTime = gifHandler.renderFrame(bitmap, currentLength);
        imageView.setImageBitmap(bitmap);
        if (handler != null) {
            handler.sendEmptyMessageDelayed(1, delayTime);
        }
        /*Glide.with(this).asGif().load(path).into(imageView);*/
    }

    Handler handler = new Handler(new Handler.Callback() {
        @Override
        public boolean handleMessage(@NonNull Message msg) {
            currentLength++;
            if (currentLength >= maxLength) {
                currentLength = 0;
            }
            long delayTime = gifHandler.renderFrame(bitmap, currentLength);
            imageView.setImageBitmap(bitmap);
            handler.sendEmptyMessageDelayed(0, delayTime);
            return false;
        }
    });
到此结束。