一、Cookie是什么?
解释:可以认为是一张Vip通行证/饼干(解释:有就可以用/吃,没有就不能用/吃,过期了也不能用/吃)。
重点:Cookie是存在于浏览器上的(所以不安全)。
二、Cookie的主要作用:
-
您可以使用Cookie技术存储您的账户登录信息,以便下次可以直接登录。
-
存储起始页的首选项。
-
使用缓存技术可以减少二次访问网页的加载时间,直接调用缓存数据实现二次打开。
-
Cookie还可以记录和跟踪购物车的商品信息(如数量),记录用户的访问次数。
三、各浏览器对Cookie的不同限制:

四、Cookie的优缺点:
优点:
-
数据持久性
-
不需要任何服务器资源。Cookie 存储在客户端并在发送后由服务器读取。
-
可配置到期规则。 控制 cookie 的生命期,使之不会永远有效。偷盗者很可能拿到一个过期的 cookie 。
-
简单性。 基于文本的轻量结构。
-
通过良好的编程,控制保存在cookie中的session对象的大小。
-
通过加密和安全传输技术(SSL),减少cookie被破解的可能性。
-
只在cookie中存放不敏感数据,即使被盗也不会有重大损失。
缺点:
-
Cookie数量和长度的限制。数量:每个域的 cookie 总数有限。长度:每个 cookie 长度不超过 4KB ( 4096B ),否则会被截掉。
-
潜在的安全风险 。Cookie 可能被拦截、篡改。如果 cookie 被拦截,就有可能取得所有的 session 信息。
-
用户配置为禁用 。有些用户禁用了浏览器或客户端设备接受 cookie 的能力,因此限制了这一功能。
-
有些状态不可能保存在客户端。例如,为了防止重复提交表单,我们需要在服务器端保存一个计数器。如果我们把这个计数器保存在客户端,那么它起不到任何作用。
-
cookie在每次发送http请求时,都会被发送到服务器,一些不必要的信息也会被发送过去,造成不必要的浪费
五、免登录代码实现:(页面有点丑请见谅!!!)
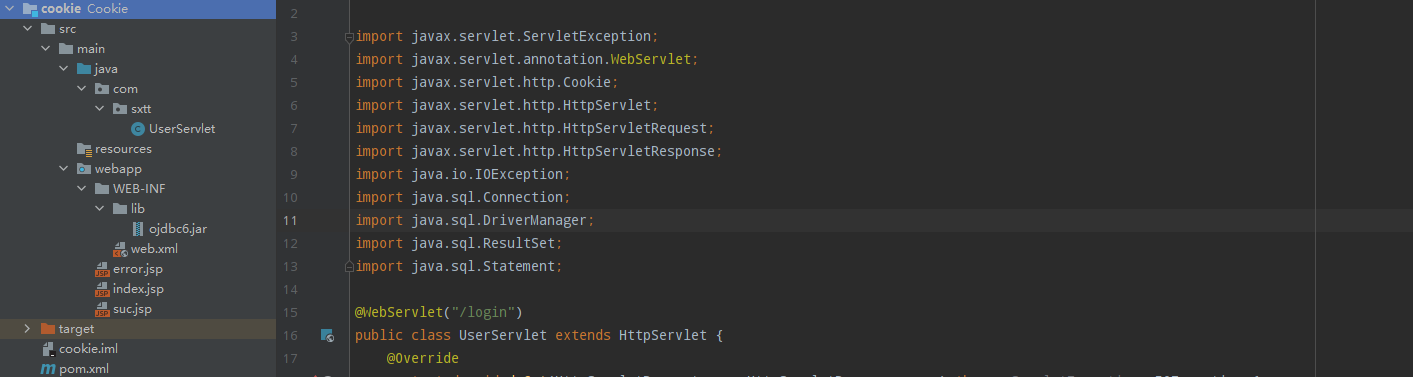
5.1)目录结构:
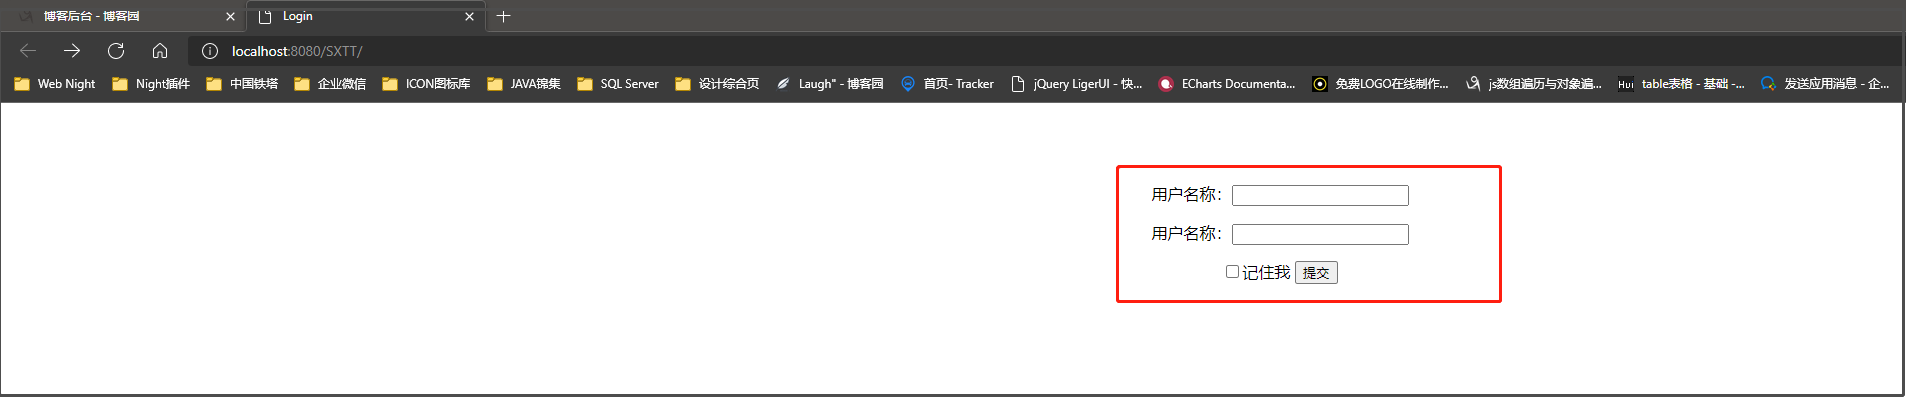
5.2)登录页面:index.jsp
<%--
  Created by IntelliJ IDEA.
  User: Laugh“
  Date: 2022/1/25
  Time: 17:33
  To change this template use File | Settings | File Templates.
--%>
<%@ page contentType="text/html;charset=UTF-8" language="java" %>
<html>
    <head>
        <title>Login</title>
    </head>

    <%
        String names = null;
        String pwds = null;
        //获取Cookie对象,因为是多值所以用数组来接收
        Cookie[] cookies = request.getCookies();
        if(cookies != null){
            //遍历数组,取出想要的值   getValue() 取得方法
            for(Cookie cookie : cookies){
                //找Cookie对应的Key,取出Key的值
                if(cookie.getName().equals("name")){
                    //取出对应的值 赋值给 names
                    names = cookie.getValue();
                    System.out.println("我是获取的cookie账号:"+ names );
                //找Cookie对应的Key,取出Key的值
                }else if(cookie.getName().equals("pwd")){
                    //取出对应的值 赋值给 pwds
                    pwds = cookie.getValue();
                    System.out.println("我是获取的cookie密码:"+ pwds );
                }
            }
        }

        if(names != null && pwds != null){
            request.getRequestDispatcher("login?name="+ names +"&pwd="+ pwds ).forward(request, response);
        }

    %>
    <body style="margin: auto;text-align: center">
        <form action="login" method="post">
            <p style="margin-top: 80px">
                用户名称:<input type="text" name="name" />
            </p>
            <p>
                用户名称:<input type="password" name="pwd" />
            </p>
            <input type="checkbox" value="1" name="remenberme" /><label>记住我</label>
            <input type="submit" value="提交"/>
        </form>
    </body>
</html>
5.3)登录成功页面:suc.jsp
<%@ page import="java.io.PrintWriter" %>
<%--
  Created by IntelliJ IDEA.
  User: laugh"
  Date: 2022/1/25
  Time: 17:42
  To change this template use File | Settings | File Templates.
--%>
<%@ page contentType="text/html;charset=UTF-8" language="java" %>
<html>
    <head>
        <title>Suc</title>
    </head>
    <body>
        欢迎<%=request.getAttribute("name") %>登录!
    </body>
</html>
5.4)登录失败页面:error.jsp
<%--
  Created by IntelliJ IDEA.
  User: Laugh”
  Date: 2022/1/27
  Time: 9:25
  To change this template use File | Settings | File Templates.
--%>
<%@ page contentType="text/html;charset=UTF-8" language="java" %>
<html>
    <head>
        <title>Error</title>
    </head>
    <body>
        登录失败!请检查账号密码!
    </body>
</html>
5.5)逻辑层:UserServlet 备注:连接数据库的需要换成自己的库,还有需要建一张表
package com.sxtt;

import javax.servlet.ServletException;
import javax.servlet.annotation.WebServlet;
import javax.servlet.http.Cookie;
import javax.servlet.http.HttpServlet;
import javax.servlet.http.HttpServletRequest;
import javax.servlet.http.HttpServletResponse;
import java.io.IOException;
import java.sql.Connection;
import java.sql.DriverManager;
import java.sql.ResultSet;
import java.sql.Statement;

//注解:提供给前端页面方便找到对应的逻辑层
@WebServlet("/login")
public class UserServlet extends HttpServlet {
    @Override
    protected void doGet(HttpServletRequest req, HttpServletResponse resp) throws ServletException, IOException {
        //设置编码格式
        req.setCharacterEncoding("utf-8");
        resp.setCharacterEncoding("utf-8");
        //读取前端输入的账号与密码
        String name = req.getParameter("name");
        String pwd = req.getParameter("pwd");
        String rem = req.getParameter("remenberme");
        //控制台打印是否选中了“记住我”,1:为选中;null:为未选
        System.out.println("是否选择:" + rem);
        int remember = 0;
        /*
        链接数据库
         */
        Connection conn = null;
        Statement s = null;
        ResultSet rs = null;
        try {
            Class.forName("oracle.jdbc.driver.OracleDriver");
            conn = DriverManager.getConnection("jdbc:oracle:thin:@XXX.XXX.XX.XX:XXXXX:XXXX", "数据库账号", "数据库密码");
            String sql = "select * from Stud where NAME='"+name+"'and PWD='"+pwd+"'";
            //打印输入的Sql语句,避免Sql出错
            System.out.println(sql);
            s =  conn.createStatement();
            rs = s.executeQuery(sql);
            //查询出来如果有值则为正确的, 用rs.next()来搞,rs.next()的意思是 下一个值。
            if (rs.next()){
                String UserName = rs.getString(2);
                String UserPwd = rs.getString(3);
                //打印取出来的值
                System.out.println("账号为:"+ UserName);
                System.out.println("密码为:"+ UserPwd);
                //此处判断是否两值一致
                if (UserName.equals(name) && UserPwd.equals(pwd)){
                    //再域中绑定name值,提供suc.jsp页面中使用
                    req.setAttribute("name",name);
                    //判断是否选中页面的 记住我,提供免登录使用
                    if (rem != null){
                        //把获取道德rem封装成Integer类型
                        remember = Integer.parseInt(rem);
                        Cookie Namecookie = new Cookie("name",name);
                        Cookie Pwdcookie = new Cookie("pwd",pwd);
                        //设置Cookie有效时间
                        Namecookie.setMaxAge(remember*60);
                        Pwdcookie.setMaxAge(remember*60);
                        //添加缓存
                        resp.addCookie(Namecookie);
                        resp.addCookie(Pwdcookie);
                    }
                    //跳页面
                    req.getRequestDispatcher("suc.jsp").forward(req, resp);
                }
                //控制台打印
                System.out.println("登录成功!");
            }else {
                resp.sendRedirect("error.jsp");
                System.out.println("用户或密码错误!");
            }
        }catch(Exception e){
            e.printStackTrace();
        }
    }

    @Override
    protected void doPost(HttpServletRequest req, HttpServletResponse resp) throws ServletException, IOException {
        doGet(req, resp);
    }
}
5.6)数据库表:

六、效果图:
6.1)登陆页面:
6.2)登陆成功:

控制台打印截图:

6.3)登陆失败页面:

控制台打印截图:

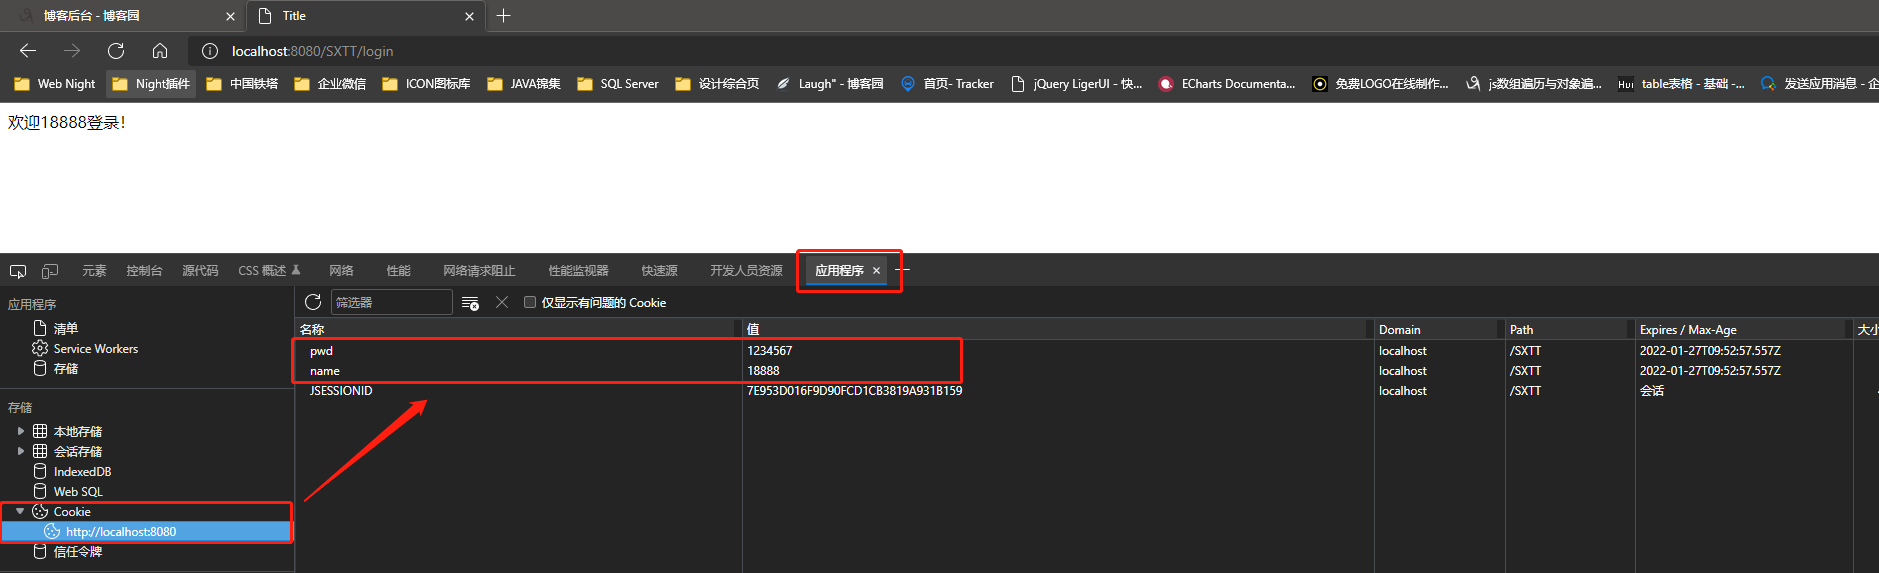
6.4)登录成功,并选择记住我,添加的缓存:
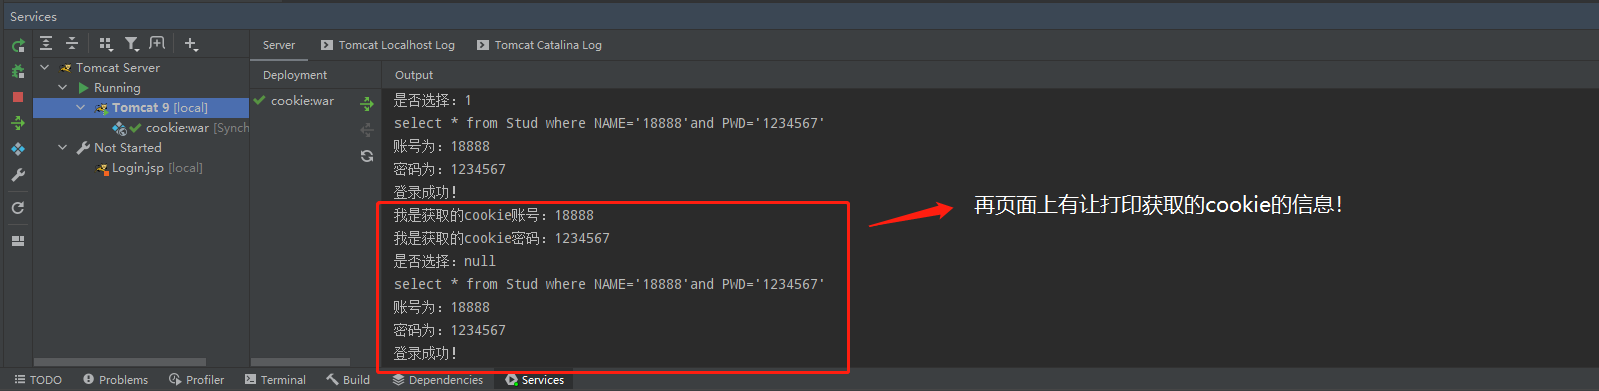
6.5)直接访问登录页面:

控制台打印:
七、总结:
登陆后需要用户自行选择记住我,用以告诉后台记住账号密码,方便下次无需登录访问成功页面!
重点:添加 / 读取缓存。
其次注意:6.2 / 6.5的访问路径!