上一篇文章大概讲了RobotFramework 构建测试套件部分。这篇文章讲一下如何从文本文件(.txt或者.robot文件)到Robot进行测试数据结构的转化。以下面的文件为例test.txt
 1 *** Settings ***
 2 Suite Setup       Initialize
 3 Suite Teardown    Clear
 4 Resource          ../Test_Run_Call.txt
 5
 6 *** Test Cases ***
 7 Init_Env
 8     log    Status is OK!
 9
10 Scope_Test
11     log    Status is OK!
1     def _parse(self, path):
2         try:
3             return TestData(source=abspath(path),
4                             include_suites=self.include_suites,
5                             warn_on_skipped=self.warn_on_skipped)
6         except DataError, err:
7             raise DataError("Parsing '%s' failed: %s" % (path, unicode(err)))
由文件到Robot数据结构主要是通过_parse这个函数来完成。也就是TestData这个函数来完成(虽然看着像一个类,但其不是哦~不要被它欺骗)
1 # robot/parsing/model.py
2 def TestData(parent=None, source=None, include_suites=None,
3              warn_on_skipped=False):
4     if os.path.isdir(source):
5         return TestDataDirectory(parent, source).populate(include_suites,
6                                                           warn_on_skipped)
7     return TestCaseFile(parent, source).populate()
由上面的源码可以得知,此处根据传入的source类型不同,而调用不同的类。当source为文件时,调用TestCaseFile这个类进行构建,而当source为目录时,调用TestDataDirectory进行构建。这也说明,robot支持指定单独的文件(suite),也支持指定包含许多文件(Suite)目录。下面以TestCaseFile这个类进行分析。
 1 class TestCaseFile(_TestData):
 2
 3     def __init__(self, parent=None, source=None):
 4         self.directory = os.path.dirname(source) if source else None
 5         self.setting_table = TestCaseFileSettingTable(self)
 6         self.variable_table = VariableTable(self)
 7         self.testcase_table = TestCaseTable(self)
 8         self.keyword_table = KeywordTable(self)
 9         _TestData.__init__(self, parent, source)
10
11     def populate(self):
12         FromFilePopulator(self).populate(self.source)
13         self._validate()
14         return self
15
16     def _validate(self):
17         if not self.testcase_table.is_started():
18             raise DataError('File has no test case table.')
19
20     def _table_is_allowed(self, table):
21         return True
22
23     def has_tests(self):
24         return True
25
26     def __iter__(self):
27         for table in [self.setting_table, self.variable_table,
28                       self.testcase_table, self.keyword_table]:
29             yield table
简单画了一下TestCaseFile所关联的类,可能会比较容易理解
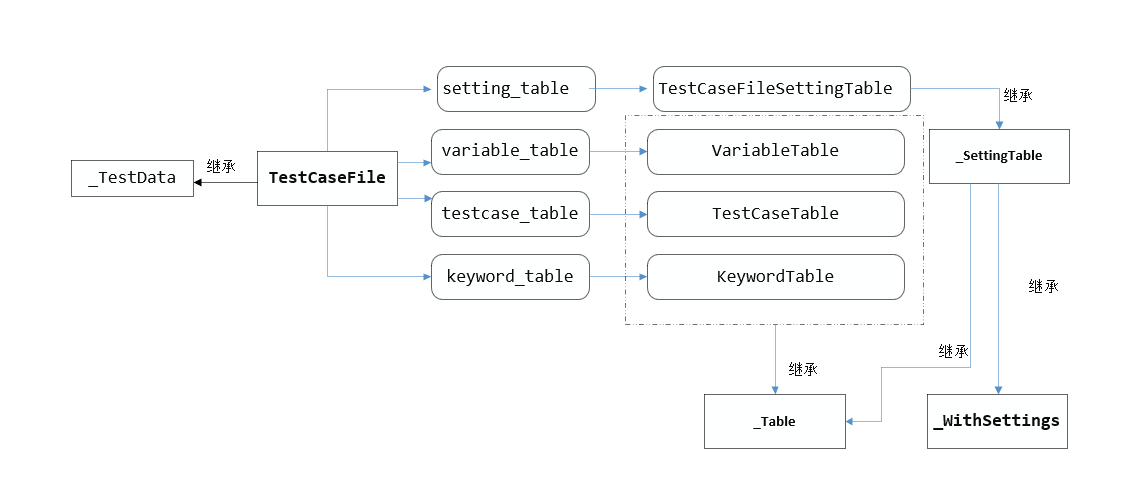
TestCaseFile初始化时会赋值4种属性,包括setting_table,variable_table,testcase_table,keyword_table。通过类初始化时传递self的方式,将属性类变量与自身联系。这4种table都继承于_Table,不同的是TestCaseFileSettingTable先继承于_SettingTable,而其多继承于_Table和_WithSettings
TestCaseFile(parent, source)的构建发生发生了以下几种操作
1、TestCaseFileSettingTable(继承于_SettingTable)初始化,添加了doc,suite_setup,suite_teardown ...... 等等的内部属性,这些属性都是各种类(Documentation, Fixture,Tags,ImportList等等)的实例
2、VariableTable、TestCaseTable以及KeyWordTable(继承于_Table)初始化,这些类,主要是内部有一个列表,用于将来对解析出来的对象进行保存
好了,接下来就来到了重点populate() 这个函数真是真是,太复杂了,一个函数完成了文件解析以及往TestCaseFile类中添加各种数据
1     def populate(self):
2         FromFilePopulator(self).populate(self.source)
3         self._validate()
4         return self
这个函数主要是调用了FromFilePopulator这个类的populate函数,源码如下,这个类内部维持一个字典_populators,看到这个字典基本上就有点恍然大悟,内部就是四种解析器对应TestCaseFile内部的四种变量,可以很明确的说它们就是相互对应的。
这个对象构建的时候,创建了三个内部变量,_datafile保存了传入的TestCaseFile类实例,_poplator被赋值了一个NullPopulator()这个是一个空的解析器,只是为了占位,_curdir是获取了文件所在的位置。
populate(self, path),此处path是传入的self.source(在TestCaseFile构建时,传入的_Table中的属性),为具体的文件。具体所做的事情,已经在下面的源码中标记了。其中关键部分由_get_reader这个私有方法实现
1 READERS = {'html': HtmlReader, 'htm': HtmlReader, 'xhtml': HtmlReader,
2            'tsv': TsvReader , 'rst': RestReader, 'rest': RestReader,
3            'txt': TxtReader, 'robot': TxtReader}
 1 class FromFilePopulator(object):
 2     _populators = {'setting': SettingTablePopulator,
 3                    'variable': VariableTablePopulator,
 4                    'test case': TestTablePopulator,
 5                    'keyword': KeywordTablePopulator}
 6
 7     def __init__(self, datafile):
 8         self._datafile = datafile
 9         self._populator = NullPopulator()
10         self._curdir = self._get_curdir(datafile.directory)
11
12     def _get_curdir(self, path):
13         return path.replace('\','\\') if path else None
14
15     def populate(self, path):
16         LOGGER.info("Parsing file '%s'." % path)
17         source = self._open(path)       <<<=================     调用内部的私有方法,简单的打开文件而已
18         try:
19             self._get_reader(path).read(source, self)
20         except:
21             raise DataError(get_error_message())
22         finally:
23             source.close()              <<<=================      和上面向对应,关闭打开的文件
24
25     def _open(self, path):
26         if not os.path.isfile(path):
27             raise DataError("Data source does not exist.")
28         try:
29             # IronPython handles BOM incorrectly if not using binary mode:
30             # http://code.google.com/p/robotframework/issues/detail?id=1580
31             return open(path, 'rb')
32         except:
33             raise DataError(get_error_message())
34
35     def _get_reader(self, path):
36         extension = os.path.splitext(path.lower())[-1][1:]  <<<========获取文件的扩展名,假如文件为test.txt,extension为txt,如果文件为test.robot,extension为robot
37         try:
38             return READERS[extension]()   <<<=========根据文件扩展名不同,从READERS中获取处理文件的类名,并实例化(通过 “()”)
39         except KeyError:
40             raise DataError("Unsupported file format '%s'." % extension)
41
42     def start_table(self, header):
43         self._populator.populate()
44         table = self._datafile.start_table(DataRow(header).all)
45         self._populator = self._populators[table.type](table)
46                 if table is not None else NullPopulator()
47         return bool(self._populator)
48
49     def eof(self):
50         self._populator.populate()
51
52     def add(self, row):
53         if PROCESS_CURDIR and self._curdir:
54             row = self._replace_curdirs_in(row)
55         data = DataRow(row)
56         if data:
57             self._populator.add(data)
58
59     def _replace_curdirs_in(self, row):
60         return [cell.replace('${CURDIR}', self._curdir) for cell in row]
这里以txt文件为例,READERS[extension]()返回的是TxtReader(),TxtReader实际继承于TsvReader。可以直接看TsvReader的源码。
读文件部分,RobotFramework单独封装了一个Uft8Reader类,保证读出来的数据不会出现编码问题。Utf8Reader(tsvfile).readlines()只是简单的返回数据单独行的一个列表。相当于file.readlines()
主要处理的部分是11~16行。process为标志处理
 1 NBSP = u'xA0'
 2
 3
 4 class TsvReader(object):
 5
 6     def read(self, tsvfile, populator):
 7         process = False
 8         for row in Utf8Reader(tsvfile).readlines():
 9             row = self._process_row(row)   <<<========= 处理空格
10             cells = [self._process_cell(cell) for cell in self.split_row(row)]   <<<=========处理换行符 以及包含 | |的行
11             if cells and cells[0].strip().startswith('*') and
12                     populator.start_table([c.replace('*', '') for c in cells]):
13                 process = True
14             elif process:
15                 populator.add(cells)
16         populator.eof()
17
18     def _process_row(self, row):
19         if NBSP in row:
20             row = row.replace(NBSP, ' ')
21         return row.rstrip()
22
23     @classmethod
24     def split_row(cls, row):
25         return row.split('	')
26
27     def _process_cell(self, cell):
28         if len(cell) > 1 and cell[0] == cell[-1] == '"':
29             cell = cell[1:-1].replace('""', '"')
30         return cell
此时populator实例为FromFilePopulator(), start_table传入的变量为每一行数据去除*的部分,如文章开头定义的test.txt,此时传入的数据为Settings,注意,此时row会处理成cells,为一个列表类型。start_table的主要作用是解析文件的各个部分的头部,确定下面的部分由哪个解析器进行解析。
1     def start_table(self, header):
2         self._populator.populate()
3         table = self._datafile.start_table(DataRow(header).all)
4         self._populator = self._populators[table.type](table)
5                 if table is not None else NullPopulator()
6         return bool(self._populator)
DataRow会将文件的行数据(此时为行数据的列表)进行转化,并根据是否以"#"开头转化成comment。这个类内置很多使用@property进行获取的属性DataRow(header).all便是返回所有非#开头的字段
此处self._datafile为上文提到的TestCaseFile类实例,所以此时调用的start_table是为TestCaseFile的方法,而这个方法是从_TestData继承来的
1     def start_table(self, header_row):
2         try:
3             table = self._tables[header_row[0]]
4         except (KeyError, IndexError):
5             return None
6         if not self._table_is_allowed(table):
7             return None
8         table.set_header(header_row)
9         return table
header_row[0]所取即为刚刚所讲DataRow(header).all中的第一个数据,拿文章开头的文件为例,即为Settings。
self._tables 实际为TestCaseFile初始化时,构成的一个字典映射,贴一下代码和实际结构,构造在初始化时。其中self.setting_table,self.variable_table即为刚开始讲TestCaseFile时所列的四个变量对应的类实例~是不是有似曾相识的感觉
 1 class _TestData(object):
 2     _setting_table_names = 'Setting', 'Settings', 'Metadata'
 3     _variable_table_names = 'Variable', 'Variables'
 4     _testcase_table_names = 'Test Case', 'Test Cases'
 5     _keyword_table_names = 'Keyword', 'Keywords', 'User Keyword', 'User Keywords'
 6
 7     def __init__(self, parent=None, source=None):
 8         self.parent = parent
 9         self.source = utils.abspath(source) if source else None
10         self.children = []
11         self._tables = utils.NormalizedDict(self._get_tables())
12
13     def _get_tables(self):
14         for names, table in [(self._setting_table_names, self.setting_table),
15                              (self._variable_table_names, self.variable_table),
16                              (self._testcase_table_names, self.testcase_table),
17                              (self._keyword_table_names, self.keyword_table)]:
18             for name in names:
19                 yield name, table
20
21     def start_table(self, header_row):
22         try:
23             table = self._tables[header_row[0]]
24         except (KeyError, IndexError):
25             return None
26         if not self._table_is_allowed(table):
27             return None
28         table.set_header(header_row)
29         return table

此处table通过字典和key,可以选出具体是哪个table,如果是Settings,则为TestCaseSettingTable,如果是Test Cases,则为TestCaseTable 等等。。
此处拿TestCaseSettingTable为例,后执行set_header(head_now),此处是为了兼容老的头部写法,这块可以看一下代码,很简单
Ok。table的具体实例拿到了。
1 self._populator = self._populators[table.type](table) if table is not None else NullPopulator()
table.type是获取table的属性,为setting. self._populators,文章前面也讲过,是四种映射组成的字典。ok,确定了数据为Setting类型,那么解析器就是SettingTablePopulator了。所以self._populator的赋值同样找到了。
go on~
按照robot文件的写法,头部完成后,会根据头部,确定下面的写法。后续调用populator.add(cells)对后续的数据继续解析,解析器解析其中的数据往table中写入数据。
基本的逻辑就是:
需要解析文件(TeseCaseFile),需要对应解析的解析器(FromFilePopulator),所以需要找对应的解析器根据文件类型确定文件的读方法(TxtReader),然后根据读出来的部分,确认Section(SettingTestCase等等)确定保存数据的表(TestCaseSettingTable, KeyWordTable等等)以及用来解析数据的解析器(SettingTablePopulator,VariableTablePopulator)等等,后续的数据解析基本上就没有问题啦