Spring IoC与bean
A bean is an object that is instantiated, assembled, and otherwise managed by a Spring IoC container. Otherwise, a bean is simply one of many objects in your application.
bean是由Spring IoC容器实例化、装配和管理的对象,否则,bean只是应用程序中的众多对象之一。
bean及其之间的依赖关系反映在容器使用的配置元数据中。
我们已经了解,Spring IoC容器能够帮我们操作bean,但是前提是我们需要配置元数据以告知Spring容器,它才能够通过读取这些配置,来实例化,装配和管理bean对象。
而配置元数据的方式,就是我们今天要总结的三种,分别是XML,Java注解以及Java代码。我们通过这几种方式,向Spring容器传达这些对象之间丰富的相互依赖关系。
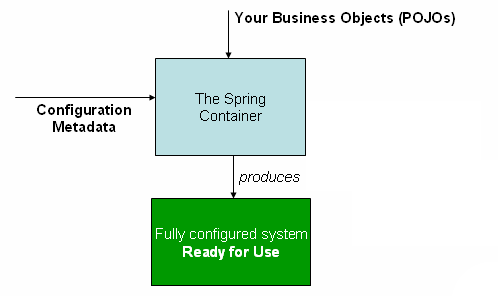
该图是Spring如何工作的高级视图。可以看到,应用程序类与配置元数据相结合,在创建并初始化ApplicationContext之后,就可以获得一个完全配置和可执行的系统或应用程序。
基于XML的显式装配
xml配置的基本结构
<?xml version="1.0" encoding="UTF-8"?>
<beans xmlns="http://www.springframework.org/schema/beans"
    xmlns:xsi="http://www.w3.org/2001/XMLSchema-instance"
    xsi:schemaLocation="http://www.springframework.org/schema/beans
        http://www.springframework.org/schema/beans/spring-beans.xsd">
    <bean id="..." class="...">
        <!-- collaborators and configuration for this bean go here -->
    </bean>
    <bean id="..." class="...">
        <!-- collaborators and configuration for this bean go here -->
    </bean>
    <!-- more bean definitions go here -->
</beans>
id属性表示bean的唯一标识。
class属性定义bean的类型并使用完全限定的类名。
bean实例的三种创建方式
<!-- 一、使用默认构造函数创建,如果没有该默认构造函数,则创建失败。 -->
<bean id="userService" class="com.smday.service.impl.UserServiceImpl"></bean>

<!-- 二、使用普通公章中的方法创建对象(使用某个类中的方法创建对象,并存入spring容器 -->
<bean id="instanceFactory" class="com.smday.factory.InstanceFactory"></bean>
<bean id="userService" factory-bean="instanceFactory" factory-method="getUserService"></bean>
<!-- 三、使用工厂中的静态方法创建对象 -->
<bean id="userService" class="com.smday.factory.StaticFactory" factory-method="getUserService"></bean>
依赖注入的两种方式
构造器注入方式
在<bean>标签的内部定义<constructor-arg>标签。
public class ExampleBean {

    private AnotherBean beanOne;

    private YetAnotherBean beanTwo;

    private int i;

    public ExampleBean(
        AnotherBean anotherBean, YetAnotherBean yetAnotherBean, int i) {
        this.beanOne = anotherBean;
        this.beanTwo = yetAnotherBean;
        this.i = i;
    }
}
<bean id="exampleBean" class="examples.ExampleBean">
    <!-- constructor injection using the nested ref element -->
    <constructor-arg>
        <ref bean="anotherExampleBean"/>
    </constructor-arg>

    <!-- constructor injection using the neater ref attribute -->
    <constructor-arg ref="yetAnotherBean"/>

    <constructor-arg type="int" value="1"/>
</bean>

<bean id="anotherExampleBean" class="examples.AnotherBean"/>
<bean id="yetAnotherBean" class="examples.YetAnotherBean"/>
value:用于提供基本类型和String类型的数据。
ref:用于提供其他的bean类型数据,在spring的ioc核心容器中出现过的bean对象。
在创建对象时,如果没有提供构造器中的这些参数,将无法创建该对象。
setter方法注入方式
在<bean>标签的内部定义<property>标签。
public class ExampleBean {

    private AnotherBean beanOne;

    private YetAnotherBean beanTwo;

    private int i;

    public void setBeanOne(AnotherBean beanOne) {
        this.beanOne = beanOne;
    }

    public void setBeanTwo(YetAnotherBean beanTwo) {
        this.beanTwo = beanTwo;
    }

    public void setIntegerProperty(int i) {
        this.i = i;
    }
}
<bean id="exampleBean" class="examples.ExampleBean">
    <!-- setter injection using the nested ref element -->
    <property name="beanOne">
        <ref bean="anotherExampleBean"/>
    </property>

    <!-- setter injection using the neater ref attribute -->
    <property name="beanTwo" ref="yetAnotherBean"/>
    <property name="integerProperty" value="1"/>
</bean>

<bean id="anotherExampleBean" class="examples.AnotherBean"/>
<bean id="yetAnotherBean" class="examples.YetAnotherBean"/>
name:指定注入时调用的set方法的属性名称。
value:提供基本类型和String类型的数据。
ref:提供其他的bean类型数据,在spring的ioc核心容器中出现过的bean对象。
如果某个成员必须有值,但并没有提供相应的setter方法,将会出错。
【集合类型的注入】:分为list和map两类结构
    <bean id="userService" class="com.smday.service.impl.UserServiceImpl">
        <property name="myStrs">
            <array>
                <value>AAA</value>
                <value>BBB</value>
                <value>BBB</value>
            </array>
        </property>
        <property name="myList">
            <list>
                <value>AAA</value>
                <value>BBB</value>
                <value>BBB</value>
            </list>
        </property>
        <property name="mySet">
            <set>
                <value>AAA</value>
                <value>BBB</value>
                <value>BBB</value>
            </set>
        </property>
        <property name="myMap">
            <map>
                <entry key="testA" value="AAA"></entry>
                <entry key="testB" >
                    <value>BBB</value>
                </entry>
            </map>
        </property>
        <property name="myProp">
            <props>
                <prop key="testC">CCC</prop>
                <prop key="testD">DDD</prop>
            </props>
        </property>
    </bean>
list结构可以使用list、array和set标签。
map结构可以使用map和props标签。
利用命名空间简化xml
一、p-namespace使用bean元素的属性来提供属性值和协作bean,而不是使用嵌套的<property/>元素,下面两段bean的配置效果相同。
<beans xmlns="http://www.springframework.org/schema/beans"
    xmlns:xsi="http://www.w3.org/2001/XMLSchema-instance"
    xmlns:p="http://www.springframework.org/schema/p"
    xsi:schemaLocation="http://www.springframework.org/schema/beans
        http://www.springframework.org/schema/beans/spring-beans.xsd">

    <!-- 传统的xml声明 -->
    <bean name="classic" class="com.example.ExampleBean">
        <property name="email" value="foo@bar.com"/>
    </bean>
    <!-- p-namespace 声明 -->
    <bean name="p-namespace" class="com.example.ExampleBean"
        p:email="foo@bar.com"/>
</beans>
二、Spring 3.1中新引入的c-namespace允许使用内联属性来配置构造函数参数,而不是使用嵌套的<constructor-arg>。
<beans xmlns="http://www.springframework.org/schema/beans"
    xmlns:xsi="http://www.w3.org/2001/XMLSchema-instance"
    xmlns:c="http://www.springframework.org/schema/c"
    xsi:schemaLocation="http://www.springframework.org/schema/beans
        http://www.springframework.org/schema/beans/spring-beans.xsd">

    <bean id="bar" class="x.y.Bar"/>
    <bean id="baz" class="x.y.Baz"/>

    <!-- 传统的xml声明 -->
    <bean id="foo" class="x.y.Foo">
        <constructor-arg ref="bar"/>
        <constructor-arg ref="baz"/>
        <constructor-arg value="foo@bar.com"/>
    </bean>

    <!-- c-namespace 声明 -->
    <bean id="foo" class="x.y.Foo" c:bar-ref="bar" c:baz-ref="baz" c:email="foo@bar.com"/>

</beans>
基于Java的显式装配
@Bean 和 @Configuration
这两个注解类是Spring's new java-configuration的核心构件。
@Bean注解用于指示方法实例化、配置和初始化要由Spring IoC容器管理的新对象,@Bean注解的作用与<bean/>标签相同。简单的理解就是这个注解可以告知spring,这个方法上面未来希望注册一个应用上下文的bean对象,因此用@Bean注解的方法需要利用Java代码,定义返回一个bean实例的逻辑。
@Configuration注解一个类表明这个类的主要目的是作为bean定义的源,@Configuration类允许通过简单地调用同一类中的其他@Bean方法来定义bean之间的依赖关系。简单的理解就是一个配置类,自此之后,你可以在该配置类中完成在xml中完成的事,但形式会有所不同。
下面这个例子是一个最简单的配置类的定义:
@Configuration
public class AppConfig {

    @Bean
    public MyService myService() {
        return new MyServiceImpl();
    }
}
它的作用和下面这段xml配置的方式等价:
<beans>
    <bean id="myService" class="com.acme.services.MyServiceImpl"/>
</beans>
Bean的依赖
一个@Bean注释的方法可以有任意数量的参数来描述构建该bean所需的依赖关系。例如,如果我们的TransferService需要一个AccountRepository,我们可以通过一个方法参数来实现这个依赖:
@Configuration
public class AppConfig {
    @Bean
    public TransferService transferService(AccountRepository accountRepository) {
        return new TransferServiceImpl(accountRepository);
    }
}
当spring调用transferService方法创建bean时,会自动装配accountRepository到配置方法中,再次印证了那句话,带有@Bean注解的方法可以编写任何必要的Java代码来产生Bean的实例,例如构造器,setter方法,以及任何可以产生实例的方法。
初始化Spring容器
AnnotationConfigApplicationContext是Spring 3.0中新增的。它不仅可以接受@Configuration配置类作为输入,还可以接受普通的@Component类和使用JSR-330元数据注释的类。
初始化spring容器,获取Myservice对象,调用对象的方法。
public static void main(String[] args) {
    ApplicationContext ctx = new AnnotationConfigApplicationContext(AppConfig.class);
    MyService myService = ctx.getBean(MyService.class);
    myService.doStuff();
}
定制bean的命名
默认情况下,配置类将会使用@Bean注解的方法的名称作为bean的名称,这一点可以通过name属性修改。
@Configuration
public class AppConfig {

    @Bean(name = "myFoo")
    public Foo foo() {
        return new Foo();
    }
}
如上:如果没有指定name属性,该bean的名称为foo,如果指定了name属性,这里的名称就是myFoo。
基于注解的自动装配
Spring从以下两个角度实现自动装配:
- 组件扫描:Spring自动发现应用上下文中所创建的bean。
- 自动装配:Spring自动满足bean之间的依赖。
首先还是来看一段简单的例子:
//定义一个UserService接口
public interface UserService {
    void add();
}
//定义实现类,注意加上@Component注解,告知spring创建这个bean
@Component
public class NormalUserServiceImpl implements UserService {
    @Override
    public void add() {
        System.out.println("添加用户");
    }
}
//controller层,注意@Autowired注解,自动按类型注入Userservice
@Component
public class UserController {
    @Autowired
    private UserService userservice;

    public void add(){
        userservice.add();
    }
}
//定义配置类,注意@ComponentScan("com.my.demo")注解开启组件扫描
@Configuration
@ComponentScan("com.my.demo")
public class Appconfig {

}
//整合junit测试类进行测试
@RunWith(SpringJUnit4ClassRunner.class)
@ContextConfiguration(classes = Appconfig.class)
public class UserServiceTest {
    @Autowired
    private UserService userservice;
    @Test
    public void testMethod(){
        userservice.add();
    }
}
以上就是一套可以正常运行的简单案例,当然其中有不少可能出现的问题或者是其他可以实现相同功能的方案,我们都暂且不提。其中出现了许多自动化装配bean的注解,我们一一来看:
自动装配的常用注解
【@Component】
- 作用:将当前类对象存入spring容器中。
- 属性:value,用于指定bean的id,不指定value时,默认值为当前类名首字母小写。
值得一提的是,在三层架构中,Spring框架提供了明确的三层注释,作用与@Component相同,但语义更加清晰明了,分别是:
Controller:表现层、Service:业务层、Respository:持久层
【@Autowired】
- 作用:自动按照类型注入,只要容器中有唯一的一个bean对象类型和要注入的变量类型匹配,就可以注入成功。
- 如果ioc容器中没有任何bean类型和要注入的变量类型匹配,则报错(解决方法是,设置required属性的值为false,如果没找到对应类型的bean,则会出于未装配状态),如果ioc容器中有多个类型匹配时,出现歧义性,也会报错。
- 出现位置:既可以是构造器,也可以是setter方法,甚至任何其他的方法,Spring都会尝试满足方法参数上声明的依赖。
- 细节:在使用注解注入时,set方法就不是必须的了。
当出现歧义性时,满足类型要求的bean不是唯一时,可以考虑使用@Qualifier和@Resource注解,参考:Spring解决自动装配歧义性的几种方案
【@Configuration】
- 作用:指定当前类是一个配置类
- 细节:当配置类作为AnnotationConfigApplicationContext对象创建的参数时,该注解可以不写。
【@ComponentScan】
- 作用:开启组件扫描,用于通过注解指定spring在创建容器时要扫描的包。
- 属性:value,和basePackages的作用相同,指定创建容器时要扫描的包。
- 如果不指定value或者basePackages的值,将会默认扫描与配置类相同的包。
设置spring组件扫描的基础包的几种方案:
-
@ComponentScan("com.my.demo") -
@ComponentScan(basePackages = {"com.my.demo.web","com.my.demo.service"}) -
@ComponentScan(basePackageClasses = {UserController.class, UserService.class, UserDao.class}),相较于第二种,较为安全。
需要注意的是,组件扫描默认是不开启的,我们需要通过该注解显式通知Spring,告诉它去寻找带有@Component注解的类,去创建该类的bean对象。
开启组件扫描的xml方式:
<?xml version="1.0" encoding="UTF-8"?>
<beans xmlns="http://www.springframework.org/schema/beans"
       xmlns:xsi="http://www.w3.org/2001/XMLSchema-instance"
       xmlns:context="http://www.springframework.org/schema/context"
       xsi:schemaLocation="http://www.springframework.org/schema/beans http://www.springframework.org/schema/beans/spring-beans.xsd http://www.springframework.org/schema/context https://www.springframework.org/schema/context/spring-context.xsd">

        <!--配置扫描,相当于@ComponentScan("com.my.demo")-->
        <context:component-scan base-package="com.my.demo"/>
</beans>
既然使用xml方式开启组件扫描,那么测试的时候需要谨慎,要读取该xml文件:@ContextConfiguration("classpath:applicationContext.xml")。
导入和混合配置
直接以例子呈现:
#jdbcConfig.properties
jdbc.driver=com.mysql.jdbc.Driver
jdbc.url=jdbc:mysql://localhost:3306/spring
jdbc.username=root
jdbc.password=123456
/**
 * @author Summerday
 * <p>
 * 和spring连接数据库相关的配置类
 */
public class JdbcConfig {
    @Value("${jdbc.driver}")
    private String driver;
    @Value("${jdbc.url}")
    private String url;
    @Value("${jdbc.username}")
    private String username;
    @Value("${jdbc.password}")
    private String password;

    /**
     * 创建queryRunner对象
     *
     * @param dataSource
     * @return
     */
    @Bean(name = "runner")
    @Scope("prototype")
    public QueryRunner createQueryRunner(DataSource dataSource) {
        return new QueryRunner(dataSource);
    }

    /**
     * 创建数据源对象
     *
     * @return
     */
    @Bean(name = "dataSource")
    public DataSource createDataSource() {
        try {
            ComboPooledDataSource ds = new ComboPooledDataSource();
            ds.setDriverClass(driver);
            ds.setJdbcUrl(url);
            ds.setUser(username);
            ds.setPassword(password);
            return ds;
        } catch (Exception e) {
            throw new RuntimeException(e);
        }
    }
}
【@Value】
- 作用:用于基本类型和string类型的数据。
- 属性:value,指定数据的值,可以使用spring中的SpEL,spring的el表达式。
- SpEL的写法:${表达式}。
/**
 * 主配置类
 */
@Configuration
@ComponentScan(basePackages = "com.smday")
@Import(JdbcConfig.class)
@PropertySource("classpath:JdbcConfig.properties")
public class SpringConfiguration {
}
【@Import】
- 作用:用于导入其他的配置类。
- 属性:value,指定其他配置类的字节码,使用Import注解后,有该注解的类为父配置类,导入的都是子配置类。
【@PropertySource】
- 作用:作用于指定properties文件的位置。
- 属性:value,指定文件的名称和路径,关键字classpath表示类路径下。
最后的最后,引用Spring in Action中作者的话:自动化配置、基于Java的显式配置以及基于xml的显式配置都描述了Spring应用中组件以及这些组件之间的关系。作者建议尽可能使用自动化的配置,其次如果需要显式配置,希望优先选择基于Java的配置,类型安全且易懂。