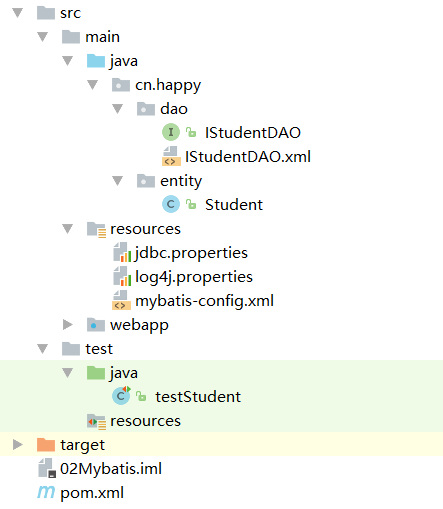
整体结构如下:

首先写大配置,该配置的作用是连接数据库。
可以将连接数据库的方法单独提出来,写在jdbc.propterties中,代码如下:
jdbc.driver=com.mysql.jdbc.Driver   //加载驱动
jdbc.url=jdbc:mysql://localhost:3306/school  //连接mysql数据库
jdbc.username=root                           //数据库用户名
jdbc.password=123156                          //数据库密码

大配置文件的名称一般为mybatis-config.xml

mybatis-config.xml中的代码如下:
<?xml version='1.0' encoding='UTF-8'?>
<!DOCTYPE configuration
        PUBLIC "-//mybatis.org//DTD Config 3.0//EN"
        "http://mybatis.org/dtd/mybatis-3-config.dtd">
<configuration>  <!--根节点 -->
    <!--让程序识别到jdbc.propterties -->
    <properties resource="jdbc.properties">
    </properties>
    <environments default="development">
        <!--数据库环境 -->
        <environment id="development">
            <!--事务管理方案 -->
            <transactionManager type="JDBC" />
            <dataSource type="POOLED">
                <property name="driver" value="${jdbc.driver}"/>
                <property name="url" value="${jdbc.url}"/>
                <property name="username" value="${jdbc.username}"/>
                <property name="password" value="${jdbc.password}"/>
            </dataSource>
        </environment>
    </environments>
    <!--映射文件:描述某个实体和数据库表的对应关系 -->
    <!--关联小配置 -->
    <mappers>
        <mapper resource="cn/happy/dao/IStudentDAO.xml" />
        <!--   <package name="cn.happy.dao"></package>-->
    </mappers>
</configuration>

下面以学校管理学生为例
实体层
/**
 * Created by Administrator on 2017/9/14.
 */
public class Student {
    private Integer id;
    private  String name;

    public Integer getId() {
        return id;
    }
    public void setId(Integer id) {
        this.id = id;
    }

    public String getName() {return name;}
    public void setName(String name) {
        this.name = name;
    }
}

接口
/**
 * Created by Administrator on 2017/9/14.
 */
public interface IStudentDAO {

        /**
         * 查询所有
         * @return
         */
        public  List<Student> getAll();

        /**
         * 新增
         * @param student
         * @return
         */
        public int addStudent(Student student) throws Exception;
}


小配置文件  该文件同样是以.xml结尾

代码如下:
<?xml version='1.0' encoding='UTF-8'?>
<!DOCTYPE mapper
        PUBLIC "-//mybatis.org//DTD Mapper 3.0//EN"
        "http://mybatis.org/dtd/mybatis-3-mapper.dtd">
<mapper namespace="cn.happy.dao.IStudentDAO">
    <!--查询所有-->
    <select id="getAll" resultType="cn.happy.entity.Student">
        select  *from student
    </select>
    <!--新增学生-->
    <select id="addStudent"  resultType="cn.happy.entity.Student">
       insert  into student(name) value(#{name})
    </select>
</mapper>


测试类
public class testStudent {
    @Test
    /**
     * 查询
     */
    public void getAll() throws Exception{
        String resource = "mybatis-config.xml";
        //将硬盘中的xml变成一个输入流
        InputStream inputStream = Resources.getResourceAsStream(resource);
        //使用流对象创建一个会话工厂
        SqlSessionFactory sf = new SqlSessionFactoryBuilder().build(inputStream);
        //session就是程序员与数据库交互的入口
        SqlSession session = sf.openSession();
        IStudentDAO mapper = session.getMapper(IStudentDAO.class);
        List<Student> all = mapper.getAll();
        for (Student item:all){
            System.out.println(item.getName());
        }
        session.commit();
        //关闭会话,释放资源
        session.close();
    }

    /**
     * 新增
     * @throws Exception
     */
    public void inserts() throws Exception{
        String resource = "mybatis-config.xml";
        InputStream inputStream = Resources.getResourceAsStream(resource);
        SqlSessionFactory sf = new SqlSessionFactoryBuilder().build(inputStream);
        SqlSession session = sf.openSession();
        Student student=new Student();
        student.setName("张飞");
        int count = session.insert("cn.happy.dao.IStudentDAO.addStudent",student);
        System.out.println(count);
        session.commit();
        session.close();
    }

}
这里只写了新增和查询所有,删除和修改类似,只有需要做小的改动,因此这里就不写出来了。