一、什么是redis
Redis是用C语言开发的一个开源的高性能键值对(key-value)数据库。它通过提供多种键值数据类型来适应不同场景下的存储需求,目前为止Redis支持的键值数据类型如
下:
字符串类型
散列类型
列表类型
集合类型
有序集合类型。
二、redis的应用场景
缓存(数据查询、短连接、新闻内容、商品内容等等)。(最多使用)
分布式集群架构中的session分离。
聊天室的在线好友列表。
任务队列。(秒杀、抢购、12306等等)
应用排行榜。
网站访问统计。
数据过期处理(可以精确到毫秒)
三、Redis的安装
redis是C语言开发,建议在linux上运行,本教程使用Centos6.4作为安装环境。
安装redis需要先将官网下载的源码进行编译,编译依赖gcc环境,如果没有gcc环境,需要安装 gcc:yum install gcc-c++
n 版本说明
本教程使用redis3.0版本。3.0版本主要增加了redis集群功能。
n 源码下载
从官网下载
http://download.redis.io/releases/redis-3.0.0.tar.gz
将redis-3.0.0.tar.gz拷贝到/usr/local下
n 解压源码
tar -zxvf redis-3.0.0.tar.gz
n 进入解压后的目录进行编译
cd /usr/local/redis-3.0.0
make
n 安装到指定目录,如 /usr/local/redis
cd /usr/local/redis-3.0.0
make PREFIX=/usr/local/redis install
n redis.conf
redis.conf是redis的配置文件,redis.conf在redis源码目录。
注意修改port作为redis进程的端口,port默认6379。
n 拷贝配置文件到安装目录下
进入源码目录,里面有一份配置文件 redis.conf,然后将其拷贝到安装路径下
cd /usr/local/redis
mkdir conf
cp /usr/local/redis-3.0.0/redis.conf /usr/local/redis/bin
n 安装目录bin下的文件列表

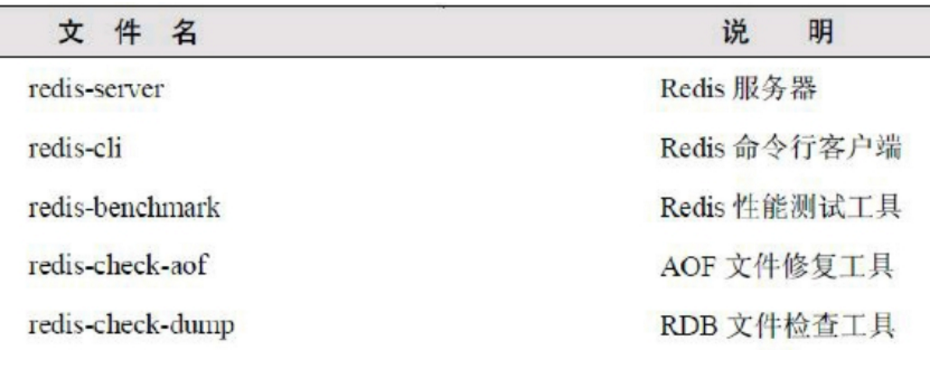
redis3.0新增的redis-sentinel是redis集群管理工具可实现高可用。
配置文件目录:

四、redis启动
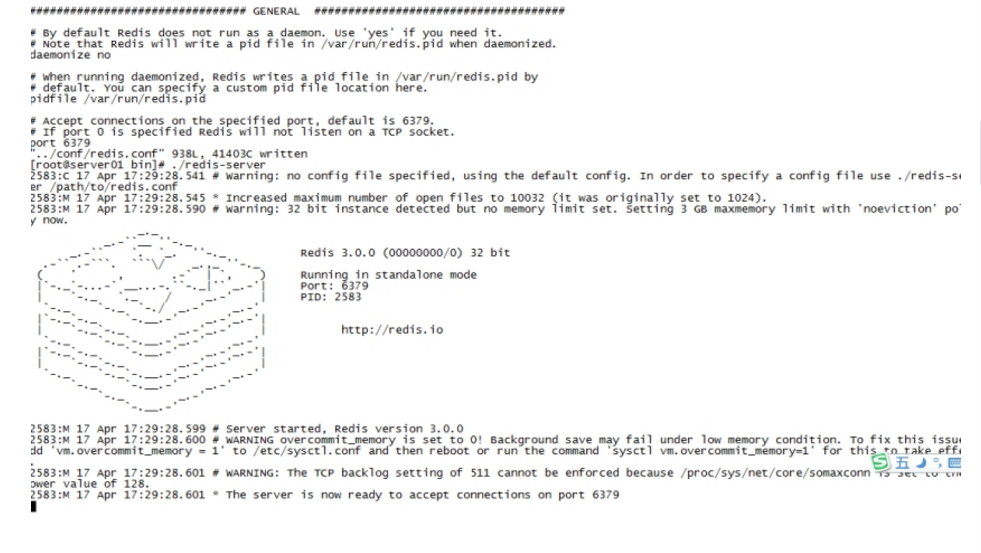
1. 前端模式启动
直接运行bin/redis-server将以前端模式启动,前端模式启动的缺点是ssh命令窗口关闭则redis-server程序结束,不推荐使用此方法。如下图:
2. 后端模式启动
修改redis.conf配置文件, daemonize yes 以后端模式启动。
执行如下命令启动redis:
cd /usr/local/redis
./bin/redis-server ./redis.conf
redis默认使用6379端口。

也可更改redis.conf文件,修改端口号:

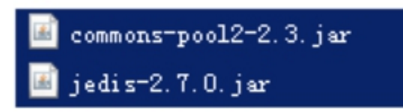
3. 通过jedis连接redis单机
jar包
pom坐标:
<dependency>
<groupId>redis.clients</groupId>
<artifactId>jedis</artifactId>
<version>2.7.0</version>
</dependency>
jar包如下:
4、 单实例连接
通过创建单实例jedis对象连接redis服务,如下代码:
// 单实例连接redis
@Test
public void testJedisSingle() {
Jedis jedis = new Jedis("192.168.101.3", 6379);
jedis.set("name", "bar");
String name = jedis.get("name");
System.out.println(name);
jedis.close();
}
1. 外部连接不上redis的解决方法
由于linux防火墙默认开启,redis的服务端口6379并不在开放规则之内,所有需要将此端口开放访问或者关闭防火墙。
关闭防火墙命令:sevice iptables stop
如果是修改防火墙规则,可以修改:/etc/sysconfig/iptables文件
2. 使用连接池连接
通过单实例连接redis不能对redis连接进行共享,可以使用连接池对redis连接进行共享,提高资源利用率,使用jedisPool连接redis服务,如下代码:
@Test
public void pool() {
JedisPoolConfig config = new JedisPoolConfig();
//最大连接数
config.setMaxTotal(30);
//最大连接空闲数
config.setMaxIdle(2);
JedisPool pool = new JedisPool(config, "192.168.101.3", 6379);
Jedis jedis = null;
try {
jedis = pool.getResource();
jedis.set("name", "lisi");
String name = jedis.get("name");
System.out.println(name);
}catch(Exception ex){
ex.printStackTrace();
}finally{
if(jedis != null){
//关闭连接
jedis.close();
}
}
}
详细的连接池配置参数参考下节jedis和spring整合中applicationContext.xml的配置内容。
1.5.4. jedis与spring整合
配置spring配置文件applicationContext.xml
<?xml version="1.0" encoding="UTF-8"?>
<beans xmlns="http://www.springframework.org/schema/beans"
xmlns:xsi="http://www.w3.org/2001/XMLSchema-instance" xmlns:mvc="http://www.springframework.org/schema/mvc"
xmlns:context="http://www.springframework.org/schema/context"
xmlns:aop="http://www.springframework.org/schema/aop" xmlns:tx="http://www.springframework.org/schema/tx"
xsi:schemaLocation="http://www.springframework.org/schema/beans
http://www.springframework.org/schema/beans/spring-beans-3.2.xsd
http://www.springframework.org/schema/mvc
http://www.springframework.org/schema/mvc/spring-mvc-3.2.xsd
http://www.springframework.org/schema/context
http://www.springframework.org/schema/context/spring-context-3.2.xsd
http://www.springframework.org/schema/aop
http://www.springframework.org/schema/aop/spring-aop-3.2.xsd
http://www.springframework.org/schema/tx
http://www.springframework.org/schema/tx/spring-tx-3.2.xsd ">
<!-- 连接池配置 -->
<bean id="jedisPoolConfig" class="redis.clients.jedis.JedisPoolConfig">
<!-- 最大连接数 -->
<property name="maxTotal" value="30" />
<!-- 最大空闲连接数 -->
<property name="maxIdle" value="10" />
<!-- 每次释放连接的最大数目 -->
<property name="numTestsPerEvictionRun" value="1024" />
<!-- 释放连接的扫描间隔(毫秒) -->
<property name="timeBetweenEvictionRunsMillis" value="30000" />
<!-- 连接最小空闲时间 -->
<property name="minEvictableIdleTimeMillis" value="1800000" />
<!-- 连接空闲多久后释放, 当空闲时间>该值 且 空闲连接>最大空闲连接数 时直接释放 -->
<property name="softMinEvictableIdleTimeMillis" value="10000" />
<!-- 获取连接时的最大等待毫秒数,小于零:阻塞不确定的时间,默认-1 -->
<property name="maxWaitMillis" value="1500" />
<!-- 在获取连接的时候检查有效性, 默认false -->
<property name="testOnBorrow" value="true" />
<!-- 在空闲时检查有效性, 默认false -->
<property name="testWhileIdle" value="true" />
<!-- 连接耗尽时是否阻塞, false报异常,ture阻塞直到超时, 默认true -->
<property name="blockWhenExhausted" value="false" />
</bean>
<!-- redis单机 通过连接池 -->
<bean id="jedisPool" class="redis.clients.jedis.JedisPool" destroy-method="close">
<constructor-arg name="poolConfig" ref="jedisPoolConfig"/>
<constructor-arg name="host" value="192.168.25.145"/>
<constructor-arg name="port" value="6379"/>
</bean>
测试代码:
private ApplicationContext applicationContext;
@Before
public void init() {
applicationContext = new ClassPathXmlApplicationContext(
"classpath:applicationContext.xml");
}
@Test
public void testJedisPool() {
JedisPool pool = (JedisPool) applicationContext.getBean("jedisPool");
try {
jedis = pool.getResource();
jedis.set("name", "lisi");
String name = jedis.get("name");
System.out.println(name);
}catch(Exception ex){
ex.printStackTrace();
}finally{
if(jedis != null){
//关闭连接
jedis.close();
}
}
}