实战一:在percona插件监控mariadb数据库
1、环境准备:
node1:192.168.7.101 master-mysql主数据库
node2:192.168.7.102 slave-mysql从数据库
node4:192.168.7.104 zabbix-proxy服务器
(1)主从数据库都需要安装zabbix-agent
# yum install zabbix-agent -y
(2)node4主机需要安装zabbix-proxy-mysql包
# yum install zabbix-proxy-mysql -y
2、安装配置主从数据库
(1)在node1和node2主机上安装mariadb-server数据库
# yum install mariadb-server -y
(2)配置主服务器mariadb数据库:/etc/my.cnf
[mysqld]
socket=/var/lib/mysql/mysql.sock
user=mysql
symbolic-links=0
datadir=/data/mysql
innodb_file_per_table=1
relay-log = /data/mysql
server-id=101
log-bin=/data/mysql/master-log
创建一个存放数据库目录:
# mkdir /data/mysql -p
# chown -R mysql.mysql  /data/mysql
(3)启动mariadb主服务器的数据库
# systemctl start mariadb
(4)配置从服务器的mariadb数据库:vim /etc/my.cnf
[mysqld]
socket=/var/lib/mysql/mysql.sock
user=mysql
symbolic-links=0
datadir=/data/mysql
innodb_file_per_table=1
relay-log = /data/mysql
server-id=102
log-bin=/data/mysql/master-log
创建一个存放数据库目录:
# mkdir /data/mysql -p
# chown -R mysql.mysql  /data/mysql
(5)启动从服务器的数据库
# systemctl start mariadb
(6)在主服务器上(node1)创建linux数据库,并授权
[root@node1 ~]# mysql
Welcome to the MariaDB monitor.  Commands end with ; or g.
Your MariaDB connection id is 11
Server version: 10.3.10-MariaDB-log MariaDB Server

Copyright (c) 2000, 2018, Oracle, MariaDB Corporation Ab and others.

Type 'help;' or 'h' for help. Type 'c' to clear the current input statement.

MariaDB [(none)]> create database linux; # 创建linux数据库
MariaDB [(none)]> GRANT REPLICATION SLAVE,REPLICATION CLIENT ON *.* TO 'linux'@'192.168.7.%' IDENTIFIED BY '123456';
Query OK, 0 rows affected (0.003 sec)
(7)在主服务器的数据库备份数据,并导出到/opt目录下
[root@node1 ~]# mysqldump -A -F --single-transaction --master-data=1 > /opt/backup.sql
(8)将备份出来的backup.sql数据传到从数据库上(node2主机上)
[root@node1 ~]# scp /opt/backup.sql 192.168.7.102:/opt
(9)查看主数据库传到从数据库的二进制日志初始的名称:vim /opt/backup.sql

(10)在从服务器上,将/opt/backup.sql数据传到从服务器上
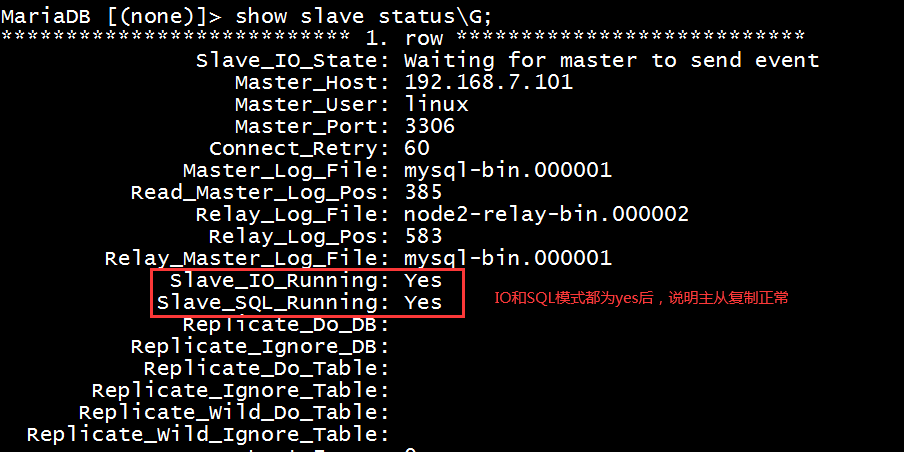
[root@node2 ~]# mysql < /opt/backup.sql
[root@node2 ~]# mysql  # 进入数据库
Welcome to the MariaDB monitor.  Commands end with ; or g.
Your MariaDB connection id is 3
Server version: 5.5.64-MariaDB MariaDB Server

Copyright (c) 2000, 2018, Oracle, MariaDB Corporation Ab and others.

Type 'help;' or 'h' for help. Type 'c' to clear the current input statement.

MariaDB [(none)]> show databases ; # 查看导入的linux数据库信息,此时已经导入到数据库内。
+--------------------+
| Database           |
+--------------------+
| information_schema |
| linux              |
| mysql              |
| performance_schema |
| test               |
+--------------------+
5 rows in set (0.00 sec)
MariaDB [(none)]> CHANGE MASTER TO MASTER_HOST='192.168.7.101',MASTER_USER='linux',MASTER_PASSWORD='123456',MASTER_PORT=3306,MASTER_LOG_FILE='mysql-bin.000001',MASTER_LOG_POS=342; # 同步主从数据库,从mysql-bin.000001开始复制,文件大小是342
MariaDB [(none)]> start slave ; # 开始复制主数据库信息
Query OK, 0 rows affected (0.00 sec)

MariaDB [(none)]> show slave statusG; #查看此时的状态
*************************** 1. row ***************************
Slave_IO_State: Waiting for master to send event
Master_Host: 192.168.7.101
Master_User: linux
Master_Port: 3306
Connect_Retry: 60
Master_Log_File: mysql-bin.000001
Read_Master_Log_Pos: 385
Relay_Log_File: node2-relay-bin.000002
Relay_Log_Pos: 583
Relay_Master_Log_File: mysql-bin.000001
Slave_IO_Running: Yes  # 两个为yes,说明正常。
Slave_SQL_Running: Yes
Replicate_Do_DB:
Replicate_Ignore_DB:
Replicate_Do_Table:
Replicate_Ignore_Table:
Replicate_Wild_Do_Table:
Replicate_Wild_Ignore_Table:
Last_Errno: 0
Last_Error:
Skip_Counter: 0
Exec_Master_Log_Pos: 385
Relay_Log_Space: 877
Until_Condition: None
Until_Log_File:
Until_Log_Pos: 0
Master_SSL_Allowed: No
Master_SSL_CA_File:
Master_SSL_CA_Path:
Master_SSL_Cert:
Master_SSL_Cipher:
Master_SSL_Key:
Seconds_Behind_Master: 0
Master_SSL_Verify_Server_Cert: No
Last_IO_Errno: 0
Last_IO_Error:
Last_SQL_Errno: 0
Last_SQL_Error:
Replicate_Ignore_Server_Ids:
Master_Server_Id: 1
查看此时的主从IO和SQL运行状态都为yes,说明正常。
3、官网下载percona的zabbix监控插件
官网下载地址:https://www.percona.com/downloads/
官方文档:https://www.percona.com/doc/percona-monitoring-plugins/LATEST/zabbix/index.html
安装教程:https://www.percona.com/doc/percona-monitoring-plugins/LATEST/zabbix/index.html#installation-instructions
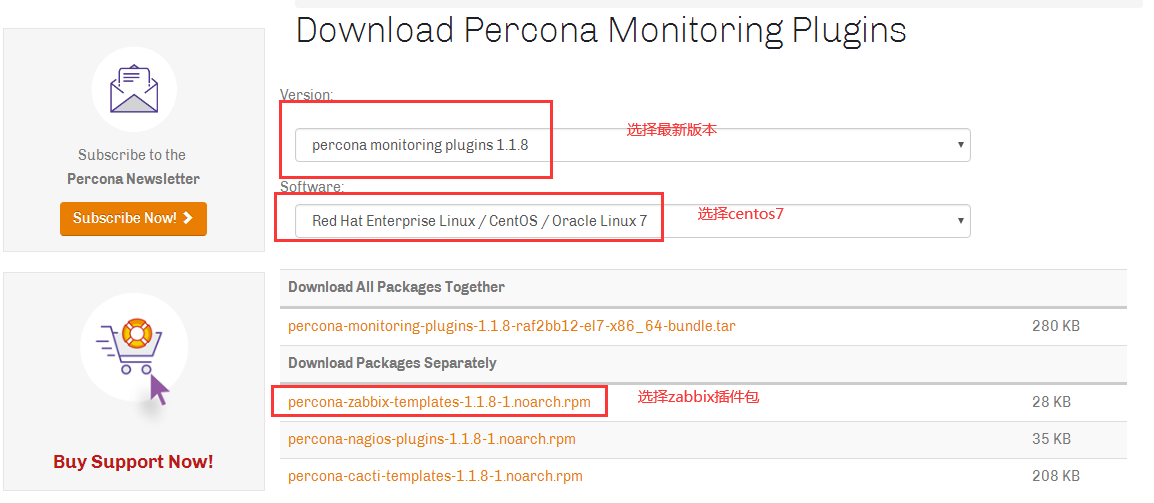
(1)进入官网然,然后选择Percona的zabbix监控插件

(2)选择最新版本,并选择centos7系统,然后复制percona关联的zabbix的插件包链接,在linux上下载并安装
(3)在(从服务器上)linux系统上开始下载percona关联的zabbix插件
[root@node2 ~]# wget https://www.percona.com/downloads/percona-monitoring-plugins/percona-monitoring-plugins-1.1.8/binary/redhat/7/x86_64/percona-zabbix-templates-1.1.8-1.noarch.rpm
--2020-02-25 21:11:12--  https://www.percona.com/downloads/percona-monitoring-plugins/percona-monitoring-plugins-1.1.8/binary/redhat/7/x86_64/percona-zabbix-templates-1.1.8-1.noarch.rpm
Resolving www.percona.com (www.percona.com)... 74.121.199.234
Connecting to www.percona.com (www.percona.com)|74.121.199.234|:443... connected.
HTTP request sent, awaiting response... 200 OK
Length: 28296 (28K) [application/x-redhat-package-manager]
Saving to: ‘percona-zabbix-templates-1.1.8-1.noarch.rpm’

100%[=======================================================================================================>] 28,296      38.0KB/s   in 0.7s

2020-02-25 21:11:25 (38.0 KB/s) - ‘percona-zabbix-templates-1.1.8-1.noarch.rpm’ saved [28296/28296]
(4)在从服务器上安装percona关联的zabbix插件
[root@node2 ~]# rpm -ivh percona-zabbix-templates-1.1.8-1.noarch.rpm
warning: percona-zabbix-templates-1.1.8-1.noarch.rpm: Header V4 DSA/SHA1 Signature, key ID cd2efd2a: NOKEY
Preparing...                          ################################# [100%]
Updating / installing...
   1:percona-zabbix-templates-1.1.8-1 ################################# [100%]

Scripts are installed to /var/lib/zabbix/percona/scripts
Templates are installed to /var/lib/zabbix/percona/templates
(5)在从服务器上复制percona的zabbix插件模板
[root@node2 ~]# cp /var/lib/zabbix/percona/templates/userparameter_percona_mysql.conf /etc/zabbix/zabbix_agentd.d/
(6)配置从服务器的/etc/zabbix/zabbix_agentd.conf文件
Server=192.168.7.100,192.168.7.104 # zabbix server服务器端的IP地址和主动模式代理服务器的IP地址
ServerActive=192.168.7.104 # 代理服务器的IP地址
Hostname=192.168.7.102  # 从服务器的IP地址
(7)重启zabbix-agent服务: systemctl restart zabbix-agent
(8)新建一个配置文件:/var/lib/zabbix/percona/scripts/ss_get_mysql_stats.php.cnf
<?php
$mysql_user= 'root';
$mysql_pass= '';
(9)在从服务器上安装php和php-mysql包
# yum install php php-mysql -y
(10)用脚本测试页面是否会显示数据,如果显示数据,说明正确
[root@node2 ~]# /var/lib/zabbix/percona/scripts/get_mysql_stats_wrapper.sh gg
5599
(11)在从服务器验证完之后,因此测试的文件是root执行生成的文件,此时在zabbix-server服务器端验证就会获取不到数据,所以必须删除脚本测试的临时文件,临时文件在/tmp/目录下。
[root@node2 ~]# rm -rf /tmp/localhost-mysql_cacti_stats.txt
(12)在zabbix-server服务器端获取数据
[root@zabbix ~]# zabbix_get  -s 192.168.7.102 -p 10050 -k "MySQL.Key-read-requests"
5599
(13)此时在从服务器上查看/tmp临时目录下的文件,就会创建以zabbix用户创建的文件
[root@node2 ~]# ll /tmp/localhost-mysql_cacti_stats.txt
-rw-rw-r-- 1 zabbix zabbix 1237 Feb 25 22:09 /tmp/localhost-mysql_cacti_stats.txt
在zabbix网页上创建Percona模板
(1)导入自制的Percona模板

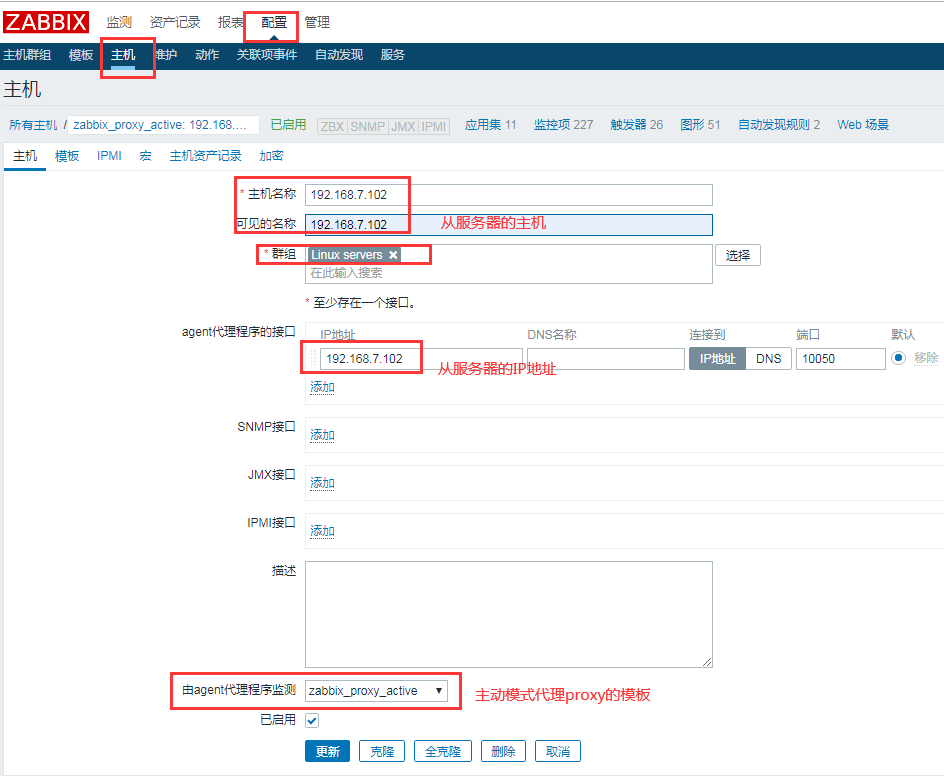
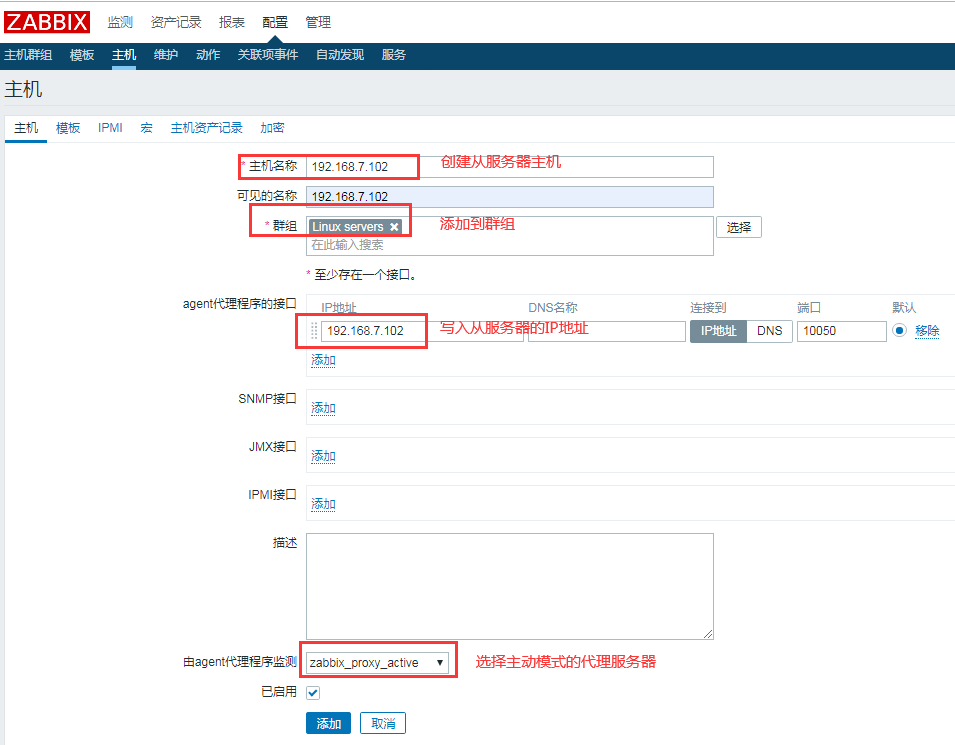
(2)将主机关联到前面创建的主动模式的proxy代理服务器node4上
(3)关联Percon模板

(4)将percona模板的监控项被动模式改为主动模式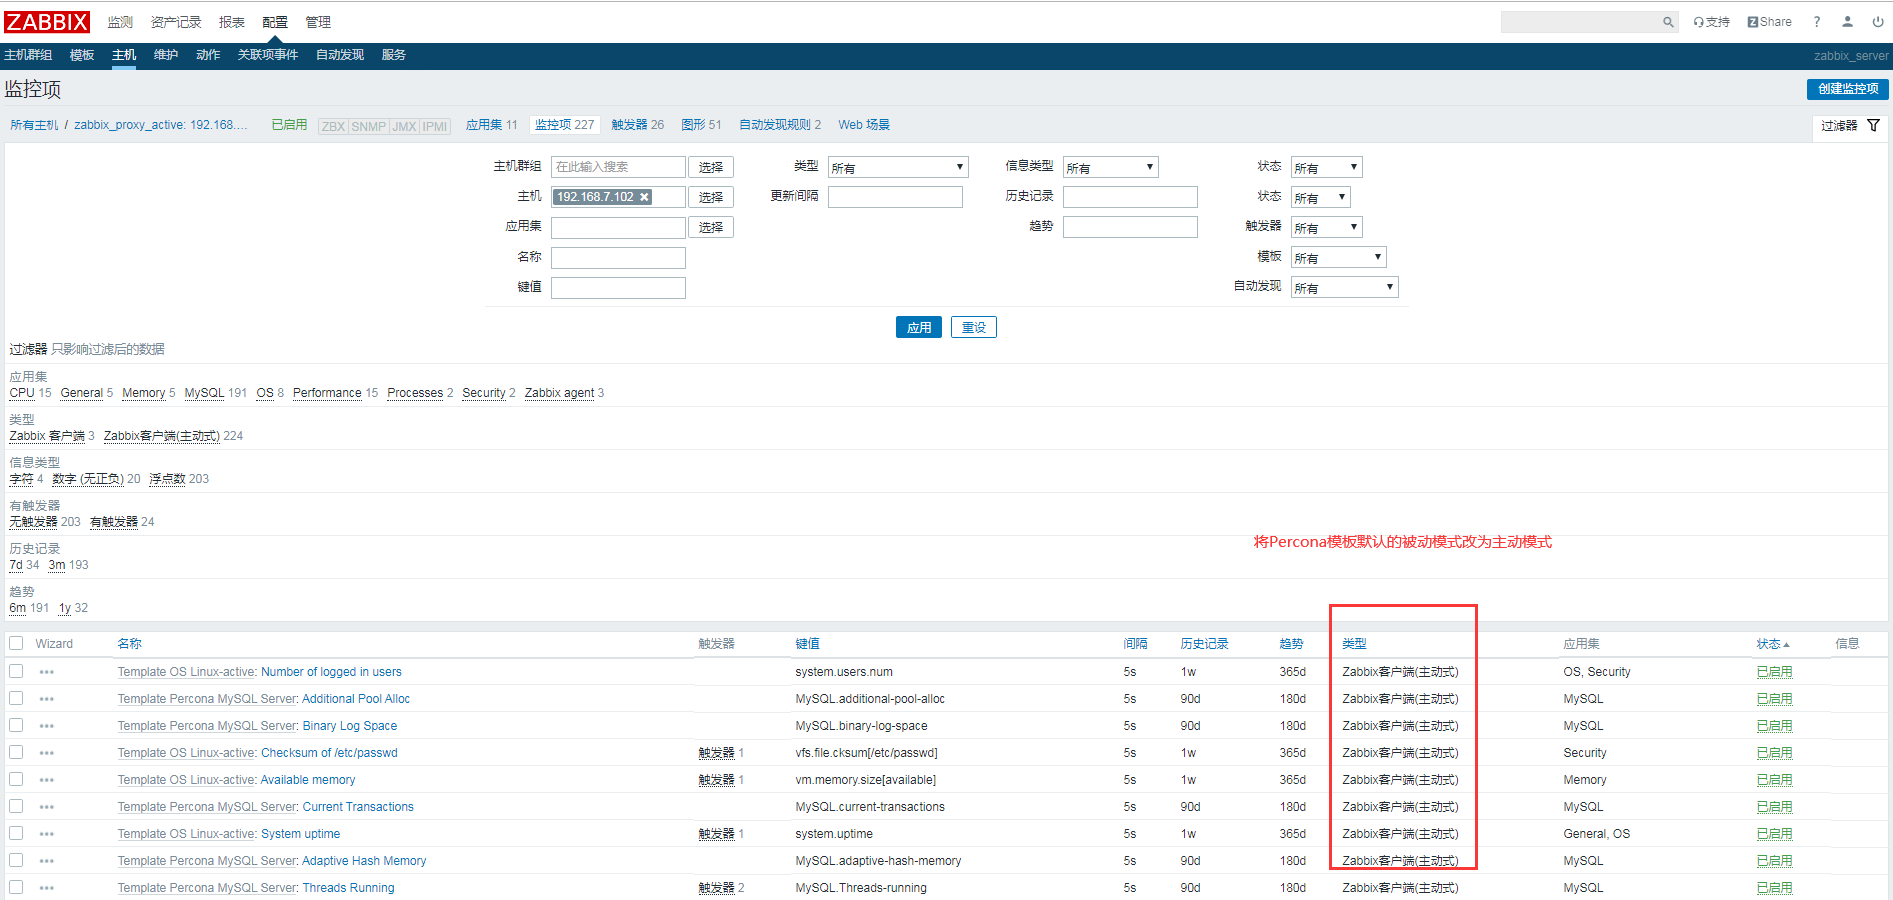
(5)此时可以看到从服务器的主机的zabbix-agent变绿了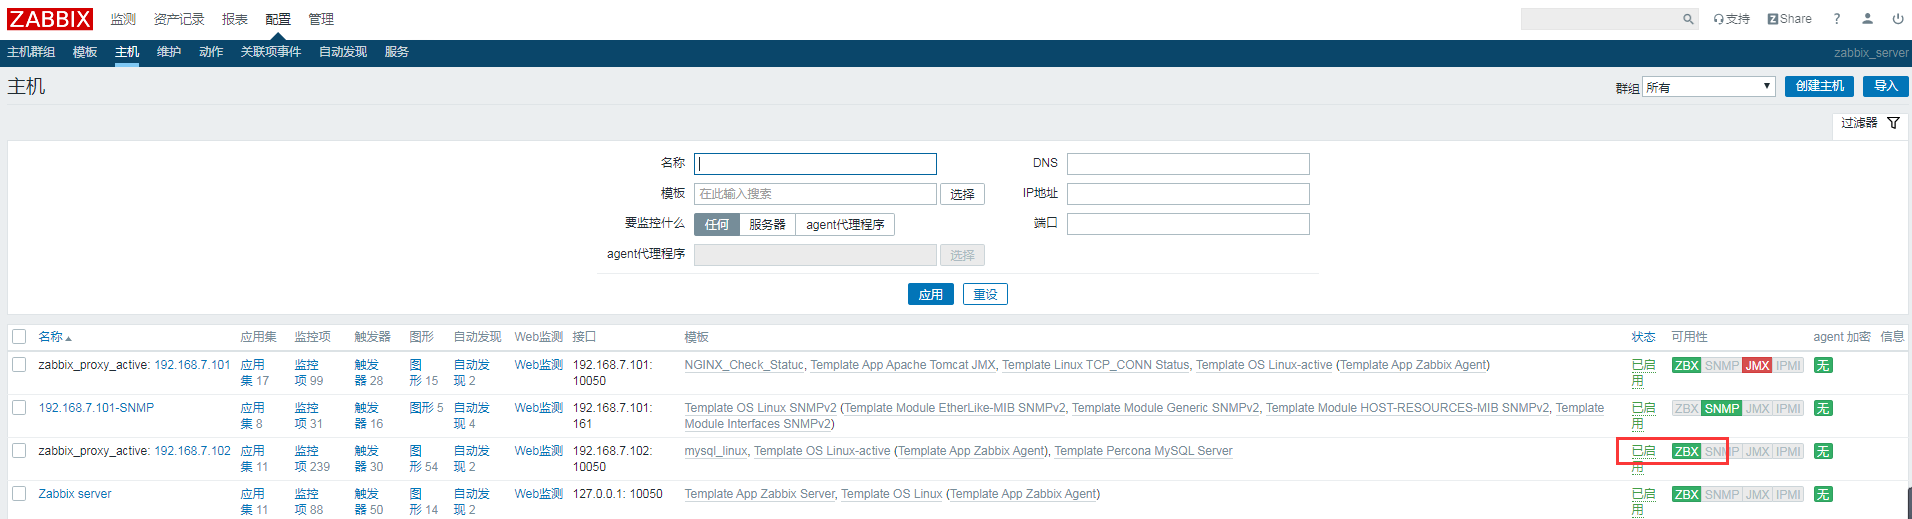
(6)查看此时监控的结果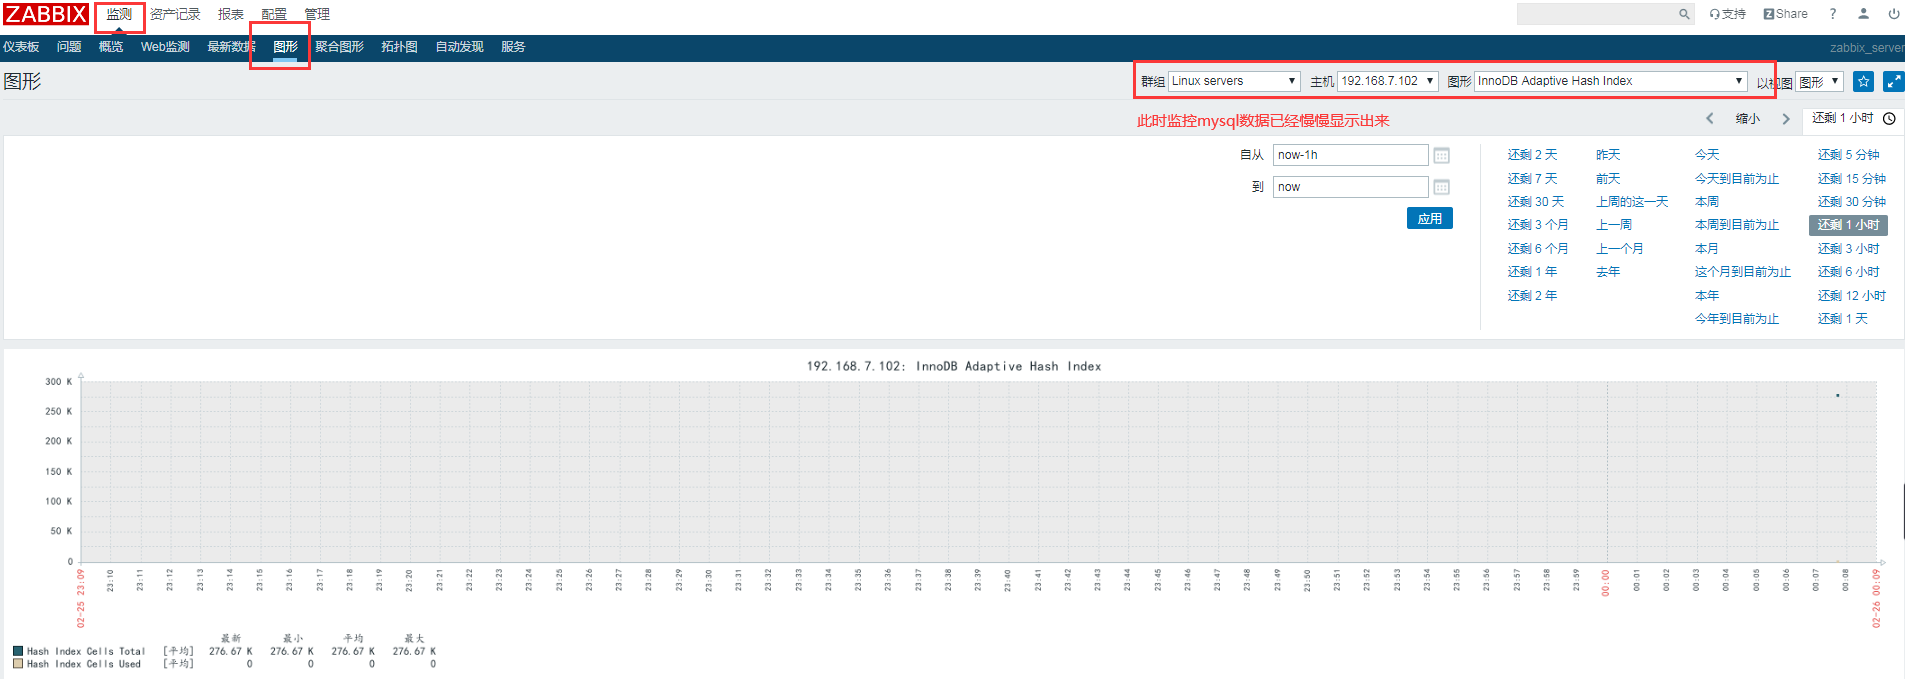
实战二:自定义监控项监控数据库
在从服务器上创建检查主从同步自定义监控脚本
(1)在从服务器上/etc/zabbix/zabbix_agentd.d/目录下创建脚本,调用脚本查看返回的值,脚本名称为mysql_monitor.sh
#!/bin/bash
Seconds_Behind_Master(){
        NUM=`mysql -uroot -hlocalhost   -e "show slave statusG;"  | grep "Seconds_Behind_Master:" | awk -F: '{print $2}'`
        echo $NUM
}

master_slave_check(){
NUM1=`mysql -uroot -hlocalhost   -e "show slave statusG;"  | grep "Slave_IO_Running" | awk -F:  '{print $2}' | sed 's/^[ 	]*//g'`
#echo $NUM1
NUM2=`mysql -uroot -hlocalhost   -e "show slave statusG;"  | grep "Slave_SQL_Running:" | awk -F:  '{print $2}' | sed 's/^[ 	]*//g'`
#echo $NUM2
if test $NUM1 == "Yes" &&  test $NUM2 == "Yes";then
    echo 50
else
    echo 100
fi
}

main(){
    case $1 in
        Seconds_Behind_Master)
           Seconds_Behind_Master;
           ;;
        master_slave_check)
           master_slave_check
           ;;
    esac
}
main $1
(2)验证脚本返回值,检查返回为50,时延返回为0,说明没问题。
[root@node2 zabbix_agentd.d]# bash mysql_monitor.sh  master_slave_check
50
[root@node2 zabbix_agentd.d]# bash mysql_monitor.sh  Seconds_Behind_Master
0
(3)将mysql_monitor.sh加上执行权限
# chomd +x mysql_monitor.sh
(4)创建一个调用脚本的文件:vim /etc/zabbix/zabbix_agentd.d/mysql_monitor.conf
UserParameter=mysql_monitor[*],/etc/zabbix/zabbix_agentd.d/mysql_monitor.sh $1
(5)重启zabbix-agent服务,并在zabbix-server服务器端验证返回效果:systemctl restart zabbix-agent
(6)在zabbix-server服务器端进行验证此时的脚本返回值,和在服务器上返回一致。
[root@zabbix ~]# zabbix_get -s 192.168.7.102 -p 10050 -k "mysql_monitor[master_slave_check]"
50
[root@zabbix ~]# zabbix_get -s 192.168.7.102 -p 10050 -k "mysql_monitor[Seconds_Behind_Master]"
0
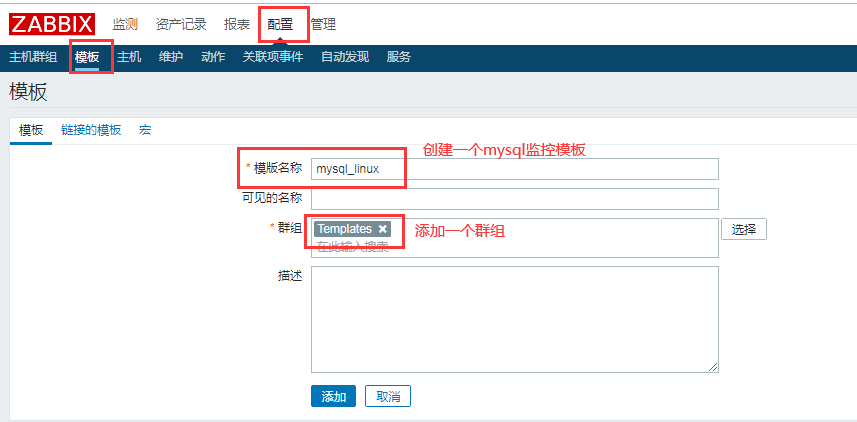
4、在zabbix网页上创建模板,关联proxy主动模式代理的模板
(1)创建mysql_linux模板
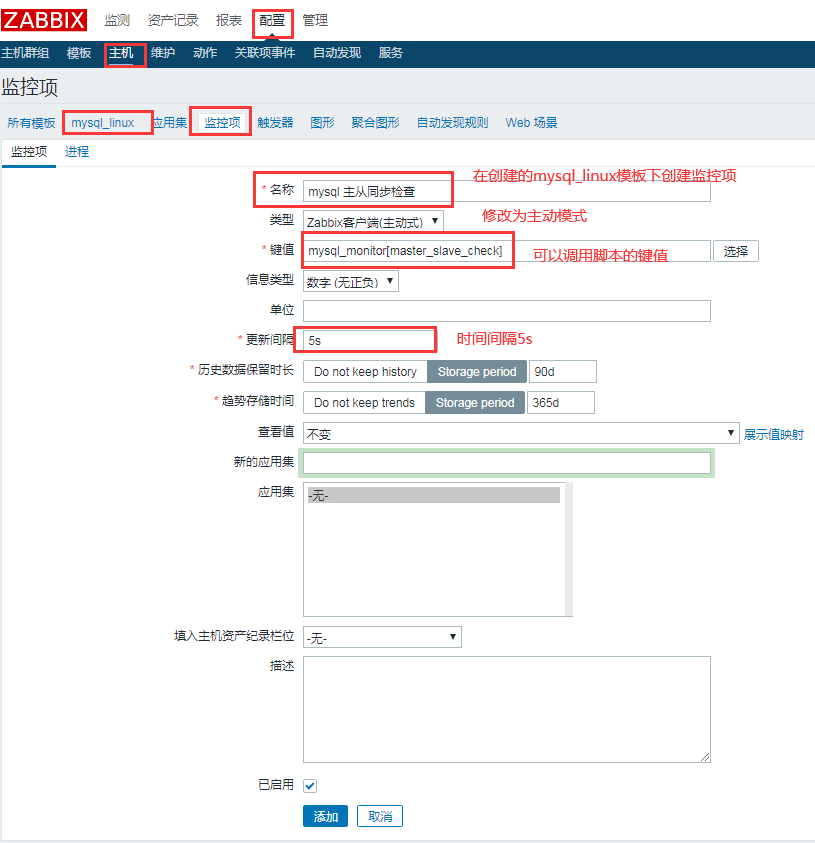
(2)创建在创建了mysql_linux模板下,创建监控项
(3)添加从服务器主机
(4)将从服务器关联到创建mysql监控的模板上。

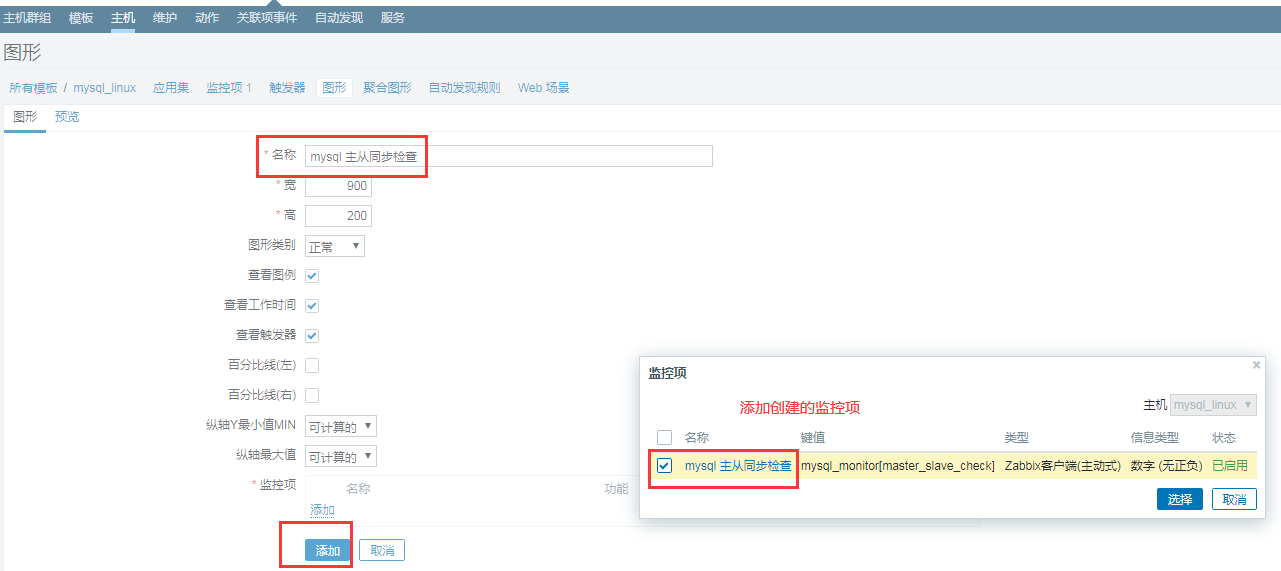
(5)创建主从同步检查的图形
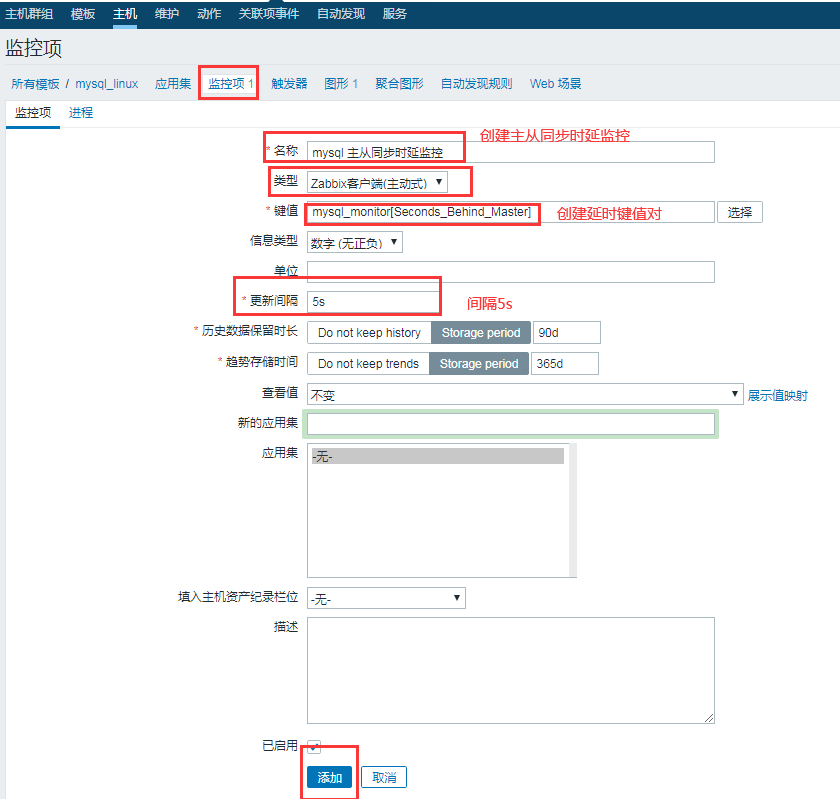
(6)创建mysql时延监控项
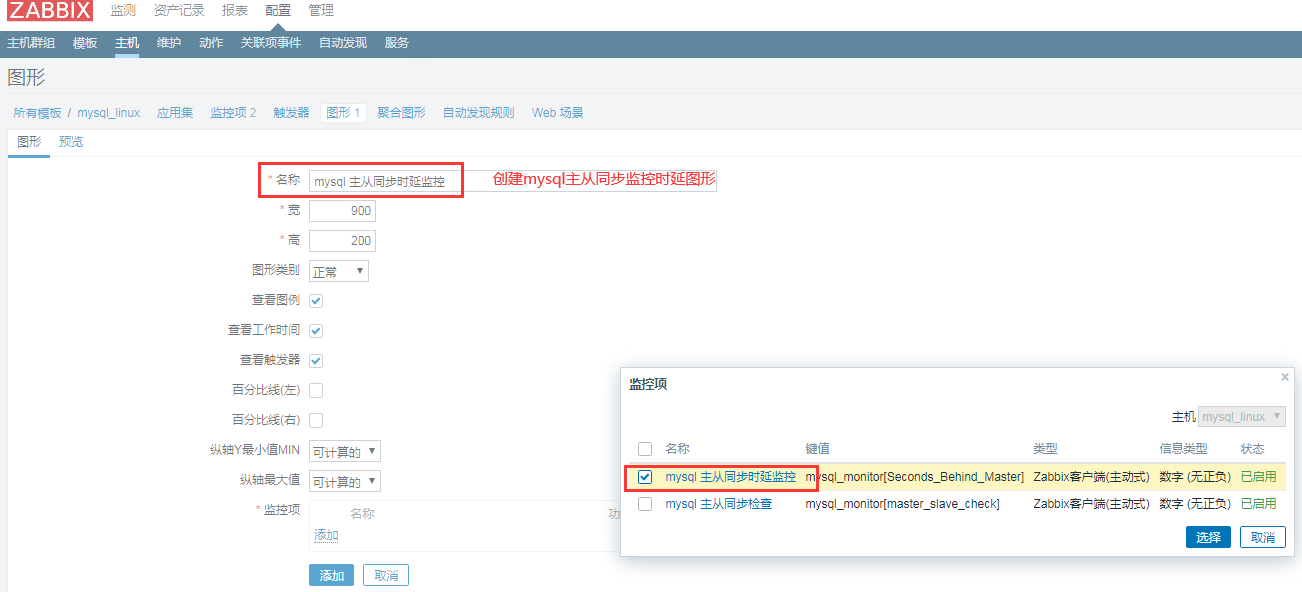
(7)创建mysql时延监控图形
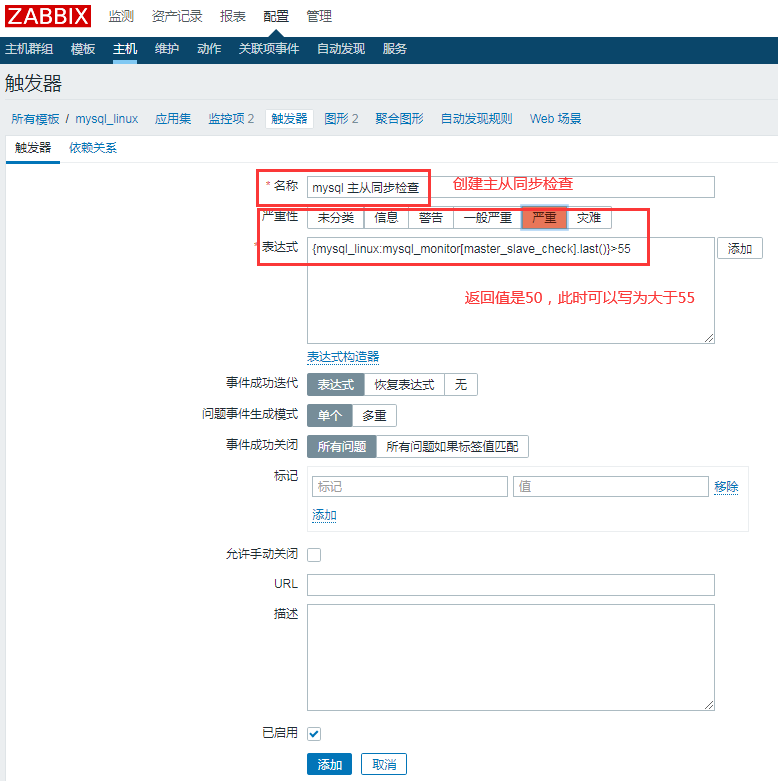
(8)创建mysql主从同步检查触发器
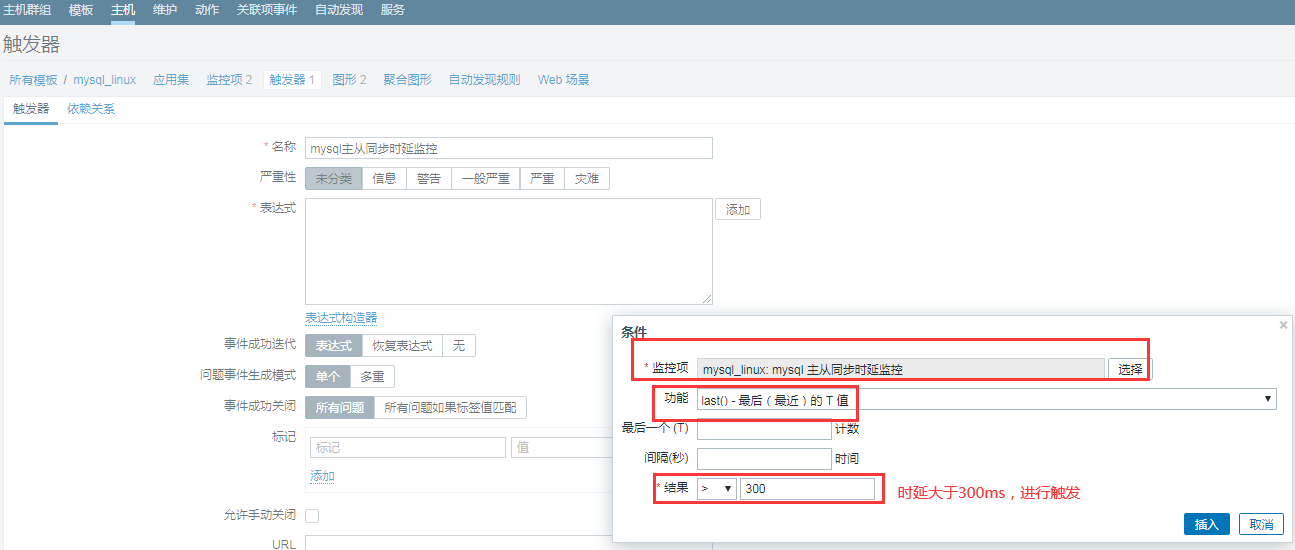
(9)创建主从同步延时触发器,时延大于300ms就会触发动作
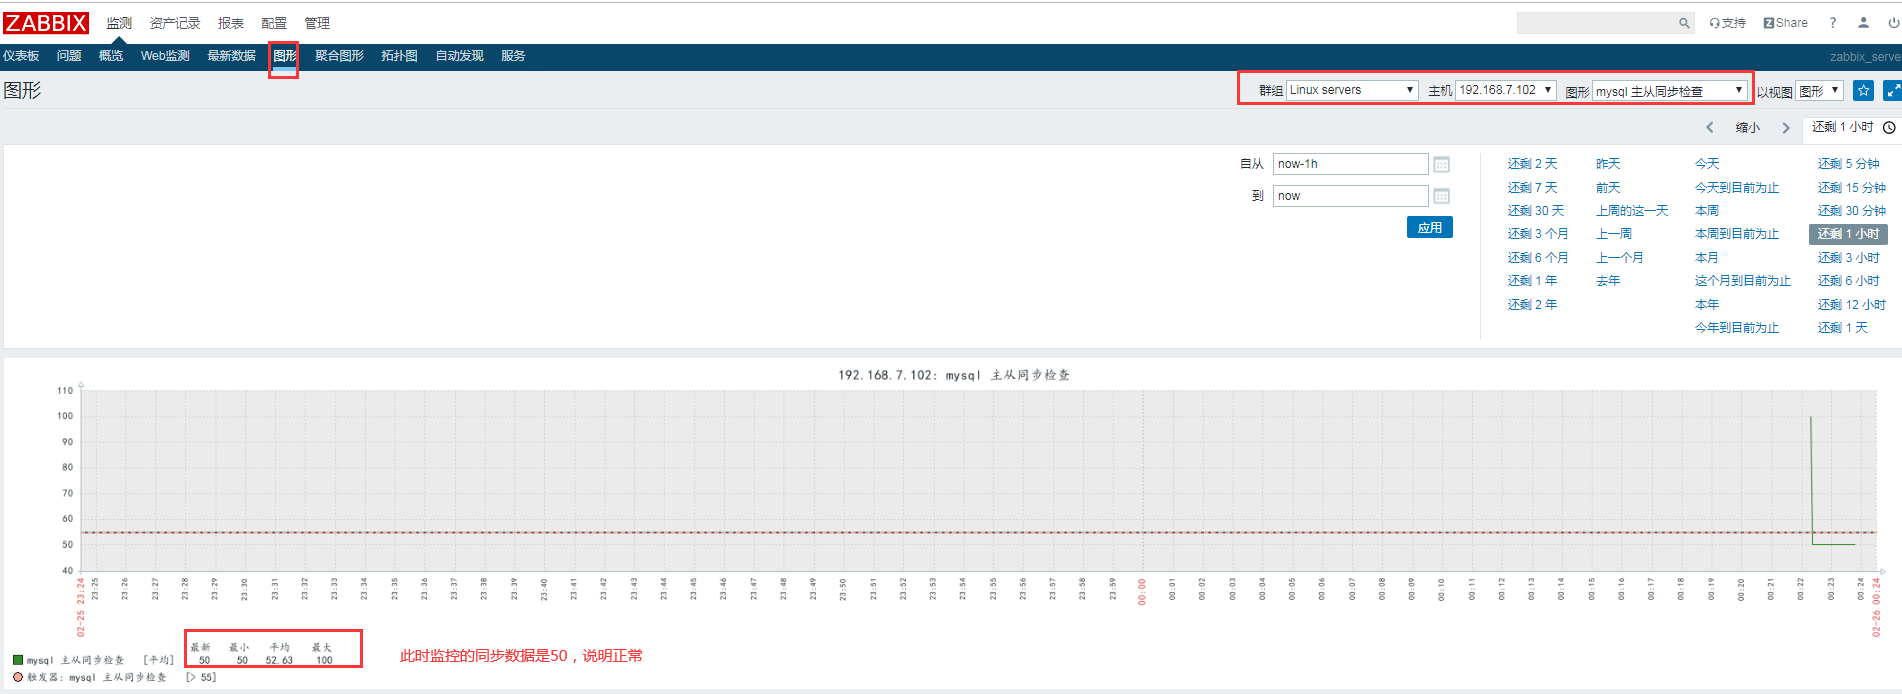
(10)查看此时的mysql监控时延信息。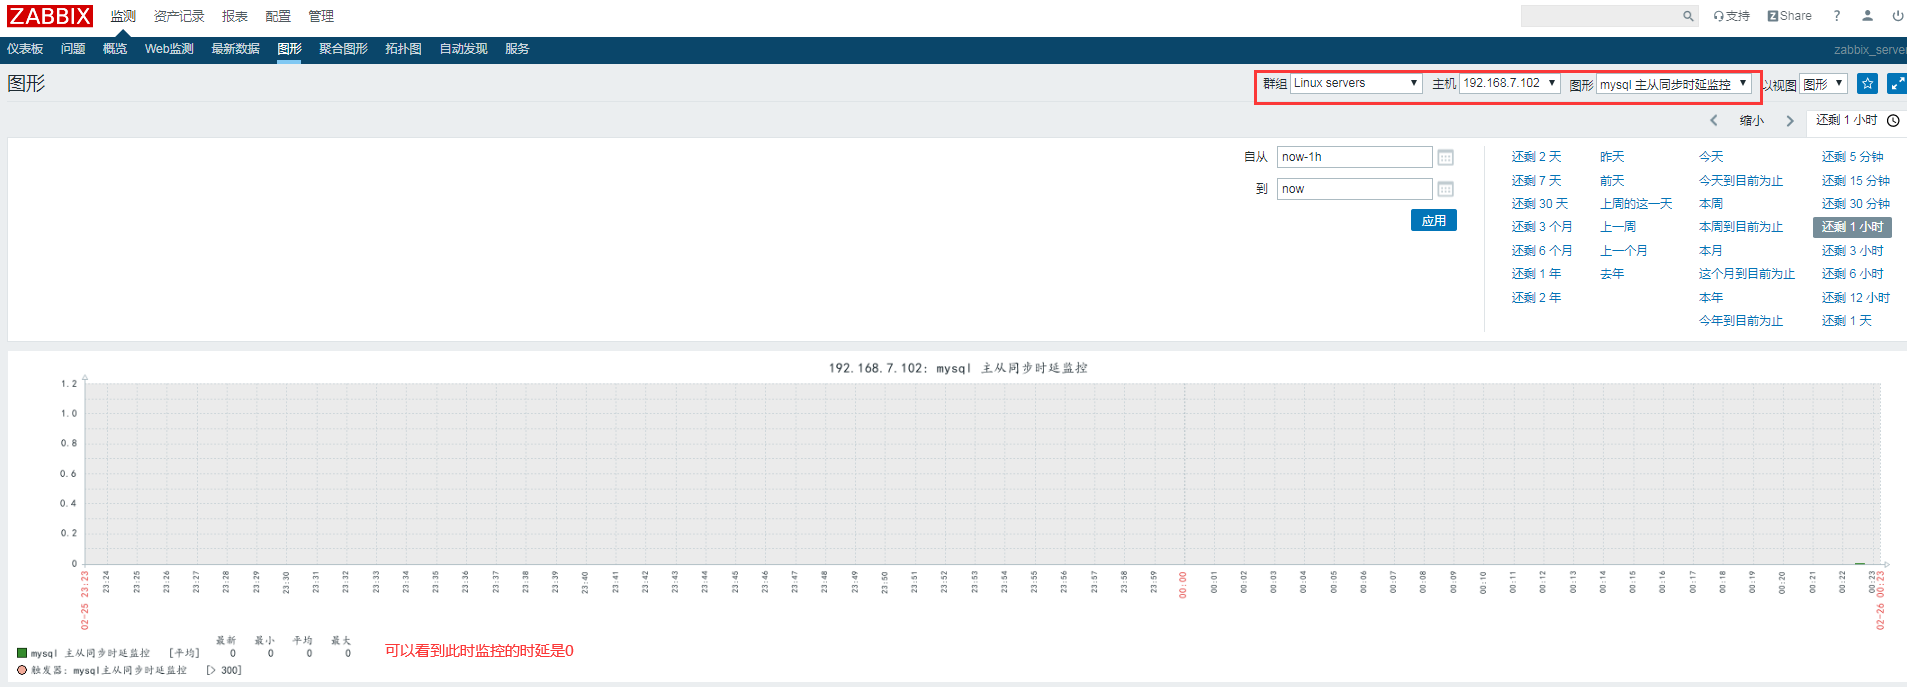
(11)查看mysql监控的同步信息