备份和恢复
(1)为什么要备份
灾难恢复:硬件故障、软件故障、自然灾害、黑客攻击、误操作测试等数据
(2)丢失场景
备份注意要点 能容忍最多丢失多少数据 恢复数据需要在多长时间内完成 需要恢复哪些数据
(3)还原要点
做还原测试,用于测试备份的可用性 还原演练
备份类型:
完全备份,部分备份
完全备份:整个数据集
部分备份:只备份数据子集,如部分库或表
完全备份、增量备份、差异备份
增量备份:仅备份最近一次完全备份或增量备份(如果存在增量)以来变化的数据,备份较快,还原复杂
差异备份:仅备份最近一次完全备份以来变化的数据,
备份较慢,还原简单
注意:二进制日志文件不应该与数据文件放在同一磁盘
冷、温、热备份
冷备:读写操作均不可进行
温备:读操作可执行;但写操作不可执行
热备:读写操作均可执行
MyISAM:温备,不支持热备
InnoDB:都支持
物理和逻辑备份
 物理备份:直接复制数据文件进行备份,与存储引擎有关,占用较多的空间,速度快
 逻辑备份:从数据库中“导出”数据另存而进行的备份,与存储引擎无关,占用空间少,速度慢,可能丢失精度
冷备份完全备份操作过程:特点,备份速度快,但是需要关闭服务器才能操作。
(1)需要将两个主机A和B的mysql服务都停止掉:A备份到B主机上
systemctl stop mariadb
(2)将主机A的/etc/my.cnf配置文件复制到B主机:
[root@centos7.ssh]#scp /etc/my.cnf 192.168.34.102:/etc/    将A主机的mysql配置文件复制到B主机上
The authenticity of host '192.168.34.102 (192.168.34.102)' can't be established.
ECDSA key fingerprint is SHA256:nl4GdONb/BsSo/TpR+UHsM/gFo4+tLpD40NhCklkf7M.
ECDSA key fingerprint is MD5:55:a8:61:99:c3:52:fd:25:80:95:21:88:2b:98:1b:87.
Are you sure you want to continue connecting (yes/no)? yes
Warning: Permanently added '192.168.34.102' (ECDSA) to the list of known hosts.
root@192.168.34.102's password:
my.cnf                                                                                               100%  739   393.7KB/s   00:00
(3)在B主机上新建一个二进制日志指定路径的文件:
mkdir  /data/logbin   新建二进制日志文件路径
chown -R mysql.mysql /data/login   修改所有者,所属组权限
(4)将A主机的数据库文件复制到B主机上
[root@centos7.ssh]#scp -rp /var/lib/mysql/* 192.168.34.102:/var/lib/mysql/
(5)修改B主机的数据库所有者和所属组权限
[root@centos7-1.ssh]#chown -R mysql.mysql /var/lib/mysql
备份和恢复
备份时需要考虑的因素
温备的持锁多久
备份产生的负载
备份过程的时长
恢复过程的时长
备份什么
数据
二进制日志、InnoDB的事务日志
程序代码(存储过程、函数、触发器、事件调度器)
服务器的配置文件
备份工具
1> cp, tar等复制归档工具:物理备份工具,适用所有存储引擎;只支持冷备;完全和部分备份
2> LVM的快照:先加锁,做快照后解锁,几乎热备;借助文件系统工具进行备份
3> mysqldump:逻辑备份工具,适用所有存储引擎,温备;支持完全或部分备份;对InnoDB存储引擎支持热备,结合binlog的增量备份
4> xtrabackup:由Percona提供支持对InnoDB做热备(物理备份)的工具,支持完全备份、增量备份
5> MariaDB Backup: 从MariaDB 10.1.26开始集成,基于Percona XtraBackup 2.3.8实现
6> mysqlbackup:热备份, MySQL Enterprise Edition组件
7> mysqlhotcopy:PERL 语言实现,几乎冷备,仅适用于MyISAM存储引擎,使用LOCK TABLES、FLUSH TABLES和cp或scp来快速备份数据库
基于LVM的备份
(1) 请求锁定所有表 mysql> FLUSH TABLES WITH READ LOCK; (2) 记录二进制日志文件及事件位置 mysql> FLUSH LOGS; mysql> SHOW MASTER STATUS; mysql -e 'SHOW MASTER STATUS' > /PATH/TO/SOMEFILE (3) 创建快照 lvcreate -L # -s -p r -n NAME /DEV/VG_NAME/LV_NAME (4) 释放锁 mysql> UNLOCK TABLES; (5) 挂载快照卷,执行数据备份 (6) 备份完成后,删除快照卷 (7) 制定好策略,通过原卷备份二进制日志
基于LVM的备份操作:
(1)将/dev/sda磁盘进行分区。
[root@centos7-1lib]#fdisk /dev/sda      #将/dev/sda进行磁盘分区
Welcome to fdisk (util-linux 2.23.2).

Changes will remain in memory only, until you decide to write them.
Be careful before using the write command.

Command (m for help): n   对磁盘进行分区
All primary partitions are in use
Adding logical partition 6
First sector (322967552-419430399, default 322967552):
Using default value 322967552
Last sector, +sectors or +size{K,M,G} (322967552-419430399, default 419430399): +5G  选择5的磁盘
Partition 6 of type Linux and of size 5 GiB is set
Command (m for help): t  查看磁盘类型
Partition number (1-6, default 6): 6
Hex code (type L to list all codes): L

 0  Empty           24  NEC DOS         81  Minix / old Lin bf  Solaris
 1  FAT12           27  Hidden NTFS Win 82  Linux swap / So c1  DRDOS/sec (FAT-
 2  XENIX root      39  Plan 9          83  Linux           c4  DRDOS/sec (FAT-
 3  XENIX usr       3c  PartitionMagic  84  OS/2 hidden C:  c6  DRDOS/sec (FAT-
 4  FAT16 <32M      40  Venix 80286     85  Linux extended  c7  Syrinx
 5  Extended        41  PPC PReP Boot   86  NTFS volume set da  Non-FS data
 6  FAT16           42  SFS             87  NTFS volume set db  CP/M / CTOS / .
 7  HPFS/NTFS/exFAT 4d  QNX4.x          88  Linux plaintext de  Dell Utility
 8  AIX             4e  QNX4.x 2nd part 8e  Linux LVM       df  BootIt
 9  AIX bootable    4f  QNX4.x 3rd part 93  Amoeba          e1  DOS access
 a  OS/2 Boot Manag 50  OnTrack DM      94  Amoeba BBT      e3  DOS R/O
 b  W95 FAT32       51  OnTrack DM6 Aux 9f  BSD/OS          e4  SpeedStor
 c  W95 FAT32 (LBA) 52  CP/M            a0  IBM Thinkpad hi eb  BeOS fs
 e  W95 FAT16 (LBA) 53  OnTrack DM6 Aux a5  FreeBSD         ee  GPT
 f  W95 Ext'd (LBA) 54  OnTrackDM6      a6  OpenBSD         ef  EFI (FAT-12/16/
10  OPUS            55  EZ-Drive        a7  NeXTSTEP        f0  Linux/PA-RISC b
11  Hidden FAT12    56  Golden Bow      a8  Darwin UFS      f1  SpeedStor
12  Compaq diagnost 5c  Priam Edisk     a9  NetBSD          f4  SpeedStor
14  Hidden FAT16 <3 61  SpeedStor       ab  Darwin boot     f2  DOS secondary
16  Hidden FAT16    63  GNU HURD or Sys af  HFS / HFS+      fb  VMware VMFS
17  Hidden HPFS/NTF 64  Novell Netware  b7  BSDI fs         fc  VMware VMKCORE
18  AST SmartSleep  65  Novell Netware  b8  BSDI swap       fd  Linux raid auto
1b  Hidden W95 FAT3 70  DiskSecure Mult bb  Boot Wizard hid fe  LANstep
1c  Hidden W95 FAT3 75  PC/IX           be  Solaris boot    ff  BBT
1e  Hidden W95 FAT1 80  Old Minix
Hex code (type L to list all codes): 8e  选择8e,就是逻辑卷LVM格式的磁盘

WARNING: If you have created or modified any DOS 6.xpartitions, please see the fdisk manual page for additionalinformation.

Changed type of partition 'FAT12' to 'Linux LVM'

Command (m for help): w  进行保存磁盘
The partition table has been altered!

Calling ioctl() to re-read partition table.

WARNING: Re-reading the partition table failed with error 16: Device or resource busy.
The kernel still uses the old table. The new table will be used at
the next reboot or after you run partprobe(8) or kpartx(8)
Syncing disks.
(2)对磁盘进行同步,此时的同步方法是centos7的同步方式:
[root@centos7-1lib]#partprobe
Warning: Unable to open /dev/sr0 read-write (Read-only file system).  /dev/sr0 has been opened read-only.
[root@centos7-1lib]#lsblk
NAME   MAJ:MIN RM  SIZE RO TYPE MOUNTPOINT
sda      8:0    0  200G  0 disk
├─sda1   8:1    0    1G  0 part /boot
├─sda2   8:2    0  100G  0 part /
├─sda3   8:3    0   50G  0 part /data
├─sda4   8:4    0    1K  0 part
├─sda5   8:5    0    3G  0 part [SWAP]
└─sda6   8:6    0    5G  0 part
sr0     11:0    1   10G  0 rom
(3)创建物理卷、创建卷组、创建逻辑卷,并将卷组加入到逻辑卷中。
[root@centos7-1lib]#pvcreate /dev/sda6   创建物理卷
  Physical volume "/dev/sda6" successfully created.
[root@centos7-1lib]#vgcreate vg0 /dev/sda6  创建卷组
  Volume group "vg0" successfully created
[root@centos7-1lib]#lvcreate -n mysql -L 1G vg0   创建逻辑卷,并将卷组加入到逻辑卷mysql中
  Logical volume "mysql" created.
[root@centos7-1lib]#lvcreate -n binlog -L 1G vg0   创建逻辑卷,并将卷组加入到逻辑卷binlog中
Logical volume "binlog" created.
(4)格式化两个逻辑卷:
[root@centos7-1lib]#mkfs.xfs /dev/vg0/mysql   格式化mysql逻辑卷
meta-data=/dev/vg0/mysql         isize=512    agcount=4, agsize=65536 blks
         =                       sectsz=512   attr=2, projid32bit=1
         =                       crc=1        finobt=0, sparse=0
data     =                       bsize=4096   blocks=262144, imaxpct=25
         =                       sunit=0      swidth=0 blks
naming   =version 2              bsize=4096   ascii-ci=0 ftype=1
log      =internal log           bsize=4096   blocks=2560, version=2
         =                       sectsz=512   sunit=0 blks, lazy-count=1
realtime =none                   extsz=4096   blocks=0, rtextents=0
[root@centos7-1lib]#mkfs.xfs /dev/vg0/binlog  格式化binlog逻辑卷
meta-data=/dev/vg0/binlog        isize=512    agcount=4, agsize=65536 blks
         =                       sectsz=512   attr=2, projid32bit=1
         =                       crc=1        finobt=0, sparse=0
data     =                       bsize=4096   blocks=262144, imaxpct=25
         =                       sunit=0      swidth=0 blks
naming   =version 2              bsize=4096   ascii-ci=0 ftype=1
log      =internal log           bsize=4096   blocks=2560, version=2
         =                       sectsz=512   sunit=0 blks, lazy-count=1
realtime =none                   extsz=4096   blocks=0, rtextents=0
(5)将逻辑卷挂载到新建的/data/mysql和/data/binlog目录下:
[root@centos7-1lib]#systemctl stop mariadb  停止mariadb服务
[root@centos7-1lib]#mkdir /data/{mysql,binlog}  新建mysql 和binlog目录
[root@centos7-1lib]#mount /dev/vg0/mysql /data/mysql  将mysql逻辑卷挂载到mysql目录上
[root@centos7-1lib]#mount /dev/vg0/binlog  /data/binlog   将binlog逻辑卷挂载到binlog目录上
(6)修改mysql配置文件内容:
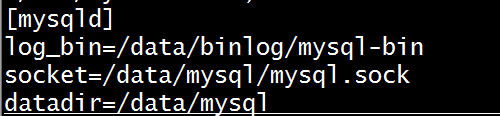
vim /etc/my.cnf
[mysqld]
log_bin=/data/binlog/mysql-bin  修改mysql的log后缀名称
socket=/data/mysql/mysql.sock   修改sock(套接字)数据路径
datadir=/data/mysql  修改mysql数据库路径
(7)将mysql数据全部复制过去
[root@centos7-1lib]#cp -av /var/lib/mysql/* /data/mysql  复制mysql的数据库,并将保留所有属性
[root@centos7-1lib]#ll /data/mysql -l   查看此时数据库的所有属性
total 28704
-rw-rw---- 1 mysql mysql    16384 Nov 22 10:44 aria_log.00000001
-rw-rw---- 1 mysql mysql       52 Nov 22 10:44 aria_log_control
drwx------ 2 mysql mysql     4096 Nov 20 15:52 hellodb
-rw-rw---- 1 mysql mysql 18874368 Nov 22 10:44 ibdata1
-rw-rw---- 1 mysql mysql  5242880 Nov 22 10:44 ib_logfile0
-rw-rw---- 1 mysql mysql  5242880 Nov 12 14:47 ib_logfile1
drwx------ 2 mysql mysql     4096 Nov 12 14:47 mysql
drwx------ 2 mysql mysql     4096 Nov 12 14:47 performance_schema
drwx------ 2 mysql mysql      128 Nov 14 21:20 studentdb
drwx------ 2 mysql mysql       20 Nov 12 15:17 testdb
[root@centos7-1lib]#ll /data/    查看新建在data下的mysql和binlog目录的所有者和所属组都是root,需要修改为mysql属性。
total 16
drwxr-xr-x 2 root root 6 Nov 22 10:45 binlog
drwxr-xr-x. 150 root root 8192 Nov 17 16:03 etc2019-11-17
drwxr-xr-x 2 mysql mysql 4096 Nov 22 09:21 logbin
drwxr-xr-x 2 mysql mysql 44 Nov 20 09:29 logs
drwxr-xr-x 7 root root 193 Nov 22 10:56 mysql
drwxr-xr-x 2 root root 297 Nov 17 20:38 scripts
[root@centos7-1lib]#chown -R mysql.mysql /data/mysql /data/binlog  将两个数据库的属性都改为mysql
(8)启动mysql服务:
[root@centos7-1lib]#systemctl start mariadb  启动mysql服务
[root@centos7-1lib]#ss -nlt  查看此时mysql的3306端口已经打开
State       Recv-Q Send-Q                      Local Address:Port                                     Peer Address:Port
LISTEN      0      50                                      *:3306                                                *:*
LISTEN      0      128                                     *:57770                                               *:*
LISTEN      0      128                                     *:111                                                 *:*
LISTEN      0      128                                     *:6000                                                *:*
LISTEN      0      10                          192.168.122.1:53                                                  *:*
LISTEN      0      10                         192.168.34.117:53                                                  *:*
LISTEN      0      10                         192.168.34.102:53                                                  *:*
LISTEN      0      10                              127.0.0.1:53                                                  *:*
LISTEN      0      128                                     *:22                                                  *:*
LISTEN      0      128                             127.0.0.1:631                                                 *:*
LISTEN      0      100                             127.0.0.1:25                                                  *:*
LISTEN      0      128                             127.0.0.1:953                                                 *:*
LISTEN      0      128                             127.0.0.1:6010                                                *:*
LISTEN      0      128                                    :::47245                                              :::*
LISTEN      0      128                                    :::111                                                :::*
LISTEN      0      128                                    :::6000                                               :::*
LISTEN      0      10                                    ::1:53                                                 :::*
LISTEN      0      128                                    :::22                                                 :::*
LISTEN      0      128                                   ::1:631                                                :::*
LISTEN      0      128                                    :::23                                                 :::*
LISTEN      0      100                                   ::1:25                                                 :::*
LISTEN      0      128                                   ::1:953                                                :::*
LISTEN      0      128                                   ::1:6010                                               :::*
(9) 进入mysql客户端:
[root@centos7-1lib]#mysql -pcentos  提示客户端的路径不对,需要修改mysql配置文件。
ERROR 2002 (HY000): Can't connect to local MySQL server through socket '/tmp/mysql.sock' (2)
出现此错误问题,是由于自己的mysql数据库sock路径存在错误,需要指定自己新建的data数据库路径
第一种就是在命令行指定数据库sock文件的路径
[root@centos7-1lib]#mysql -S /data/mysql/mysql.sock -pmagedu
Welcome to the MariaDB monitor.  Commands end with ; or g.
Your MariaDB connection id is 5
Server version: 5.5.60-MariaDB MariaDB Server

Copyright (c) 2000, 2018, Oracle, MariaDB Corporation Ab and others.

Type 'help;' or 'h' for help. Type 'c' to clear the current input statement.

MariaDB [(none)]>
第二种修改客户端mysql客户端配置文件:
[root@centos7-1~]#vim /etc/my.cnf.d/mysql-clients.cnf
[client]
socket=/data/mysql/mysql.sock
第三种方式:创建软链接,也可以进入到mysql数据库。
[root@centos7-1~]#ln -s   /data/mysql/mysql.sock  /tmp/mysql.sock   给/data/mysql/mysql.sock 创建一个快捷方式 /tmp/mysql.sock
[root@centos7-1~]#ll /tmp/mysql.sock
lrwxrwxrwx 1 root root 22 Nov 22 11:21 /tmp/mysql.sock -> /data/mysql/mysql.sock    查看/tmp/mysql.sock指向的真实文件路径
[root@centos7-1~]#mysql -pmagedu     通过密码 此时已经可以登录
Welcome to the MariaDB monitor.  Commands end with ; or g.
Your MariaDB connection id is 3
Server version: 5.5.60-MariaDB MariaDB Server

Copyright (c) 2000, 2018, Oracle, MariaDB Corporation Ab and others.

Type 'help;' or 'h' for help. Type 'c' to clear the current input statement.

MariaDB [(none)]>
(10)查看当前的二进制日志文件信息:
[root@centos7-1~]#ll /data/binlog
total 20
-rw-rw---- 1 mysql mysql 264 Nov 22 11:09 mysql-bin.000001
-rw-rw---- 1 mysql mysql 264 Nov 22 11:10 mysql-bin.000002
-rw-rw---- 1 mysql mysql 264 Nov 22 11:17 mysql-bin.000003
-rw-rw---- 1 mysql mysql 245 Nov 22 11:17 mysql-bin.000004
-rw-rw---- 1 mysql mysql 120 Nov 22 11:17 mysql-bin.index
(11)对数据库进行加锁处理,新开一个窗口,不要退出mysql,否则锁就会解开。
[root@centos7-1~]#mysql -pmagedu
Welcome to the MariaDB monitor.  Commands end with ; or g.
Your MariaDB connection id is 5
Server version: 5.5.60-MariaDB MariaDB Server

Copyright (c) 2000, 2018, Oracle, MariaDB Corporation Ab and others.

Type 'help;' or 'h' for help. Type 'c' to clear the current input statement.

MariaDB [(none)]> FLUSH TABLES WITH READ LOCK;  将数据库进行加锁
Query OK, 0 rows affected (0.00 sec)
将数据库原始的信息记录保存到一个文件中,方便后期恢复数据库
[root@centos7-1~]#mysql -pmagedu -e 'show master logs' > post.log 主要记录备份后的日志文件大小,方便后面的恢复
创建数据库快照文件
[root@centos7-1~]#lvcreate -n mysql_snapshot -L 200M -s -p r /dev/vg0/mysql   创建快照文件
Logical volume "mysql_snapshot" created.
解锁数据库:
MariaDB [hellodb]> unlock tables;
在数据库中插入内容
MariaDB [hellodb]> insert students(name)values('e');
Query OK, 1 row affected, 1 warning (0.01 sec)

MariaDB [hellodb]> insert students(name)values('f');
Query OK, 1 row affected, 1 warning (0.00 sec)

MariaDB [hellodb]> insert students(name)values('g');
Query OK, 1 row affected, 1 warning (0.01 sec)
将快照挂载到临时文件上:
[root@centos7-1~]#blkid
/dev/sr0: UUID="2018-11-26-14-22-58-00" LABEL="CentOS 7 x86_64" TYPE="iso9660" PTTYPE="dos"
/dev/sda1: UUID="4357cc0e-6ee7-4a8f-8064-d1a54bdbf17f" TYPE="xfs"
/dev/sda2: UUID="38dd5f68-4f30-411c-b80a-0f4a60b06c6f" TYPE="xfs"
/dev/sda3: UUID="eb4bf5e6-2645-4b1c-bda8-12c5831b81c2" TYPE="xfs"
/dev/sda5: UUID="b8c37e0b-3628-40b6-ac44-c36ca09b448f" TYPE="swap"
/dev/sda6: UUID="86lOOC-6LED-5egR-hHaq-COSf-GvV5-joolGR" TYPE="LVM2_member"
/dev/mapper/vg0-mysql: UUID="a4722f63-5099-4a81-a2c6-886b659e7e9b" TYPE="xfs"    此时的卷组和快照卷组UUID一致,无法挂载
/dev/mapper/vg0-binlog: UUID="6c50f626-172a-44e6-af04-8fd187db96d5" TYPE="xfs"
/dev/mapper/vg0-mysql_snapshot: UUID="a4722f63-5099-4a81-a2c6-886b659e7e9b" TYPE="xfs"   此时的快照和mysql卷组UUID一致,所以需要加上nouuid挂载
[root@centos7-1~]#mount -o nouuid,norecovery  /dev/vg0/mysql_snapshot  /mnt    由于之前创建逻辑卷时,显示的是只读文件,所以要进行norecovery进行挂载
mount: /dev/mapper/vg0-mysql_snapshot is write-protected, mounting read-only
备份数据库文件内容:
[root@centos7-1~]#tar cvf /root/mysql.tar /mnt 将数据库文件备份到 root目录下,会忽略sock文件,不影响,因为启动mysql服务时就会自动生成新的sock文件
此时备份已经完成,需要将快照删除:
[root@centos7-1~]#umount /mnt   卸载当前的挂载
[root@centos7-1~]#lvremove  /dev/vg0/mysql_snapshot  删除快照
Do you really want to remove active logical volume vg0/mysql_snapshot? [y/n]: y
  Logical volume "mysql_snapshot" successfully removed
此时模拟删库:
[root@centos7-1~]#rm -rf /data/mysql/*
开始恢复数据库文件:
[root@centos7-1~]#tar -xvf mysql.tar    将备份的数据库文件解压到当前目录,此时会解开的目录是mnt
[root@centos7-1~]#mv mnt/*  /data/mysql/   将mnt下的所有文件复制到/data/mysql目录下,此时完成数据库的数据恢复
[root@centos7-1~]#ll /data/mysql
total 28704
-rw-rw---- 1 mysql mysql    16384 Nov 22 11:17 aria_log.00000001
-rw-rw---- 1 mysql mysql       52 Nov 22 11:17 aria_log_control
drwx------ 2 mysql mysql     4096 Nov 20 15:52 hellodb
-rw-rw---- 1 mysql mysql 18874368 Nov 22 12:12 ibdata1
-rw-rw---- 1 mysql mysql  5242880 Nov 22 12:12 ib_logfile0
-rw-rw---- 1 mysql mysql  5242880 Nov 12 14:47 ib_logfile1
drwx------ 2 mysql mysql     4096 Nov 12 14:47 mysql
drwx------ 2 mysql mysql     4096 Nov 12 14:47 performance_schema
drwx------ 2 mysql mysql      128 Nov 14 21:20 studentdb
drwx------ 2 mysql mysql       20 Nov 12 15:17 testdb
此时我们查看到当前的数据只恢复了修改前的那些数据,我们想把所有的数据库全部还原,那怎么办呢?
[root@centos7-1~]#mysql -pmagedu
Welcome to the MariaDB monitor.  Commands end with ; or g.
Your MariaDB connection id is 3
Server version: 5.5.60-MariaDB MariaDB Server

Copyright (c) 2000, 2018, Oracle, MariaDB Corporation Ab and others.

Type 'help;' or 'h' for help. Type 'c' to clear the current input statement.
MariaDB [(none)]> use hellodb;
Database changed

MariaDB [hellodb]> select * from students;
+-------+---------------+-----+--------+---------+-----------+
| StuID | Name          | Age | Gender | ClassID | TeacherID |
+-------+---------------+-----+--------+---------+-----------+
|     1 | Shi Zhongyu   |  22 | M      |       2 |         3 |
|    38 | a             |   0 | F      |    NULL |      NULL |
|    39 | b             |   0 | F      |    NULL |      NULL |
|    40 | c             |   0 | F      |    NULL |      NULL |
|    41 | d             |   0 | F      |    NULL |      NULL |
+-------+---------------+-----+--------+---------+-----------+
40 rows in set (0.01 sec)
此时需要我们还原二进制日志文件,在还原之前不能允许所有用户访问数据库,可以通过防火墙去阻挡其他用户登录,恢复过程中不能关闭mysql数据库:
首先在数据库中将日志生成开关临时关闭:
set sql_log_bin=off;
然后再打开一个centos7窗口,将二进制日志文件导入到指定的目录中
[root@centos7-1~]#cd /data/binlog    我们去切换到二进制日志目录下
[root@centos7-1binlog]#mysqlbinlog  --start-position=1365  mysql-bin.000001 > incr.sql   然后将修改前记录的日志文件1导入到incr.sql目录中
[root@centos7-1binlog]#mysqlbinlog  mysql-bin.000002 >> incr.sql   第二个二进制日志文件全部导入到incr.sql目录中
[root@centos7-1binlog]#ls
incr.sql  mysql-bin.000001  mysql-bin.000002  mysql-bin.000003  mysql-bin.000004  mysql-bin.000005  mysql-bin.index
[root@centos7-1binlog]#mysqlbinlog  mysql-bin.000003 >> incr.sql   第三个导入到日志中
[root@centos7-1binlog]#mysqlbinlog  mysql-bin.000004 >> incr.sql   第四个导入到日志中
[root@centos7-1binlog]#mysqlbinlog  mysql-bin.000005 >> incr.sql   第五个导入到日志中
最后我们在未关闭的mysql窗口里进行导入二进制日志文件,恢复文件内容,此时基于LVM备份的基本操作全部完成。
MariaDB [hellodb]> source /data/binlog/incr.sql  将二进制日志文件导入到mysql数据库中
MariaDB [hellodb]> use hellodb;   此时切换当前的数据库
MariaDB [hellodb]> select * from students;  查看数据库表内的内容,此时数据库全部还原
+-------+---------------+-----+--------+---------+-----------+
| StuID | Name          | Age | Gender | ClassID | TeacherID |
+-------+---------------+-----+--------+---------+-----------+
|    38 | a             |   0 | F      |    NULL |      NULL |
|    39 | b             |   0 | F      |    NULL |      NULL |
|    40 | c             |   0 | F      |    NULL |      NULL |
|    41 | d             |   0 | F      |    NULL |      NULL |
|    42 | e             |   0 | F      |    NULL |      NULL |
|    43 | f             |   0 | F      |    NULL |      NULL |
|    44 | g             |   0 | F      |    NULL |      NULL |
+-------+---------------+-----+--------+---------+-----------+
删除之前的所有物理组,卷组和逻辑卷:
[root@centos7-1~]#lvremove /dev/vg0/mysql  删除mysql逻辑卷
Do you really want to remove active logical volume vg0/mysql? [y/n]: y
  Logical volume "mysql" successfully removed
[root@centos7-1~]#lvremove /dev/vg0/binlog  删除binlog逻辑卷
Do you really want to remove active logical volume vg0/binlog? [y/n]: y
  Logical volume "binlog" successfully removed
[root@centos7-1~]#vgremove vg0  删除vg0卷组
  Volume group "vg0" successfully removed
[root@centos7-1~]#pvremove /dev/sda6 删除sda6物理卷
删除多分出来的分区:
[root@centos7-1~]#fdisk /dev/sda  删除磁盘分区
Welcome to fdisk (util-linux 2.23.2).

Changes will remain in memory only, until you decide to write them.
Be careful before using the write command.


Command (m for help): d     删除
Partition number (1-6, default 6): 6  删除sda6分区
Partition 6 is deleted

Command (m for help): w  保存
The partition table has been altered!

Calling ioctl() to re-read partition table.

WARNING: Re-reading the partition table failed with error 16: Device or resource busy.
The kernel still uses the old table. The new table will be used at
the next reboot or after you run partprobe(8) or kpartx(8)
Syncing disks.
[root@centos7-1~]#partprobe  同步之前删除的磁盘分区
Warning: Unable to open /dev/sr0 read-write (Read-only file system).  /dev/sr0 has been opened read-only.
[root@centos7-1~]#lsblk  查看此时的分区情况
NAME   MAJ:MIN RM  SIZE RO TYPE MOUNTPOINT
sda      8:0    0  200G  0 disk
├─sda1   8:1    0    1G  0 part /boot
├─sda2   8:2    0  100G  0 part /
├─sda3   8:3    0   50G  0 part /data
├─sda4   8:4    0    1K  0 part
└─sda5   8:5    0    3G  0 part [SWAP]
sr0     11:0    1   10G  0 rom
mysqldump备份用法
1> 逻辑备份工具:mysqldump, mydumper, phpMyAdmin
2> Schema和数据存储在一起、巨大的SQL语句、单个巨大的备份文件
3> mysqldump工具:客户端命令,通过mysql协议连接至mysql服务器进行备份
mysqldump [OPTIONS] database [tables]
mysqldump [OPTIONS] –B DB1 [DB2 DB3...]
mysqldump [OPTIONS] –A [OPTIONS]
mysqldump参考:
https://dev.mysql.com/doc/refman/5.7/en/mysqldump.html
第一种数据库备份方法:
(1)对数据库进行备份,备份的数据库,此方法还原数据库,需要创建数据库,由于不知道原始的数据库属性和内容,创建新的数据库,不清楚数据库很多结构内容,不建议使用:
[root@centos7-1~]#mysqldump -pmagedu -uroot hellodb > mysql.sql
(2)删除数据库
[root@centos7-1~]#mysql -pmagedu -e 'drop database hellodb'  删除hellodb数据库
[root@centos7-1~]#mysql -pmagedu -e 'show databases;'
+--------------------+
| Database           |
+--------------------+
| information_schema |
| mysql              |
| performance_schema |
| studentdb          |
| testdb             |
(3)还原数据库
[root@centos7-1~]#mysql -pmagedu -e 'create database hellodb;'  创建一个数据库,可能此数据库和之前不一致
[root@centos7-1~]#mysql hellodb < mysql.sql  将备份的数据库导入到hellodb数据库中
[root@centos7-1~]#mysql -pmagedu
Welcome to the MariaDB monitor.  Commands end with ; or g.
Your MariaDB connection id is 24
Server version: 5.5.60-MariaDB MariaDB Server

Copyright (c) 2000, 2018, Oracle, MariaDB Corporation Ab and others.

Type 'help;' or 'h' for help. Type 'c' to clear the current input statement.

MariaDB [(none)]> show databases;
+--------------------+
| Database           |
+--------------------+
| information_schema |
| hellodb            |
| mysql              |
| performance_schema |
| studentdb          |
| testdb             |
+--------------------+
6 rows in set (0.00 sec)

MariaDB [(none)]> use hellodb;
mysqldump常见选项:
-A, --all-databases 备份所有数据库,含create database
-B , --databases db_name… 指定备份的数据库,包括create database语句
-E, --events:备份相关的所有event scheduler
-R, --routines:备份所有存储过程和自定义函数
--triggers:备份表相关触发器,默认启用,用--skip-triggers,不备份触发器
--default-character-set=utf8 指定字符集
--master-data[=#]: 此选项须启用二进制日志
-F, --flush-logs :备份前滚动日志,锁定表完成后,执行flush logs命令,生成新的二进制日志文件,配合-A 或 -B 选项时,会导致刷新多次数据库。建议在同一时刻执行转储和日志刷新,可通过和--single-transaction或-x,--master-data 一起使用实现,此时只刷新一次日志
--compact 去掉注释,适合调试,生产不使用
-d, --no-data 只备份表结构
-t, --no-create-info 只备份数据,不备份create table
-n,--no-create-db 不备份create database,可被-A或-B覆盖
--flush-privileges 备份mysql或相关时需要使用
-f, --force 忽略SQL错误,继续执行
--hex-blob 使用十六进制符号转储二进制列,当有包括BINARY,VARBINARY,BLOB,BIT的数据类型的列时使用,避免乱码
-q, --quick 不缓存查询,直接输出,加快备份速度
1:所备份的数据之前加一条记录为CHANGE MASTER TO语句,非注释,不指定#,默认为1
2:记录为注释的CHANGE MASTER TO语句
此选项会自动关闭--lock-tables功能,自动打开-x | --lock-all-tables功能(除非开启--single-transaction)
第二种备份数据库方法:
[root@centos7-1~]#mysqldump  -pmagedu -B hellodb > hello_bak.B.sql  将数据库备份,会备份数据库的结构
[root@centos7-1~]#mysql -pmagedu -e 'drop database hellodb'  删除数据库
[root@centos7-1~]#mysql -pmagedu -e 'show databases'
+--------------------+
| Database           |
+--------------------+
| information_schema |
| mysql              |
| performance_schema |
| studentdb          |
| testdb             |
+--------------------+
[root@centos7-1~]#ls
anaconda-ks.cfg  Downloads           incr.sql              Music      mysql.tar  post.log   testdb.sql     Videos
Desktop          hello_bak.B.sql     initial-setup-ks.cfg  mysqld     Pictures   Public     testlog.sql
Documents        hellodb_innodb.sql  mnt                   mysql.sql  playbook   Templates  testlog.sql.0
[root@centos7-1~]#mysql < hello_bak.B.sql
ERROR 1045 (28000): Access denied for user 'root'@'localhost' (using password: NO)
[root@centos7-1~]#mysql -pmagedu  < hello_bak.B.sql    还原数据库,将之前备份的数据导入到mysql中
[root@centos7-1~]#mysql -pmagedu   查看数据库中的内容,此时已恢复。
Welcome to the MariaDB monitor.  Commands end with ; or g.
Your MariaDB connection id is 33
Server version: 5.5.60-MariaDB MariaDB Server

Copyright (c) 2000, 2018, Oracle, MariaDB Corporation Ab and others.

Type 'help;' or 'h' for help. Type 'c' to clear the current input statement.

MariaDB [(none)]> show databases;
+--------------------+
| Database           |
+--------------------+
| information_schema |
| hellodb            |
| mysql              |
| performance_schema |
| studentdb          |
| testdb             |
+--------------------+
6 rows in set (0.00 sec)

MariaDB [(none)]> use hellodb
Database changed
MariaDB [hellodb]> show tables ;
+-------------------+
| Tables_in_hellodb |
+-------------------+
| classes           |
| coc               |
| courses           |
| scores            |
| students          |
| teachers          |
| toc               |
+-------------------+
7 rows in set (0.00 sec)
如果我们备份的数据库比较大怎么办?那就需要压缩数据库进行备份:
第一步:将数据库进行备份并压缩:
[root@centos7-1~]#mysqldump -pmagedu -B hellodb |xz > hello.B.sql.xz 压缩为xz格式的文件
第二步:删除数据库
[root@centos7-1~]#mysql -pmagedu -e 'drop database hellodb'
第三步:解压缩备份文件并还原
[root@centos7-1~]#unxz hello.B.sql.xz   解压备份的数据库
[root@centos7-1~]#xz -d  hello.B.sql.xz   此方法也是解药备份的数据库
[root@centos7-1~]#mysql -pmagedu  < hello.B.sql    将解压后的数据库导入导入到mysql中 完成数据库的还原
[root@centos7-1~]#mysql -pmagedu  -e 'show databases;'
+--------------------+
| Database           |
+--------------------+
| information_schema |
| hellodb            |
| mysql              |
| performance_schema |
| studentdb          |
| testdb             |
+--------------------+
备份所有数据库,使用-A选项进行备份和还原,生产中会常用-A选项
[root@centos7-1~]#mysqldump -uroot -pmagedu   -A > /data/all_bak.sql  备份所有数据库
[root@centos7-1~]#rm -rf /var/lib/mysql/*  删除数据库
[root@centos7-1~]#systemctl restart mariadb  重启数据库
[root@centos7-1~]#mysql < all_bak.sql  将备份的所有数据库内容全部导入到有mysql中
[root@centos7-1~]#mysql  进入到mysql中查看mysql内容,此时都已恢复
Welcome to the MariaDB monitor.  Commands end with ; or g.
Your MariaDB connection id is 5
Server version: 5.5.60-MariaDB MariaDB Server

Copyright (c) 2000, 2018, Oracle, MariaDB Corporation Ab and others.

Type 'help;' or 'h' for help. Type 'c' to clear the current input statement.

MariaDB [(none)]> show databases;
+--------------------+
| Database           |
+--------------------+
| information_schema |
| hellodb            |
| mysql              |
| performance_schema |
| studentdb          |
| test               |
| testdb             |
+--------------------+
7 rows in set (0.00 sec)

MariaDB [(none)]>
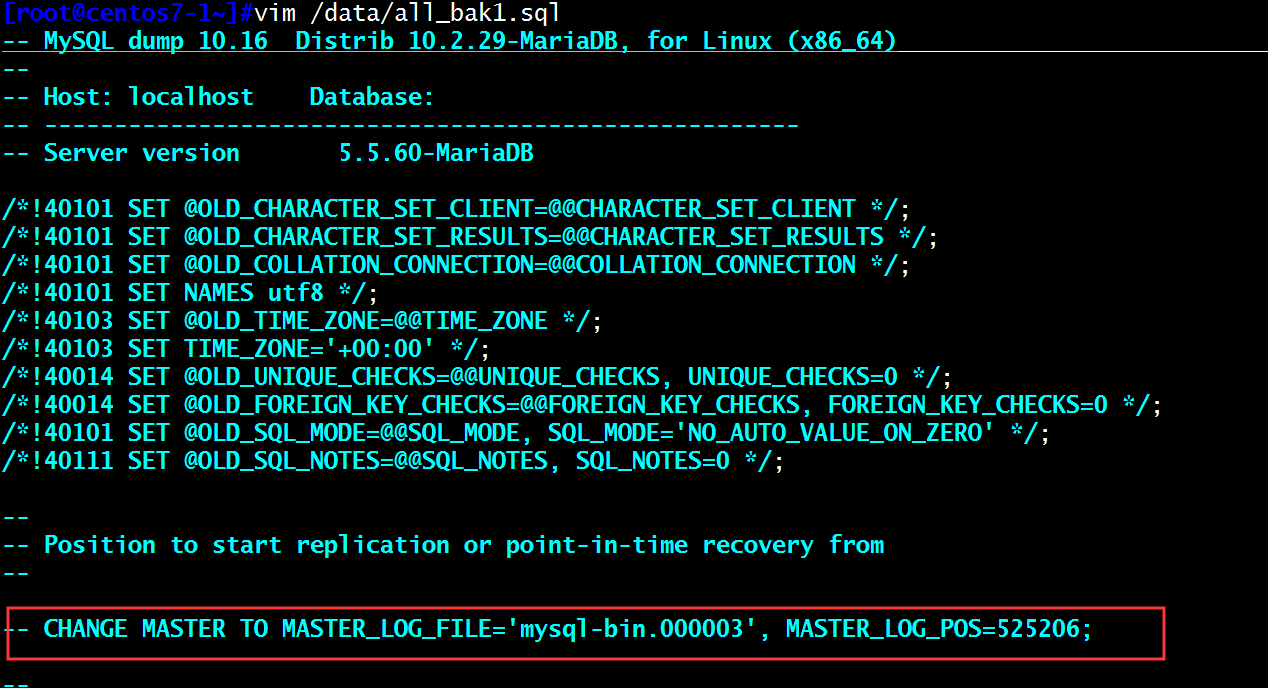
--master-data=1|2用法,(单纯备份用2,主从复制时用1)备份时,建议使用此选项,恢复时也可以快速定位恢复:
[root@centos7-1~]#mysqldump  --master-data=2 -A > /data/all_bak1.sql  备份二进制日志   会记录什么节点上备注的二进制日志
[root@centos7-1~]#vim /data/all_bak1.sql
-- CHANGE MASTER TO MASTER_LOG_FILE='mysql-bin.000003', MASTER_LOG_POS=525206;   --代表的是注释,后面的525206代表的是二进制当前备份的节点,之后的和二进制日志备份有关系,之前都没有关系
-F 选项用法:
[root@centos7-1data]#mysql -pmagedu  -e 'show master logs'
+------------------+-----------+
| Log_name         | File_size |
+------------------+-----------+
| mysql-bin.000001 |     30343 |
| mysql-bin.000002 |   1038814 |
| mysql-bin.000003 |    525225 |
| mysql-bin.000004 |       288 |
| mysql-bin.000005 |       245 |
+------------------+-----------+
[root@centos7-1data]#mysqldump -pmagedu --master-data=2 -A -F > /data/all_bak1.sql
[root@centos7-1data]#mysql -pmagedu  -e 'show master logs'
+------------------+-----------+
| Log_name         | File_size |
+------------------+-----------+
| mysql-bin.000001 |     30343 |
| mysql-bin.000002 |   1038814 |
| mysql-bin.000003 |    525225 |
| mysql-bin.000004 |       288 |
| mysql-bin.000005 |       288 |
| mysql-bin.000006 |       245 |
+------------------+-----------+
[root@centos7-1data]#mysqldump -pmagedu --master-data=2 -A  > /data/all_bak2.sql
[root@centos7-1data]#mysql -pmagedu  -e 'show master logs'
+------------------+-----------+
| Log_name         | File_size |
+------------------+-----------+
| mysql-bin.000001 |     30343 |
| mysql-bin.000002 |   1038814 |
| mysql-bin.000003 |    525225 |
| mysql-bin.000004 |       288 |
| mysql-bin.000005 |       288 |
| mysql-bin.000006 |       245 |
+------------------+-----------+
[root@centos7-1data]#mysqldump -pmagedu --master-data=2 -A  > /data/all_bak3.sql
[root@centos7-1data]#mysql -pmagedu  -e 'show master logs'
+------------------+-----------+
| Log_name         | File_size |
+------------------+-----------+
| mysql-bin.000001 |     30343 |
| mysql-bin.000002 |   1038814 |
| mysql-bin.000003 |    525225 |
| mysql-bin.000004 |       288 |
| mysql-bin.000005 |       288 |
| mysql-bin.000006 |       245 |
+------------------+-----------+
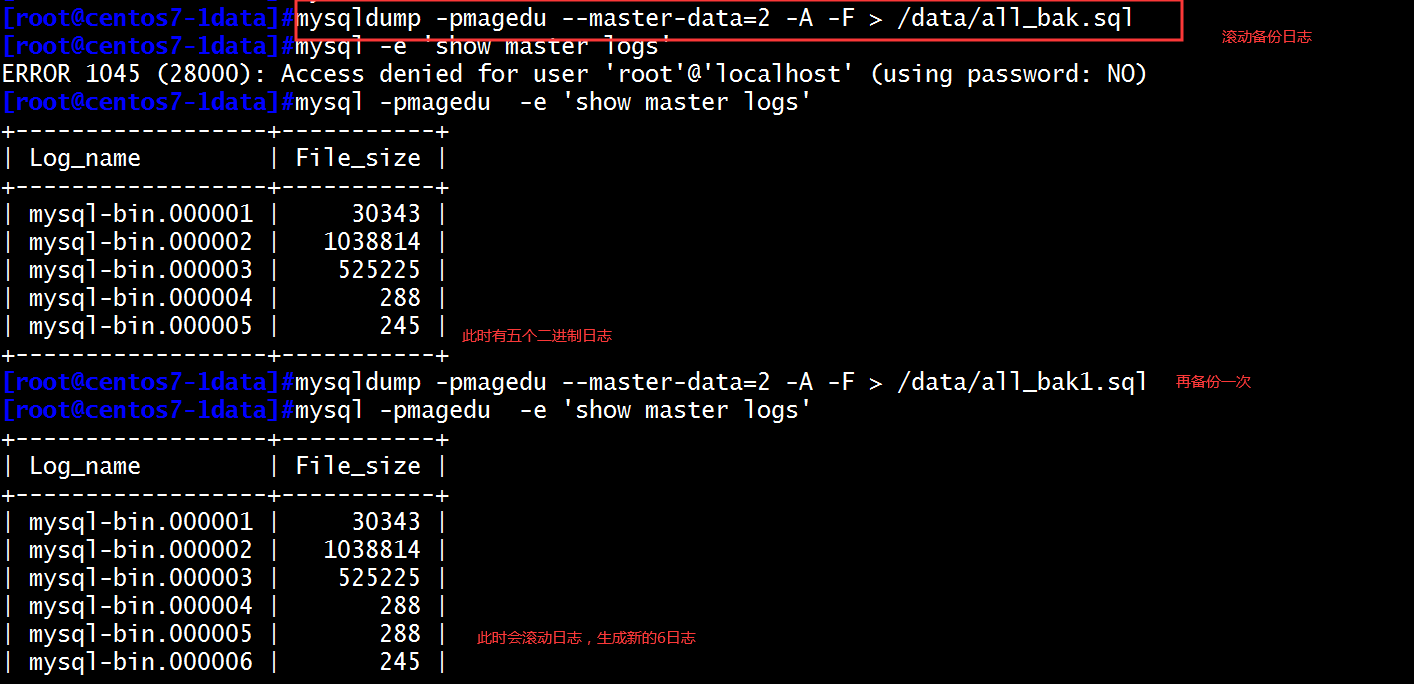

对比加上-F和不加的区别:
将新旧的二进制日志文件分别存放,做到了分离,如果不区分二进制日志文件,二进制日志文件会很大,不方便遇到紧急事情还原。
[root@centos7-1data]#mysql -pmagedu -e 'show databases'   此时查看当前有5个数据库
+--------------------+
| Database           |
+--------------------+
| information_schema |
| hellodb            |
| mysql              |
| performance_schema |
| studentdb          |
| test               |
| testdb             |
+--------------------+
[root@centos7-1data]#mysqldump -pmagedu --master-data=2 -A  > /data/all_bak2.sql
[root@centos7-1data]#mysql -pmagedu  -e 'show master logs'  不加--master-data=2选项时,备份完成的日志,此时的二进制日志文件在第6个的245
+------------------+-----------+
| Log_name         | File_size |
+------------------+-----------+
| mysql-bin.000001 |     30343 |
| mysql-bin.000002 |   1038814 |
| mysql-bin.000003 |    525225 |
| mysql-bin.000004 |       288 |
| mysql-bin.000005 |       288 |
| mysql-bin.000006 |       245 |
+------------------+-----------+
[root@centos7-1data]#mysqldump -pmagedu  -A -F  > /data/all_bak3.sql  再备份一个数据库指定到一个文件中,此时可以看到,有五个数据库,就刷新了五个最新的日志,之前备份的日志(1-6)可以存放到另一个文件中,防止所有的二进制日志全部存放到一个文件中,便于管理二进制日志文件
[root@centos7-1data]#mysql -pmagedu  -e 'show master logs'
+------------------+-----------+
| Log_name         | File_size |
+------------------+-----------+
| mysql-bin.000001 |     30343 |
| mysql-bin.000002 |   1038814 |
| mysql-bin.000003 |    525225 |
| mysql-bin.000004 |       288 |
| mysql-bin.000005 |       288 |
| mysql-bin.000006 |       288 |
| mysql-bin.000007 |       288 |
| mysql-bin.000008 |       288 |
| mysql-bin.000009 |       288 |
| mysql-bin.000010 |       288 |
| mysql-bin.000011 |       245 |
+------------------+-----------+
分库备份数据库脚本,两种写法:
第一种:
mysql -e 'show databases' |grep -Ev '^(Database|information_schema|performance_schema)$' |sed -r 's/(.*)/mysqldump -B 1 | xz > /data/1.sql.xz/' |bash
第二种:
for db in `mysql -e 'show databases' |grep -Ev '^(Database|information_schema|performance_schema)$'`;do mysqldump -B $db |gzip > $db`date +%F`.sql.gz;done
MyISAM备份选项:建议加-x选项
支持温备;不支持热备,所以必须先锁定要备份的库,而后启动备份操作锁定方法如下:
-x,--lock-all-tables:加全局读锁,锁定所有库的所有表,同时加--single-
transaction或--lock-tables选项会关闭此选项功能
注意:数据量大时,可能会导致长时间无法并发访问数据库
-l,--lock-tables:对于需要备份的每个数据库,在启动备份之前分别锁定其所有表,默认为on,--skip-lock-tables选项可禁用,对备份MyISAM的多个库,可能会造成数据不一致
注:以上选项对InnoDB表一样生效,实现温备,但不推荐使用
InnoDB备份选项: 支持热备,可用温备但不建议用,建议用--single-transaction
--single-transaction  以事务方式存放
此选项Innodb中推荐使用,不适用MyISAM,此选项会开始备份前,先执行START TRANSACTION指令开启事务
此选项通过在单个事务中转储所有表来创建一致的快照。 仅适用于存储在支持多版本控制的存储引擎中的表(目前只有InnoDB可以); 转储不保证与其他存储引擎保持一致。 在进行单事务转储时,要确保有效的转储文件(正确的表内容和二进制日志位置),没有其他连接应该使用以下语句:ALTER TABLE,DROP TABLE,RENAME TABLE,TRUNCATE TABLE
此选项和--lock-tables(此选项隐含提交挂起的事务)选项是相互排斥备份大型表时,建议将--single-transaction选项和--quick结合一起使用
生产环境实战备份策略
InnoDB建议备份策略
mysqldump -uroot -A -F --single-transaction --master-data=2 --default-character-set=utf8 --hex-blob | gzip > /data/all_bak_`date +%F`.sql.gz 其中--hex-blob是二进制备份文件,--single-transaction 以事务方式存放, --master-data=2是以注释形式,不用于主从复制
MyISAM建议备份策略
mysqldump -uroot -A -F -E -R -x --master-data=2 --triggers --default-character-set=utf8 --hex-blob | gzip> /data/all_bak_`date +%F`.sql.gz
实战演练:删除数据库,还原数据库文件
(1)新建一个二进制日志文件路径:
[root@centos7-1data]#mkdir /data/logbin
[root@centos7-1data]#chown -R mysql.mysql logbin
(2)将二进制日志文件路径指定到新建的文件路径位置
vim /etc/my.cnf
[mysqld]
log_bin=/data/logbin/mysql-bin
socket=/var/lib/mysql/mysql.sock
datadir=/var/lib/mysql
先临时在mysql插入几条记录:
MariaDB [hellodb]> create table teacher(id int primary key auto_increment,name varchar(3));  创建表
Query OK, 0 rows affected (0.01 sec)

MariaDB [hellodb]> insert teacher(id,name)values(1,'a'); 在表中插入内容a
Query OK, 1 row affected (0.00 sec)
MariaDB [hellodb]> insert teacher(id,name)values(2,'b');
Query OK, 1 row affected (0.00 sec)
MariaDB [hellodb]> insert teacher(id,name)values(3,'c');
Query OK, 1 row affected (0.00 sec)
MariaDB [hellodb]> select * from teacher;
+----+------+
| id | name |
+----+------+
|  1 | a    |
|  2 | b    |
|  3 | c    |
+----+------+
3 rows in set (0.01 sec)
(3)打开一个新终端,备份数据库
mysqldump -uroot -magedu -A -F --single-transaction --master-data=2 --default-character-set=utf8 | gzip > /data/all_bak_`date +%F`.sql.gz
此时在数据库中再插入几条记录:
[root@centos7-1data]#mysql -pmagedu
Welcome to the MariaDB monitor.  Commands end with ; or g.
Your MariaDB connection id is 9
Server version: 5.5.60-MariaDB MariaDB Server

Copyright (c) 2000, 2018, Oracle, MariaDB Corporation Ab and others.

Type 'help;' or 'h' for help. Type 'c' to clear the current input statement.

MariaDB [(none)]> use hellodb;
Database changed
MariaDB [hellodb]> insert teacher(id,name)values(4,'d');
Query OK, 1 row affected (0.00 sec)

MariaDB [hellodb]> insert teacher(id,name)values(5,'f');
Query OK, 1 row affected (0.00 sec)

MariaDB [hellodb]> select * from teacher;
+----+------+
| id | name |
+----+------+
|  1 | a    |
|  2 | b    |
|  3 | c    |
|  4 | d    |
|  5 | f    |
+----+------+
5 rows in set (0.01 sec)
(4)在新终端开始破坏数据库:
[root@centos7-1data]#rm -rf /var/lib/msyql/*
(5)在新终端设置防火墙功能,阻止其他用户访问mysql数据库,并解压备份的数据库
[root@centos7-1data]#gzip -d all_bak_2019-11-22.sql.gz
(6)在旧终端临时禁用二进制日志生成:
[root@centos7-1data]#mysql
Welcome to the MariaDB monitor.  Commands end with ; or g.
Your MariaDB connection id is 3
Server version: 5.5.60-MariaDB MariaDB Server

Copyright (c) 2000, 2018, Oracle, MariaDB Corporation Ab and others.

Type 'help;' or 'h' for help. Type 'c' to clear the current input statement.

MariaDB [(none)]> set sql_log_bin=off;
Query OK, 0 rows affected (0.00 sec)
MariaDB [(none)]> show  variables like 'sql_log_bin';
+---------------+-------+
| Variable_name | Value |
+---------------+-------+
| sql_log_bin   | OFF   |
+---------------+-------+
(7)在新终端将解压后的文件在数据库中直接执行,此时我们看到了数据库的文件已经恢复,但是二进制的日志文件未恢复
MariaDB [hellodb]> source /data/all_bak_2019-11-22.sql   还原备份数据库的数据
MariaDB [testdb]> use hellodb
MariaDB [hellodb]> select * from teacher; 此时查看只恢复了备份数据库的数据
+----+------+
| id | name |
+----+------+
|  1 | a    |
|  2 | b    |
|  3 | c    |
+----+------+
3 rows in set (0.00 sec)
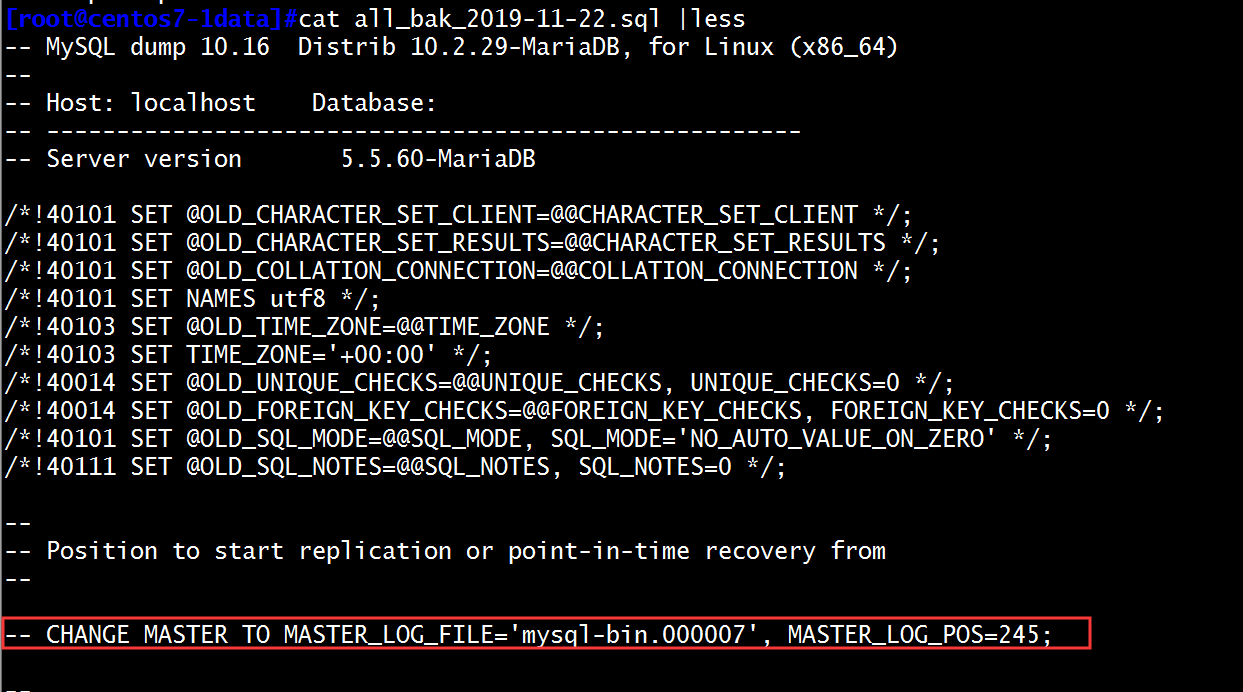
(8)在新终端查看备份的二进制日志文件备份的时间点,可以看出最近备份的数据库文件中对应的二进制日志文件是000007后缀的文件。
(9)在新终端,将二进制日志的文件全部存放在一个文件中。
[root@centos7-1data]#mysqlbinlog /data/logbin/mysql-bin.0000{07,08,09,10} > incr.sql
(10)在旧终端,将数据库中恢复二进制日志文件:
MariaDB [hellodb]> source /data/incr.sql   恢复二进制日志的文件信息
MariaDB [mysql]> use hellodb
Database changed
MariaDB [hellodb]> select * from teacher;  查看二进制日志备份的文件信息
+----+------+
| id | name |
+----+------+
|  1 | a    |
|  2 | b    |
|  3 | c    |
|  4 | d    |
|  5 | f    |
+----+------+
(11)在旧终端检查无误后,开启二进制日志功能,并打开防火墙,使其用户接入mysql数据库,此时所有的备份完成。
set sql_log_bin=on;
误删除表实验:
(1)新建一个二进制日志文件路径:
[root@centos7-1data]#mkdir /data/logbin
[root@centos7-1data]#chown -R mysql.mysql logbin
(2)将二进制日志文件路径指定到新建的文件路径位置
vim /etc/my.cnf
[mysqld]
log_bin=/data/logbin/mysql-bin
socket=/var/lib/mysql/mysql.sock
datadir=/var/lib/mysql
binlog_format=ROW
先临时在mysql插入几条记录:
mysql -pmagedu  登陆数据库
MariaDB [hellodb]> use hellodb  切换到数据库
MariaDB [hellodb]> insert students(name)values('a');  插入a内容
Query OK, 1 row affected, 1 warning (0.01 sec)

MariaDB [hellodb]> insert students(name)values('b'); 插入b内容
Query OK, 1 row affected, 1 warning (0.00 sec)
(3)打开一个新终端,备份数据库
mysqldump -uroot -magedu -A -F --single-transaction --master-data=2 --default-character-set=utf8 | gzip > /data/all_bak_`date +%F`.sql.gz
(4)开始删除数据库中表的内容:
MariaDB [hellodb]> drop table students;
再在teachers表格中插入信息:
MariaDB [hellodb]> select * from teachers;
+-----+---------------+-----+--------+
| TID | Name          | Age | Gender |
+-----+---------------+-----+--------+
|   1 | Song Jiang    |  45 | M      |
|   2 | Zhang Sanfeng |  94 | M      |
|   3 | Miejue Shitai |  77 | F      |
|   4 | Lin Chaoying  |  93 | F      |
+-----+---------------+-----+--------+
4 rows in set (0.00 sec)

MariaDB [hellodb]> insert teachers(name)values('a');
Query OK, 1 row affected, 1 warning (0.00 sec)

MariaDB [hellodb]> insert teachers(name)values('b');
Query OK, 1 row affected, 1 warning (0.00 sec)
(5)设置防火墙,阻止用户访问数据库,然后临时关闭二进制日志生成开关
MariaDB [hellodb]> set sql_log_bin=off;
(6)现在就可以利用上新终端备份的数据库,将数据库进行还原
MariaDB [mysql]> source /data/incr.sql  恢复数据库
MariaDB [hellodb]> select * from students;  查看被删除的students表,此时已经查看到表格已经恢复
+-------+---------------+-----+--------+---------+-----------+
| StuID | Name          | Age | Gender | ClassID | TeacherID |
+-------+---------------+-----+--------+---------+-----------+
|    26 | a             |   0 | F      |    NULL |      NULL |
|    27 | b             |   0 | F      |    NULL |      NULL |
(7)查看all_back.sql 确定二进制日志位置:
[root@centos7-1data]#less all_back.sql
-- MySQL dump 10.16  Distrib 10.2.29-MariaDB, for Linux (x86_64)
--
-- Host: localhost    Database:
-- ------------------------------------------------------
-- Server version       5.5.60-MariaDB

/*!40101 SET @OLD_CHARACTER_SET_CLIENT=@@CHARACTER_SET_CLIENT */;
/*!40101 SET @OLD_CHARACTER_SET_RESULTS=@@CHARACTER_SET_RESULTS */;
/*!40101 SET @OLD_COLLATION_CONNECTION=@@COLLATION_CONNECTION */;
/*!40101 SET NAMES utf8 */;
/*!40103 SET @OLD_TIME_ZONE=@@TIME_ZONE */;
/*!40103 SET TIME_ZONE='+00:00' */;
/*!40014 SET @OLD_UNIQUE_CHECKS=@@UNIQUE_CHECKS, UNIQUE_CHECKS=0 */;
/*!40014 SET @OLD_FOREIGN_KEY_CHECKS=@@FOREIGN_KEY_CHECKS, FOREIGN_KEY_CHECKS=0 */;
/*!40101 SET @OLD_SQL_MODE=@@SQL_MODE, SQL_MODE='NO_AUTO_VALUE_ON_ZERO' */;
/*!40111 SET @OLD_SQL_NOTES=@@SQL_NOTES, SQL_NOTES=0 */;

--
-- Position to start replication or point-in-time recovery from
--

-- CHANGE MASTER TO MASTER_LOG_FILE='mysql-bin.000002', MASTER_LOG_POS=245;  可以确定,备份的二进制日志文件在000002(包含2)以后的文件全部都需要还原
(8)导出000002以后的二进制日志文件
[root@centos7-1logbin]#mysqlbinlog mysql-bin.000002 > /data/incr.sql
(9)查看导出的二进制日志文件里边的内容,被删除的DROP命令那行注释掉,或者删除
[root@centos7-1data]#vim incr.sql
#DROP TABLE IF EXISTS `students` /* generated by server */
(10)开始恢复二进制日志文件
MariaDB [hellodb]> source /data/incr.sql
(11)此时可以看到,已经恢复到当前时间点插入的表格内容
MariaDB [hellodb]> select * from teachers;
+-----+---------------+-----+--------+
| TID | Name          | Age | Gender |
+-----+---------------+-----+--------+
|   1 | Song Jiang    |  45 | M      |
|   2 | Zhang Sanfeng |  94 | M      |
|   3 | Miejue Shitai |  77 | F      |
|   4 | Lin Chaoying  |  93 | F      |
|   5 | a             |   0 | NULL   |
|   6 | b             |   0 | NULL   |
+-----+---------------+-----+--------+
(12)最后恢复二进制日志开关和防火墙,让用户继续访问
set sql_log_bin=on;