文件描述符标志的概念
文件描述符标志(目前就只有一个close-on-exec):
它仅仅是一个标志,当进程fork一个子进程的时候,在子进程中调用了exec函数时就用到了这个标志。意义是执行exec前是否要关闭这个文件描述符。要把文件描述符标志和文件状态标志区分开来。
文件状态标志:在系统内核维护的系统打开文件表中,每一个系统文件表项都有一个关于write、read等的标志。
close-on-exec是一个进程所有文件描述符(文件句柄)的位图标志,每个比特位代表一个打开的文件描述符的标志位,用于确定在调用系统调用execve()时是否需要关闭文件的句柄。
当一个进程使用fork()函数创建了一个子进程时,通常在该子进程中调用execve()函数来加载执行另一个新的程序。此时子程序讲完全被新程序替换掉,并在子进程中开始执行新程序。
若一个文件描述符在close-on-exec中的对应比特位被设置,那么在执行execve()时,该描述符将被关闭,否则该描述符将始终处于打开的状态,也就是说close-on-exec的默认状态是没有被设置的。
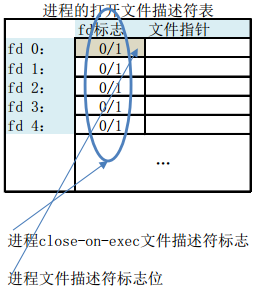
每一个位对应该进程的一个打开文件描述符的标志位。
close-on-exec标志由如下用途:
1. 如果调用了exec(),应该关闭指定的套接字。
2. 一般会调用exec执行另一个程序,此时会用全新的程序替换子进程的正文、数据、堆和栈等数据。此时保存文件描述符的变量当然也不存在了,我们就无法关闭无用的文件描述符了。所以通常我们会fork进程后在子进程中执行close关掉无用的文件描述符,然后在执行exec。
例:父进程代码
/* Parent Process */
#include <fcntl.h>
#include <unistd.h>
#include <string.h>
#include <stdio.h>
#include <sys/wait.h>

int main()
{
	int fd = open("test.txt", O_RDWR | O_APPEND);
	if(fd == -1)
	{
		printf("the file test.txt open failed! the fd = %d
", fd);
		execl("/bin/touch", "touch", "test.txt", (char *)NULL);
		return 0;
	}
	else
	{
		printf("the file test.txt open success! the fd = %d
", fd);
	}

	printf("fork...
");

	//什么也不写,相当于默认fcntl(fd, F_SETFD, 0),即用execl执行子进程时
	//不打开“执行时关闭”标志位FD_CLOEXEC,此时子进程可以向test.txt写入字符串

	//下面的三句话控制父进程的文件描述符在子进程中是否被关闭
	//fcntl(fd, F_SETFD, 1);
	int flags = fcntl(fd, F_FETFD);
	fcntl(fd, F_SETFD, flags | FD_CLOEXEC);

	char *str = "The Parent Process Writted!
";

	pid_t pid = fork();
	if(pid == 0)
	{
		printf("***execl child***
");
		execl("child", "./child", &fd, NULL);
		printf("*****************
");
	}

	//等待子进程结束
	wait(NULL);

	ssize_t write_bytes = write(fd, (void *)str, strlen(str));
	if(write_bytes == -1)
	{
		printf("The Parent Process Write To fd: %d Failed!
", fd);
	}

	close(fd);
	return 0;
}
子进程代码
/* Child Process */
#include <stdio.h>
#include <unistd.h>
#include <string.h>

int main(int argc, char *argv[])
{
	printf("argc = %d
", argc);

	if(argv[1] == NULL)
	{
		printf("There is no Parameter!
");
		return 0;
	}

	int fd = *argv[1];
	printf("child fd = %d
", fd);

	char *str = "Child Process Writted!
";
	ssize_t write_bytes = write(fd, (void *)str, strlslen(str));

	if(write_bytes == -1)
	{
		printf("The child Process write To fd: %d Failed
", fd);
	}

	close(fd);
	return 0;
}
两段代码通过fcntl函数设置fd的文件描述标志位,控制父进程中的文件描述符在子进程中是否被关闭。同时注意,这里的FD_CLOEXEC标识符,只针对exec系列的函数有效,如果子进程直接在当前例程的pid == 0的判断里面write,而不是通过execl一个新的例程write文件,这是FD_CLOEXEC标识符是不起作用的。
Nginx文件描述符泄露?浅析FD_CLOEXEC文件描述符标志
1. 起因
事情是这样的,最近我们线上一个基于nginx的http服务经常报警,具体如下:
accept() failed (24: Too many open files) while accepting new connection on 0.0.0.0:80
2. 分析和重现问题
第一时间怀疑是不是流量太大、tcp连接过多导致文件描述符耗光了?待我们仔细分析流量以及用netstat查看具体的连接数,离我们设置的上限还差很远。这个时候开始怀疑我们的程序是不是有bug导致文件描述符泄露了。于是用valgrind一顿狂测:
valgrind --tool=memcheck
         --leak-check=full
         --show-below-main=yes
         --leak-resolution=med
         --track-fds=yes
         --time-stamp=yes
         --trace-children=yes
         --show-reachable=yes
         /usr/local/nginx/sbin/nginx
仔细核对valgrind的输出log日志,插,居然没有发现任何疑点。狂汗!!!问题又回到原点了。错误日志是nginx输出的,那我们还是从nginx进程运行状态开始研究吧。首先想到的是看看nginx进程到底打开了多少个文件描述符,具体如下:
[cloud@w-nwdkill9 ~]$ ps aux|grep nginx
root      5501  0.4  0.2 544204 284676 ?       S    16:31   0:02 nginx: master process /usr/local/nginx/sbin/nginx
cloud     5560 13.8  0.2 552780 287152 ?       S    16:31   1:19 nginx: worker process
cloud     5561 11.6  0.2 550476 285748 ?       S    16:31   1:07 nginx: worker process
cloud     5562 11.1  0.2 550820 285888 ?       S    16:31   1:04 nginx: worker process
cloud     5564 10.5  0.2 550388 285464 ?       S    16:31   1:00 nginx: worker process
cloud     5565 11.7  0.2 550408 285768 ?       S    16:31   1:07 nginx: worker process
cloud     5566 12.0  0.2 550868 285908 ?       S    16:31   1:09 nginx: worker process
cloud     5567 12.3  0.2 550732 285936 ?       R    16:31   1:11 nginx: worker process
cloud     5569 12.8  0.2 550600 285912 ?       S    16:31   1:14 nginx: worker process
cloud     5570 10.5  0.2 550848 285880 ?       S    16:31   1:00 nginx: worker process
cloud     5571 12.4  0.2 550548 285804 ?       S    16:31   1:11 nginx: worker process
cloud     5572 11.7  0.2 550664 285968 ?       S    16:31   1:07 nginx: worker process
cloud     5573 10.6  0.2 550376 285540 ?       R    16:31   1:01 nginx: worker process
cloud     5574  8.7  0.2 550288 285056 ?       S    16:31   0:50 nginx: worker process
cloud     5575  9.6  0.2 550656 285688 ?       S    16:31   0:55 nginx: worker process
cloud     5576  9.9  0.2 550436 285408 ?       S    16:31   0:57 nginx: worker process
cloud     5577 12.1  0.2 550532 285720 ?       S    16:31   1:10 nginx: worker process
cloud     5578 11.3  0.2 550400 285660 ?       S    16:31   1:05 nginx: worker process
cloud     5579 10.6  0.2 550588 285428 ?       S    16:31   1:01 nginx: worker process
cloud    17834  0.0  0.0 103304   888 pts/1    S+   16:40   0:00 grep nginx
[cloud@w-nwdkill9 ~]$ ls -lhst /proc/5571/fd|wc -l
55190
一个nginx进程打开的文件描述符就是5万多,而我们设置的进程最大能打开的文件描述符个数为65535:
[cloud@w-nwdkill9 ~]$ ulimit -a
core file size          (blocks, -c) unlimited
data seg size           (kbytes, -d) unlimited
scheduling priority             (-e) 0
file size               (blocks, -f) unlimited
pending signals                 (-i) 65535
max locked memory       (kbytes, -l) 65535
max memory size         (kbytes, -m) unlimited
open files                      (-n) 65535
pipe size            (512 bytes, -p) 8
POSIX message queues     (bytes, -q) 819200
real-time priority              (-r) 0
stack size              (kbytes, -s) 65535
cpu time               (seconds, -t) unlimited
max user processes              (-u) unlimited
virtual memory          (kbytes, -v) unlimited
file locks                      (-x) unlimited
的确是这样的,流量稍稍变化,可能就没有文件描述符可用了,因此nginx accept函数返回错误。再具体看看进程到底打开了什么文件描述符:
[cloud@w-nwdkill9 ~]$ ls -lhst /proc/5571/fd
...
0 lrwx------ 1 cloud cloud 64 Apr 26 16:34 54786 -> /usr/local/nginx/logs/qlog_missing_8888_20140414.log (deleted)
0 lrwx------ 1 cloud cloud 64 Apr 26 16:34 54787 -> socket:[1350821086]
0 lrwx------ 1 cloud cloud 64 Apr 26 16:34 54788 -> socket:[1350821317]
0 lrwx------ 1 cloud cloud 64 Apr 26 16:34 54789 -> socket:[1350821321]
0 lrwx------ 1 cloud cloud 64 Apr 26 16:34 54790 -> socket:[1350821338]
0 lrwx------ 1 cloud cloud 64 Apr 26 16:34 54791 -> /usr/local/nginx/logs/qlog_missing_8888_20140413.log (deleted)
...
我们发现很多这种文件描述符“54791 -> /usr/local/nginx/logs/qlog_missing_8888_20140413.log (deleted)”,再到文件系统上ls一下,发现“ /usr/local/nginx/logs/qlog_missing_8888_20140413.log ”文件的确已经不在了。然后我们想到会不是qlog这个日志公共库的问题呢?
我们随即联系了维护qlog库的同事,仔细聊起这个问题,他说qlog库本身会打开两种文件描述符:
- 写网络日志的时候,需要打开socket
- 写本地文件日志的时候,需要打开本地文件
然后又聊到,我们使用qlog的nginx程序的运行和运维方式。我们nginx在不定期reload,根据场景不同选择的reload方式主要有三种:
- 重新加载配置:kill -HUP nginx-master.pid
- 二进制文件替换的平滑重启热加载:kill -USR2 nginx-master.pid
- 日志滚动:kill -USR1 nginx-master.pid
经过离线实际测试和验证,我们发现第二种方式“kill -USR2 nginx-master.pid”的确会有文件描述符泄露。验证过程就是,我们使用一个离线的差不多的环境,在另一个端口(例如16888)发启动nginx,然后对master进程发送USR2信号,即可以通过命令kill -USR2 `cat /usr/local/nginx/logs/nginx.pid`来操作,这个时候会有两个nginx的master进程,然后对比两个master打开的文件描述符个数,发现新的master进程比原来老的master进程多出3个来:
[weizili@build11 ~]$ ./nginx -c nginx.conf
[weizili@build11 ~]$ ps aux|grep nginx|grep weizili
weizili   7432  0.0  0.0 129964  3140 ?        Ss   17:10   0:00 nginx: master process ./nginx -c nginx.conf
weizili   7433  0.0  0.0 129964  3124 ?        S    17:10   0:00 nginx: worker process
weizili   7462  0.0  0.0   6436   680 pts/15   S+   17:10   0:00 grep -n --color nginx
[weizili@build11 ~]$ kill -USR2 7432
[weizili@build11 ~]$ ps aux|grep nginx|grep weizili
weizili   7432  0.0  0.0 129964  3288 ?        Ss   17:10   0:00 nginx: master process ./nginx -c nginx.conf
weizili   7433  0.0  0.0 129964  3124 ?        S    17:10   0:00 nginx: worker process
weizili   7503  0.3  0.2 129964  9004 ?        S    17:10   0:00 nginx: master process ./nginx -c nginx.conf
weizili   7504  0.0  0.0 129964  3124 ?        S    17:10   0:00 nginx: worker process
weizili   7515  0.0  0.0   6436   680 pts/15   S+   17:10   0:00 grep -n --color nginx
[weizili@build11 ~]$ ls -l /proc/7432/fd | wc -l			<----  老master进程打开的文件句柄数
25
[weizili@build11 ~]$ ls -l /proc/7503/fd | wc -l 			<----  新master进程打开的文件句柄数
28
再仔细分析新master进程所有打开的文件句柄,发现日志文件都打开了两次。
[weizili@build11 ~]$ ls -l /proc/7503/fd | grep tutorial | sort -k 11
l-wx------ 1 weizili weizili 64 Apr 26 17:10 17 -> /home/s/tutorial/logs/frameworktrace.2014-04-26-17
l-wx------ 1 weizili weizili 64 Apr 26 17:10 20 -> /home/s/tutorial/logs/frameworktrace.2014-04-26-17
l-wx------ 1 weizili weizili 64 Apr 26 17:10 4 -> /home/s/tutorial/logs/info.2014-04-26-17
l-wx------ 1 weizili weizili 64 Apr 26 17:10 5 -> /home/s/tutorial/logs/info.2014-04-26-17
lrwx------ 1 weizili weizili 64 Apr 26 17:10 18 -> /home/s/tutorial/logs/qlog_missing_20140426.log
l-wx------ 1 weizili weizili 64 Apr 26 17:10 16 -> /home/s/tutorial/logs/stat.2014-04-26-17
l-wx------ 1 weizili weizili 64 Apr 26 17:10 19 -> /home/s/tutorial/logs/stat.2014-04-26-17
我们把老的master进程kill之后,再对新的master又发一次USR2信号,发现日志文件现在都被打开了三次,进程文件描述又多了3个。
[weizili@build11 ~]$ kill -QUIT 7432
[weizili@build11 ~]$ kill -USR2 7503
[weizili@build11 ~]$ ps aux|grep nginx|grep weizili
weizili   7503  0.0  0.2 129964  9008 ?        S    17:10   0:00 nginx: master process ./nginx -c nginx.conf
weizili   7504  0.0  0.0 129964  3124 ?        S    17:10   0:00 nginx: worker process
weizili   8374  1.2  0.2 129960  9000 ?        S    17:16   0:00 nginx: master process ./nginx -c nginx.conf
weizili   8375  0.0  0.0 129960  3120 ?        S    17:16   0:00 nginx: worker process
weizili   8378  0.0  0.0   6436   676 pts/15   S+   17:16   0:00 grep -n --color nginx
[weizili@build11 ~]$ ls -l /proc/8374/fd |grep tutorial  | sort -k 11
l-wx------ 1 weizili weizili 64 Apr 26 17:16 17 -> /home/s/tutorial/logs/frameworktrace.2014-04-26-17
l-wx------ 1 weizili weizili 64 Apr 26 17:16 20 -> /home/s/tutorial/logs/frameworktrace.2014-04-26-17
l-wx------ 1 weizili weizili 64 Apr 26 17:16 24 -> /home/s/tutorial/logs/frameworktrace.2014-04-26-17
l-wx------ 1 weizili weizili 64 Apr 26 17:16 4 -> /home/s/tutorial/logs/info.2014-04-26-17
l-wx------ 1 weizili weizili 64 Apr 26 17:16 5 -> /home/s/tutorial/logs/info.2014-04-26-17
l-wx------ 1 weizili weizili 64 Apr 26 17:16 6 -> /home/s/tutorial/logs/info.2014-04-26-17
lrwx------ 1 weizili weizili 64 Apr 26 17:16 22 -> /home/s/tutorial/logs/qlog_missing_20140426.log
l-wx------ 1 weizili weizili 64 Apr 26 17:16 16 -> /home/s/tutorial/logs/stat.2014-04-26-17
l-wx------ 1 weizili weizili 64 Apr 26 17:16 19 -> /home/s/tutorial/logs/stat.2014-04-26-17
l-wx------ 1 weizili weizili 64 Apr 26 17:16 23 -> /home/s/tutorial/logs/stat.2014-04-26-17
3. 解决问题
3.1 nginx相关源码分析
上面已经可以稳定重现问题了,现在就着手解决问题。
case ngx_signal_value(NGX_CHANGEBIN_SIGNAL):
    if (getppid() > 1 || ngx_new_binary > 0) {

        /*
         * Ignore the signal in the new binary if its parent is
         * not the init process, i.e. the old binary's process
         * is still running.  Or ignore the signal in the old binary's
         * process if the new binary's process is already running.
         */

        action = ", ignoring";
        ignore = 1;
        break;
    }

    ngx_change_binary = 1;
    action = ", changing binary";
    break;
上述代码将变量ngx_change_binary置为1。然后会在master cycle中实际去处理。最总会走到下列代码处:
if (ngx_change_binary) {
    ngx_change_binary = 0;
    ngx_log_error(NGX_LOG_NOTICE, cycle->log, 0, "changing binary");
    // 函数ngx_exec_new_binary是核心
    ngx_new_binary = ngx_exec_new_binary(cycle, ngx_argv);
}
关于函数 ngx_exec_new_binary,代码如下:
ngx_pid_t
ngx_exec_new_binary(ngx_cycle_t *cycle, char *const *argv)
{
    char             **env, *var;
    u_char            *p;
    ngx_uint_t         i, n;
    ngx_pid_t          pid;
    ngx_exec_ctx_t     ctx;
    ngx_core_conf_t   *ccf;
    ngx_listening_t   *ls;

    ctx.path = argv[0];
    ctx.name = "new binary process";
    ctx.argv = argv;

    n = 2;
    env = ngx_set_environment(cycle, &n);
    if (env == NULL) {
        return NGX_INVALID_PID;
    }

    var = ngx_alloc(sizeof(NGINX_VAR)
                    + cycle->listening.nelts * (NGX_INT32_LEN + 1) + 2,
                    cycle->log);

    p = ngx_cpymem(var, NGINX_VAR "=", sizeof(NGINX_VAR));

    ls = cycle->listening.elts;
    for (i = 0; i < cycle->listening.nelts; i++) {
        p = ngx_sprintf(p, "%ud;", ls[i].fd);
    }

    *p = '';

    env[n++] = var;

#if (NGX_SETPROCTITLE_USES_ENV)

    /* allocate the spare 300 bytes for the new binary process title */

    env[n++] = "SPARE=XXXXXXXXXXXXXXXXXXXXXXXXXXXXXXXXXXXXXXXXXXXXXXXXXXXXXX"
               "XXXXXXXXXXXXXXXXXXXXXXXXXXXXXXXXXXXXXXXXXXXXXXXXXXXXXXXXXXXX"
               "XXXXXXXXXXXXXXXXXXXXXXXXXXXXXXXXXXXXXXXXXXXXXXXXXXXXXXXXXXXX"
               "XXXXXXXXXXXXXXXXXXXXXXXXXXXXXXXXXXXXXXXXXXXXXXXXXXXXXXXXXXXX"
               "XXXXXXXXXXXXXXXXXXXXXXXXXXXXXXXXXXXXXXXXXXXXXXXXXXXXXXXXXXXX";

#endif

    env[n] = NULL;

#if (NGX_DEBUG)
    {
    char  **e;
    for (e = env; *e; e++) {
        ngx_log_debug1(NGX_LOG_DEBUG_CORE, cycle->log, 0, "env: %s", *e);
    }
    }
#endif

    ctx.envp = (char *const *) env;

    ccf = (ngx_core_conf_t *) ngx_get_conf(cycle->conf_ctx, ngx_core_module);

    if (ngx_rename_file(ccf->pid.data, ccf->oldpid.data) != NGX_OK) {
        ngx_log_error(NGX_LOG_ALERT, cycle->log, ngx_errno,
                      ngx_rename_file_n " %s to %s failed "
                      "before executing new binary process "%s"",
                      ccf->pid.data, ccf->oldpid.data, argv[0]);

        ngx_free(env);
        ngx_free(var);

        return NGX_INVALID_PID;
    }

    pid = ngx_execute(cycle, &ctx);

    if (pid == NGX_INVALID_PID) {
        if (ngx_rename_file(ccf->oldpid.data, ccf->pid.data) != NGX_OK) {
            ngx_log_error(NGX_LOG_ALERT, cycle->log, ngx_errno,
                          ngx_rename_file_n " %s back to %s failed after "
                          "the try to execute the new binary process "%s"",
                          ccf->oldpid.data, ccf->pid.data, argv[0]);
        }
    }

    ngx_free(env);
    ngx_free(var);

    return pid;
}
上述函数 解释起来其实说来也简单,nginx就是通过fork+execve这种经典的处理方式来实现的。不过在函数的开始部分有一些设置环境变量的处理,它有什么作用呢?设想一下,如果新的二进制文件在启动时必然要涉及bind端口的动作,而此时旧进程已经做了绑定,我们知道多个进程是不能同时绑定同一个地址和端口的,所以新的进程要避免这种情况发生。nginx的做法是将原来的绑定得到的listen fd保存在名为”NGINX”(宏定义NGINX_VAR)环境变量中,这样在新进程初始化的过程中,通过函数ngx_add_inherited_sockets就可以获取listen fd来使用了,不必再次绑定。关于listen fd如何在环境变量中设置和获取,这里不再详细列举。
至此,到达该文的高潮部分了。我们发现nginx在新的master进程起来之后,并没有将不用的文件描述符关闭。
3.2文件描述符与exec()
我们知道,默认情况下,由exec()的调用程序(这里指老的nginx master进程)所打开的所有文件描述符在exec()的执行过程中会保持打开状态,且在新的程序(这里指新的nginx master进程)中依然有效。这种通常情况下,是一个很实用的特性,因为调用程序可能会以特定的文件描述符来打开文件,而在新程序中这些文件会保持有效,无需在去了解文件名或重新打开。shell就是利用这一特性为其所执行的程序处理IO重定向。
分析到这里,我们就知道为什么上述正对nginx的USR2信息处理过程中,新的master进程会多出一些看起来重复的文件描述符。怎么解决这问题呢?我们需要用到这个标记:FD_CLOEXEC
3.3 执行时关闭(close-on-exec)标记:FD_CLOEXEC
在执行exec()之前,程序有时需要确保关闭某些特定的文件描述符。尤其是在特权进程中来调用exec()来启动一个未知程序,亦或是新的程序并不需要这些已经打开的文件描述符。我们这个场景,qlog作为一个基础库,他是不知道应用场景的,因此需要检查qlog库的文件描述符打开时是否设置了FD_CLOEXEC这个标记,经过源码阅读确认没有设置这个标记;另外,nginx作为一个server程序,而且作为一个http框架,支持插件式的扩展模块,理应处理好这中文件句柄泄露的问题。但是我们看到目前双方都把这个标记FD_CLOEXEC忘记了。
从安全编程的角度出发,nginx应该在做热加载(ngx_exec_new_binary)之前确保关闭那些不必要的文件描述符。对所有的此类文件描述符调用close()函数即可达到这一目的,然而nginx没有这么做,是有他的道理的,因为这一做法存在如下局限性:
- 某些描述符可能是由库函数打开的(例如我们当前这种情况下,qlog会打开一些文件描述符)。但库函数无法使nginx在执行exec()之前关闭相应的文件描述符。作为基本原则,库函数应该总是为其打开的文件描述符设置FD_CLOEXEC标记。稍后介绍这种做法。
- 如果exec()因某种原因失败,可能还需要使这些描述符保持打开状态。如果这些描述符依然关闭,将他们重新打开并执行相同的文件的难度是可想而知,是相当大的,基本不可能。
基于上述原因,nginx把这个问题留给了他的使用者解决。
3.4 closeonexec测试程序
FD_CLOEXEC,这是fcntl的一个Flag标志,用来设置文件的close-on-exec状态标志。在exec()调用后,close-on-exec标志为0的情况,此文件不被关闭;非零则在exec()后自动关闭。默认close-on-exec状态为0,需要通过FD_CLOEXEC设置。
下面的测试程序说明了FD_CLOEXEC标记的用法。程序执行时,如果带了命令行参数(可以是任意字符串参数),该程序首先为标准输出设置FD_CLOEXEC标记,随后再执行ls外部命令。程序如下。
#include <stdio.h>
#include <fcntl.h>
#include <unistd.h>

int main(int argc, char* argv[])
{
    if (argc > 1) {
        int flags = fcntl(STDOUT_FILENO, F_GETFD);
        if (flags == -1) {
            perror("fctnl(STDOUT_FILENO, F_GETFD) ERROR:");
            return -1;
        }

        flags |= FD_CLOEXEC;
        if (fcntl(STDOUT_FILENO, F_SETFD, flags) == -1) {
            perror("fctnl(STDOUT_FILENO, F_SETFD) ERROR:");
            return -1;
        }
    }

    execlp("ls", "ls", "-l", argv[0], (char*)NULL);
    return 0;
}
程序执行效果如下:
[weizili@build11 ~]$ ./closeonexec
-rwxrwxr-x 1 weizili weizili 45752 Apr 26 15:52 ./closeonexec
[weizili@build11 ~]$ ./closeonexec 1
ls: write error: Bad file descriptor
[weizili@build11 ~]$
实际上FD_CLOEXEC是文件描述符标志中唯一可以操作的一位。包括Linux在内的许多UNIX实现,还允许另外一种非标准的ioctl调用来修改该标记:
- 以ioctl(fd, FIOCLEX)为fd设置此标志
- 以ioctl(fd, FIONCLEX)来清除此标志
3.5 修复上述文件描述符泄露bug
修改nginx模块代码,在模块main_conf的初始化函数开始处调用 closeonexec,即可解决上述问题。
/** porting code from libdaemon-0.14/libdaemon/dfork.c:daemon_close_allv */
static int daemon_close_allv(const std::set<int> except_fds) {
    struct rlimit rl;
    int fd, maxfd;

#ifdef __linux__

    DIR *d;

    if ((d = opendir("/proc/self/fd"))) {

        struct dirent *de;

        while ((de = readdir(d))) {
            int found;
            long l;
            char *e = NULL;

            if (de->d_name[0] == '.')
                continue;

            errno = 0;
            l = strtol(de->d_name, &e, 10);
            if (errno != 0 || !e || *e) {
                closedir(d);
                errno = EINVAL;
                return -1;
            }

            fd = (int) l;

            if ((long) fd != l) {
                closedir(d);
                errno = EINVAL;
                return -1;
            }

            if (fd < 3)
                continue;

            if (fd == dirfd(d))
                continue;

            found = 0;
            if (except_fds.find(fd) != except_fds.end()) {
                found = 1;
            }
#if 0
            for (int i = 0;  i < (int)except_fds.size() && except_fds[i] >= 0; i++)
                if (except_fds[i] == fd) {
                    found = 1;
                    break;
                }
#endif

            if (found)
                continue;

            if (close(fd) < 0) {
                int saved_errno = errno;
                closedir(d);
                errno = saved_errno;

                return -1;
            }

        }

        closedir(d);
        return 0;
    }

#endif

    if (getrlimit(RLIMIT_NOFILE, &rl) > 0)
        maxfd = (int) rl.rlim_max;
    else
        maxfd = sysconf(_SC_OPEN_MAX);

    for (fd = 3; fd < maxfd; fd++) {
        int found = 0;
        if (except_fds.find(fd) != except_fds.end()) {
            found = 1;
        }
#if 0
        for (int i = 0; except_fds[i] >= 0; i++)
            if (except_fds[i] == fd) {
                found = 1;
                break;
            }
#endif

        if (found)
            continue;

        if (close(fd) < 0 && errno != EBADF)
            return -1;

    }

    return 0;
}

static void convert_except_fds(const char* listening_fds, std::set<int>& except_fds) {
    std::vector<std::string> string_fds;
    osl::StringUtil::split(string_fds, listening_fds, ";");
    std::vector<std::string>::iterator it (string_fds.begin());
    std::vector<std::string>::iterator ite(string_fds.end());
    for (; it != ite; ++it) {
        if (it->empty()) {
            return;
        }
        except_fds.insert(atoi(it->data()));
    }
}

static void append_errorlog_fds(std::set<int>& except_fds) {
    except_fds.insert(3);// fd of the opened file : /usr/local/nginx/logs/error.log
    //TODO unknown case ??
}

/**
 * If we use 'kill -USR2 nginx.pid' to restart a new nginx binary,
 * we have a potential risk of file descriptor leak.
 *
 * Why? Please see the manual of system call 'execve' 'open', and pay attention of O_CLOEXEC
 *
 */
static bool closeonexec()
{
    char* listening_fds = getenv(NGINX_VAR);
    if (!listening_fds) {
        //cold start
        return true;
    }

    pid_t ppid = getppid();
    if (ppid == 1) {
        //fprintf(stderr, "%s:%d reload nginx by kill -HUP
", __func__, __LINE__);
        return true;
    }

#if 0
    //TODO Add logic code to acquire
    //  : pid_t ngx_master_pid = get_ngx_master_pid();
    // to do a double check
    assert(ppid == ngx_master_pid);
#endif
    std::set<int> except_fds;
    convert_except_fds(listening_fds, except_fds);
    append_errorlog_fds(except_fds);
    daemon_close_allv(except_fds);

    return true;
}
4. 总结
再次把FD_CLOEXEC的含义简单的总结一下:close on exec, 从字面意思即可理解为:如果对描述符设置了FD_CLOEXEC,在使用execl调用执行的程序里,此描述符将在子进程中会被自动关闭,不能使用了。但是在父进程中仍然可以使用。
Linux系统的open函数,其中flags参数可以传入O_CLOEXEC标记,即可自动设置上FD_CLOEXEC标记,但Linux内核版本2.6.23才开始支持此标记。