一、安装
# 下载依赖包
yum install gcc patch libffi-devel python-devel  zlib-devel bzip2-devel openssl-devel ncurses-devel sqlite-devel readline-devel tk-devel gdbm-devel db4-devel libpcap-devel xz-devel openssl openssl-devel -y

# 下载源码包并解压
tar -zxf nginx-1.14.2.tar.gz
cd nginx-1.14.2/


# 编译安装
#  开启nginx状态监测功能
./configure --prefix=/opt/nginx-1.14/ --with-http_ssl_module --with-http_stub_status_module
make && make install

# 启动
cd /opt/nginx-1.14/sbin/
./nginx
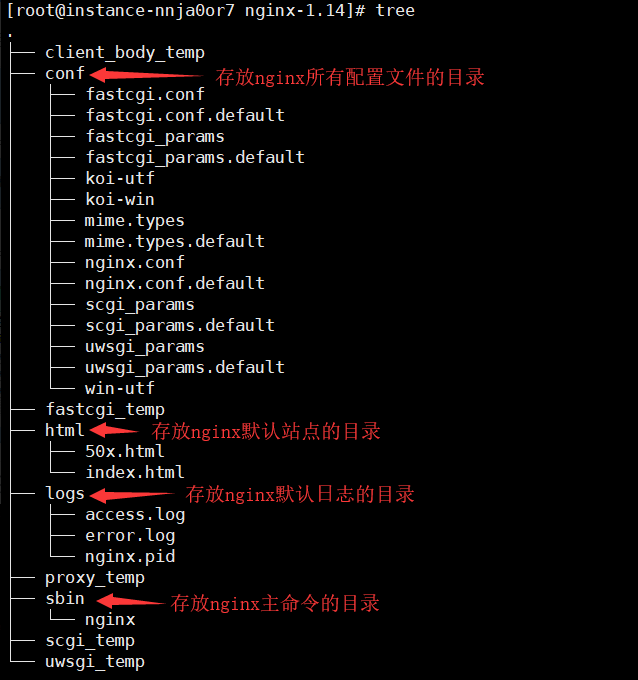
二、目录分析
- conf 存放nginx所有配置文件的目录,主要nginx.conf
- html 存放nginx默认站点的目录,如index.html、error.html等
- logs 存放nginx默认日志的目录,如error.log access.log
- sbin 存放nginx主命令的目录,sbin/nginx
三、nginx主配置文件解析
vim /opt/nginx-1.14/conf/nginx.conf
# nginx运行的用户和用户组
#user  nobody;

#nginx的进程数,建议设置为等于CPU的总核心数
worker_processes  1;

# 全局错误日志定义类型,[ debug | info | notice | warn | error | crit ]
#error_log  logs/error.log;
#error_log  logs/error.log  notice;
#error_log  logs/error.log  info;

# 进程pid文件
#pid        logs/nginx.pid;


events {
    # 单个进程最大连接数(最大连接数=连接数*进程数)
    worker_connections  1024;

    # keepalive超时时间。
    # keepalive_timeout 60;
}
# http服务器,利用它的反向代理功能提供负载均衡支持
http {
    #文件扩展名与文件类型映射表
    include       mime.types;
    #默认的文件类型
    default_type  application/octet-stream;

    #默认编码
    #charset urf-8
    ##通常web服务器放在反向代理的后面,这样就不能获取到客户的IP地址了,通过$remote_add拿到的IP地址是反向代理服务器的
iP地址。反向代理服务器在转发请求的http头信息中,可以增加x_forwarded_for信息,用以记录原有客户端的IP地址和原来客户端
的请求的服务器地址。
    #nginx的accses.log日志功能,查看用户访问记录
    #log_format  main  '$remote_addr - $remote_user [$time_local] "$request" '
    #                  '$status $body_bytes_sent "$http_referer" '
    #                  '"$http_user_agent" "$http_x_forwarded_for"';

    # 日志文件位置
    #access_log  logs/access.log  main;

    # 开启高效文件传输模式
    sendfile        on;

    # 允许或禁止使用socke的TCP_CORK的选项,此选项仅在使用sendfile的时候使用
    #tcp_nopush     on;

    #长连接超时时间,单位是秒
    #keepalive_timeout  0;
    keepalive_timeout  65;

    #开启gzip压缩输出
    #gzip  on;

    # 虚拟主机设置
    server {
        # 监听端口
        listen       80;
        # 域名可以有多个,用空格隔开
        server_name  localhost;

        # 字符编码
        #charset koi8-r;

        # 本虚拟主机的访问日志
        #access_log  logs/host.access.log  main;

        # 控制网址访问的路径
        location / {
            root   html;        # 存放网址代码的路径
            index  index.html index.htm;  # 服务器返回的默认页面文件
        }

        # 指定错误代码,统一定义错误页面
        #error_page  404              /404.html;

        # redirect server error pages to the static page /50x.html
        #
        # 500错误代码的页面
        error_page   500 502 503 504  /50x.html;
        location = /50x.html {
            root   html;
        }

        # proxy the PHP scripts to Apache listening on 127.0.0.1:80
        #
        #location ~ .php$ {
        #    # 反向代理
        #    proxy_pass   http://127.0.0.1;
        #}

        # pass the PHP scripts to FastCGI server listening on 127.0.0.1:9000
        #
        #
        #location ~ .php$ {
        #    root           html;
        #    fastcgi_pass   127.0.0.1:9000;
        #    fastcgi_index  index.php;
        #    fastcgi_param  SCRIPT_FILENAME  /scripts$fastcgi_script_name;
        #    include        fastcgi_params;
        #}

        # deny access to .htaccess files, if Apache's document root
        # concurs with nginx's one
        #
        #location ~ /.ht {
        #    deny  all;
        #}
    }
四、创建多个虚拟主机
server{} 代表一个虚拟主机
server {
        listen       80;
        server_name  qishijdd.com;
        location / {
            root   /opt/myweb/jd;
            index  index.html index.htm;
        }
        error_page  404              404.html;
        error_page  500 502 503 504  404.html;
        location = /404.html {
           root /opt/myweb/404;
        }
    }