环境说明
系统版本 CentOS 6.9 x86_64
软件版本 fpm-1.4.0
1、安装ruby环境
fpm利用ruby编程语言开发,先安装ruby的环境
[root@m01 ~]# yum -y install ruby rubygems ruby-devel
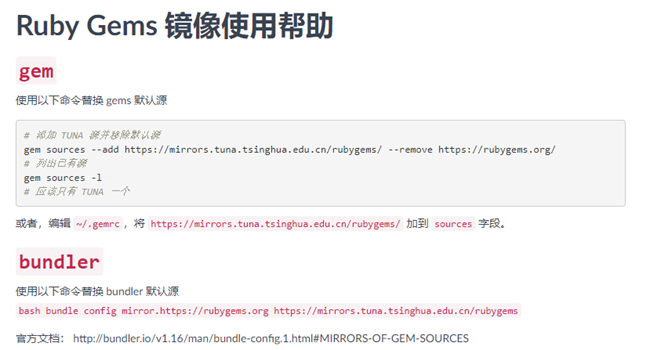
2、更换Ruby Gems源
将官方的源更换为国内的源
gem sources --add https://mirrors.tuna.tsinghua.edu.cn/rubygems/ --remove http://rubygems.org/
验证:gem sources -l
 https://mirrors.tuna.tsinghua.edu.cn/rubygems/
3、使用gem安装fpm
gem install fpm
若出现以下报错
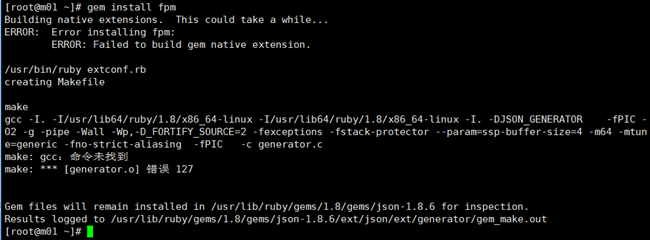
yum install gcc gcc-c++ glibc -y先安装gcc编译器
再次安装gem install fpm
出现报错

出现这个报错,是因为fpm最新版只支持centos7,对于centos6只能使用旧版的fpm
官方网站:https://rubygems.org/
官方中文网站:https://gems.ruby-china.org/
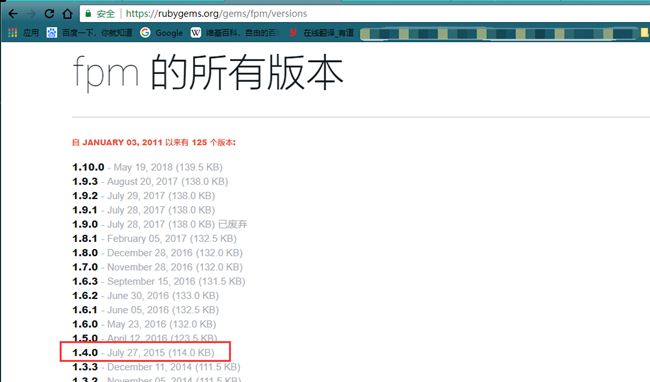
gem install fpm -v 1.4.0 安装旧版本,-v指定版本为2015年最后一个版本
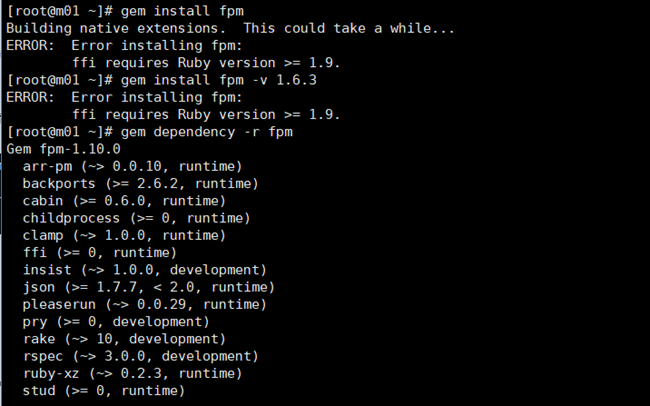
出现报错
[root@m01 ~]# gem install fpm -v 1.4.0
ERROR: Error installing fpm:
ffi requires Ruby version >= 1.9.
说明fpm的依赖包ffi默认也是安装最新版本
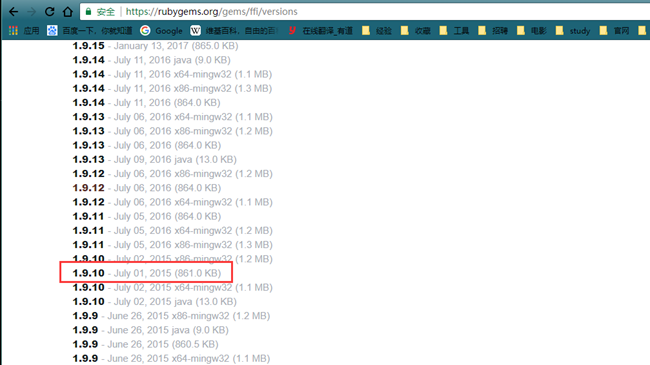
[root@m01 ~]# gem install ffi -v 1.9.10
Building native extensions. This could take a while...
Successfully installed ffi-1.9.10
1 gem installed
Installing ri documentation for ffi-1.9.10...
Installing RDoc documentation for ffi-1.9.10...
再次安装gem install fpm -v 1.4.0

使用gem dependency -r fpm 查看依赖
4、fpm的使用
4.1 参数说明
fpm (rpm包,deb包)
-s 指定源类型
-t 指定目标类型,即想要制作为什么包
-n 指定包的名字
-v 指定包的版本号
-C 指定打包的相对路径 Change directory to here before searching forfiles
-d 指定依赖于哪些包
-f 第二次打包时目录下如果有同名安装包存在,则覆盖它
-p 输出的安装包的目录,不想放在当前目录下就需要指定
--post-install 软件包安装完成之后所要运行的脚本;同--after-install
--pre-install 软件包安装完成之前所要运行的脚本;同--before-install
--post-uninstall 软件包卸载完成之后所要运行的脚本;同--after-remove
--pre-uninstall 软件包卸载完成之前所要运行的脚本;同--before-remove
4.2 制作nginx-1.12.2的rpm包
4.2.1 本地编译安装nginx-1.12.2
mkdir -p /service/tools
mkdir /application
cd /service/tools
wget http://nginx.org/download/nginx-1.12.2.tar.gz
tar zxvf nginx-1.12.2.tar.gz
yum install gcc gcc-c++ glibc pcre-devel zlib-devel openssl-devel -y
cd nginx-1.12.2
./configure --prefix=/application/nginx-1.12.2 --pid-path=/var/run/nginx.pid --user=nginx --group=nginx --with-http_ssl_module
make && make install
ln -s /application/nginx-1.12.2 /application/nginx
ln -s /application/nginx/sbin/nginx /usr/bin/
useradd -M -s /sbin/nologin -r -u 88 nginx
cd /application/nginx/conf/
grep -Ev '^$|#' nginx.conf.default >nginx.conf
4.2.2 编写脚本
安装后脚本:
[root@m01 scripts]# vim nginx_rpm.sh
#!/bin/bash
useradd -M -s /sbin/nologin -r -u 88 nginx
ln -s /application/nginx-1.12.2 /application/nginx
ln -s /application/nginx/sbin/nginx /usr/bin/
卸载后脚本
[root@m01 scripts]# vim nginx_remove.sh
#!/usr/bin
nginx -s stop
rm -fr /application/nginx1.12.2
rm -fr /application/nginx
rm -fr /usr/bin/nginx
4.2.3 打包
打包之前需要安装rpmbuild工具才能使用fpm进行打包
yum install rpm-build -y
开始打包
fpm -s dir -t rpm -n nginx -v 1.12.2 -d 'pcre-devel,openssl-devel' --post-install /service/scripts/nginx_rpm.sh --post-uninstall /service/scripts/nginx_remove.sh -f /application/nginx-1.12.2/

4.2.4 制作nginx-1.12.2的rpm包(带日志轮询和高亮显示)
下载官方nginx的rpm包
https://mirrors.aliyun.com/epel/6/x86_64/Packages/n/nginx-1.10.2-1.el6.x86_64.rpm
查看rpm包的内容(解压rpm包)
[root@m01 nginx]# rpm2cpio nginx-1.10.2-1.el6.x86_64.rpm | cpio -div #解压官方的rpm包
[root@m01 nginx]# ls
etc nginx-1.10.2-1.el6.x86_64.rpm usr var
将官方的etc/logrotate.d/nginx
和usr/share/vim/vimfiles/{ftdetect,indent,syntax}/nginx.vim拷贝到本地系统中
[root@m01 nginx]# cp etc/logrotate.d/nginx /etc/logrotate.d/
[root@m01 nginx]# cp usr/share/vim/vimfiles/ftdetect/nginx.vim /usr/share/vim/vimfiles/ftdetect/
[root@m01 nginx]# cp usr/share/vim/vimfiles/indent/nginx.vim /usr/share/vim/vimfiles/indent/
[root@m01 nginx]# cp usr/share/vim/vimfiles/syntax/nginx.vim /usr/share/vim/vimfiles/syntax/
修改卸载后脚本
[root@m01 scripts]# vim nginx_remove.sh
#!/usr/bin
nginx -s stop
rm -fr /application/nginx1.12.2
rm -fr /application/nginx
rm -fr /usr/bin/nginx
rm -fr /usr/share/vim/vimfiles/ftdetect/nginx.vim
rm -fr /usr/share/vim/vimfiles/indent/nginx.vim
rm -fr /usr/share/vim/vimfiles/syntax/nginx.vim
rm -fr /etc/logrotate.d/nginx
打包
[root@m01 scripts]# fpm -s dir -t rpm -n nginx -v 1.12.2 -d ' pcre-devel,openssl-devel ' --post-install /service/scripts/nginx_rpm.sh --post-uninstall /service/scripts/nginx_remove.sh -f /application/nginx-1.12.2/ /etc/logrotate.d/nginx /usr/share/vim/vimfiles/{ftdetect,indent,syntax}/nginx.vim

附:
1、查看nginx命令所需要的库文件并依赖于哪些rpm包
ldd /application/nginx/sbin/nginx|awk -F "[ ]+" 'NR>1{print $3}'|sed '/^$/d'|xargs rpm -qf|sort -n|uniq|sed -r 's#-[1-9][0-9.]*.*$##g'

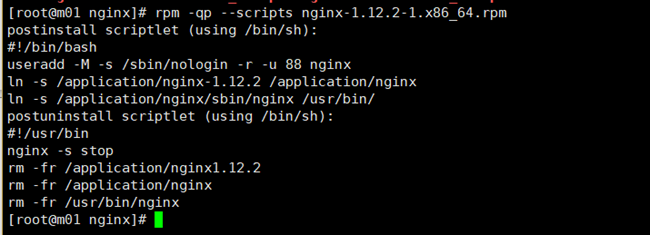
2、查看rpm包中的脚本
rpm -qp --scripts nginx-1.12.2-1.x86_64.rpm
3、查看rpm包中的内容
rpm -qlp xxx.rpm
4、解压rpm包
rpm2cpio xxx.rpm | cpio -div
博主原创文章,转载请务必注明出处