一、使用2.6内核Linux,配置sysctl参数
vi /etc/sysctl.conf
#haproxy config
net.ipv4.tcp_tw_reuse = 1
net.ipv4.ip_local_port_range = 1024 65000
net.ipv4.tcp_max_syn_backlog = 10240
net.ipv4.tcp_max_tw_buckets = 400000
net.ipv4.tcp_max_orphans = 60000
net.ipv4.tcp_synack_retries = 3
net.core.somaxconn = 10000
net.ipv4.ip_nonlocal_bind = 1 #解决备节点bind vip报错问题

sysctl -p #sysctl参数立即生效
二、查看yum源版本
yum list | grep haproxy

三、yum源安装
yum install haproxy -y
安装时haproxy用户及用户组系统会自动创建
四、配置haproxy
vi /etc/haproxy/haproxy.cfg
#---------------------------------------------------------------------
# Global settings
#---------------------------------------------------------------------
global
    # to have these messages end up in /var/log/haproxy.log you will
    # need to:
    #
    # 1) configure syslog to accept network log events.  This is done
    #    by adding the '-r' option to the SYSLOGD_OPTIONS in
    #    /etc/sysconfig/syslog
    #
    # 2) configure local2 events to go to the /var/log/haproxy.log
    #   file. A line like the following can be added to
    #   /etc/sysconfig/syslog
    #
    #
    #nbproc      8                              #启动进程数
    log         127.0.0.1 local0 info
    log         127.0.0.1 local1 warning
    chroot      /var/lib/haproxy                #安全参数,出现bug保护
    pidfile     /var/run/haproxy.pid            #进程号文件路径
    maxconn     3000
    user        haproxy
    group       haproxy
    daemon                                      #守护进程的方式运行

    # turn on stats unix socket
    stats socket /var/lib/haproxy/stats

#---------------------------------------------------------------------
# common defaults that all the 'listen' and 'backend' sections will
# use if not designated in their block
#---------------------------------------------------------------------
defaults
    mode                    http
    log                     global
    option                  httplog
    option                  dontlognull
    option                  http-server-close
    option  forwardfor      except 127.0.0.0/8
    option                  redispatch
    retries                 3
    timeout http-request    10s
    timeout queue           1m
    timeout connect         5s
    timeout client          50s
    timeout server          50s
    timeout http-keep-alive 10s
    timeout check           10s
    maxconn                 3000

#---------------------------------------------------------------------
# main frontend which proxys to the backends
#---------------------------------------------------------------------
frontend  main *:5000
    acl url_static       path_beg       -i /static /images /javascript /stylesheets
    acl url_static       path_end       -i .jpg .gif .png .css .js

    use_backend static   if             url_static
    default_backend      kdapp

frontend kdapp
    bind 192.168.0.206:80
    maxconn 3000
    default_backend kdapp

frontend blapp
    bind 192.168.0.206:8080
    maxconn 300
#    acl valid_ip src 172.17.188.0/24
#    block if !valid_ip
    default_backend blapp
#    acl lbprint_dom path_beg -i /lbprint/
#    acl tmp_dom hdr(host) -i www.4pinfo.com    #tmp_dom名称,hdr(host)主机名,i不区分大小写
#    use_backend lbprint if lbprint_dom
#    default_backend    k3cloud

#---------------------------------------------------------------------
# static backend for serving up images, stylesheets and such
#---------------------------------------------------------------------
backend static
    balance     roundrobin
    server      static          192.168.0.72:80

#---------------------------------------------------------------------
# round robin balancing between the various backends
#---------------------------------------------------------------------
backend kdapp
    balance  roundrobin                 #轮询模式
    mode     http
    option   httpclose
    option   forwardfor
#    option   httpchk HEAD /check.html HTTP/1.0
#    option   httpchk GET /check.html
    option   allbackups
    cookie   SERVERID insert indirect
    timeout  server 50s
    timeout  connect 15s
    server   kd70 192.168.0.70:80 cookie kd70 maxconn 3000 check inter 2000 fall 3
    server   kd71 192.168.0.71:80 cookie kd71 maxconn 3000 check inter 2000 fall 3
    server   kd73 192.168.0.73:80 cookie kd73 maxconn 3000 check inter 2000 fall 3 backup
#    server   web01 192.168.0.70:80 check port 80 inter 5000 fall 5
#    server   web02 192.168.0.72:80 check port 80 inter 5000 fall 5

backend blapp
    balance  roundrobin
    mode     http
    option   httpclose
    option   forwardfor
    cookie   SERVERID insert indirect
    timeout  server 50s
    timeout  connect 15s
    server   port81 192.168.0.61:81 cookie port81 maxconn 300 check port 81 weight 5 inter 2000 fall 3
    server   port82 192.168.0.61:82 cookie port82 maxconn 300 check port 82 weight 5 inter 2000 fall 3

listen stats
    bind 192.168.0.206:1080
    stats enable
    stats refresh 30s
    stats hide-version
    stats uri /stats
    stats realm HAProxy Stats
    stats auth admin:admin
五、配置rsyslog
1.为rsyslog添加haproxy日志的配置
vi /etc/rsyslog.d/haproxy.conf
local0.* /var/log/haproxy_info.log
local1.* /var/log/haproxy_warn.log
2.修改rsyslog的启动参数,主要目的兼容RHCL5版本
vi /etc/sysconfig/rsyslog
#SYSLOGD_OPTIONS="-c 5"
SYSLOGD_OPTIONS="-c 2 -r -m 0"

3.启动rsyslog,查看端口监听
service rsyslog start

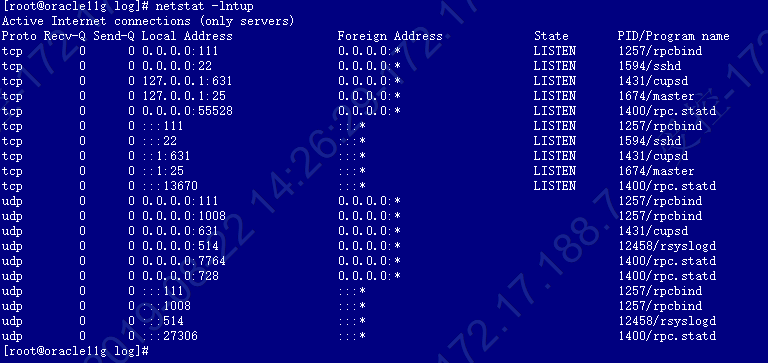
netstat -lntup

rsyslog为UDP的514端口,如果没有端口监听需要修改rsyslog配置,取消配置注释并重启rsyslog
vi /etc/rsyslog.conf
# Provides UDP syslog reception
$ModLoad imudp
$UDPServerRun 514

六、启动HAProxy
service haproxy start

如果启动不了查日志,根据报错寻找解决办法。生成环境不建议开启info日志,日志记录信息过多比较占空间。
rsyslog不会自动切分,可以使用linux系统自带logrotate进行切分,网上很多文章,此处不累述。

到此配置就完成了,后续只需要优化参数及通过Keepalive或Heartbeat实现高可用。