secure the nodejs app transmissions by ssl
1. make a simplest socket.io app
ref: https://socket.io/get-started/chat/
basic nodejs app:
- use the Node.JS web framework
expressto html as client end. - create a
package.jsonmanifest file that describes our project npm install express@4.15.2- create an
index.jsfile that will setup our application
Theindex.jsfile supply the html content of "Hello world". - create a
index.htmlfile and modify theindex.jsto serve theindex.html.
Insert socket.io:
The socket.io has a service end (socket.io) and client end (socket.io-client).
- install:
npm install socket.io - in
index.js, initialize a new instance ofsocket.ioby passing thehttp(the HTTP server) object. - listen on the
connectionevent for incoming sockets, and I log it to the console. - in
index.html, add the snippet aboutvar socket = io();for loading the socket.io-client.
Emitting events:
Send and receive any events we want, with any data. Any objects that can be encoded as JSON will do, and binary data is supported too.
- make the server get user message as a chat message event, add the emitting code in
index.html. - in
index.jswe print out the chat message event
Broadcasting:
- send the message to everyone, including the sender:
io.emit('chat message', msg); - in client, make it capture a
chat messageevent:socket.on('chat message', function(msg){ ...
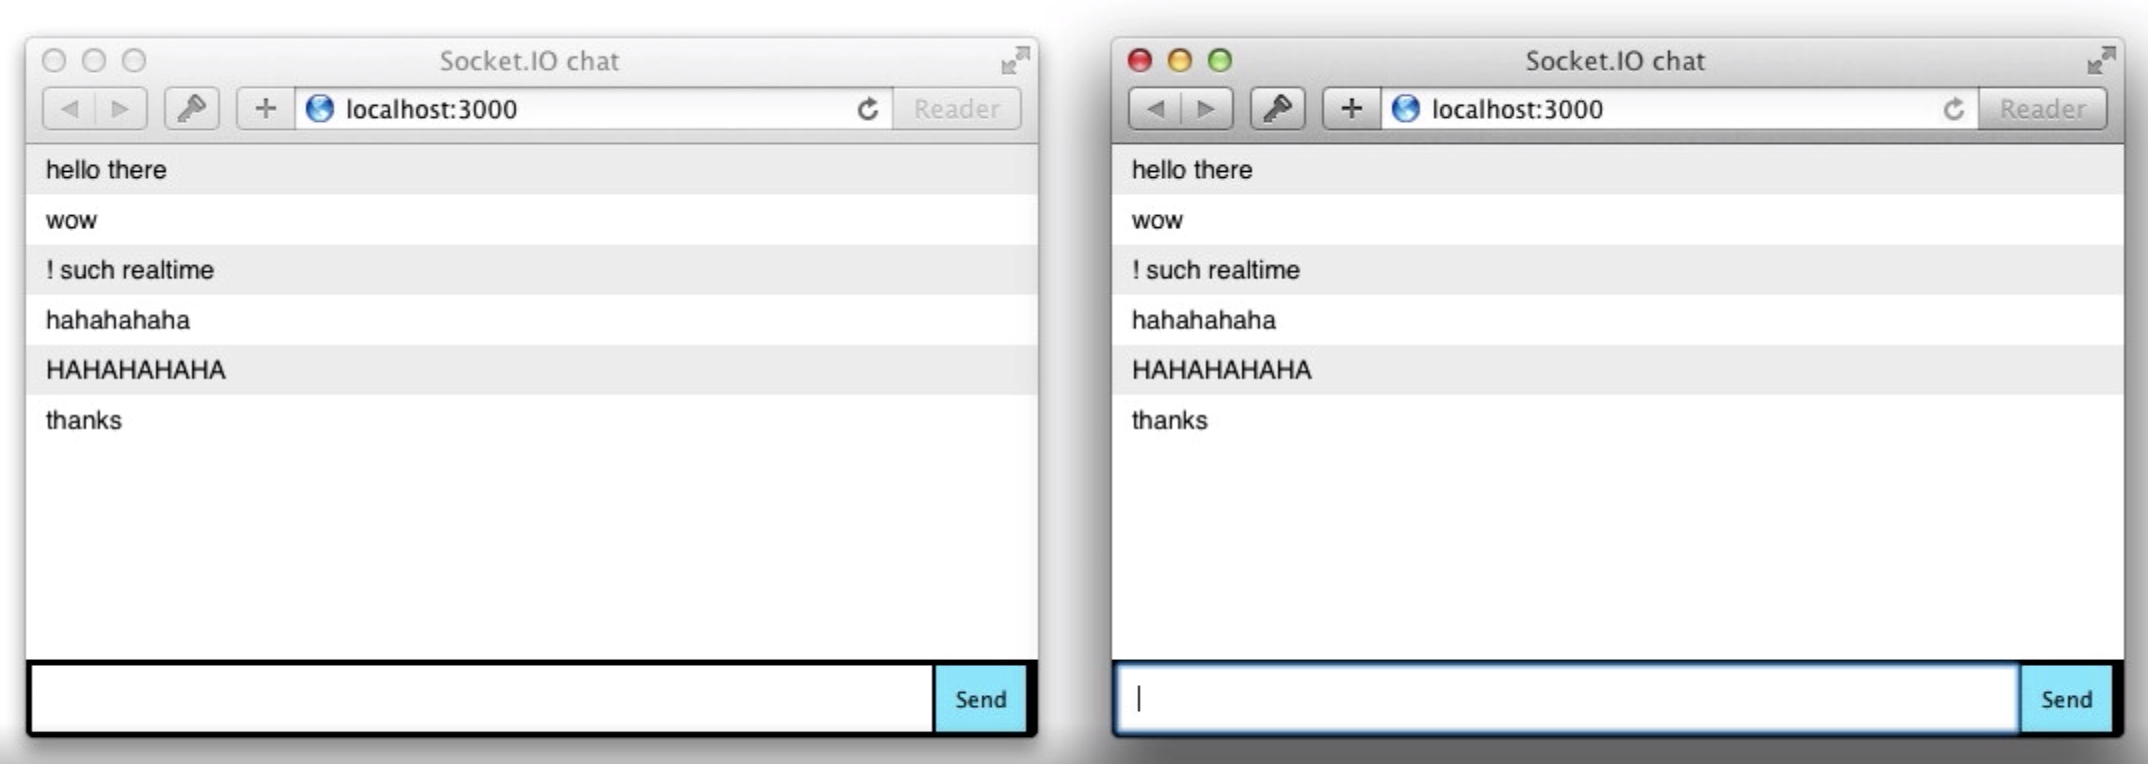 For more details: https://socket.io/get-started/chat/
2. Take nginx as a web server, make the nodejs app accessible
Even though the Caddy is the convenient server for https and the certificate application. The nginx is still the wider used solution for web service.
ref: https://www.sitepoint.com/configuring-nginx-ssl-node-js/
Configure the nginx for nodejs service on port 3000
configure the nginx.conf file, and add a server:
server {
  listen       80;
  server_name  <your_domain_name>;

  location / {
    proxy_pass http://localhost:3000;
    proxy_http_version 1.1;
    proxy_set_header Upgrade $http_upgrade;
    proxy_set_header Connection 'upgrade';
    proxy_set_header Host $host;
    proxy_cache_bypass $http_upgrade;
  }
}
The location / block tells NGINX what to do with any incoming request. We use proxy_pass to point to our Node.js application, which is running at http://localhost:3000 in this case.
3. Secure the nodejs app by https
- Install the cerbot: https://certbot.eff.org/lets-encrypt/centosrhel8-nginx (select the nginx and the os of web server)
- to configure ssl by
cerbot, runsudo /usr/local/bin/certbot-auto --nginx - obtain the below means success:
IMPORTANT NOTES:
 - Congratulations! Your certificate and chain have been saved at:
   /etc/letsencrypt/live/<yourdomain>/fullchain.pem
   Your key file has been saved at:
   /etc/letsencrypt/live/<yourdomain>/privkey.pem
   Your cert will expire on 2020-01-18. To obtain a new or tweaked
   version of this certificate in the future, simply run certbot-auto
   again with the "certonly" option. To non-interactively renew *all*
   of your certificates, run "certbot-auto renew"
- restart the service of nginx should make the ssl transmission enabled.
Note: the ssl goes on the 443 port by default. Check the port occupy bynetstat -tulnp. If the 443 is occupied, you may change the 443 into other port and specify the port when you aquire the web in web browser. e.g. :https://your_domain.com:port_num
The transmission should be secured now.
tip: You may need a simple CLI tool for ensuring that a given script runs continuously (i.e. forever).
4. Secure the socket.io
ref: node-js-socket-io-with-ssl
5. Bonus more: streaming binary data using socket-io
ref: streaming binary data using socket-io
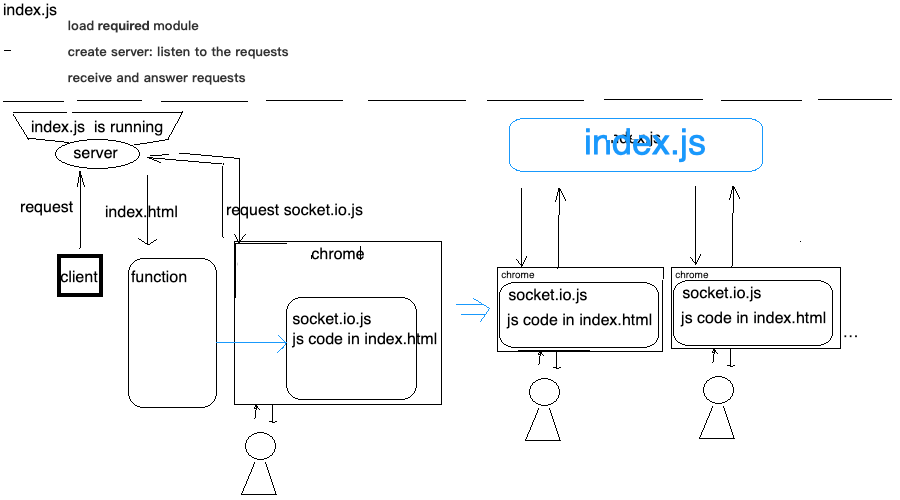
6. Bonus: request-response illustration figure