一、简介
ZooKeeper是一个分布式的,开放源码的分布式应用程序协调服务,是Google的Chubby一个开源的实现,是Hadoop和Hbase的重要组件。它是一个为分布式应用提供一致性服务的软件,提供的功能包括:配置维护、域名服务、分布式同步、组服务等。
ZooKeeper的目标就是封装好复杂易出错的关键服务,将简单易用的接口和性能高效、功能稳定的系统提供给用户。
二、环境
Windows或者Centos7,本例中使用Centos7测试,Windows上的用和Linux是相似的,只是启动解本执行对应.bat而不是.sh即可。
三、部署
1、下载最新版(3.4.13):https://archive.apache.org/dist/zookeeper/ 下载https://archive.apache.org/dist/zookeeper/zookeeper-3.4.13/zookeeper-3.4.13.tar.gz解压开即可。
2、解压开后,进入conf目录:
(a)如果是要配置单节点,则然后复制并重命名zoo_sample.cfg文件为zoo.cfg,然后修改zoo.cfg如下:
# The number of milliseconds of each tick
tickTime=2000
# The number of ticks that the initial
# synchronization phase can take
initLimit=10
# The number of ticks that can pass between
# sending a request and getting an acknowledgement
syncLimit=5
# the directory where the snapshot is stored.
# do not use /tmp for storage, /tmp here is just
# example sakes.
dataDir=D:\Applicaton\DevTools\Zookeeper\zookeeper-3.4.13\data
dataLogDir=D:\Applicaton\DevTools\Zookeeper\zookeeper-3.4.13\log
# the port at which the clients will connect
clientPort=2181
# the maximum number of client connections.
# increase this if you need to handle more clients
#maxClientCnxns=60
#
# Be sure to read the maintenance section of the
# administrator guide before turning on autopurge.
#
# http://zookeeper.apache.org/doc/current/zookeeperAdmin.html#sc_maintenance
#
# The number of snapshots to retain in dataDir
#autopurge.snapRetainCount=3
# Purge task interval in hours
# Set to "0" to disable auto purge feature
#autopurge.purgeInterval=1
配置说明:
tickTime:zookeeper中使用的基本时间单位, 毫秒值。
initLimit:这个配置项是用来配置 Zookeeper 接受客户端(这里所说的客户端不是用户连接 Zookeeper 服务器的客户端,而是 Zookeeper 服务器集群中连接到 Leader 的 Follower 服务器)初始化连接时最长能忍受多少个 tickTime 时间间隔数。这里设置为5表名最长容忍时间为 5 * 2000 = 10 秒。
syncLimit:这个配置标识 Leader 与 Follower 之间发送消息,请求和应答时间长度,最长不能超过多少个 tickTime 的时间长度,总的时间长度就是 2 * 2000 = 4 秒。
dataDir 和 dataLogDir 看配置就知道干吗的了,不用解释,Windows上和Linux上都可以,配置相应目录即可,使用\来作的转义。
clientPort:监听client连接的端口号,这里说的client就是连接到Zookeeper的代码程序。
server.{myid}={ip}:{leader服务器交换信息的端口}:{当leader服务器挂了后, 选举leader的端口}
maxClientCnxns:对于一个客户端的连接数限制,默认是60,这在大部分时候是足够了。但是在我们实际使用中发现,在测试环境经常超过这个数,经过调查发现有的团队将几十个应用全部部署到一台机器上,以方便测试,于是这个数字就超过了。
(b)如果是要配置多节点,则复制并重命名zoo_sample.cfg为zoo.server1.cfg、zoo.server2.cfg、zoo.server3.cfg三个文件,并追加server.<myid>=<serverIP>:<Leader交换信息端口>:<当Leader挂了后选举Leader的端口>。
server.{myid}={ip}:{leader服务器交换信息的端口}:{当leader服务器挂了后, 选举leader的端口}
其中zoo.server1.cfg内容如下:
# sending a request and getting an acknowledgement
syncLimit=5
# the directory where the snapshot is stored.
# do not use /tmp for storage, /tmp here is just
# example sakes.
dataDir=/tmp/zookeeper/server1
# the port at which the clients will connect
clientPort=2181
# the maximum number of client connections.
# increase this if you need to handle more clients
#maxClientCnxns=60
#
# Be sure to read the maintenance section of the
# administrator guide before turning on autopurge.
#
# http://zookeeper.apache.org/doc/current/zookeeperAdmin.html#sc_maintenance
#
# The number of snapshots to retain in dataDir
#autopurge.snapRetainCount=3
# Purge task interval in hours
# Set to "0" to disable auto purge feature
#autopurge.purgeInterval=1i
server.1=127.0.0.1:2888:3888
server.2=127.0.0.1:2889:3889
server.3=127.0.0.1:2890:3890
其中zoo.server2.cfg内容如下:
# The number of milliseconds of each tick
tickTime=2000
# The number of ticks that the initial
# synchronization phase can take
initLimit=10
# The number of ticks that can pass between
# sending a request and getting an acknowledgement
syncLimit=5
# the directory where the snapshot is stored.
# do not use /tmp for storage, /tmp here is just
# example sakes.
dataDir=/tmp/zookeeper/server2
# the port at which the clients will connect
clientPort=2182

# the maximum number of client connections.
# increase this if you need to handle more clients
#maxClientCnxns=60
#
# Be sure to read the maintenance section of the
# administrator guide before turning on autopurge.
#
# http://zookeeper.apache.org/doc/current/zookeeperAdmin.html#sc_maintenance
#
# The number of snapshots to retain in dataDir
#autopurge.snapRetainCount=3
# Purge task interval in hours
# Set to "0" to disable auto purge feature
#autopurge.purgeInterval=1i
server.1=127.0.0.1:2888:3888
server.2=127.0.0.1:2889:3889
server.3=127.0.0.1:2890:3890
其中zoo.server3.cfg内容如下:
# The number of milliseconds of each tick
tickTime=2000
# The number of ticks that the initial
# synchronization phase can take
initLimit=10
# The number of ticks that can pass between
# sending a request and getting an acknowledgement
syncLimit=5
# the directory where the snapshot is stored.
# do not use /tmp for storage, /tmp here is just
# example sakes.
dataDir=/tmp/zookeeper/server3
# the port at which the clients will connect
clientPort=2183
# the maximum number of client connections.
# increase this if you need to handle more clients
#maxClientCnxns=60
#
# Be sure to read the maintenance section of the
# administrator guide before turning on autopurge.
#
# http://zookeeper.apache.org/doc/current/zookeeperAdmin.html#sc_maintenance
#
# The number of snapshots to retain in dataDir
#autopurge.snapRetainCount=3
# Purge task interval in hours
# Set to "0" to disable auto purge feature
#autopurge.purgeInterval=1i
server.1=127.0.0.1:2888:3888
server.2=127.0.0.1:2889:3889
server.3=127.0.0.1:2890:3890
3、创建数据目录:
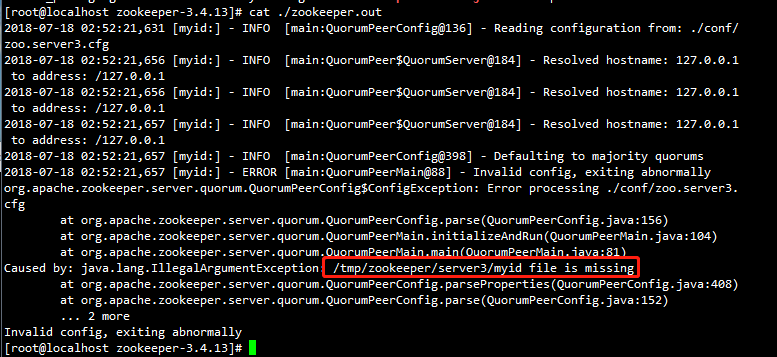
如果前面的配置是使用多节点集群模式时,请在相应的数据dataDir参数的目录下面创建一个名为myid的文件,内容就写各个服务器的myid标记,例如:前面的多节点配置中,在/tmp/zookeeper/server1、/tmp/zookeeper/server2、/tmp/zookeeper/server3目录下分别创建一个名为myid的文件,内容分别是:1、2、3。
可用下列角本快速创建实现:
echo 1>/tmp/zookeeper/server1/myid
echo 2>/tmp/zookeeper/server2/myid
echo 3>/tmp/zookeeper/server3/myid
如果不配置此步,则会出现下列错误:Caused by: java.lang.IllegalArgumentException: /tmp/zookeeper/server3/myid file is missing
3、启动程序
(a)如果是单节点程序,则进入zookeeper解压目录下执行:./bin/zkServer.sh start即可,系统默认会查找./conf/zoo.cfg作为配置文件。在Windows上则直接执行/bin/zkServer.bat即可。
(b)如果是多节点程序,则进入zookeeper解压目录下分别执行:
./bin/zkServer.sh start ./conf/zoo.server1.cfg
./bin/zkServer.sh start ./conf/zoo.server2.cfg
./bin/zkServer.sh start ./conf/zoo.server3.cfg
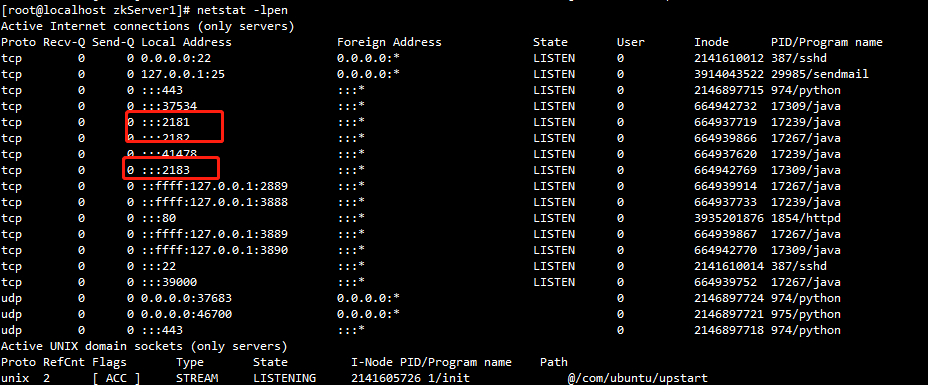
(c)使用ss -tanl或者netstat -lpen命令检查服务是否已启动。
三、用法
Zookeeper提供了Java操作的API,用法网上一找一大堆,本文就讲讲C#使用Zookeeper.net库操作的方法。
(1)新建Netframework控制台项目,并Nuget引入下列包:https://www.nuget.org/packages/ZooKeeper.Net/
(2)日志配置:
(a)在项目中新建log4net.config文件,并设置输出方式为:【如果较新则复制】 内容如下:
<?xml version="1.0" encoding="UTF-8"?>

<configuration status="ON">
  <log4net>
    <!--<appender name="ConsoleAppender" type="log4net.Appender.ConsoleAppender">
      <layout type="log4net.Layout.PatternLayout" value="%date [%thread] %-5level %logger - %message%newline" />
    </appender>-->
    <appender name="RollingLogFileAppender" type="log4net.Appender.RollingFileAppender">
      <file value="logs/" />
      <appendToFile value="true" />
      <rollingStyle value="Composite" />
      <staticLogFileName value="false" />
      <datePattern value="yyyyMMdd'.log'" />
      <maxSizeRollBackups value="10" />
      <maximumFileSize value="1MB" />
      <layout type="log4net.Layout.PatternLayout">
        <conversionPattern value="%date [%thread] %-5level %logger [%property{NDC}] - %message%newline" />
      </layout>
    </appender>
    <root level="WARN">
      <!--<appender-ref ref="ConsoleAppender" />-->
      <appender-ref ref="RollingLogFileAppender" />
    </root>
  </log4net>
</configuration>
(3)新建类:MyWatcher,内容如下:
using System;
using System.Collections.Generic;
using System.Linq;
using System.Text;
using System.Threading.Tasks;
using ZooKeeperNet;

namespace ZookeeperDemo
{
    class MyWatcher : ZooKeeperNet.IWatcher
    {
        public void Process(WatchedEvent @event)
        {
            var old = Console.ForegroundColor;
            Console.ForegroundColor = ConsoleColor.Yellow;
            Console.WriteLine(">>>>> Path:" + @event.Path + "   State:" + @event.State + "   Type:" + @event.Type);
            Console.ForegroundColor = old;
        }
    }
}
(4)在Program类中,注意连接集群时,用","分隔主机与Port。这样写:
using System;
using System.Collections.Generic;
using System.Linq;
using System.Text;
using System.Threading;
using System.Threading.Tasks;
using ZooKeeperNet;

namespace ZookeeperDemo
{
    class Program
    {
        static void Main(string[] args)
        {
            //配置日志
            log4net.Config.XmlConfigurator.Configure(new System.IO.FileInfo("log4net.config"));
            //测试Zookeper
            using (ZooKeeperNet.ZooKeeper zk = new ZooKeeperNet.ZooKeeper("xxx.xxx.xxx.xxx:2181,xxx.xxx.xxx.xxx:2182,xxx.xxx.xxx.xxx:2183", TimeSpan.FromSeconds(50), new MyWatcher()))
            {
                //注意,当第一次调用命令时,Zookeeper可能还未连接到服务器。此时是调用命令会提示ZooKeeperNet.KeeperException.ConnectionLossException错误,所以要当收到服务器第1次返回SyncConnected给MyWatcher时,再开始往下执行代码,或者判断State再往下走。
                while (zk.State != ZooKeeper.States.CONNECTED)
                {
                    Thread.Sleep(100);
                    Console.WriteLine("Connect ...");
                }
                Org.Apache.Zookeeper.Data.Stat stat = zk.Exists("/root", true);//使用 exists 函数时,如果节点不存在将返回一个 null 值。
                if (stat != null)
                {
                    //删除前,要先删除子节点。
                    var nodes = zk.GetChildren("/root", false);
                    foreach (var item in nodes)
                    {
                        zk.Delete(string.Format("/root/{0}", item), -1);
                    }
                    zk.Delete("/root", -1);//前一个参数代表节点名称(一般用作路径),后一个是版本号 -1表示全匹配
                }

                Console.WriteLine("Begin Create Node");
                String createResult = zk.Create("/root", "Song".GetBytes(), Ids.OPEN_ACL_UNSAFE, CreateMode.Persistent);//在创建节点的时候,需要提供节点的名称、数据、权限以及节点类型。
                Console.WriteLine("Create Node Success:" + createResult);//return '/root'


                Console.WriteLine("Begin Get Data");
                var bys = zk.GetData("/root", true, null);
                Console.WriteLine("Get Data Success:" + Encoding.UTF8.GetString(bys));//return 'Song'

                Console.WriteLine("Begin Update Data");
                var statSet = zk.SetData("/root", "Sindrol".GetBytes(), -1);//数据量应为1MB以下。
                if (statSet != null) Console.WriteLine("Update data Success!");

                Console.WriteLine("Create data Sequential.");
                zk.Create("/root/", "data1".GetBytes(), Ids.OPEN_ACL_UNSAFE, CreateMode.PersistentSequential); //路径中使用/结尾,则创建节点时当CreateMode.*Sequential时,会以数字序列形式生成子节点。
                zk.Create("/root/", "data2".GetBytes(), Ids.OPEN_ACL_UNSAFE, CreateMode.PersistentSequential);

                Console.WriteLine("Get Children:");
                IEnumerable<string> lst = zk.GetChildren("/root", true).ToList().ConvertAll(s => "/root/" + s);
                if (lst != null) Console.WriteLine("Get Children Success:" + string.Join(",", lst));

                Console.WriteLine("Get Children Data:");
                foreach (var item in lst)
                {
                    var path = item;
                    var dataBys = zk.GetData(path, true, null);
                    Console.WriteLine(Encoding.UTF8.GetString(dataBys));
                }
            }
        }
    }
}
好了,上面的代码就不多解释了,是最简单的了,和原生API也是很像的。
四、使用zkCli命令行工具
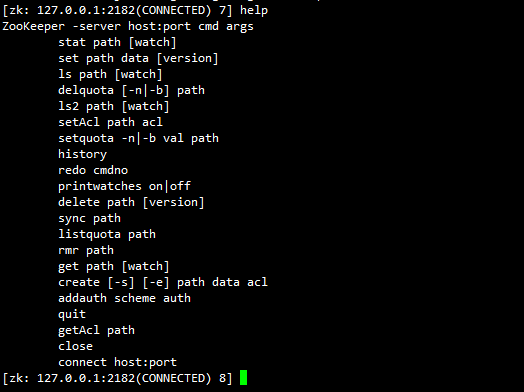
1、在zookeeper安装包解压目录下执行下列命令连接到Zookeeper并进入命令行模式,输入quit退出。
./bin/zkCli.sh -server 127.0.0.1:2181
./bin/zkCli.sh -server 127.0.0.1:2182
./bin/zkCli.sh -server 127.0.0.1:2183
2、命令行操作:
五、说明
Zookeeper集群操作时,当Set数据时,它会同时给所有的服务器设置相同的数据,保证数据一致性,内存中Zookeeper会维护一个Linux结构的树型目录。设置数据时,数量量最大是1MB,不要太多。