Spirng boot笔记
简介
Spring Boot是由Pivotal团队提供的全新框架,其设计目的是用来简化新Spring应用的初始搭建以及开发过程。该框架使用了特定的方式来进行配置,从而使开发人员不再需要定义样板化的配置。通过这种方式,Boot致力于在蓬勃发展的快速应用开发领域(rapid application development)成为领导者。
Spring boot的特点
1. 创建独立的Spring应用程序
2. 嵌入的Tomcat,无需部署WAR文件
3. 简化Maven配置
4. 自动配置Spring
5. 提供生产就绪型功能,如指标,健康检查和外部配置
6. 绝对没有代码生成和对XML没有要求配置
Spring boot的优点
spring boot 可以支持你快速的开发出 restful 风格的微服务架构
自动化确实方便,做微服务再合适不过了,单一jar包部署和管理都非常方便。只要系统架构设计合理,大型项目也能用,加上nginx负载均衡,轻松实现横向扩展
spring boot 要解决的问题, 精简配置是一方面, 另外一方面是如何方便的让spring生态圈和其他工具链整合(比如redis, email, elasticsearch)
入门
环境搭建
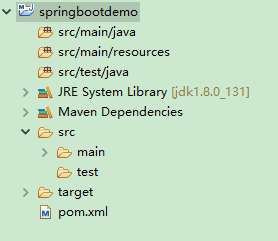
创建maven项目
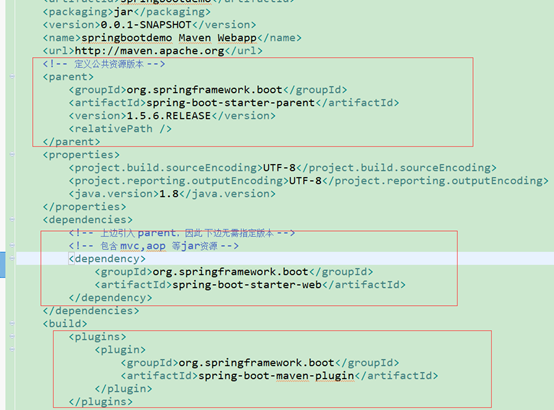
添加依赖
创建目录和配置文件
创建 src/main/resources 源文件目录,并在该目录下创建 application.properties 文件、static 和 templates 的文件夹。
application.properties:用于配置项目运行所需的配置数据。
static:用于存放静态资源,如:css、js、图片等。
templates:用于存放模板文件。

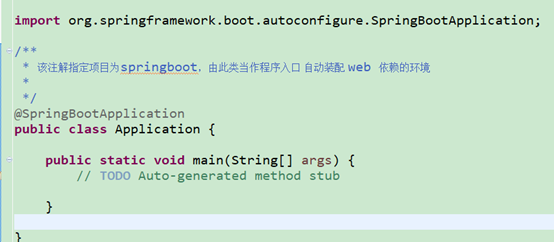
创建启动类
案例演示
创建 com.guige.springbootdemo.controller 包,在该包下创建一个 Controller 类,如下:
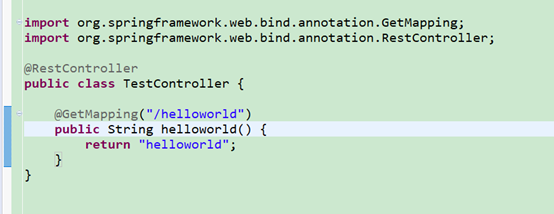
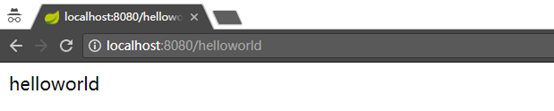
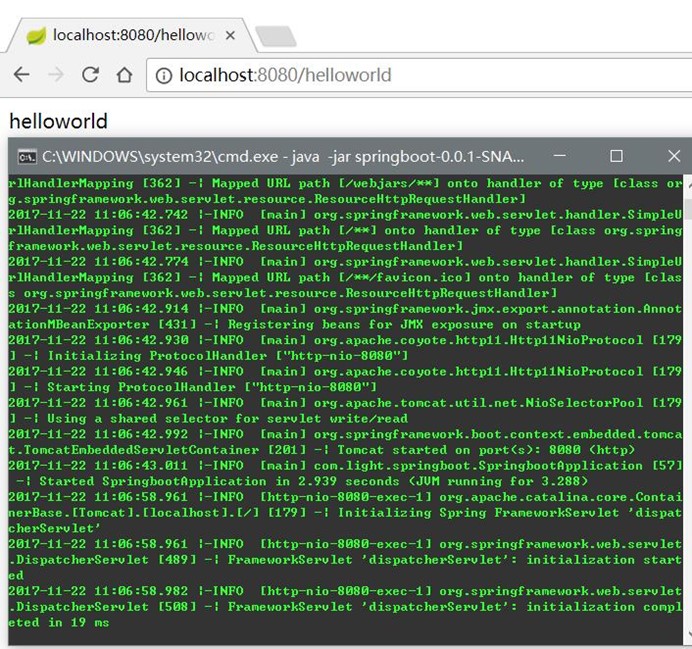
在 SpringbootApplication 文件中右键 Run as -> Java Application。当看到 "Tomcat started on port(s): 8080 (http)" 字样说明启动成功。
打开浏览器访问 http://localhost:8080/helloworld,结果如下:
热部署
当我们修改文件和创建文件时,都需要重新启动项目。这样频繁的操作很浪费时间,配置热部署可以让项目自动加载变化的文件,省去的手动操作。
在 pom.xml 文件中添加如下配置:
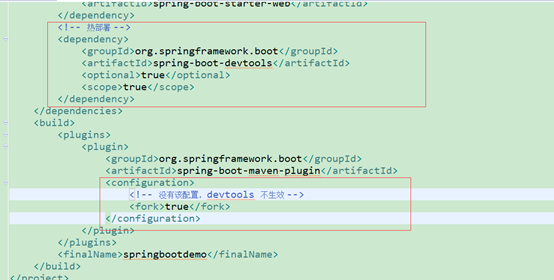
配置好 pom.xml 文件后,我们启动项目,随便创建/修改一个文件并保存,会发现控制台打印 springboot 重新加载文件的信息。

附加:
如果使用tk/mybatis 在resources目录创建META-INF文件夹
创建spring-devtools.properties文件
增加restart.include.companycommonlibs=tk/mybatis.*

多环境切换
application.properties 是 springboot 在运行中所需要的配置信息。
当我们在开发阶段,使用自己的机器开发,测试的时候需要用的测试服务器测试,上线时使用正式环境的服务器。
这三种环境需要的配置信息都不一样,当我们切换环境运行项目时,需要手动的修改多出配置信息,非常容易出错。
为了解决上述问题,springboot 提供多环境配置的机制,让开发者非常容易的根据需求而切换不同的配置环境。
在 src/main/resources 目录下创建三个配置文件:
application-dev.properties:用于开发环境
application-test.properties:用于测试环境
application-prod.properties:用于生产环境
我们可以在这个三个配置文件中设置不同的信息,application.properties 配置公共的信息。
在 application.properties 中配置:
spring.profiles.active=dev
表示激活 application-dev.properties 文件配置, springboot 会加载使用 application.properties 和 application-dev.properties 配置文件的信息。
同理,可将 spring.profiles.active 的值修改成 test 或 prod 达到切换环境的目的。

配置日志
配置 logback(官方推荐使用)
spring boot 默认会加载 classpath:logback-spring.xml 或者 classpath:logback-spring.groovy。
如需要自定义文件名称,在 application.properties 中配置 logging.config 选项即可。
在 src/main/resources 下创建 logback-spring.xml 文件,内容如下:
<?xml version="1.0" encoding="UTF-8"?>
<configuration>
<!-- 文件输出格式 -->
<property name="PATTERN" value="%-12(%d{yyyy-MM-dd HH:mm:ss.SSS}) |-%-5level [%thread] %c [%L] -| %msg%n" />
<!-- test文件路径 -->
<property name="TEST_FILE_PATH" value="d:/test.log" />
<!-- pro文件路径 -->
<property name="PRO_FILE_PATH" value="/opt/test/log" />
<!-- 开发环境 -->
<springProfile name="dev">
<appender name="CONSOLE" class="ch.qos.logback.core.ConsoleAppender">
<encoder>
<pattern>${PATTERN}</pattern>
</encoder>
</appender>
<logger name="com.guige" level="debug" />
<root level="info">
<appender-ref ref="CONSOLE" />
</root>
</springProfile>
<!-- 测试环境 -->
<springProfile name="test">
<!-- 每天产生一个文件 -->
<appender name="TEST-FILE" class="ch.qos.logback.core.rolling.RollingFileAppender">
<!-- 文件路径 -->
<file>${TEST_FILE_PATH}</file>
<rollingPolicy class="ch.qos.logback.core.rolling.TimeBasedRollingPolicy">
<!-- 文件名称 -->
<fileNamePattern>${TEST_FILE_PATH}/info.%d{yyyy-MM-dd}.log</fileNamePattern>
<!-- 文件最大保存历史数量 -->
<MaxHistory>100</MaxHistory>
</rollingPolicy>
<layout class="ch.qos.logback.classic.PatternLayout">
<pattern>${PATTERN}</pattern>
</layout>
</appender>
<root level="info">
<appender-ref ref="TEST-FILE" />
</root>
</springProfile>
<!-- 生产环境 -->
<springProfile name="prod">
<appender name="PROD_FILE" class="ch.qos.logback.core.rolling.RollingFileAppender">
<file>${PRO_FILE_PATH}</file>
<rollingPolicy class="ch.qos.logback.core.rolling.TimeBasedRollingPolicy">
<fileNamePattern>${PRO_FILE_PATH}/warn.%d{yyyy-MM-dd}.log</fileNamePattern>
<MaxHistory>100</MaxHistory>
</rollingPolicy>
<layout class="ch.qos.logback.classic.PatternLayout">
<pattern>${PATTERN}</pattern>
</layout>
</appender>
<root level="warn">
<appender-ref ref="PROD_FILE" />
</root>
</springProfile>
</configuration>
其中,springProfile 标签的 name 属性对应 application.properties 中的 spring.profiles.active 的配置。
即 spring.profiles.active 的值可以看作是日志配置文件中对应的 springProfile 是否生效的开关。
配置 log4j2
添加依赖
<dependency>
<groupId>org.springframework.boot</groupId>
<artifactId>spring-boot-starter-log4j2</artifactId>
</dependency>
配置日志文件
spring boot 默认会加载 classpath:log4j2.xml 或者 classpath:log4j2-spring.xml。
如需要自定义文件名称,在 application.properties 中配置 logging.config 选项即可。
log4j2.xml 文件内容如下:
<?xml version="1.0" encoding="utf-8"?>
<configuration>
<properties>
<!-- 文件输出格式 -->
<property name="PATTERN">%d{yyyy-MM-dd HH:mm:ss.SSS} |-%-5level [%thread] %c [%L] -| %msg%n</property>
</properties>
<appenders>
<Console name="CONSOLE" target="system_out">
<PatternLayout pattern="${PATTERN}" />
</Console>
</appenders>
<loggers>
<logger name="com.light.springboot" level="debug" />
<root level="info">
<appenderref ref="CONSOLE" />
</root>
</loggers>
</configuration>
log4j2 不能像 logback 那样在一个文件中设置多个环境的配置数据,只能命名 3 个不同名的日志文件,分别在 application-dev,application-test 和 application-prod 中配置 logging.config 选项。
除了在日志配置文件中设置参数之外,还可以在 application-*.properties 中设置,日志相关的配置:
logging.config # 日志配置文件路径,如 classpath:logback-spring.xml
logging.exception-conversion-word # 记录异常时使用的转换词
logging.file # 记录日志的文件名称,如:test.log
logging.level.* # 日志映射,如:logging.level.root=WARN,logging.level.org.springframework.web=DEBUG
logging.path # 记录日志的文件路径,如:d:/
logging.pattern.console # 向控制台输出的日志格式,只支持默认的 logback 设置。
logging.pattern.file # 向记录日志文件输出的日志格式,只支持默认的 logback 设置。
logging.pattern.level # 用于呈现日志级别的格式,只支持默认的 logback 设置。
logging.register-shutdown-hook # 初始化时为日志系统注册一个关闭钩子
打包运行
打包的形式有两种:jar 和 war。
默认情况下,通过 maven 执行 package 命令后,会生成 jar 包,且该 jar 包会内置了 tomcat 容器,因此我们可以通过 java -jar 就可以运行项目
打包成部署的war
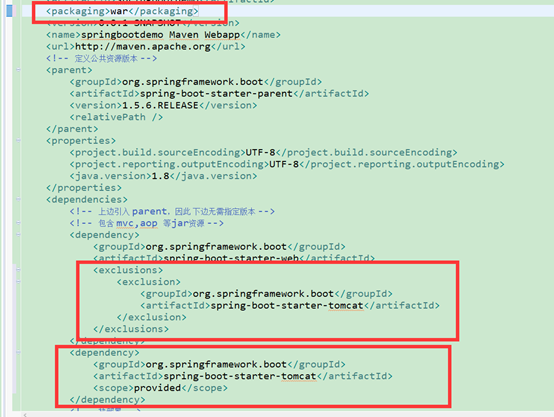
打包成功后,将 war 包部署到 tomcat 容器中运行即可。
Web配置
整合Freemarker
由于 jsp 不被 SpringBoot 推荐使用,所以模板引擎主要介绍 Freemarker 和 Thymeleaf。
添加 Freemarker 依赖
<!-- 添加 Freemarker 依赖 -->
<dependency>
<groupId>org.springframework.boot</groupId>
<artifactId>spring-boot-starter-freemarker</artifactId>
</dependency>
添加 Freemarker 模板配置
在 application.properties 中添加如下内容:
spring.freemarker.allow-request-override=false
spring.freemarker.cache=true
spring.freemarker.check-template-location=true
spring.freemarker.charset=UTF-8
spring.freemarker.content-type=text/html
spring.freemarker.expose-request-attributes=false
spring.freemarker.expose-session-attributes=false
spring.freemarker.expose-spring-macro-helpers=false
spring.freemarker.prefix=
spring.freemarker.suffix=.ftl
上述配置都是默认值。
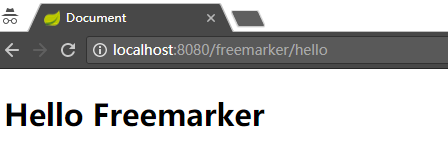
Freemarker 案例演示
在 controller 包中创建 FreemarkerController:

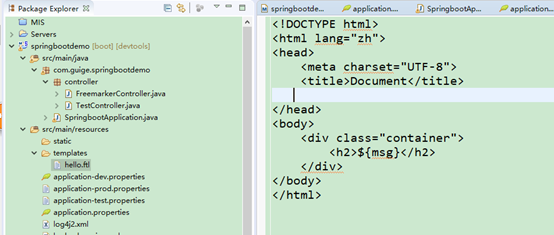
在 templates 目录中创建名为 hello.ftl 文件,内容如下:
结果如下:
整合Thymeleaf
添加 Thymeleaf 依赖
<dependency>
<groupId>org.springframework.boot</groupId>
<artifactId>spring-boot-starter-thymeleaf</artifactId>
</dependency>
在 application.properties 中添加如下内容:
spring.thymeleaf.cache=true
spring.thymeleaf.prefix=classpath:/templates/
spring.thymeleaf.suffix=.html
spring.thymeleaf.mode=HTML5
spring.thymeleaf.encoding=UTF-8
spring.thymeleaf.content-type=text/html
上述配置都是默认值。
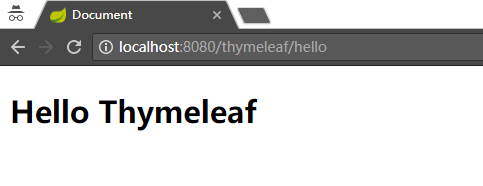
Thymeleaf 案例演示
在 controller 包中创建 ThymeleafController:
@Controller
@RequestMapping("thymeleaf")
public class ThymeleafController {
@RequestMapping("hello")
public String hello(Map<String,Object> map) {
map.put("msg", "Hello Thymeleaf");
return "hello";
}
}
在 template 目录下创建名为 hello.html 的文件,内容如下:
<!DOCTYPE html>
<html lang="zh">
<head>
<meta charset="UTF-8">
<title>Document</title>
</head>
<body>
<div class="container">
<h2 th:text="${msg}"></h2>
</div>
</body>
</html>
结果如下:
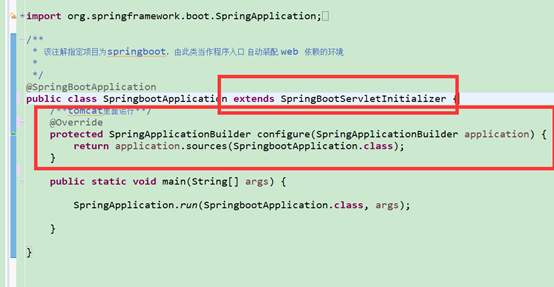
整合jsp
src/main/下创建web资源文件夹,webapp,并设置为资源文件。
application.properties文件设置如下
#jsp 支持
spring.mvc.view.suffix=.jsp
spring.mvc.view.prefix=/WEB-INF/jsp/
#关闭默认模板引擎
spring.thymeleaf.cache=false
spring.thymeleaf.enabled=false
maven配置jsp相关依赖。
<!--jsp支持-->
<!-- servlet 依赖. -->
<dependency>
<groupId>javax.servlet</groupId>
<artifactId>javax.servlet-api</artifactId>
<scope>provided</scope>
</dependency>
<dependency>
<groupId>javax.servlet</groupId>
<artifactId>jstl</artifactId>
</dependency>
<!-- tomcat 的支持.-->
<dependency>
<groupId>org.springframework.boot</groupId>
<artifactId>spring-boot-starter-tomcat</artifactId>
</dependency>
<dependency>
<groupId>org.apache.tomcat.embed</groupId>
<artifactId>tomcat-embed-jasper</artifactId>
<scope>provided</scope>
</dependency>
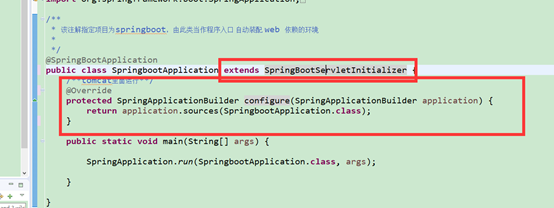
创建ServletInitalizer集成SpringbootServletInitalizer,绑定自己添加了@SpringbootApplication类。
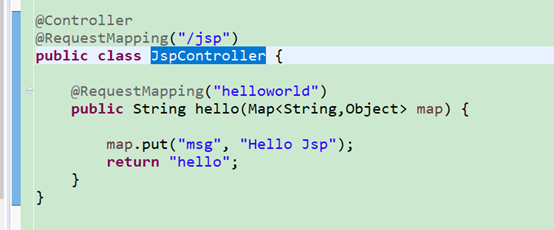
创建JspController
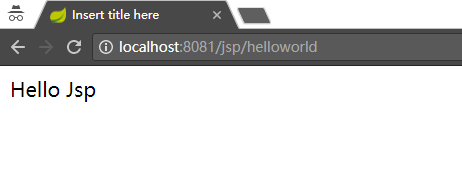
创建hello.jsp

效果如下
整合 Fastjson
添加依赖
<!-- fastjson -->
<dependency>
<groupId>com.alibaba</groupId>
<artifactId>fastjson</artifactId>
<version>1.2.35</version>
</dependency>
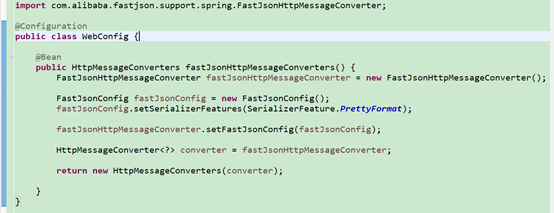
创建一个配置管理类 WebConfig ,如下:
演示案例:
创建一个实体类 User:

创建控制器类 FastjsonController :
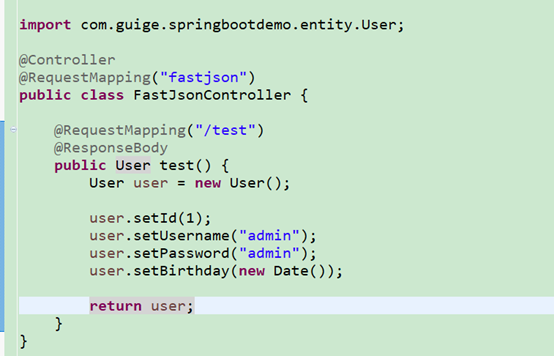
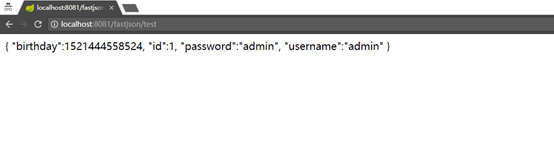
打开浏览器,访问 http://localhost:8080/fastjson/test,结果如下图:
此时,还不能看出 Fastjson 是否正常工作,我们在 User 类中使用 Fastjson 的注解,如下内容:
@JSONField(format="yyyy-MM-dd")
private Date birthday;
再次访问 http://localhost:8080/fastjson/test,结果如下图:
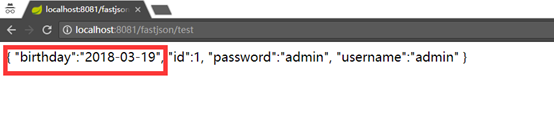
日期格式与我们修改的内容格式一致,说明 Fastjson 整合成功。
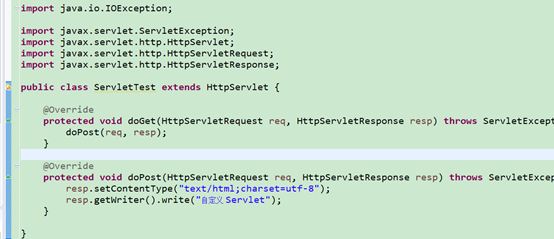
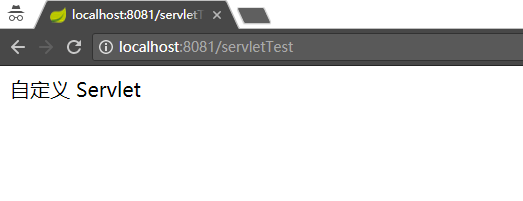
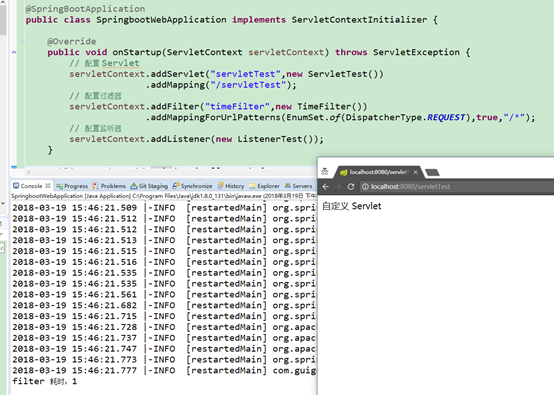
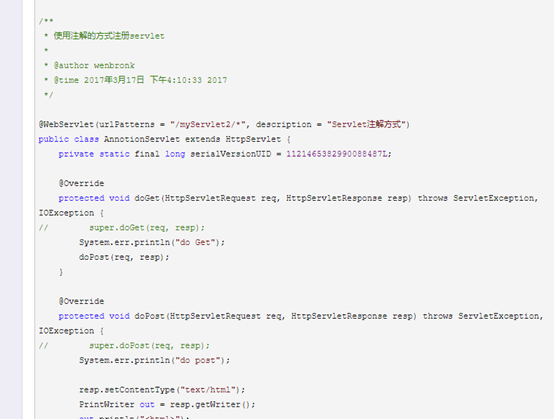
自定义 Servlet
编写 Servlet
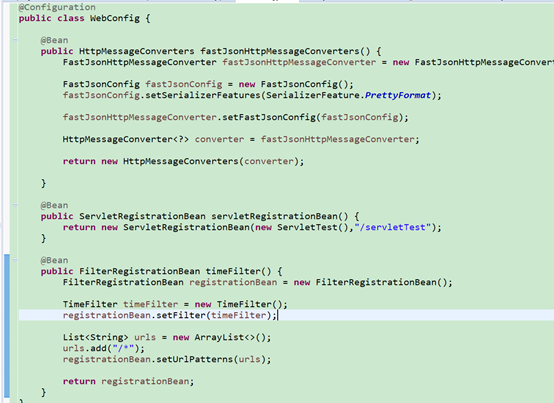
将 Servelt 注册成 Bean。在上文创建的 WebConfig 类中添加如下代码:

结果如下:
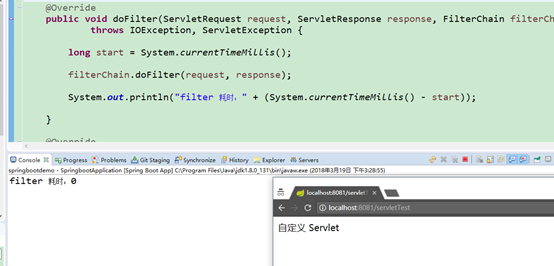
自定义过滤器/第三方过滤器
编写过滤器

注册过滤器
要是该过滤器生效,有两种方式:
1) 使用 @Component 注解
2) 添加到过滤器链中,此方式适用于使用第三方的过滤器。将过滤器写到 WebConfig 类中,如下:
结果如下:
自定义监听器
编写监听器

注册监听器
注册监听器为 Bean,在 WebConfig 配置类中添加如下代码:

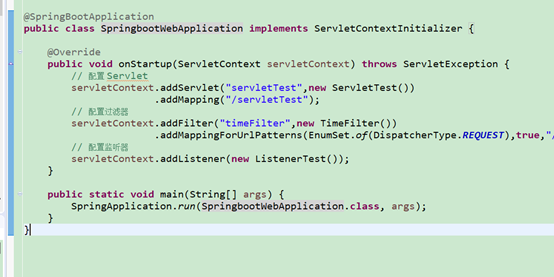
针对自定义 Servlet、Filter 和 Listener 的配置,还有另一种方式:
自定义拦截器
编写拦截器
使用 @Component 让 Spring 管理其生命周期:

注册拦截器
编写拦截器后,我们还需要将其注册到拦截器链中,如下配置:

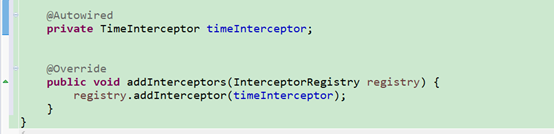
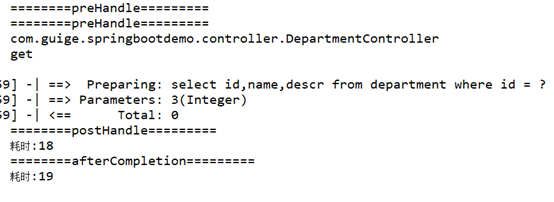
请求一个 controller ,结果如下:

配置 AOP 切面
添加依赖
<!-- aop -->
<dependency>
<groupId>org.springframework.boot</groupId>
<artifactId>spring-boot-starter-aop</artifactId>
</dependency>
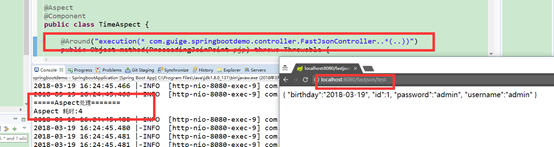
编写切面类
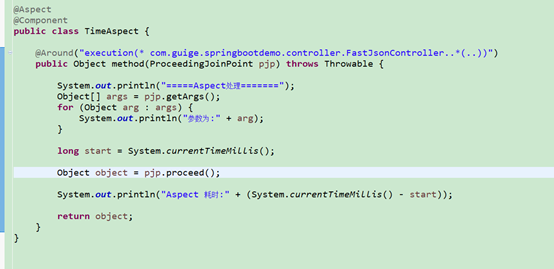
请求 FastJsonController 控制器的方法,结果如下:
错误处理
友好页面
先演示非友好页面,修改 FastJsonController 类中的 test 方法:

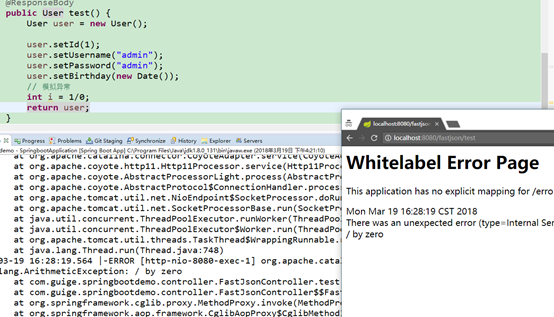
当系统报错时,返回到页面的内容通常是一些杂乱的代码段,这种显示对用户来说不友好,因此我们需要自定义一个友好的提示系统异常的页面。
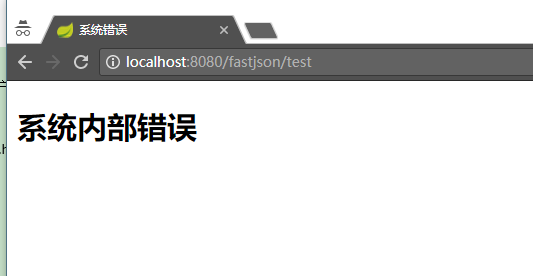
在 src/main/resources 下创建 /public/error,在该目录下再创建一个名为 5xx.html 文件,该页面的内容就是当系统报错时返回给用户浏览的内容:
<!DOCTYPE html>
<html lang="zh">
<head>
<meta charset="UTF-8">
<title>系统错误</title>
<link href="/css/index.css" rel="stylesheet"/>
</head>
<body>
<div class="container">
<h2>系统内部错误</h2>
</div>
</body>
</html>
路径时固定的,Spring Boot 会在系统报错时将返回视图指向该目录下的文件。
如下图:
上边处理的 5xx 状态码的问题,接下来解决 404 状态码的问题。
当出现 404 的情况时,用户浏览的页面也不够友好,因此我们也需要自定义一个友好的页面给用户展示。
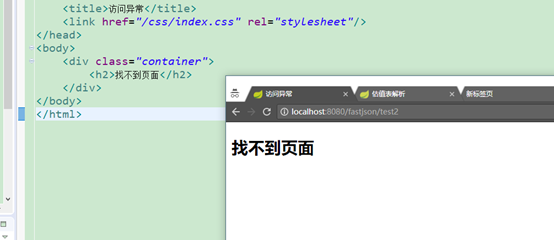
在 /public/error 目录下再创建一个名为 404.html 的文件:
<!DOCTYPE html>
<html lang="zh">
<head>
<meta charset="UTF-8">
<title>访问异常</title>
<link href="/css/index.css" rel="stylesheet"/>
</head>
<body>
<div class="container">
<h2>找不到页面</h2>
</div>
</body>
</html>
我们请求一个不存在的资源,如:http://localhost:8080/fastjson/test2,结果如下图:
全局异常捕获
如果项目前后端是通过 JSON 进行数据通信,则当出现异常时可以常用如下方式处理异常信息。
编写一个类充当全局异常的处理类,需要使用 @ControllerAdvice 和 @ExceptionHandler 注解:
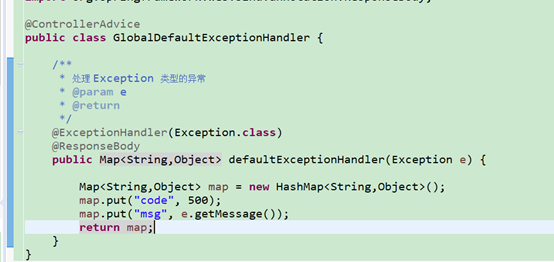
其中,方法名为任意名,入参一般使用 Exception 异常类,方法返回值可自定义。
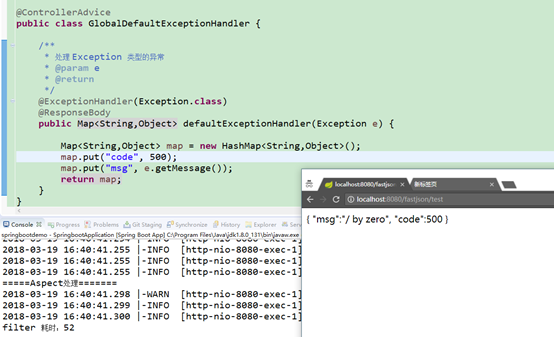
启动项目,访问 http://localhost:8080/fastjson/test,结果如下图:
我们还可以自定义异常,在全局异常的处理类中捕获和判断,从而对不同的异常做出不同的处理。
文件上传和下载
添加依赖
<!-- 工具 -->
<dependency>
<groupId>commons-io</groupId>
<artifactId>commons-io</artifactId>
<version>2.4</version>
</dependency>
实现
public class FileInfo {
private String path;
public FileInfo(String path) {
this.path = path;
}
public String getPath() {
return path;
}
public void setPath(String path) {
this.path = path;
}
}
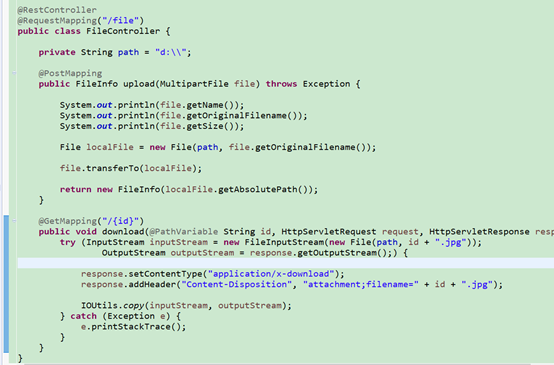
基本上都是在学习 javaweb 时用到的 API。
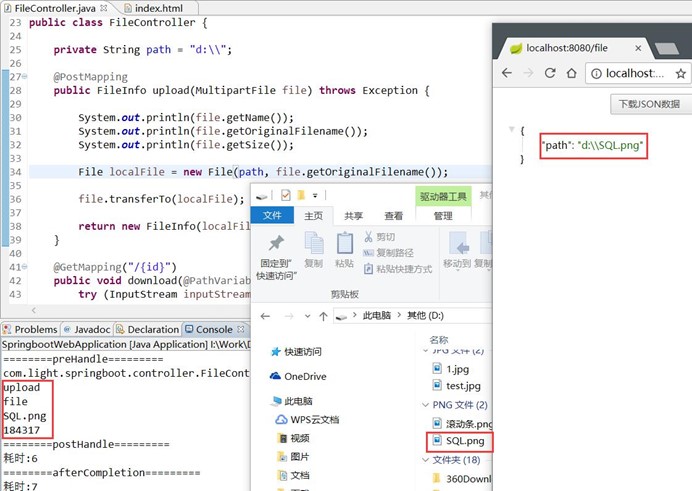
文件上传测试结果如下图:
CORS 支持
前端页面:
<!DOCTYPE html>
<html lang="en">
<head>
<meta charset="UTF-8">
<title>跨域测试</title>
</head>
<body>
<button id="test">测试</button>
<script type="text/javascript" src="jquery-1.12.3.min.js"></script>
<script type="text/javascript">
$(function() {
$("#test").on("click", function() {
$.ajax({
"url": "http://localhost:8080/fastjson/test",
"type": "get",
"dataType": "json",
"success": function(data) {
console.log(data);
}
})
});
});
</script>
</body>
</html>
通过 http 容器启动前端页面代码,笔者使用 Sublime Text 的插件启动的,测试结果如下:
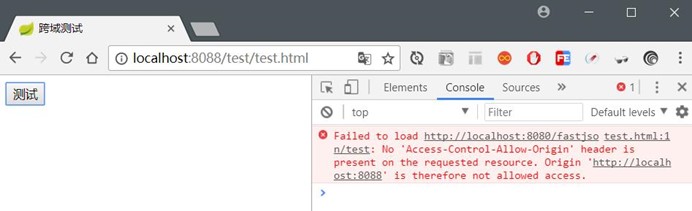
从图中可知,前端服务器启动端口为 8088 与后端服务器 8080 不同源,因此出现跨域的问题。
现在开始解决跨域问题,可以两种维度控制客户端请求。
粗粒度控制:
方式一
@Configuration
public class WebConfig {
@Bean
public WebMvcConfigurer corsConfigurer() {
return new WebMvcConfigurerAdapter() {
@Override
public void addCorsMappings(CorsRegistry registry) {
registry.addMapping("/fastjson/**")
.allowedOrigins("http://localhost:8088");// 允许 8088 端口访问
}
};
}
}
方式二
@Configuration
public class WebConfig extends WebMvcConfigurerAdapter{
@Override
public void addCorsMappings(CorsRegistry registry) {
registry.addMapping("/fastjson/**")
.allowedOrigins("http://localhost:8088");// 允许 8088 端口访问
}
}
配置后,重新发送请求,结果如下:
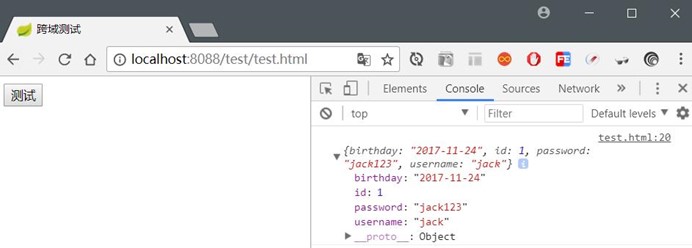
细粒度控制:
在 FastJsonController 类中的方法上添加 @CrossOrigin(origins="xx") 注解:
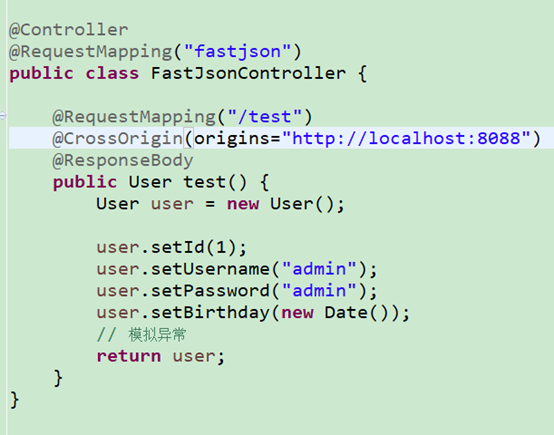
在使用该注解时,需要注意 @RequestMapping 使用的请求方式类型,即 GET 或 POST。
整合 Swagger2
添加依赖
<dependency>
<groupId>io.springfox</groupId>
<artifactId>springfox-swagger2</artifactId>
<version>2.7.0</version>
</dependency>
<dependency>
<groupId>io.springfox</groupId>
<artifactId>springfox-swagger-ui</artifactId>
<version>2.7.0</version>
</dependency>
重新创建一个配置类,如下:

为了能更好的说明接口信息,我们还可以在 Controller 类上使用 Swagger2 相关注解说明信息。
我们以 FastJsonController 为例:
@Api(value = "FastJson测试", tags = { "测试接口" })
@RestController
@RequestMapping("fastjson")
public class FastJsonController {
@ApiOperation("获取用户信息")
@ApiImplicitParam(name = "name", value = "用户名", dataType = "string", paramType = "query")
@GetMapping("/test/{name}")
public User test(@PathVariable("name") String name) {
User user = new User();
user.setId(1);
user.setUsername(name);
user.setPassword("jack123");
user.setBirthday(new Date());
return user;
}
}
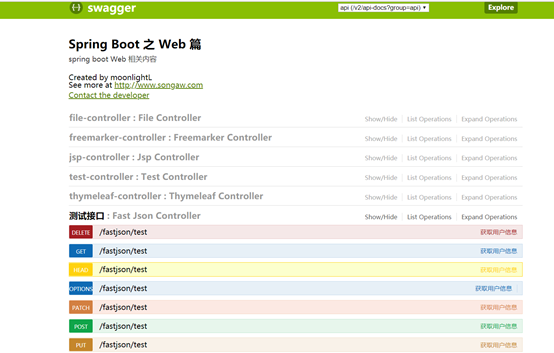
注意,上边的方法是用 @GetMapping 注解,如果只是使用 @RequestMapping 注解,不配置 method 属性,那么 API 文档会生成 7 种请求方式。
启动项目,打开浏览器访问 http://localhost:8080/swagger-ui.html。结果如下图:
持久层配置
整合 JdbcTemplate
添加依赖
<!-- jdbc依赖 -->
<dependency>
<groupId>org.springframework.boot</groupId>
<artifactId>spring-boot-starter-jdbc</artifactId>
</dependency>
<!-- mysql 驱动包 -->
<dependency>
<groupId>mysql</groupId>
<artifactId>mysql-connector-java</artifactId>
</dependency>
配置数据库连接
在 application-dev.properties 中添加:
spring.datasource.driver-class-name=com.mysql.jdbc.Driver
spring.datasource.url=jdbc:mysql://localhost:3306/springbootdemo?useUnicode=true&characterEncoding=utf8
spring.datasource.username=root
spring.datasource.password=root
其中,可以不指定 driver-class-name,因为 spring boot 会自动识别 url。
测试
在 MySQL 中创建名为 springboot 的数据库,在该库中创建 user 表:
CREATE TABLE `user` (
`id` INT(11) NOT NULL AUTO_INCREMENT,
`username` VARCHAR(50) NOT NULL,
`password` VARCHAR(64) NOT NULL,
`birthday` DATE NOT NULL,
PRIMARY KEY (`id`)
)
COLLATE='utf8_general_ci'
ENGINE=InnoDB
AUTO_INCREMENT=3
;
建实体类
public class User implements Serializable{
private static final long serialVersionUID = -6249397911566315813L;
private Integer id;
private String username;
private String password;
private Date birthday;
}
setter 和 getter 方法此处省略。
dao 接口
接口和实现类如下:
public interface UserDao {
public int insert(User user);
public int deleteById(Integer id);
public int update(User user);
public User getById(Integer id);
}
@Repository
public class UserDaoImpl implements UserDao {
@Autowired
private JdbcTemplate jdbcTemplate;
@Override
public int insert(User user) {
String sql = "insert into user(id,username,password,birthday) values(?,?,?,?)";
return this.jdbcTemplate.update(
sql,
user.getId(),
user.getUsername(),
user.getPassword(),
user.getBirthday()
);
}
@Override
public int deleteById(Integer id) {
String sql = "delete from user where id = ?";
return this.jdbcTemplate.update(sql,id);
}
@Override
public int update(User user) {
String sql = "update user set password = ? where id = ?";
return this.jdbcTemplate.update(
sql,
user.getPassword(),
user.getId()
);
}
@Override
public User getById(Integer id) {
String sql = "select * from user where id = ?";
return this.jdbcTemplate.queryForObject(sql, new RowMapper<User>() {
@Override
public User mapRow(ResultSet rs, int rowNum) throws SQLException {
User user = new User();
user.setId(rs.getInt("id"));
user.setUsername(rs.getString("username"));
user.setPassword(rs.getString("password"));
user.setBirthday(rs.getDate("birthday"));
return user;
}
},id);
}
}
测试类
@RunWith(SpringRunner.class)
@SpringBootTest
public class UserDaoTest {
@Autowired
private UserDao userDao;
@Test
public void testInsert() {
User user = new User();
user.setId(1);
user.setUsername("张三");
user.setPassword("zhangsan");
user.setBirthday(new Date());
int result = this.userDao.insert(user);
System.out.println(result);
}
@Test
public void testGetById() {
User user = this.userDao.getById(1);
System.out.println(user.getUsername());
}
@Test
public void testUpdate() {
User user = new User();
user.setId(1);
user.setPassword("zhangsan123");
this.userDao.update(user);
}
@Test
public void testDeleteById() {
int result = this.userDao.deleteById(1);
System.out.println(result);
}
}
测试结果省略...
如需打印日志,在日志配置文件中添加如下配置:
<logger name="org.springframework.jdbc.core.JdbcTemplate" level="debug"/>
整合 Spring-data-jpa
添加依赖
<dependency>
<groupId>org.springframework.boot</groupId>
<artifactId>spring-boot-starter-data-jpa</artifactId>
</dependency>
<dependency>
<groupId>mysql</groupId>
<artifactId>mysql-connector-java</artifactId>
</dependency>
配置数据库连接
####jdbc
spring.datasource.driver-class-name=com.mysql.jdbc.Driver
spring.datasource.url=jdbc:mysql://localhost:3306/springbootdemo?useUnicode=true&characterEncoding=utf8
spring.datasource.username=root
spring.datasource.password=root
# JPA
spring.jpa.hibernate.ddl-auto=update
spring.jpa.show-sql=true
建表
CREATE TABLE `role` (
`id` INT(11) NOT NULL AUTO_INCREMENT,
`name` VARCHAR(10) NOT NULL,
`descr` VARCHAR(100) NULL DEFAULT NULL,
PRIMARY KEY (`id`)
)
COLLATE='utf8_general_ci'
ENGINE=InnoDB
;
注意,主键 ID 为 AUTO_INCREMENT 自增。
建实体类
添加相应的注解
@Entity
public class Role implements Serializable{
private static final long serialVersionUID = 3926276668667517847L;
@Id
@GeneratedValue
private Integer id;
@Column
private String name;
@Column
private String descr;
}
setter 和 getter 方法此处省略。
Repository 接口
public interface RoleRepository extends JpaRepository<Role, Integer>{
}
测试类
@RunWith(SpringRunner.class)
@SpringBootTest
public class RoleRepositoryTest {
@Autowired
private RoleRepository roleRepository;
@Test
public void testInsert() {
Role role = new Role();
role.setName("管理员");
role.setDescr("测试");
Role result = this.roleRepository.save(role);
System.out.println(result);
}
@Test
public void testFindOne() {
Role role = this.roleRepository.findOne(1);
System.out.println(role);
}
@Test
public void testUpdate() {
Role role = new Role();
role.setId(1);
role.setName("管理员");
role.setDescr("控制权限");
Role result = this.roleRepository.save(role);
System.out.println(result);
}
@Test
public void testDelete() {
this.roleRepository.delete(1);
}
}
测试结果省略...
整合 Mybatis
整合 MyBatis 有两种方式:
1) 使用 mybatis 官方提供的 Spring Boot 整合包实现。
2) 使用 mybatis-spring 整合的方式,也就是传统的方式(推荐,此方式容易控制 MyBatis 的配置)。
配置依赖
方式一:
添加依赖:
<!-- mybatis -->
<dependency>
<groupId>org.mybatis.spring.boot</groupId>
<artifactId>mybatis-spring-boot-starter</artifactId>
<version>1.3.0</version>
</dependency>
<!-- mysql 驱动包 -->
<dependency>
<groupId>mysql</groupId>
<artifactId>mysql-connector-java</artifactId>
</dependency>
配置数据库连接:
在 application.properties 中添加:
# 数据源配置
spring.datasource.driver-class-name=com.mysql.jdbc.Driver
spring.datasource.url=jdbc:mysql://localhost:3380/springboot?useUnicode=true&characterEncoding=utf8
spring.datasource.username=root
spring.datasource.password=tiger
# mybatis 配置
mybatis.config-location=classpath:mybatis/mybatis-config.xml
mybatis.mapper-locations=classpath:mybatis/mapper/*.xml
方式二:
添加依赖:
<dependency>
<groupId>org.mybatis</groupId>
<artifactId>mybatis</artifactId>
<version>3.4.4</version>
</dependency>
<dependency>
<groupId>org.mybatis</groupId>
<artifactId>mybatis-spring</artifactId>
<version>1.3.1</version>
</dependency>
创建配置类:
@Configuration
public class MyBatisConfiguration {
@Bean
@ConditionalOnMissingBean // 当容器里没有指定的 Bean 的情况下创建该对象
public SqlSessionFactoryBean sqlSessionFactory(DataSource dataSource) {
SqlSessionFactoryBean sqlSessionFactoryBean = new SqlSessionFactoryBean();
// 设置数据源
sqlSessionFactoryBean.setDataSource(dataSource);
// 设置mybatis的主配置文件
ResourcePatternResolver resolver = new PathMatchingResourcePatternResolver();
Resource mybatisConfigXml = resolver.getResource("classpath:mybatis/mybatis-config.xml");
sqlSessionFactoryBean.setConfigLocation(mybatisConfigXml);
// 设置mapper映射文件
Resource[] mapperXml;
try {
mapperXml = resolver.getResources("classpath:mybatis/mapper/*.xml");
sqlSessionFactoryBean.setMapperLocations(mapperXml);
} catch (IOException e) {
e.printStackTrace();
}
// 设置别名包
//sqlSessionFactoryBean.setTypeAliasesPackage("com.guige");
return sqlSessionFactoryBean;
}
@Bean
@ConditionalOnBean(SqlSessionFactoryBean.class) // 当 SqlSessionFactoryBean 实例存在时创建对象
public MapperScannerConfigurer mapperScannerConfigurer() {
MapperScannerConfigurer mapperScannerConfigurer = new MapperScannerConfigurer();
mapperScannerConfigurer.setBasePackage("com.guige.springbootdemo.mapper");
return mapperScannerConfigurer;
}
}
此方式也需要在 applicaton.properties 配置数据库连接,当不需要在文件中配置 mybatis 相关参数。
以上便是两种方式的配置的不同之处。
在 src/main/resources 下创建 mybatis 文件夹,并在 mybatis 文件夹中创建 "mybatis-config.xml" 配置文件,内容如下:
<?xml version="1.0" encoding="UTF-8"?>
<!DOCTYPE configuration
PUBLIC "-//mybatis.org//DTD Config 3.0//EN"
"http://mybatis.org/dtd/mybatis-3-config.dtd">
<configuration>
<typeAliases>
</typeAliases>
</configuration>
mybatis 文件夹下再创建一个 "mapper" 文件夹,里边存放 Mpper 接口对应的 mapper 映射文件。
测试
建表
在 MySQL 中创建名为 springboot 的数据库,在该库中创建 department表:
CREATE TABLE `department` (
`id` INT(11) NOT NULL,
`name` VARCHAR(10) NOT NULL,
`descr` VARCHAR(50) NULL DEFAULT NULL,
PRIMARY KEY (`id`)
)
ENGINE=InnoDB
;
实体类
public class Department implements Serializable{
private static final long serialVersionUID = 6067283535977178571L;
private Integer id;
private String name;
private String descr;
}
setet 和 getter 方法省略。
Mapper 接口
@Mapper
public interface DepartmentMapper {
public void insert(Department department);
public Department getById(Integer id);
public void update(Department department);
public void deleteById(Integer id);
}
mybatis/mapper/departmentMapper.xml :
<?xml version="1.0" encoding="UTF-8"?>
<!DOCTYPE mapper PUBLIC "-//mybatis.org//DTD Mapper 3.0//EN"
"http://mybatis.org/dtd/mybatis-3-mapper.dtd">
<mapper namespace="com.guige.springbootdemo.mapper.DepartmentMapper">
<insert id="insert" parameterType="com.guige.springbootdemo.entity.Department">
insert into department(id,name,descr) values(#{id},#{name},#{descr})
</insert>
<select id="getById" parameterType="java.lang.Integer" resultType="com.guige.springbootdemo.entity.Department">
select id,name,descr from department where id = #{id}
</select>
<update id="update" parameterType="com.guige.springbootdemo.entity.Department">
update department set descr = #{descr} where id = #{id}
</update>
<delete id="deleteById" parameterType="java.lang.Integer">
delete from department where id = #{id}
</delete>
</mapper>
测试类
@RunWith(SpringRunner.class)
@SpringBootTest
public class DepartmentMapperTest {
@Autowired
private DepartmentMapper departmentMapper;
@Test
public void testInsert() {
Department department = new Department();
department.setId(1);
department.setName("研发部");
department.setDescr("开发产品");
this.departmentMapper.insert(department);
}
@Test
public void testGetById() {
Department department = this.departmentMapper.getById(1);
System.out.println(department);
}
@Test
public void testUpdate() {
Department department = new Department();
department.setId(1);
department.setDescr("开发高级产品");
this.departmentMapper.update(department);
}
@Test
public void testDeleteById() {
this.departmentMapper.deleteById(1);
}
}
Mybatis生成代码
在pom中build的插件中添加生成插件
<plugin>
<groupId>org.mybatis.generator</groupId>
<artifactId>mybatis-generator-maven-plugin</artifactId>
<version>1.3.2</version>
<configuration>
<configurationFile>src/main/resources/generator/generatorConfig.xml</configurationFile>
<overwrite>true</overwrite>
<verbose>true</verbose>
</configuration>
</plugin>
在resources下创建 generator文件夹
配置config.properties
datasource.url=jdbc:oracle:thin:@dbServer254:1521:guigedb1
datasource.username=mis
datasource.password=mis
datasource.driverClassName=oracle.jdbc.OracleDriver
##项目目录下执行命令:mvn mybatis-generator:generate
targetJavaProject=src/main/java
targetMapperBasePackage=com.guige.springbootdemo
targetModelPackage=com.guige.springbootdemo.entity
targetMapperPackage=com.guige.springbootdemo.mapper
targetResourcesProject=src/main/resources
targetXMLPackage=mybatis/mapper
创建generatorConfig.xml 配置文件
<?xml version="1.0" encoding="UTF-8"?>
<!DOCTYPE generatorConfiguration
PUBLIC "-//mybatis.org//DTD MyBatis Generator Configuration 1.0//EN"
"http://mybatis.org/dtd/mybatis-generator-config_1_0.dtd">
<generatorConfiguration>
<properties resource="generator/config.properties"/>
<classPathEntry location="D:work4 omcat2apache-tomcat-6.0.532webappsMISWEB-INFlibojdbc6.jar"/>
<!-- 一个数据库一个context -->
<context id="Mysql" targetRuntime="MyBatis3Simple" defaultModelType="flat">
<property name="javaFileEncoding" value="UTF-8"/>
<property name="beginningDelimiter" value="`"/>
<property name="endingDelimiter" value="`"/>
<!-- 为了防止生成的代码中有很多注释,比较难看,加入下面的配置控制 -->
<commentGenerator>
<property name="suppressAllComments" value="true" />
<property name="suppressDate" value="true" />
</commentGenerator>
<!-- jdbc连接 -->
<jdbcConnection driverClass="${datasource.driverClassName}"
connectionURL="${datasource.url}"
userId="${datasource.username}"
password="${datasource.password}">
</jdbcConnection>
<!-- 生成实体类地址 -->
<javaModelGenerator targetPackage="${targetModelPackage}" targetProject="${targetJavaProject}">
</javaModelGenerator>
<!-- 生成mapxml文件 -->
<sqlMapGenerator targetPackage="${targetXMLPackage}" targetProject="${targetResourcesProject}">
</sqlMapGenerator>
<!-- 生成mapxml对应client,也就是接口dao|mapper -->
<javaClientGenerator targetPackage="${targetMapperPackage}" targetProject="${targetJavaProject}"
type="XMLMAPPER"/>
<table tableName="conf_parser" domainObjectName="ConfParser" enableCountByExample="false" enableUpdateByExample="false" enableDeleteByExample="false" enableSelectByExample="false" selectByExampleQueryId="false">
<generatedKey column="id" sqlStatement="select SEQ_CONF_PARSER.NEXTVAL from dual" identity="false" />
</table>
</context>
</generatorConfiguration>
##项目目录下执行命令:mvn mybatis-generator:generate
配置 Druid 数据源
添加依赖
<dependency>
<groupId>com.alibaba</groupId>
<artifactId>druid-spring-boot-starter</artifactId>
<version>1.1.5</version>
</dependency>
添加配置
在 application.properties 中添加:
# 修改数据源
spring.datasource.type=com.alibaba.druid.pool.DruidDataSource
spring.datasource.druid.initial-size=5
spring.datasource.druid.min-idle=5
spring.datasource.druid.max-active=20
spring.datasource.druid.max-wait=60000
spring.datasource.druid.time-between-eviction-runs-millis=60000
spring.datasource.druid.min-evictable-idle-time-millis=300000
spring.datasource.druid.validation-query=SELECT 1 FROM DUAL
spring.datasource.druid.test-while-idle=true
spring.datasource.druid.test-on-borrow=false
spring.datasource.druid.test-on-return=false
spring.datasource.druid.pool-prepared-statements=true
spring.datasource.druid.max-pool-prepared-statement-per-connection-size=20
spring.datasource.druid.filters=stat,wall,log4j
通过上文 MyBatis 的测试代码,运行结果如下:
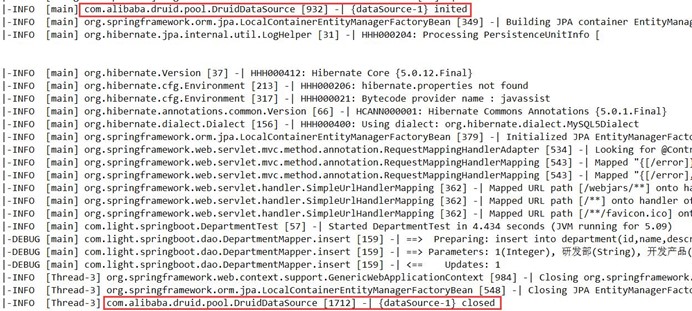
项目已经使用了 Druid 数据源了。
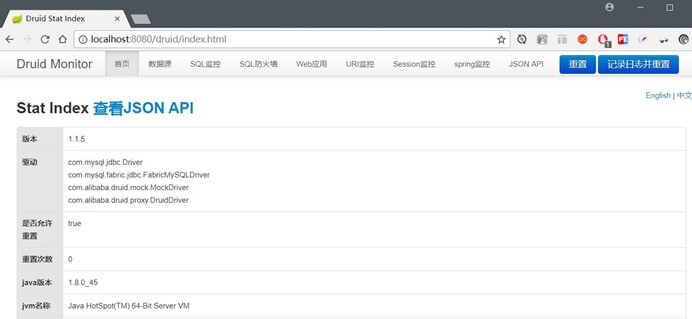
配置 Druid 监控
默认情况下,Druid 的监控统计功能和页面是开启的。
我们启动项目,访问 http://localhost:8080/druid/index.html,如下图:
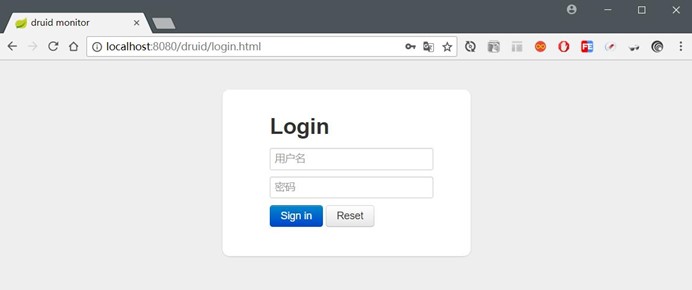
为了保证访问的安全性,我们可以如下配置:
在 application.properties 中添加:
## druid 监控
spring.datasource.druid.web-stat-filter.enabled=true
spring.datasource.druid.web-stat-filter.url-pattern=/*
spring.datasource.druid.web-stat-filter.exclusions=*.js,*.gif,*.jpg,*.png,*.css,*.ico,/druid/*
## druid 监控页面
spring.datasource.druid.stat-view-servlet.enabled=true
spring.datasource.druid.stat-view-servlet.url-pattern=/druid/*
spring.datasource.druid.stat-view-servlet.login-username=druid
spring.datasource.druid.stat-view-servlet.login-password=druid123
重启项目,再次访问 http://localhost:8080/druid/index.html 地址时需要身份验证:
参考资料
https://github.com/alibaba/druid/tree/master/druid-spring-boot-starter Druid 相关
缓存配置
当系统的访问量增大时,相应的数据库的性能就逐渐下降。但是,大多数请求都是在重复的获取相同的数据,如果使用缓存,将结果数据放入其中可以很大程度上减轻数据库的负担,提升系统的响应速度。
本篇将介绍 Spring Boot 中缓存和 NoSQL 的使用。
整合缓存
Spring Boot 针对不同的缓存技术实现了不同的封装,本篇主要介绍 EhCache 和 Redis 缓存。
Spring Boot 提供了以下几个注解实现声明式缓存:
|
注解 |
说明 |
|
@EnableCaching |
开启缓存功能,放在配置类或启动类上 |
|
@CacheConfig |
缓存配置,设置缓存名称 |
|
@Cacheable |
执行方法前先查询缓存是否有数据。有则直接返回缓存数据;否则查询数据再将数据放入缓存 |
|
@CachePut |
执行新增或更新方法后,将数据放入缓存中 |
|
@CacheEvict |
清除缓存 |
|
@Caching |
将多个缓存操作重新组合到一个方法中 |
EhCache 缓存
添加依赖
<dependency>
<groupId>org.springframework.boot</groupId>
<artifactId>spring-boot-starter-cache</artifactId>
</dependency>
<dependency>
<groupId>net.sf.ehcache</groupId>
<artifactId>ehcache</artifactId>
</dependency>
在 src/main/resources 目录下创建 ehcache.xml 文件,内容如下:
<ehcache xmlns:xsi="http://www.w3.org/2001/XMLSchema-instance"
xsi:noNamespaceSchemaLocation="ehcache.xsd">
<cache name="department"
eternal="false"
maxEntriesLocalHeap="0"
timeToIdleSeconds="50">
</cache>
</ehcache>
application.properties :
spring.cache.type=ehcache
spring.cache.ehcache.config=classpath:ehcache.xml
# 打印日志,查看 sql
logging.level.com.light.springboot=DEBUG
在持久层篇的基础上,结合 Mybatis 测试:
Service 层:
@CacheConfig(cacheNames = "department")
@Service
public class DepartmentService {
@Autowired
private DepartmentMapper departmentMapper;
@CachePut(key = "#department.id")
public Department save(Department department) {
System.out.println("保存 id=" + department.getId() + " 的数据");
this.departmentMapper.insert(department);
return department;
}
@CachePut(key = "#department.id")
public Department update(Department department) {
System.out.println("修改 id=" + department.getId() + " 的数据");
this.departmentMapper.update(department);
return department;
}
@Cacheable(key = "#id")
public Department getDepartmentById(Integer id) {
System.out.println("获取 id=" + id + " 的数据");
Department department = this.departmentMapper.getById(id);
return department;
}
@CacheEvict(key = "#id")
public void delete(Integer id) {
System.out.println("删除 id=" + id + " 的数据");
this.departmentMapper.deleteById(id);
}
}
控制层:
@Controller
@RequestMapping("department")
@ResponseBody
public class DepartmentController {
@Autowired
private DepartmentService departmentService;
@RequestMapping("save")
public Map<String,Object> save(Department department) {
this.departmentService.save(department);
Map<String,Object> map = new HashMap<String,Object>();
map.put("code", "200");
map.put("msg", "保存成功");
return map;
}
@RequestMapping("get/{id}")
public Map<String,Object> get(@PathVariable("id") Integer id) {
Department department = this.departmentService.getDepartmentById(id);
Map<String,Object> map = new HashMap<String,Object>();
map.put("code", "200");
map.put("msg", "获取成功");
map.put("data", department);
return map;
}
@RequestMapping("update")
public Map<String,Object> update(Department department) {
this.departmentService.update(department);
Map<String,Object> map = new HashMap<String,Object>();
map.put("code", "200");
map.put("msg", "修改成功");
return map;
}
@RequestMapping("delete/{id}")
public Map<String,Object> delete(@PathVariable("id") Integer id) {
this.departmentService.delete(id);
Map<String,Object> map = new HashMap<String,Object>();
map.put("code", "200");
map.put("msg", "删除成功");
return map;
}
}
启动类:
添加 @EnableCaching 注解,开启缓存功能。
@EnableCaching
@SpringBootApplication
public class SpringbootNosqlApplication {
public static void main(String[] args) {
SpringApplication.run(SpringbootNosqlApplication.class, args);
}
}
测试说明
发送保存接口
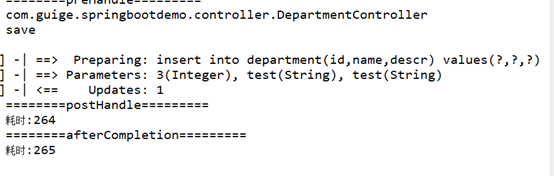
发送查询接口
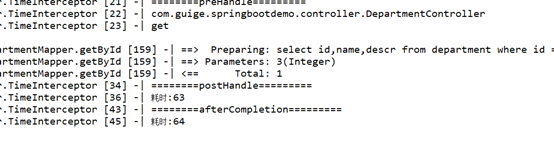
再次发送查询接口

说明数据是从缓存中获取。
发起修改请求:
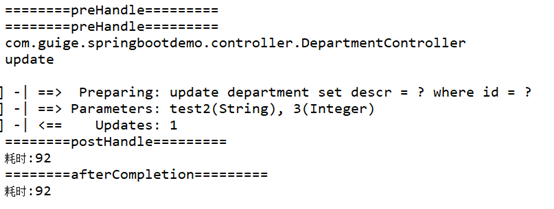
发送查询接口
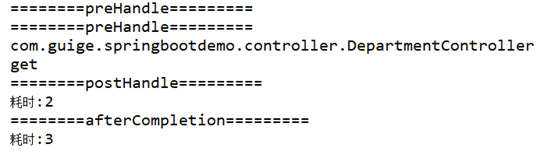
没有sql日志打印,但返回修改后的对象数据,说明缓存中的数据已经同步。
发起删除请求:
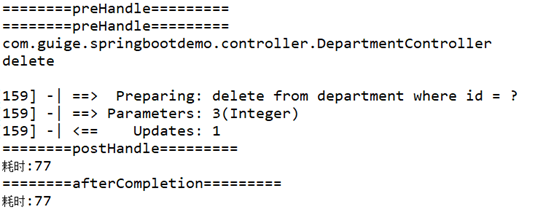
删除成功后,立刻发起查询请求,控制台打印 sql 语句,说明缓存数据被删除,需要查询数据库。
Redis 缓存
添加依赖
<dependency>
<groupId>org.springframework.boot</groupId>
<artifactId>spring-boot-starter-data-redis</artifactId>
</dependency>
添加配置
application.properties :
spring.redis.host=192.168.1.254
spring.redis.port=6379
spring.redis.password=123456
spring.redis.database=6
spring.redis.pool.max-active=8
spring.redis.pool.max-idle=8
spring.redis.pool.max-wait=-1
spring.redis.pool.min-idle=0
spring.redis.timeout=0
注意:spring.cache.type=redis,缓存类型设置成 redis。
完成上边 2 个步骤后,其他步骤与测试 Ehcache 时的步骤一致。
测试结果也一致,此处省略。
整合 Redis
在添加 redis 依赖包启动项目后,Spring Boot 会自动配置 RedisCacheManger 和 RedisTemplate 的 Bean。如果开发者不想使用 Spring Boot 写好的 Redis 缓存,而是想使用其 API 自己实现缓存功能、消息队列或分布式锁之类的需求时,可以继续往下浏览。
Spring Data Redis 为我们提供 RedisTemplate 和 StringRedisTemplate 两个模板进行数据操作,它们主要 的访问方法如下:
|
方法 |
说明 |
|
opsForValue() |
操作简单属性的数据 |
|
opsForList() |
操作含有 list 的数据 |
|
opsForSet() |
操作含有 set 的数据 |
|
opsForZSet() |
操作含有 zset 的数据 |
|
opsForHash() |
操作含有 hash 的数据 |
添加依赖
<dependency>
<groupId>org.springframework.boot</groupId>
<artifactId>spring-boot-starter-data-redis</artifactId>
</dependency>
配置连接
spring.redis.host=192.168.1.254
spring.redis.port=6379
spring.redis.password=123456
spring.redis.database=6
spring.redis.pool.max-active=8
spring.redis.pool.max-idle=8
spring.redis.pool.max-wait=-1
spring.redis.pool.min-idle=0
spring.redis.timeout=0
编码
@Component
public class RedisDao {
@Autowired
private StringRedisTemplate stringRedisTemplate;
public void set(String key, String value) {
this.stringRedisTemplate.opsForValue().set(key, value);
}
public String get(String key) {
return this.stringRedisTemplate.opsForValue().get(key);
}
public void delete(String key) {
this.stringRedisTemplate.delete(key);
}
}
测试
@RunWith(SpringRunner.class)
@SpringBootTest
public class RedisDaoTest {
@Autowired
private RedisDao redisDao;
@Test
public void testSet() {
String key = "name";
String value = "zhangsan";
this.redisDao.set(key, value);
}
@Test
public void testGet() {
String key = "name";
String value = this.redisDao.get(key);
System.out.println(value);
}
@Test
public void testDelete() {
String key = "name";
this.redisDao.delete(key);
}
}
测试结果

整合 MongoDB
Spring Data MongoDB 提供了 MongoTemplate 模板 和 Repository 让开发者进行数据访问。
添加依赖
<dependency>
<groupId>org.springframework.boot</groupId>
<artifactId>spring-boot-starter-data-mongodb</artifactId>
</dependency>
配置连接
spring.data.mongodb.host=192.168.2.25
spring.data.mongodb.port=27017
spring.data.mongodb.database=test
编码
使用 MongoTemplate
@Component
public class MongodbDao {
@Autowired
private MongoTemplate mongoTemplate;
public void insert(User user) {
this.mongoTemplate.insert(user);
}
public void deleteById(int id) {
Criteria criteria = Criteria.where("id").is(id);
Query query = new Query(criteria);
this.mongoTemplate.remove(query, User.class);
}
public void update(User User) {
Criteria criteria = Criteria.where("id").is(User.getId());
Query query = new Query(criteria);
Update update = new Update();
update.set("password", User.getPassword());
this.mongoTemplate.updateMulti(query, update, User.class);
}
public User getById(int id) {
Criteria criteria = Criteria.where("id").is(id);
Query query = new Query(criteria);
return this.mongoTemplate.findOne(query, User.class);
}
public List<User> getAll() {
List<User> userList = this.mongoTemplate.findAll(User.class);
return userList;
}
}
使用 Repository
public interface UserRepository extends MongoRepository<User, Integer> {
}
测试方式与 Redis 测试大同小异,测试结果省略...
参考资料
https://docs.spring.io/spring/docs/current/spring-framework-reference/integration.html 官方文档
消息中间件
在消息中间件中有 2 个重要的概念:消息代理和目的地。当消息发送者发送消息后,消息就被消息代理接管,消息代理保证消息传递到指定目的地。
我们常用的消息代理有 JMS 和 AMQP 规范。对应地,它们常见的实现分别是 ActiveMQ 和 RabbitMQ。
整合 ActiveMQ
添加依赖
<dependency>
<groupId>org.springframework.boot</groupId>
<artifactId>spring-boot-starter-activemq</artifactId>
</dependency>
<!-- 如果需要配置连接池,添加如下依赖 -->
<dependency>
<groupId>org.apache.activemq</groupId>
<artifactId>activemq-pool</artifactId>
</dependency>
添加配置
# activemq 配置
spring.activemq.broker-url=tcp://192.168.2.12:61616
spring.activemq.user=admin
spring.activemq.password=admin
spring.activemq.pool.enabled=false
spring.activemq.pool.max-connections=50
# 使用发布/订阅模式时,下边配置需要设置成 true
spring.jms.pub-sub-domain=false
此处 spring.activemq.pool.enabled=false,表示关闭连接池。
编码
配置类:
@Configuration
public class JmsConfirguration {
public static final String QUEUE_NAME = "activemq_queue";
public static final String TOPIC_NAME = "activemq_topic";
@Bean
public Queue queue() {
return new ActiveMQQueue(QUEUE_NAME);
}
@Bean
public Topic topic() {
return new ActiveMQTopic(TOPIC_NAME);
}
}
负责创建队列和主题。
消息生产者:
@Component
public class JmsSender {
@Autowired
private Queue queue;
@Autowired
private Topic topic;
@Autowired
private JmsMessagingTemplate jmsTemplate;
public void sendByQueue(String message) {
this.jmsTemplate.convertAndSend(queue, message);
}
public void sendByTopic(String message) {
this.jmsTemplate.convertAndSend(topic, message);
}
}
消息消费者:
@Component
public class JmsReceiver {
@JmsListener(destination = JmsConfirguration.QUEUE_NAME)
public void receiveByQueue(String message) {
System.out.println("接收队列消息:" + message);
}
@JmsListener(destination = JmsConfirguration.TOPIC_NAME)
public void receiveByTopic(String message) {
System.out.println("接收主题消息:" + message);
}
}
消息消费者使用 @JmsListener 注解监听消息。
测试
@RunWith(SpringRunner.class)
@SpringBootTest
public class JmsTest {
@Autowired
private JmsSender sender;
@Test
public void testSendByQueue() {
for (int i = 1; i < 6; i++) {
this.sender.sendByQueue("hello activemq queue " + i);
}
}
@Test
public void testSendByTopic() {
for (int i = 1; i < 6; i++) {
this.sender.sendByTopic("hello activemq topic " + i);
}
}
}
打印结果:
接收队列消息:hello activemq queue 1
接收队列消息:hello activemq queue 2
接收队列消息:hello activemq queue 3
接收队列消息:hello activemq queue 4
接收队列消息:hello activemq queue 5
测试发布/订阅模式时,设置 spring.jms.pub-sub-domain=true
接收主题消息:hello activemq topic 1
接收主题消息:hello activemq topic 2
接收主题消息:hello activemq topic 3
接收主题消息:hello activemq topic 4
接收主题消息:hello activemq topic 5
整合 RabbitMQ
添加依赖
<dependency>
<groupId>org.springframework.boot</groupId>
<artifactId>spring-boot-starter-amqp</artifactId>
</dependency>
添加配置
spring.rabbitmq.host=192.168.2.30
spring.rabbitmq.port=5672
spring.rabbitmq.username=light
spring.rabbitmq.password=light
spring.rabbitmq.virtual-host=/test
编码
配置类:
@Configuration
public class AmqpConfirguration {
//=============简单、工作队列模式===============
public static final String SIMPLE_QUEUE = "simple_queue";
@Bean
public Queue queue() {
return new Queue(SIMPLE_QUEUE, true);
}
//===============发布/订阅模式============
public static final String PS_QUEUE_1 = "ps_queue_1";
public static final String PS_QUEUE_2 = "ps_queue_2";
public static final String FANOUT_EXCHANGE = "fanout_exchange";
@Bean
public Queue psQueue1() {
return new Queue(PS_QUEUE_1, true);
}
@Bean
public Queue psQueue2() {
return new Queue(PS_QUEUE_2, true);
}
@Bean
public FanoutExchange fanoutExchange() {
return new FanoutExchange(FANOUT_EXCHANGE);
}
@Bean
public Binding fanoutBinding1() {
return BindingBuilder.bind(psQueue1()).to(fanoutExchange());
}
@Bean
public Binding fanoutBinding2() {
return BindingBuilder.bind(psQueue2()).to(fanoutExchange());
}
//===============路由模式============
public static final String ROUTING_QUEUE_1 = "routing_queue_1";
public static final String ROUTING_QUEUE_2 = "routing_queue_2";
public static final String DIRECT_EXCHANGE = "direct_exchange";
@Bean
public Queue routingQueue1() {
return new Queue(ROUTING_QUEUE_1, true);
}
@Bean
public Queue routingQueue2() {
return new Queue(ROUTING_QUEUE_2, true);
}
@Bean
public DirectExchange directExchange() {
return new DirectExchange(DIRECT_EXCHANGE);
}
@Bean
public Binding directBinding1() {
return BindingBuilder.bind(routingQueue1()).to(directExchange()).with("user");
}
@Bean
public Binding directBinding2() {
return BindingBuilder.bind(routingQueue2()).to(directExchange()).with("order");
}
//===============主题模式============
public static final String TOPIC_QUEUE_1 = "topic_queue_1";
public static final String TOPIC_QUEUE_2 = "topic_queue_2";
public static final String TOPIC_EXCHANGE = "topic_exchange";
@Bean
public Queue topicQueue1() {
return new Queue(TOPIC_QUEUE_1, true);
}
@Bean
public Queue topicQueue2() {
return new Queue(TOPIC_QUEUE_2, true);
}
@Bean
public TopicExchange topicExchange() {
return new TopicExchange(TOPIC_EXCHANGE);
}
@Bean
public Binding topicBinding1() {
return BindingBuilder.bind(topicQueue1()).to(topicExchange()).with("user.add");
}
@Bean
public Binding topicBinding2() {
return BindingBuilder.bind(topicQueue2()).to(topicExchange()).with("user.#");
}
}
RabbitMQ 有多种工作模式,因此配置比较多。想了解相关内容的读者可以查看本站的《RabbitMQ 工作模式介绍》或者自行百度相关资料。
消息生产者:
@Component
public class AmqpSender {
@Autowired
private AmqpTemplate amqpTemplate;
/**
* 简单模式发送
*
* @param message
*/
public void simpleSend(String message) {
this.amqpTemplate.convertAndSend(AmqpConfirguration.SIMPLE_QUEUE, message);
}
/**
* 发布/订阅模式发送
*
* @param message
*/
public void psSend(String message) {
this.amqpTemplate.convertAndSend(AmqpConfirguration.FANOUT_EXCHANGE, "", message);
}
/**
* 路由模式发送
*
* @param message
*/
public void routingSend(String routingKey, String message) {
this.amqpTemplate.convertAndSend(AmqpConfirguration.DIRECT_EXCHANGE, routingKey, message);
}
/**
* 主题模式发送
*
* @param routingKey
* @param message
*/
public void topicSend(String routingKey, String message) {
this.amqpTemplate.convertAndSend(AmqpConfirguration.TOPIC_EXCHANGE, routingKey, message);
}
}
消息消费者:
@Component
public class AmqpReceiver {
/**
* 简单模式接收
*
* @param message
*/
@RabbitListener(queues = AmqpConfirguration.SIMPLE_QUEUE)
public void simpleReceive(String message) {
System.out.println("接收消息:" + message);
}
/**
* 发布/订阅模式接收
*
* @param message
*/
@RabbitListener(queues = AmqpConfirguration.PS_QUEUE_1)
public void psReceive1(String message) {
System.out.println(AmqpConfirguration.PS_QUEUE_1 + "接收消息:" + message);
}
@RabbitListener(queues = AmqpConfirguration.PS_QUEUE_2)
public void psReceive2(String message) {
System.out.println(AmqpConfirguration.PS_QUEUE_2 + "接收消息:" + message);
}
/**
* 路由模式接收
*
* @param message
*/
@RabbitListener(queues = AmqpConfirguration.ROUTING_QUEUE_1)
public void routingReceive1(String message) {
System.out.println(AmqpConfirguration.ROUTING_QUEUE_1 + "接收消息:" + message);
}
@RabbitListener(queues = AmqpConfirguration.ROUTING_QUEUE_2)
public void routingReceive2(String message) {
System.out.println(AmqpConfirguration.ROUTING_QUEUE_2 + "接收消息:" + message);
}
/**
* 主题模式接收
*
* @param message
*/
@RabbitListener(queues = AmqpConfirguration.TOPIC_QUEUE_1)
public void topicReceive1(String message) {
System.out.println(AmqpConfirguration.TOPIC_QUEUE_1 + "接收消息:" + message);
}
@RabbitListener(queues = AmqpConfirguration.TOPIC_QUEUE_2)
public void topicReceive2(String message) {
System.out.println(AmqpConfirguration.TOPIC_QUEUE_2 + "接收消息:" + message);
}
}
测试
@RunWith(SpringRunner.class)
@SpringBootTest
public class AmqpTest {
@Autowired
private AmqpSender sender;
@Test
public void testSimpleSend() {
for (int i = 1; i < 6; i++) {
this.sender.simpleSend("test simpleSend " + i);
}
}
@Test
public void testPsSend() {
for (int i = 1; i < 6; i++) {
this.sender.psSend("test psSend " + i);
}
}
@Test
public void testRoutingSend() {
for (int i = 1; i < 6; i++) {
this.sender.routingSend("order", "test routingSend " + i);
}
}
@Test
public void testTopicSend() {
for (int i = 1; i < 6; i++) {
this.sender.topicSend("user.add", "test topicSend " + i);
}
}
}
测试结果略过。。。
踩坑提醒1:ACCESS_REFUSED - Login was refused using authentication mechanism PLAIN
解决方案:
1) 请确保用户名和密码是否正确,需要注意的是用户名和密码的值是否包含空格或制表符(笔者测试时就是因为密码多了一个制表符导致认证失败)。
2) 如果测试账户使用的是 guest,需要修改 rabbitmq.conf 文件。在该文件中添加 "loopback_users = none" 配置。
踩坑提醒2:Cannot prepare queue for listener. Either the queue doesn't exist or the broker will not allow us to use it
解决方案:
我们可以登陆 RabbitMQ 的管理界面,在 Queue 选项中手动添加对应的队列。
参考资料
Rabbit MQ 访问控制相关
Lombok 简单入门
Lombok 是一个 Java 库,它作为插件安装至编辑器中,其作用是通过简单注解来精简代码,以此达到消除冗长代码的目的。
优点
1) 通过注解自动生成成员变量的 getter、setter 等方法,使代码简洁
2) 修改类变量名时,无需关注其 getter、setter 等方法
缺点
降低源码文件的可读性。
原理
从 Java 6 开始,javac 就支持 JSR 269 API 规范,而 Lombok 实现 JSR 269 Pluggable Annation Processing API 规范。
当我们编写代码并保存后,编辑器会自动编译源码文件,在这个过程中,源码先被转化为 AST。
然后,Lombok 插件解析 AST 是否存在 Lombok 的注解。如果存在则修改 AST ,使其生成注解对应的代码。
最终将修改的 AST 解析并生成字节码文件。
安装插件
为编辑器安装 Lombok 插件。
IDEA 安装
在 IDEA 界面点击 "File"->"Settings" 弹出设置框,选择左侧 "Plugins",通过 "Browse repositories" 搜索 lombok 关键字安装即可。
Eclipse 安装
点击 Lombok.jar,下载该 jar 包。
双击 jar 包会弹出一个安装界面,点击界面的"Specify location..." 安装选择 Eclipse 的安装路径(精确到 eclipse.exe)。
使用
使用 Lombok 的方法非常简单,就是在类上或者成员变量上添加注解即可。
为了能使用注解,我们还需要在项目中引入 lombok 的 jar 包。
<dependency>
<groupId>org.projectlombok</groupId>
<artifactId>lombok</artifactId>
</dependency>
注解介绍
Lombok 常用的注解如下:
|
注解名 |
作用描述 |
|
@Getter |
作用在类上或成员变量上,生成对应的 getter 方法 |
|
@Setter |
作用在类上或成员变量上,生成对应的 setter 方法 |
|
@NoArgsConstructor |
作用在类上,生成对应的无参构造方法 |
|
@AllArgsConstructor |
作用在类上,生成对应的有参构造方法 |
|
@ToString |
作用在类上,生成对应的 toString 方法 |
|
@EqualsAndHashCode |
作用在类上,生成对应的 equals 和 hashCode 方法 |
|
@Data |
作用在类上,效果等同于上述 5 个注解,排除 @AllArgsConstructor 功能 |
|
作用在类上,生成对应的 Logger 对象,变量名为 log |
本次测试使用 Ecplise 编辑器。
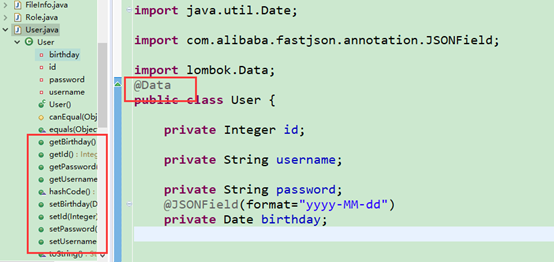
@Data
public class User {
private int id;
private String name;
private String password;
private Date birthday;
}
当添加注解保存文件后,Ecplise 编辑器的 Outline 视图结果如下:
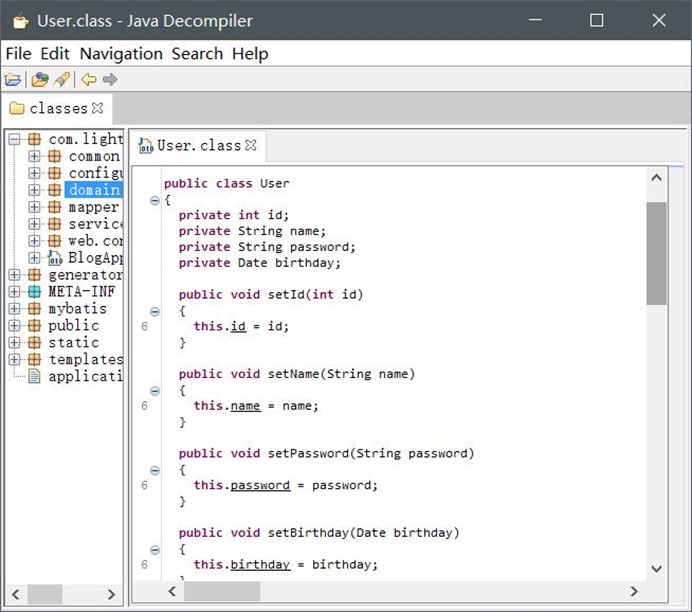
我们还可以使用 jd-gui 等反编译工具查看源码,结果如下:
参考资料
http://jnb.ociweb.com/jnb/jnbJan2010.html 官方文档