线程池原理和使用在面试中被高频问到,比如阿里的面试题。下面我们针对问题来进行回答。
为什么要使用线程池?
线程池的使用场景有2:
1, 高并发场景:比如tomcat的处理机制,内置了线程池处理http请求;
2,异步任务处理:比如spring的异步方法改造,增加@Asyn注解对应了一个线程池;
使用线程池带来的好处有4:
1, 降低系统的消耗:线程池复用了内部的线程对比处理任务的时候创建线程处理完毕销毁线程降低了线程资源消耗
2,提高系统的响应速度:任务不必等待新线程创建,直接复用线程池的线程执行
3,提高系统的稳定性:线程是重要的系统资源,无限制创建系统会奔溃,线程池复用了线程,系统会更稳定
4,提供了线程的可管理功能:暴露了方法,可以对线程进行调配,优化和监控
线程池的实现原理
线程池处理任务流程
当向线程池中提交一个任务,线程池内部是如何处理任务的?
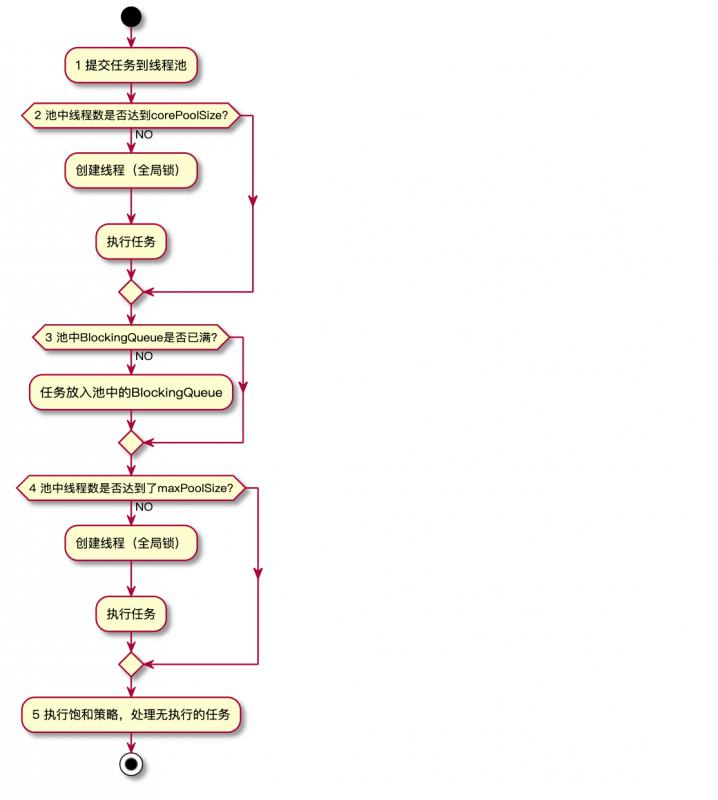
先来个流程图,标识一下核心处理步骤:

1,线程池内部会获取activeCount, 判断活跃线程的数量是否大于等于corePoolSize(核心线程数量),如果没有,会使用全局锁锁定线程池,创建工作线程,处理任务,然后释放全局锁;
2,判断线程池内部的阻塞队列是否已经满了,如果没有,直接把任务放入阻塞队列;
3,判断线程池的活跃线程数量是否大于等于maxPoolSize,如果没有,会使用全局锁锁定线程池,创建工作线程,处理任务,然后释放全局锁;
4,如果以上条件都满足,采用饱和处理策略处理任务。
说明:使用全局锁是一个严重的可升缩瓶颈,在线程池预热之后(即内部线程数量大于等于corePoolSize),任务的处理是直接放入阻塞队列,这一步是不需要获得全局锁的,效率比较高。
源码如下:
    public void execute(Runnable command) {
        if (command == null)
            throw new NullPointerException();

        int c = ctl.get();
        if (workerCountOf(c) < corePoolSize) {
            if (addWorker(command, true))
                return;
            c = ctl.get();
        }
        if (isRunning(c) && workQueue.offer(command)) {
            int recheck = ctl.get();
            if (! isRunning(recheck) && remove(command))
                reject(command);
            else if (workerCountOf(recheck) == 0)
                addWorker(null, false);
        }
        else if (!addWorker(command, false))
            reject(command);
    }
注释没保留,注释的内容就是上面画的流程图;
代码的逻辑就是流程图中的逻辑。
线程池中的线程执行任务
执行任务模型如下:

线程池中的线程执行任务分为以下两种情况:
1, 创建一个线程,会在这个线程中执行当前任务;
2,工作线程完成当前任务之后,会死循环从BlockingQueue中获取任务来执行;
代码如下:
  private boolean addWorker(Runnable firstTask, boolean core) {
        retry:
        for (int c = ctl.get();;) {
            // Check if queue empty only if necessary.
            if (runStateAtLeast(c, SHUTDOWN)
                && (runStateAtLeast(c, STOP)
                    || firstTask != null
                    || workQueue.isEmpty()))
                return false;

            for (;;) {
                if (workerCountOf(c)
                    >= ((core ? corePoolSize : maximumPoolSize) & COUNT_MASK))
                    return false;
                if (compareAndIncrementWorkerCount(c))
                    break retry;
                c = ctl.get();  // Re-read ctl
                if (runStateAtLeast(c, SHUTDOWN))
                    continue retry;
                // else CAS failed due to workerCount change; retry inner loop
            }
        }

        boolean workerStarted = false;
        boolean workerAdded = false;
        Worker w = null;
        try {
            w = new Worker(firstTask);
            final Thread t = w.thread;
            if (t != null) {
                final ReentrantLock mainLock = this.mainLock;
                mainLock.lock();
                try {
                    // Recheck while holding lock.
                    // Back out on ThreadFactory failure or if
                    // shut down before lock acquired.
                    int c = ctl.get();

                    if (isRunning(c) ||
                        (runStateLessThan(c, STOP) && firstTask == null)) {
                        if (t.isAlive()) // precheck that t is startable
                            throw new IllegalThreadStateException();
                        workers.add(w);
                        int s = workers.size();
                        if (s > largestPoolSize)
                            largestPoolSize = s;
                        workerAdded = true;
                    }
                } finally {
                    //释放锁
                    mainLock.unlock();
                }
                if (workerAdded) {
                    //执行提交的任务,然后设置工作线程为启动状态
                    t.start();
                    workerStarted = true;
                }
            }
        } finally {
            if (! workerStarted)
                addWorkerFailed(w);
        }
        return workerStarted;
    }
从代码中可以看到:把工作线程增加到线程池,然后释放锁,执行完提交进来的任务之后,新建的工作线程状态为启动状态;
线程池的使用
创建线程池
创建线程池使用线程池的构造函数来创建。
/**
     * Creates a new {@code ThreadPoolExecutor} with the given initial
     * parameters.
     *
     * @param corePoolSize the number of threads to keep in the pool, even
     *        if they are idle, unless {@code allowCoreThreadTimeOut} is set
     * @param maximumPoolSize the maximum number of threads to allow in the
     *        pool
     * @param keepAliveTime when the number of threads is greater than
     *        the core, this is the maximum time that excess idle threads
     *        will wait for new tasks before terminating.
     * @param unit the time unit for the {@code keepAliveTime} argument
     * @param workQueue the queue to use for holding tasks before they are
     *        executed.  This queue will hold only the {@code Runnable}
     *        tasks submitted by the {@code execute} method.
     * @param threadFactory the factory to use when the executor
     *        creates a new thread
     * @param handler the handler to use when execution is blocked
     *        because the thread bounds and queue capacities are reached
     * @throws IllegalArgumentException if one of the following holds:<br>
     *         {@code corePoolSize < 0}<br>
     *         {@code keepAliveTime < 0}<br>
     *         {@code maximumPoolSize <= 0}<br>
     *         {@code maximumPoolSize < corePoolSize}
     * @throws NullPointerException if {@code workQueue}
     *         or {@code threadFactory} or {@code handler} is null
     */
    public ThreadPoolExecutor(int corePoolSize,
                              int maximumPoolSize,
                              long keepAliveTime,
                              TimeUnit unit,
                              BlockingQueue<Runnable> workQueue,
                              ThreadFactory threadFactory,
                              RejectedExecutionHandler handler)
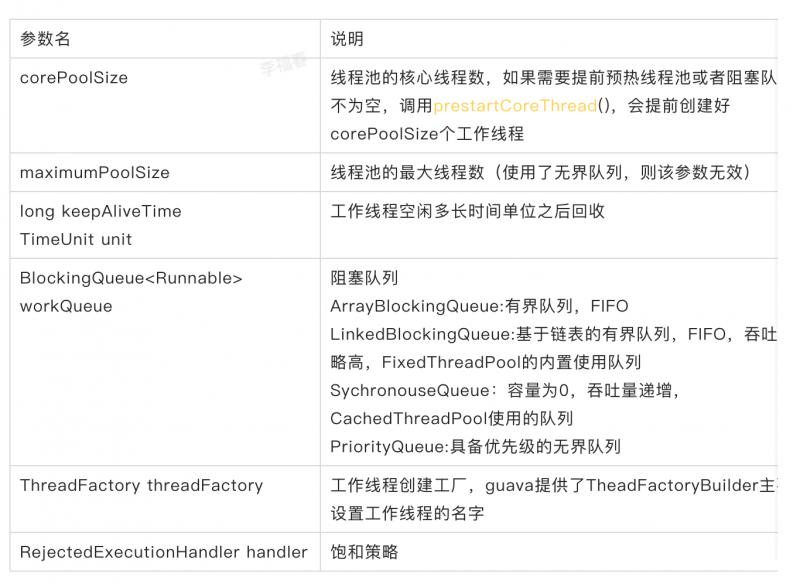
参数简单翻译过来,然后做一下备注:

RejectedExecutionHandler分为4种:
Abort:直接抛出异常
Discard:静默丢弃最后的任务
DiscardOldest:静默丢弃最先入队的任务,并处理当前任务
CallerRuns:调用者线程来执行任务
也可以自定义饱和策略。实现RejectedExecutionHandler即可。
线程池中提交任务
线程池中提交任务的方法有2:
1,void execute(Runable) ,没有返回值,无法判断任务的执行状态。
2,Future
代码如下:
public interface Executor {

    /**
     * Executes the given command at some time in the future.  The command
     * may execute in a new thread, in a pooled thread, or in the calling
     * thread, at the discretion of the {@code Executor} implementation.
     *
     * @param command the runnable task
     * @throws RejectedExecutionException if this task cannot be
     * accepted for execution
     * @throws NullPointerException if command is null
     */
    void execute(Runnable command);
}
<T> Future<T> submit(Callable<T> task);
关闭线程池
关闭线程池方法有2:
1,shutdown();
2,shutdownNow();
两种关闭的方法区别如下表:

关闭原理都是调用线程的interrupt()方法来中断所有的工作线程,所以无法中断的线程的任务可能永远没法终止。
只要调用了以上两个方法,isShutdown=true;只有所有的工作线程都关闭,isTerminaed=true;
如何合理的配置线程池参数?
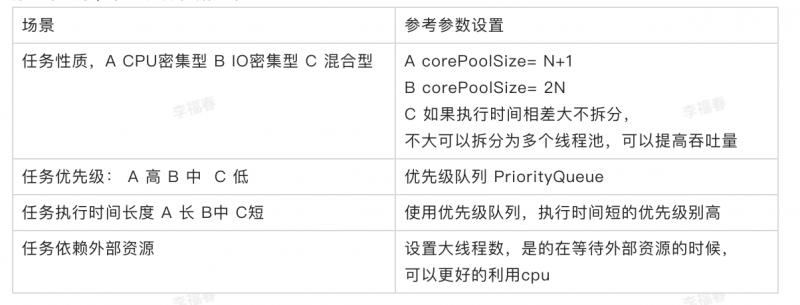
分如下场景,参考选择依据如下:

队列的使用推荐使用有界队列,提高系统的稳定性和预警能力。
监控线程池
场景:当线程池出现问题,可以根据监控数据快速定位和解决问题。
线程池提供的主要监控参数:

也可以自定义监控,通过自定义线程池,实现beforeExecute,afterExecute,terminated方法,可以在任务执行前,任务执行后,线程池关闭前记录监控数据。
小结
本篇先从使用场景和优点出发分析了为什么要使用线程池。
然后介绍了线程池中任务的执行过程,以及工作线程处理任务的两种方式。
最后介绍了如何使用线程池,创建,销毁,提交任务,监控,设置合理的参数调优等方面。
原创不易,点赞关注支持一下吧!转载请注明出处,让我们互通有无,共同进步,欢迎沟通交流。
我会持续分享Java软件编程知识和程序员发展职业之路,欢迎关注,我整理了这些年编程学习的各种资源,关注公众号‘李福春持续输出’,发送'学习资料'分享给你!
