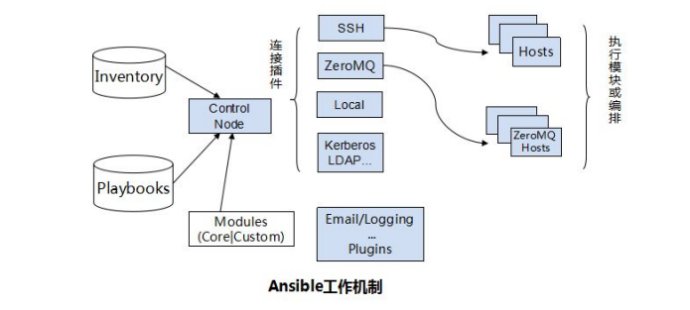
ansible分为以下几个部份:
Ansible:核心引擎
Modules:包括 Ansible 自带的核心模块(core modules)及自定义模块 (custom modules);
核心模块:ansible模块资源分发到远程节点使其执行特定任务或匹配一个特定的状态。
自定义模块:如果核心模块不足以完成某种功能,可以添加自定义模块。
Plugins:完成模块功能的补充,包括连接插件、邮件插件等
Playbooks:网上很多翻译为剧本,个人觉得理解为编排更为合理;定义ansible任务的配置文件,可以将多个任务定义在一个剧本中,由ansible自动执行,剧本执行支持多个任务,可以由控制主机运行多个任务,同时对多台远程主机进行管理。
Inventory:定义 Ansible 管理主机的清单
ansible功能特性
应用代码自动化部署。
系统管理配置自动化。
支持持续交付自动化。
支持云计算、大数据平台(如AWS、OpenStack、VMWare等)环境。
轻量级,无需在客户端安装agent,更新时只需在控制机上进行一次更新即可。
批量任务执行可以写成脚本,不用分发到远程就可以执行。
使用Python编写,维护更简单,Ruby语法过于复杂。
支持非root用户管理操作,支持sudo。
可以按组分发、按机器名分发
python版本要在2.6以上
OS:(3台都一样)
[root@ansible-1 ~]# cat /etc/centos-release
CentOS release 6.8 (Final)
关闭selinux和防火墙:(3台都一样)
[root@ansible-1 ~]# vim /etc/selinux/config
SELINUX=disabled
[root@ansible-1 ~]# service iptables stop
安装Ansible:
一台控制主机:192.168.0.223
三台管理主机:
192.168.0.224
192.168.0.225
准备安装:
修改yum源、挂载光盘等......
控制主机端配置:
安装ansible前需要安装依赖包
[root@ansible-1 ~]# yum -y install epel-release
安装ansible:
[root@ansible-1 ~]# yum -y install ansible
配置机组:
[root@ansible-1 ~]# vim /etc/hosts #在最后插入以下内容
192.168.0.223 ansible-1 #服务端的主机名和IP
192.168.0.224 ansible-2 #客户端的主机名和IP
192.168.0.225 ansible-3 #客户端的主机名和IP
服务端ssh配置:
[root@ansible-1 ~]# /etc/ssh/sshd_config
Protocol 2
PasswordAuthentication no #去掉密码登录
PubkeyAuthentication yes #使用key登录
AuthorizedKeysFile .ssh/authorized_keys #这里的名字要记好,下面要用到
服务端生成自己的秘钥:(当前是哪个用户生成的就是这个用户的秘钥)
[root@ansible-1 ~]# ssh-keygen -t rsa
//按4次回车,每一次都不输入任何东西,如果在生成公钥的过程中有一次输入了密码什么的免秘钥配置就会失败。
查看自己的公钥和私钥:
[root@ansible-1 ~]# cd ~/.ssh
[root@ansible-1 .ssh]# ls
id_rsa id_rsa.pub
//id_rsa(私钥) id_rsa.pub(公钥)
[root@ansible-1 .ssh]# chmod 700 id_rsa
#重命名公钥,保持和/etc/ssh/sshd_config里的一致
[root@ansible-1 .ssh]# mv id_rsa.pub authorized_keys
[root@ansible-1 .ssh]# chmod 600 authorized_keys //!!!这一步是必须的
把自己的公钥copy到其他服务器上去:
############ 在发送之前客户端也要生成秘钥 ###############
[root@ansible-1 .ssh]# scp authorized_keys root@192.168.0.224:~/.ssh
[root@ansible-1 .ssh]# scp authorized_keys root@192.168.0.225:~/.ssh
第一次登录会提示输入密码:
[root@ansible-1 .ssh]# ssh ansible-2
The authenticity of host 'ansible-2 (192.168.0.224)' can't be established.
RSA key fingerprint is 61:2b:96:30:20:43:68:24:d8:ed:18:03:66:f5:c0:4a.
Are you sure you want to continue connecting (yes/no)? yes ###这里、这里、这里
Warning: Permanently added 'ansible-2' (RSA) to the list of known hosts.
Last login: Wed Nov 15 18:01:58 2017 from 192.168.0.49
第二次登录:
[root@ansible-1 .ssh]# ssh ansible-2
Last login: Wed Nov 15 22:56:11 2017 from ansible-1
修改ansible的hosts文件:
[root@ansible-1 .ssh]# cd
[root@ansible-1 ~]# vim /etc/ansible/ansible.cfg
inventory = /etc/ansible/hosts #指定默认hosts配置的位置
## ask_sudo_pass = True #不进行host_key检查,省去目标key发生变化时输入(yes/no)的步骤
## ask_pass = True # 每次执行ansible命令是否询问ssh密码
host_key_checking = False # 每次执行ansible命令时是否询问sudo密码
[root@ansible-1 ~]# vim /etc/ansible/hosts
[xycm]
192.168.0.224
192.168.0.225
注:将要管理的主机写进去,可以填写IP或主机名
[root@ansible-1 ~]# ansible all -m ping
192.168.0.224 | SUCCESS => {
"changed": false,
"ping": "pong"
}
192.168.0.225 | SUCCESS => {
"changed": false,
"ping": "pong"
}
常用模块介绍(module_name)
官方模块介绍地址:http://docs.ansible.com/ansible/latest/modules_by_category.html
1)command模块:远程主机上运行命令
command模块为ansible默认模块,不指定-m参数时,使用的就是command模块;
comand模块比较简单,常见的命令都可以使用,但其命令的执行不是通过shell执行的,所以,像这些 "<", ">", "|", and "&"操作都不可以,当然,也就不支持管道;
缺点:不支持管道,就没法批量执行命令
示例:
[root@ansible-1 ~]# ansible xycm -m command -a "ls /"
192.168.0.224 | SUCCESS | rc=0 >>
bin
boot
cgroup
dev
etc
home
lib
.......... 略一部分 ...........
192.168.0.225 | SUCCESS | rc=0 >>
bin
boot
cgroup
dev
etc
home
lib
.......... 略一部分 ...........
给远程主机添加用户,并设置密码:
[root@ansible-1 ~]# ansible xycm -a "useradd ansible-2"
192.168.0.224 | SUCCESS | rc=0 >>
192.168.0.225 | SUCCESS | rc=0 >>
设置密码:
[root@ansible-1 ~]# ansible xycm -a "echo weixiao | passwd --stdin ansible-2"
192.168.0.224 | SUCCESS | rc=0 >>
weixiao | passwd --stdin ansible-2
192.168.0.225 | SUCCESS | rc=0 >>
weixiao | passwd --stdin ansible-2
shell模块:
使用shell模块,在远程命令通过/bin/sh来执行;所以,我们在终端输入的各种命令方式,都可以使用;
但是我们自己定义在.bashrc/.bash_profile中的环境变量shell模块由于没有加载,所以无法识别;如果需要使用自定义的环境变量,就需要在最开始,执行加载自定义脚本的语句;
对shell模块的使用可以分成两块:
1) 如果待执行的语句少,可以直接写在一句话中:
[root@ansible-1 ~]# ansible xycm -a ". .bash_profile;ps -ef|grep crond" -m shell
2) 使用scripts模块可以在本地写一个脚本,在远程服务器上执行:
示例:
[root@ansible-1 /]# vim 123.sh
#!/bin/bash
echo "ni ye bu de yi wo hui xiao xiao de liqu"
[root@ansible-1 /]# ansible xycm -m script -a "/123.sh"
192.168.0.225 | SUCCESS => {
"changed": true,
"rc": 0,
"stderr": "Shared connection to 192.168.0.225 closed.
",
"stdout": "ni ye bu de yi wo hui xiao xiao de liqu
",
"stdout_lines": [
"ni ye bu de yi wo hui xiao xiao de liqu"
]
}
192.168.0.224 | SUCCESS => {
"changed": true,
"rc": 0,
"stderr": "Shared connection to 192.168.0.224 closed.
",
"stdout": "ni ye bu de yi wo hui xiao xiao de liqu
",
"stdout_lines": [
"ni ye bu de yi wo hui xiao xiao de liqu"
]
}
3) copy模块:把当前主机文件复制到远程主机位置,可以指定mode(权限)、own(所属主)、group(所属组)
[root@ansible-1 /]# ansible all -m copy -a "src=/123.sh dest=/ mode=644 owner=root group=root"
4)fetch模块:和copy相反,从远程主机拷贝文件到本地主机
[root@ansible-1 /]# ansible xycm -m fetch -a "src=/opop-1 dest=/mnt/kkkk/"
192.168.0.224 | SUCCESS => {
"changed": true,
"checksum": "da39a3ee5e6b4b0d3255bfef95601890afd80709",
"dest": "/mnt/kkkk/192.168.0.224/opop-1",
"md5sum": "d41d8cd98f00b204e9800998ecf8427e",
"remote_checksum": "da39a3ee5e6b4b0d3255bfef95601890afd80709",
"remote_md5sum": null
}
192.168.0.225 | SUCCESS => {
"changed": false,
"file": "/opop-1",
"msg": "the remote file does not exist, not transferring, ignored"
}
注:当dest=/kkkk/,abc.txt会保存在/kkkk/目录下
当dest=/kkkk,会拷贝abc.txt文件,并命名为kkkk
5)cron模块:在远程主机制定crontab周期性计划任务
minute= hour= day= month= weekday= job= name=(必须填写) state=
分 时 日 月 周 执行的命令 用户名
例如:
ansible all -m cron -a "minute=*/10 job='/sbin/ntpdate 10.10.10.10 &> /dev/null' name=Synctime"
在被管理的主机上使用crontab -l查看
[root@WebServer ~]# crontab -l
#Ansible: Synctime
*/10 * * * * /sbin/ntpdate 10.10.10.10 &> /dev/null
在管理(ansible)的主机上,可以删除制定的计划任务
[root@wlm ~] ansible all -m cron -a "state=absent name=Synctime"
### absent = 缺席 ###
欢迎加入QQ群一起讨论Linux、开源等技术
