目标
之前的自动答复机器人需要从一个内部网页上获取的消息用于回复一些问题,但是没有对应的查询api,于是想到了用脚本模拟浏览器访问网站爬取内容返回给用户。详细介绍了第一次探索python爬虫的坑。
准备工作
requests模块向网站发送http请求,BeautifulSoup模块来从静态HTML文本中提取我们想要的数据,更高级的,对于动态加载页面我们需要用webdriver去模拟真实的网页访问,并解析内容。
推荐使用Anaconda 这个科学计算版本,主要是因为它自带一个包管理工具,可以解决有些包安装错误的问题。
- 安装requests(anaconda自带),selenium,beautifulsoup4,方法为
pip install selenium
conda install beautifulsoup4
conda install lxml
使用Python3.5 的童鞋们直接使用pip install beautifulsoup4安装会报错(所以才推荐使用Anaconda版本),安装教程看这里。
你可能需要安装lxml,这是一个解析器,BeautifulSoup可以使用它来解析HTML,然后提取内容。
如果不安装lxml,则BeautifulSoup会使用Python内置的解析器对文档进行解析。之所以使用lxml,是因为它速度快。
参考Python爬虫小白入门(三)BeautifulSoup库
https://www.cnblogs.com/Albert-Lee/p/6232745.html
关于webdriver的搭配网上一些旧帖子都说的是selenium+PhantomJS,但是目前selenium已经不再支持PhantomJS(如果使用了会报错syntax error,坑了很久才知道这个消息),只能使用chrome或者firefox的对应驱动,这里我们使用chromedriver,你也可以使用firefoxdriver。接下来说说chromedriver的安装
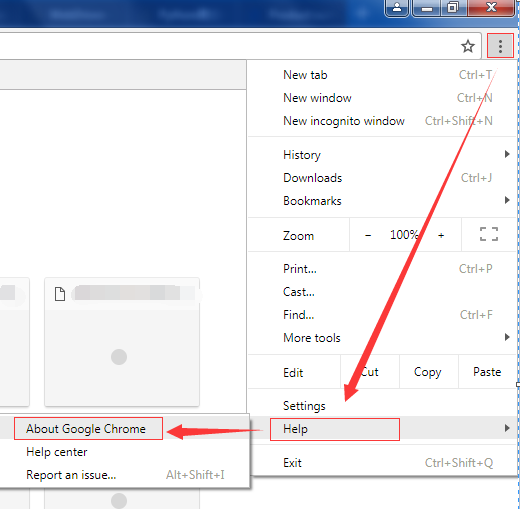
- 从http://chromedriver.storage.googleapis.com/index.html网址中下载与本机chrome浏览器对应的chromedriver驱动程序,chrome版本可以打开浏览器右上角
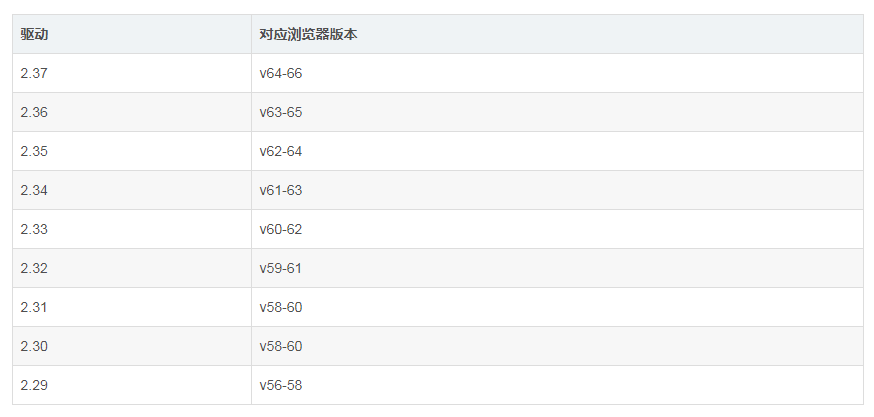
驱动版本对应参考如下,转自chromedriver与chrome各版本及下载地址
- 将下载的chromedriver解压到chrome安装目录(右键chrome快捷方式查看属性),再将chrome安装目录添加到电脑的Path环境变量中,并手动cmd刷新下path信息,相关操作百度一搜一大堆
开始工作
程序根据用户输入,在一个引导页匹配查找对应的产品网址后缀,添加到url链接的请求参数部分的?product=后面,后续将访问新的网址
import的模块
首先介绍下import的模块
import requests#发起静态url请求
from bs4 import BeautifulSoup#BeautifulSoup解析
import re#正则匹配
from selenium import webdriver#下面是webdriver所需
from selenium.webdriver.chrome.options import Options
from selenium.webdriver.common.desired_capabilities import DesiredCapabilities
import time#动态加载页面需要延时再获取信息
匹配搜索
定义了一个匹配搜索的函数,如果用户输入的字符(’a‘)被包含在搜索列表([’bat‘,’link‘,’you‘])中某项之中(比如‘a’被’bat‘包含),则返回包含的项(‘bat'),搜不到就返回’None‘,使用re正则加快匹配
1 def branchFinder(userInput, collection):
2     regex = re.compile(userInput)     # Compiles a regex.
3     for item in collection:
4         match = regex.search(item)  # Checks if the current item matches the regex.
5         if match:
6             return item
7     return 'None'
如果使用模糊搜索参考http://www.mamicode.com/info-detail-1601799.html
获取并解析静态页面
使用requests.get访问静态页面,使用BeautifulSoup处理页面
 1     url1 = 'https://www.xxxx.com/?&product='
 2
 3     r = requests.get(url1, cookies = cookies, headers = headers)
 4     # with open('main.html', 'wb+') as f:
 5     #     f.write(r.content)
 6
 7     soup = BeautifulSoup(r.content, 'lxml')  #声明BeautifulSoup对象
 8     findResult = soup.find_all('option')  #在页面查找所有的option标签
 9     optionList = []#option所有选项的value参数列表
10     for i in range(1,len(findResult)):#第一个option是默认selected的选项,为空,所以这里没有添加进列表
11         optionList.append(findResult[i]['value'])
12     # print(optionList)
13     #已获取主界面的value列表
14
15
16     #根据关键字查找对应的branch选项,生成新的访问链接
17     branch = branchFinder(userInput,optionList)
18     if (branch == 'None'):
19         return 'Not Found. Please check your input.' #为了实现return,实际上这些代码整个写在一个函数里
20     print(branch+'
')
21     url2 = url1 + branchFinder(userInput,optionList)#新的访问链接
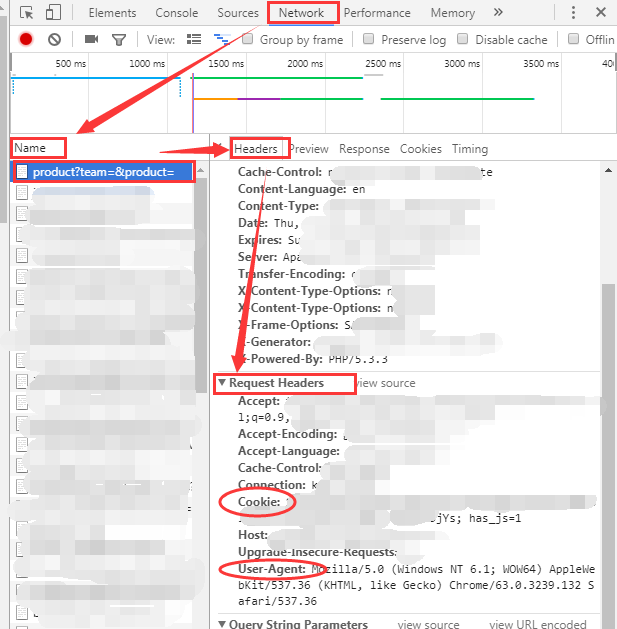
其中headers是你访问页面的浏览器信息,cookies包含了登录信息,用于在网页需要登录的情况下搞定访问权限,示例如下
headers = {'User-Agent': 'Mozilla/5.0 (Windows NT 6.1; WOW64) AppleWebKit/537.36 (KHTML, like Gecko) Chrome/63.0.3239.132 Safari/537.36'}

cookies = {'cookie': 'has_js=1; xxxxx=yyyyy'}
查看以上信息的方式为浏览器访问url1的链接,登录后F12打开调试器,按照下图寻找Name的第一个参数,找到椭圆圈出来的cookies和headers,填入上面的示例
关于BeautifulSoup对于网页信息的获取和处理函数参考Python爬虫小白入门(三)BeautifulSoup库,至此我们已经完成了静态爬取网页信息的尝试,当我尝试如法炮制访问url2的时候,使用BeautifulSoup一直获取不到我想要的表格中的数据,查找<table>标签后,里面只有<thead>没有<tbody>,查看requests获取的网页信息才发现根本没有tbody,在浏览器中访问url2,打开F12,发现表格使用的是datatable,因为之前做过使用datatable的项目,所以觉得这里可能是动态加载的tbody中的数据,静态访问是获取不到表格数据的,这就需要动态加载了。
动态加载处理页面
经历了selenium+PhantomJS的失败尝试后,我转而使用selenium+headless chrome,这也是在运行PhantomJS相关代码后编译器提示才知道的。
关于driver对于页面的处理操作非常方便,不仅可以查找,还可以模拟click等功能,详见WebDriver--定位元素的8种方式和【Selenium2+Python】常用操作和webdriver(python)学习笔记一等等
 1     dcap = dict(DesiredCapabilities.PHANTOMJS)  #设置useragent,实际上只是使用了phantomjs的参数,各位可以ctrl+鼠标点进去定义查看具体参数
 2     dcap['phantomjs.page.settings.userAgent'] = (headers['User-Agent'])  #根据需要设置具体的浏览器信息
 3
 4     chrome_options = Options()
 5     chrome_options.add_argument('--no-sandbox')#解决DevToolsActivePort文件不存在的报错
 6     chrome_options.add_argument('window-size=1920x3000') #指定浏览器分辨率
 7     chrome_options.add_argument('--disable-gpu') #谷歌文档提到需要加上这个属性来规避bug,否则会提示gpu开启失败
 8     chrome_options.add_argument('--hide-scrollbars') #隐藏滚动条, 应对一些特殊页面
 9     chrome_options.add_argument('blink-settings=imagesEnabled=false') #不加载图片, 提升速度
10     chrome_options.add_argument('--headless') #浏览器不提供可视化页面. linux下如果系统不支持可视化不加这条会启动失败,windows如果不加这条会
                             启动浏览器GUI,并且不会返回句柄,只会等待操作,后面的代码不会执行了
11     chrome_options.binary_location = r"C:/Program Files (x86)/Google/Chrome/Application/chrome.exe" #手动指定使用的浏览器位置
12
13     # driver=webdriver.Chrome(chrome_options=chrome_options)
14     # driver.get('https://www.baidu.com')
15     # print('hao123' in driver.page_source)
16     driver = webdriver.Chrome(chrome_options=chrome_options,desired_capabilities=dcap)#封装浏览器信息
17     # driver = webdriver.Chrome(desired_capabilities=dcap)
18     driver.get(url2)# 访问链接
19     # 添加cookies,注意和之前的格式不一样,之前cookies的格式是xxxxx=yyyyy,这里name对应的是=之前的xxxxx,value对应的是yyyyy
20     driver.add_cookie({'name' : 'xxxxx', 'value' : 'yyyyy'})
21     driver.refresh()#重新加载以登录
22     driver.implicitly_wait(1)#等待1s加载数据,需要根据感觉调整时长,如果1s不够就要增加时间,详情参考后面的for循环等待加载数据
23     time.sleep(0.1)
24     #显示Product summary界面
25     print('Product summary.
')
26     #点击最新的Build链接
27     driver.find_element_by_tag_name("tbody").find_element_by_tag_name("a").click()#可以顺蔓摸瓜查找一个标签下的其他标签,不论是一个标签还是标签集
28     #已进入Build Viewer界面
29     print('Build Viewer.
')
30     #点击Tests
31     driver.find_element_by_id('1').click()#根据id查找并点击
32     print(driver.find_element_by_class_name('table-responsive').text)#打印应该是空的,因为还没获取到数据
33     result = ''
34     for i in range(20):#循环加载20s,获取表格数据,由于find也需要时间,实际上加载不止20s
35         driver.implicitly_wait(1)#等待加载数据
36         result = driver.find_element_by_class_name('table-responsive').text
37         if(result == ''):#循环加载数据,直到非空
38             print( 'Waiting '+ str(i+1) + 's...')
39         else:
40             break
41
42     driver.quit()#退出浏览器
- 最开始我driver.implicitly_wait(1)加载的时间很短,但是也能获取到页面内容,因为我是设置的断点调试的!所以等待加载的时间比我设置的长多了!退出debug模式直接run的时候,有时候设置为5s仍然获取不到数据,发现这个坑的时候简直惊呼!不过还好我们可以使用循环等待来判断什么时候加载数据完毕。
- 之前没有设置headless,使用cmd尝试可以打开chrome浏览器GUI,但是使用vscode打不开GUI,才知道需要管理员权限,于是使用管理员方式打开vscode即可
输出结果
aiodnwebg


DevTools listening on ws://127.0.0.1:12133/devtools/browser/xxxx
Product summary.

Build Viewer.


Waiting 1s...
Waiting 2s...
Waiting 3s...
ID Job
123 aaa
245 bbb
完整代码


 1 import requests
 2 from bs4 import BeautifulSoup
 3 import re
 4 from selenium import webdriver
 5 from selenium.webdriver.chrome.options import Options
 6 from selenium.webdriver.common.desired_capabilities import DesiredCapabilities
 7 import time
 8
 9 ###################User Input##########################
10 userInput = '=====your input======'
11
12 headers = {'User-Agent': 'Mozilla/5.0 (Windows NT 6.1; WOW64) AppleWebKit/537.36 (KHTML, like Gecko) Chrome/63.0.3239.132 Safari/537.36'}
13
14 cookies = {'cookie': 'has_js=1; xxxxx=yyyyy'}
15 ###################User Input##########################
16
17
18 def branchFinder(userInput, collection):
19     regex = re.compile(userInput)     # Compiles a regex.
20     for item in collection:
21         match = regex.search(item)  # Checks if the current item matches the regex.
22         if match:
23             return item
24     return 'None'
25
26 def getResult(userInput):
27     url1 = 'https://www.xxx.com/?&product='
28
29     r = requests.get(url1, cookies = cookies, headers = headers)
30     # with open('main.html', 'wb+') as f:
31     #     f.write(r.content)
32
33     soup = BeautifulSoup(r.content, 'lxml')  #声明BeautifulSoup对象
34     findResult = soup.find_all('option')  #查找option标签
35     optionList = []
36     for i in range(1,len(findResult)):
37         optionList.append(findResult[i]['value'])
38     # print(optionList)
39     #已获取主界面的value列表
40
41
42     #根据关键字查找对应的branch,生成新的访问链接
43     branch = branchFinder(userInput,optionList)
44     if (branch == 'None'):
45         return 'Not Found. Please check your input.'
46     print(branch+'
')
47     url2 = url1 + branchFinder(userInput,optionList)
48     dcap = dict(DesiredCapabilities.PHANTOMJS)  #设置useragent
49     dcap['phantomjs.page.settings.userAgent'] = (headers['User-Agent'])  #根据需要设置具体的浏览器信息
50
51     chrome_options = Options()
52     chrome_options.add_argument('--no-sandbox')#解决DevToolsActivePort文件不存在的报错
53     chrome_options.add_argument('window-size=1920x3000') #指定浏览器分辨率
54     chrome_options.add_argument('--disable-gpu') #谷歌文档提到需要加上这个属性来规避bug
55     chrome_options.add_argument('--hide-scrollbars') #隐藏滚动条, 应对一些特殊页面
56     chrome_options.add_argument('blink-settings=imagesEnabled=false') #不加载图片, 提升速度
57     chrome_options.add_argument('--headless') #浏览器不提供可视化页面. linux下如果系统不支持可视化不加这条会启动失败
58     chrome_options.binary_location = r"C:/Program Files (x86)/Google/Chrome/Application/chrome.exe" #手动指定使用的浏览器位置
59
60     # driver=webdriver.Chrome(chrome_options=chrome_options)
61     # driver.get('https://www.baidu.com')
62     # print('hao123' in driver.page_source)
63     driver = webdriver.Chrome(chrome_options=chrome_options,desired_capabilities=dcap)#封装浏览器信息
64     # driver = webdriver.Chrome(desired_capabilities=dcap)
65     driver.get(url2)
66
67     driver.add_cookie({'name' : 'xxxxx', 'value' : 'yyyyy'})
68     driver.refresh()#重新加载以登录
69     driver.implicitly_wait(1)#等待加载数据
70     time.sleep(0.1)
71     #显示Product summary界面
72     print('Product summary.
')
73     #点击最新的Build链接
74     driver.find_element_by_tag_name("tbody").find_element_by_tag_name("a").click()
75     #已进入Build Viewer界面
76     print('Build Viewer.
')
77     #点击Tests
78     driver.find_element_by_id('1').click()
79     print(driver.find_element_by_class_name('table-responsive').text)
80     result = ''
81     for i in range(20):
82         driver.implicitly_wait(1)#等待加载数据
83         result = driver.find_element_by_class_name('table-responsive').text
84         if(result == ''):
85             print( 'Waiting '+ str(i+1) + 's...')
86         else:
87             break
88     driver.quit()
89     return result
90
91 finalResult = getResult(userInput)
92 print(finalResult)
后记
一个下午做完这些,才知道有个东西叫Scrapy,= =之后试一试