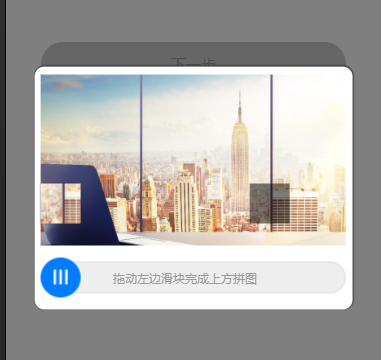
在开发用户模块的时候,相信大家都碰到过一个功能,图片滑动解锁后发送验证码,这里分享我用uni-app制作的一个小控件
效果如下:

需要如下图片资源

template
<template>
	<view class="zhezhao" v-if="shows" @tap="shows=false">
		<view class="verifyBox" @touchend="onEnd">
			<view class="pintuBox">
				<image :src="imgUrl+'/tfgg-verify/'+img+'.jpg'" class="pintuBg"></image>
			</view>
			<view class="huakuaiBox">
				<view class="yinying" :style="{top:top+'px',left:left+'px'}"></view>
				<movable-area :animation="true">
					<movable-view :x="x" direction="horizontal" @change="onMove">
						<view class="pintukuai" :style="{top:top+'px'}"><image :src="imgUrl+'/tfgg-verify/'+img+'.jpg'" :style="{top:-lefttop+'px',left:-left+'px'}"></image></view>
					</movable-view>
				</movable-area>
				<view class="huadao">拖动左边滑块完成上方拼图</view>
			</view>
		</view>
	</view>
</template>
script
<script>
	import app from "@/api/app.js";
	export default {
		name: 'tfgg-verify',
		data() {
			return {
				imgUrl: app.appImg,
				x: 0,//初始距离
				oldx:0,//移动的距离
				img:'0',//显示哪张图片
				left:'',//随机拼图的最终X轴距离
				top:'',//拼图的top距离
				lefttop:'',//拼图内容的top距离
				shows:false
			};
		},
		mounted() {
			this.shuaxinVerify()
		},
		methods: {
			//刷新验证
			shuaxinVerify(){
				var gl = Math.random();
				this.left = uni.upx2px(500)*gl>uni.upx2px(250)?(uni.upx2px(500)*gl):uni.upx2px(250);//生成随机X轴最终距离
				this.top = -(uni.upx2px(25)+uni.upx2px(343)-(uni.upx2px(263)*gl));//生成随机Y轴初始距离
				this.lefttop = uni.upx2px(263)*gl;//生成随机Y轴初始距离
				if(gl<=0.25){
					this.img=1
				}if(gl>0.25&&gl<=5){
					this.img=2
				}if(gl>0.5&&gl<=0.75){
					this.img=3
				}if(gl>0.75&&gl<=1){
					this.img=4
				}
			},
			/* 滑动中 */
			onMove(e) {
				this.oldx = e.detail.x;
			},
			/* 滑动结束 */
			onEnd() {
				if(Math.abs(this.oldx-this.left)<=5){
					uni.showToast({
						title: '验证成功'
					});
					this.$emit("result",true);
					this.hide();
				}else{
					uni.showToast({
						title: '验证失败'
					});
					this.shuaxinVerify()
					this.reset()
				}
			},
			/* 重置 */
			reset(){
				console.log('重置');
				this.x = 1;
				this.oldx = 1;
				setTimeout(()=>{
					this.x = 0;
					this.oldx = 0;
				},300)
			},
			show(){
				this.shows=true;
			},
			hide(){
				this.shows=false;
			}
		}
	}
</script>
style
<style>
	.zhezhao{
		position: fixed;
		top: 0;
		left: 0;
		 100%;
		height: 100%;
		background-color: rgba(0,0,0,.5);
		z-index: 999;
	}
	.verifyBox{
		position: absolute;
		top: 50%;
		left: 50%;
		transform: translate(-50%,-50%);
		 85%;
		background-color: #fff;
		border-radius: 20upx;
		box-shadow: 0 0 5upx rgba(0,0,0);
	}
	.pintuBox{
		position: relative;
	}
	.pintuBg{
		 610upx;
		height: 343upx;
		display: block;
		margin: 17upx auto;
	}
	.huakuaiBox{
		position: relative;
		height: 80upx;
		 610upx;
		margin: 25upx auto;
	}
	.yinying{
		position: absolute;
		 80upx;
		height: 80upx;
		background-color: rgba(0,0,0,.5);
	}
	.huakuaiBox movable-area{
		height: 80upx;
		 100%;
	}
	.huakuaiBox movable-area movable-view{
		 80upx;
		height: 80upx;
		border-radius: 50%;
		background-color: #007cff;
		background-image: url(../../static/images/tfgg-verify/icon-button-normal.png);
		background-repeat: no-repeat;
		background-size: auto 30upx;
		background-position: center;
		position: relative;
		z-index: 100;
	}
	.pintukuai{
		position: absolute;
		top: -105upx;
		left: 0;
		 100%;
		height: 100%;
		z-index: 101;
		box-shadow: 0 0 5upx rgba(0,0,0,.3);
		overflow: hidden;
	}
	.pintukuai image{
		max- none;
		position: absolute;
		top: 0;
		left: 0;
		 610upx;
		height: 343upx;
	}
	.huadao{
		position: absolute;
		 calc(100% - 35upx);
		height: 65upx;
		line-height: 65upx;
		background: #eee;
		box-shadow: inset 0 0 5upx #ccc;
		border-radius: 60upx;
		color: #999;
		text-align: center;
		top: 50%;
		right: 0;
		transform: translateY(-50%);
		font-size: 18upx;
		padding-right: 35upx;
		z-index: 99;
	}
</style>
调用方法
引入控件
import tfggVerify from "@/components/tfgg-verify/tfgg-verify.vue"
view里加上
<tfgg-verify @result='verifyResult' ref="verifyElement"></tfgg-verify>
components加上
components: {
  "tfgg-verify": tfggVerify
},
方法案例
/* 校验结果回调函数 */
verifyResult(res) {
	if (res) {
		this.$refs.verifyElement.reset(); //校验成功重置插件
		console.log('验证成功')
	}
	console.log(res);
},
/* 显示校验弹窗 */
verifyFasong() {
	this.$refs.verifyElement.show();
},
/* 校验插件重置 */
verifyReset() {
	this.$refs.verifyElement.reset();
},
如果本文章对你有帮助,请点个推荐,欢迎关注我,我会定期更新或分享开发中碰到的问题及解决方法,希望与你共同进步(*^▽^*)。