将手机桌面划分区域,进行表格布局。
效果图:
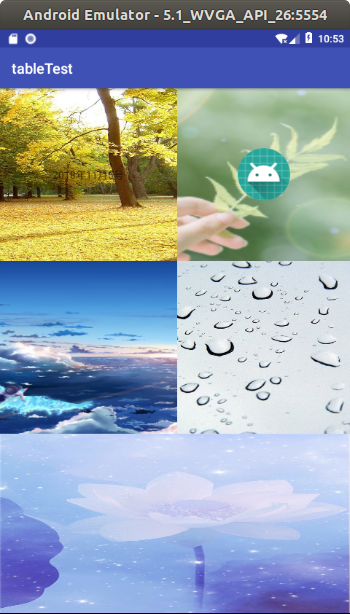
layout.xml


<?xml version="1.0" encoding="utf-8"?>
<TableLayout xmlns:android="http://schemas.android.com/apk/res/android"
    xmlns:app="http://schemas.android.com/apk/res-auto"
    xmlns:tools="http://schemas.android.com/tools"
    android:layout_width="match_parent"
    android:layout_height="match_parent"
    android:background="@mipmap/a2"
    tools:context=".MainActivity">


    <TableRow
        android:layout_width="match_parent"
        android:layout_height="match_parent"
        android:layout_weight="1">

        <LinearLayout
            android:layout_width="match_parent"
            android:layout_height="match_parent"
            android:layout_weight="1"
            android:background="@mipmap/a1"
            android:gravity="center"
            android:orientation="horizontal">

            <TextView
                android:id="@+id/textView"
                android:layout_width="wrap_content"
                android:layout_height="wrap_content"
                android:text="2018年11月5号" />
        </LinearLayout>

        <LinearLayout
            android:layout_width="match_parent"
            android:layout_height="match_parent"
            android:layout_weight="1"
            android:background="@mipmap/a2"
            android:gravity="center"
            android:orientation="horizontal">

            <ImageView
                android:id="@+id/imageView"
                android:layout_width="wrap_content"
                android:layout_height="wrap_content"
                android:layout_weight="1"
                app:srcCompat="@mipmap/ic_launcher" />
        </LinearLayout>
    </TableRow>

    <TableRow
        android:layout_width="match_parent"
        android:layout_height="match_parent"
        android:layout_weight="1">

        <LinearLayout
            android:background="@mipmap/a3"
            android:layout_width="match_parent"
            android:layout_height="match_parent"
            android:layout_weight="1"
            android:orientation="horizontal">

        </LinearLayout>

        <LinearLayout
            android:background="@mipmap/a4"
            android:layout_width="match_parent"
            android:layout_height="match_parent"
            android:layout_weight="1"
            android:orientation="horizontal">

        </LinearLayout>
    </TableRow>

    <TableRow
        android:layout_width="match_parent"
        android:layout_height="match_parent"
        android:layout_weight="1">

        <LinearLayout
            android:layout_width="match_parent"
            android:layout_height="match_parent"
            android:layout_weight="1"
            android:background="@mipmap/a5"
            android:orientation="horizontal">

        </LinearLayout>
    </TableRow>
</TableLayout>
图片可以自行在网上下载。放在res下面的mipmap-xhdpi,当然,其他几个放图片的地方也是可以存放的。
进行约束布局
效果图:

整个界面分为两部分,上和下,为线性布局,两张图片,其实这两张图片可以合起来连成一个背景。看起来就像是一张图片一样。比例为1:2
下面这张图片里面为约束布局,包含5张小图标,分别为进入,设置,帮助,退出,风云榜。
layout1.xml
<?xml version="1.0" encoding="utf-8"?>
<LinearLayout xmlns:android="http://schemas.android.com/apk/res/android"
    xmlns:app="http://schemas.android.com/apk/res-auto"
    xmlns:tools="http://schemas.android.com/tools"
    android:layout_width="match_parent"
    android:layout_height="match_parent"
    android:orientation="vertical">

    <LinearLayout
        android:layout_width="match_parent"
        android:layout_height="match_parent"
        android:layout_weight="2"
        android:background="@mipmap/top"
        android:orientation="horizontal">

    </LinearLayout>

    <android.support.constraint.ConstraintLayout
        android:layout_width="match_parent"
        android:layout_height="match_parent"
        android:layout_weight="1"
        android:background="@mipmap/bottom">

        <ImageView
            android:id="@+id/imageView2"
            android:layout_width="wrap_content"
            android:layout_height="wrap_content"
            android:layout_marginBottom="8dp"
            android:layout_marginEnd="8dp"
            android:layout_marginStart="8dp"
            android:layout_marginTop="8dp"
            app:layout_constraintBottom_toBottomOf="parent"
            app:layout_constraintEnd_toEndOf="parent"
            app:layout_constraintStart_toStartOf="parent"
            app:layout_constraintTop_toTopOf="parent"
            app:srcCompat="@mipmap/b0" />

        <ImageView
            android:id="@+id/imageView3"
            android:layout_width="wrap_content"
            android:layout_height="wrap_content"
            android:layout_marginBottom="8dp"
            android:layout_marginEnd="8dp"
            android:layout_marginTop="8dp"
            app:layout_constraintBottom_toBottomOf="@+id/imageView2"
            app:layout_constraintEnd_toStartOf="@+id/imageView2"
            app:layout_constraintTop_toTopOf="@+id/imageView2"
            app:srcCompat="@mipmap/b1" />

        <ImageView
            android:id="@+id/imageView4"
            android:layout_width="wrap_content"
            android:layout_height="wrap_content"
            android:layout_marginBottom="8dp"
            android:layout_marginEnd="8dp"
            android:layout_marginStart="8dp"
            app:layout_constraintBottom_toTopOf="@+id/imageView2"
            app:layout_constraintEnd_toEndOf="@+id/imageView2"
            app:layout_constraintStart_toStartOf="@+id/imageView2"
            app:srcCompat="@mipmap/b2" />

        <ImageView
            android:id="@+id/imageView5"
            android:layout_width="wrap_content"
            android:layout_height="wrap_content"
            android:layout_marginBottom="8dp"
            android:layout_marginStart="8dp"
            android:layout_marginTop="8dp"
            app:layout_constraintBottom_toBottomOf="@+id/imageView2"
            app:layout_constraintStart_toEndOf="@+id/imageView2"
            app:layout_constraintTop_toBottomOf="@+id/imageView4"
            app:srcCompat="@mipmap/b3" />

        <ImageView
            android:id="@+id/imageView6"
            android:layout_width="wrap_content"
            android:layout_height="wrap_content"
            android:layout_marginEnd="8dp"
            android:layout_marginStart="8dp"
            android:layout_marginTop="8dp"
            app:layout_constraintEnd_toStartOf="@+id/imageView5"
            app:layout_constraintStart_toEndOf="@+id/imageView3"
            app:layout_constraintTop_toBottomOf="@+id/imageView2"
            app:srcCompat="@mipmap/b4" />
    </android.support.constraint.ConstraintLayout>
</LinearLayout>
完成