
前言
通过 Python 爬取十万博文之后,最重要的是要让互联网用户访问到,那么如何做呢?
选型
从后台框架、前端模板、数据库连接池、缓存、代理服务、限流等组件多个维度选型。
- 后台框架 SpringBoot2+、JPA
- 前端框架 Vue
- 模块框架 Thymeleaf
- 数据库连接池 HikariCP
- 缓存 Redis
- 限流 Guava
- 代理服务 Nginx
- 文章编辑 Markdown
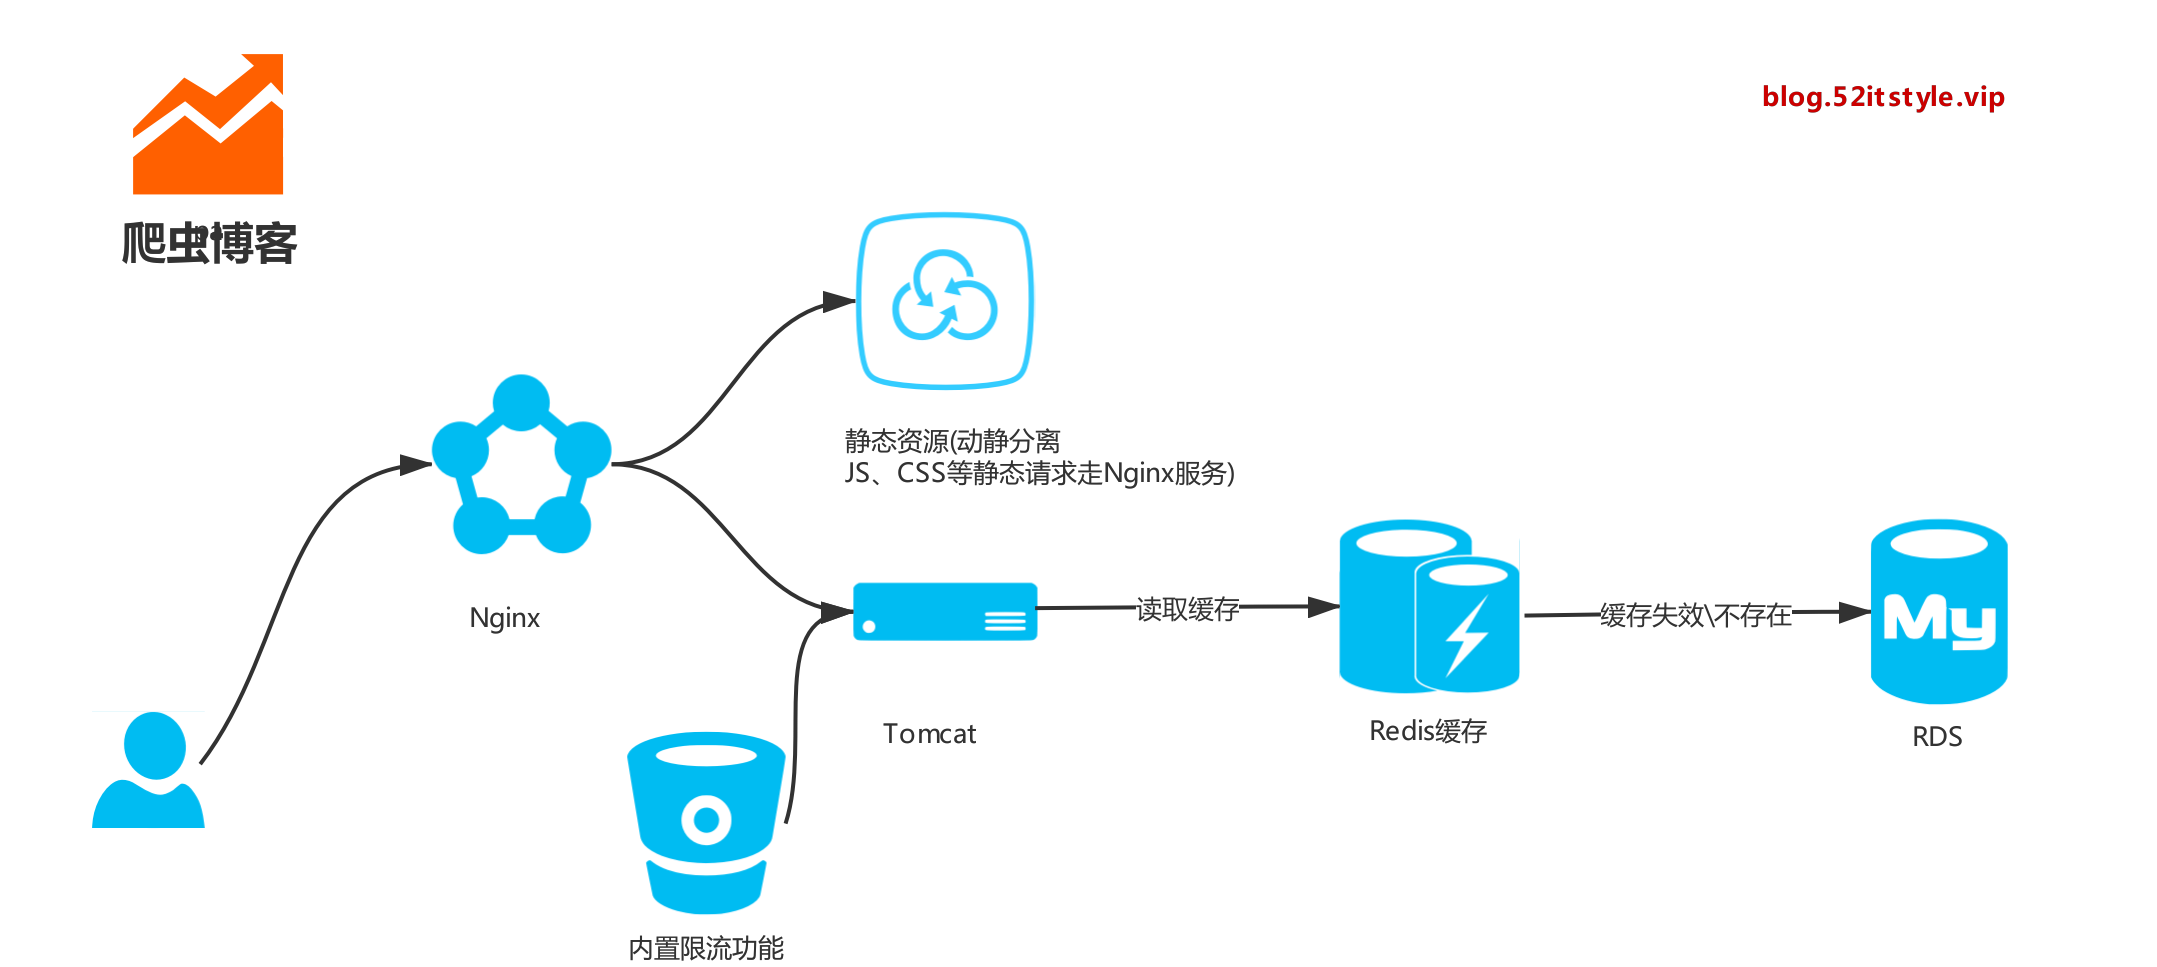
架构
博文
我们可以通过以下方式访问:
https://blog.52itstyle.top/49.html
亦或是:
https://blog.52itstyle.top/49.shtml
当然,如果你愿意你也可以显示为:
https://blog.52itstyle.top/49.php
https://blog.52itstyle.top/49.asp
https://blog.52itstyle.top/49.jsp
只需要在后台配置对应的映射关系即可:
/**
* 博文
*/
@RequestMapping("{id}.html")
public String blog(@PathVariable("id") Long id, ModelMap model) {
   Blog blog = blogService.getById(id);
   model.addAttribute("blog",blog);
   return  "article";
}
由于数据库存储的是 markedown 格式的数据,前台我们通过 editormd 转为 html 代码显示,这里只展示部分代码:
<script type='text/javascript' src='js/jquery.min.js'></script>
<!--省略部分代码-->
<script type='text/javascript' src="editor/editormd.min.js"></script>
<!--省略部分代码-->
<div id="article">
	<textarea  th:text="${blog.content}"  style="display:none;" placeholder="markdown语言">
	</textarea>
</div>
<!--省略部分代码-->
<script>
editormd.markdownToHTML("article", {
	htmlDecode      : "style,script,iframe",
	emoji           : true,
	taskList        : true,
	tex             : true,  // 默认不解析
	flowChart       : true,  // 默认不解析
	sequenceDiagram : true  // 默认不解析
});
</script>
缓存
爬取的博文一般、基本、大概不会修改,所以我们完全可以缓存起来,避免跟数据库直接交互,顺便提升一下访问速速。正好手头有个 256MB 的阿里云 Redis 服务,拿来就用了。
首相引入以下组件:
<dependency>
     <groupId>org.springframework.boot</groupId>
     <artifactId>spring-boot-starter-cache</artifactId>
</dependency>
<dependency>
     <groupId>org.springframework.boot</groupId>
     <artifactId>spring-boot-starter-data-redis</artifactId>
</dependency>
配置 redis:
spring.redis.database=1
spring.redis.host=r-m5e4873fd882de14.redis.rds.aliyuncs.com
spring.redis.port=6379
spring.redis.password=6347888
spring.redis.pool.max-active=8
spring.redis.pool.max-wait=-1
spring.redis.pool.max-idle=8
spring.redis.pool.min-idle=0
spring.redis.timeout=3000ms
spring.cache.type = redis
接口实现,引入 Cacheable 注解:
@Override
@Cacheable(cacheNames ="blog")
public Blog getById(Long id) {
     String nativeSql = "SELECT * FROM blog WHERE id=?";
     return dynamicQuery.nativeQuerySingleResult(Blog.class,nativeSql,new Object[]{id});
}
配置完成之后,我们打开数据库配置,多次访问博文地址,如果只是初次打印 SQL 说明配置成功:
spring.jpa.show-sql = true
限流
万一哪天流量暴涨亦或是有人恶意攻击,尔等小服务器根本扛不住,所以有时候我们需要一定的手段进行限流,比如限制IP访问的频率次数。
这里我们使用开源的第三方组件库,引入以下组件:
<dependency>
     <groupId>com.google.guava</groupId>
     <artifactId>guava</artifactId>
     <version>25.1-jre</version>
</dependency>
自定义注解:
/**
 * 自定义注解  限流
 */
@Target({ElementType.PARAMETER, ElementType.METHOD})
@Retention(RetentionPolicy.RUNTIME)
@Documented
public  @interface ServiceLimit {
    /**
     * 描述
     */
    String description()  default "";

    /**
     * key
     */
    String key() default "";

    /**
     * 类型
     */
    LimitType limitType() default LimitType.CUSTOMER;

    enum LimitType {
        /**
         * 自定义key
         */
        CUSTOMER,
        /**
         * 根据请求者IP
         */
        IP
    }
}
限流逻辑:
/**
 * 限流 AOP
 */
@Aspect
@Configuration
public class LimitAspect {

    //根据IP分不同的令牌桶, 每天自动清理缓存
    private static LoadingCache<String, RateLimiter> caches = CacheBuilder.newBuilder()
            .maximumSize(1000)
            .expireAfterWrite(1, TimeUnit.DAYS)
            .build(new CacheLoader<String, RateLimiter>() {
                @Override
                public RateLimiter load(String key){
                    // 新的IP初始化 每秒只发出5个令牌
                    return RateLimiter.create(5);
                }
            });

    //Service层切点  限流
    @Pointcut("@annotation(com.itstyle.blog.common.limit.ServiceLimit)")
    public void ServiceAspect() {

    }

    @Around("ServiceAspect()")
    public  Object around(ProceedingJoinPoint joinPoint) {
        MethodSignature signature = (MethodSignature) joinPoint.getSignature();
        Method method = signature.getMethod();
        ServiceLimit limitAnnotation = method.getAnnotation(ServiceLimit.class);
        ServiceLimit.LimitType limitType = limitAnnotation.limitType();
        String key = limitAnnotation.key();
        Object obj;
        try {
            if(limitType.equals(ServiceLimit.LimitType.IP)){
                key = IPUtils.getIpAddr();
            }
            RateLimiter rateLimiter = caches.get(key);
            Boolean flag = rateLimiter.tryAcquire();
            if(flag){
                obj = joinPoint.proceed();
            }else{
                throw new RrException("小同志,你访问的太频繁了");
            }
        } catch (Throwable e) {
            throw new RrException("小同志,你访问的太频繁了");
        }
        return obj;
    }
}
收录
完事具备,就差被搜索引擎收录了,我们可以通过手动生成网站地图,提交给百度。
/**
 * 生成地图
 * 参见:https://blog.52itstyle.top/sitemap.xml
 */
@Component
public class SitemapTask {

    @Autowired
    private DynamicQuery dynamicQuery;

    protected Logger logger = LoggerFactory.getLogger(getClass());

    @Value("${blog.url}")
    private  String blogUrl;

    //每天23点执行一次
    @Scheduled(cron = "0 0 23 * * ?")
    public void createSitemap() {
        logger.info("定时提交百度收录开始");
        StringBuffer xml = new  StringBuffer();
        xml.append("<?xml version='1.0' encoding='utf-8'?>
");
        xml.append("<urlset>
");
        String nativeSql = "SELECT id,create_time FROM blog";
        List<Object[]> list = dynamicQuery.query(nativeSql,new Object[]{});
        list.forEach(blog -> {
            String url = blogUrl+blog[0]+".html";
            xml.append("   <url>
");
            xml.append("       <loc>"+url+"</loc>
");
            xml.append("       <lastmod>"+blog[1]+"</lastmod>
");
            xml.append("   </url>
");
        });
        xml.append("</urlset>
");
        saveAsFileWriter(xml.toString());
        logger.info("定时提交百度收录结束");
    }

    private static void saveAsFileWriter(String content) {
        String path = ClassUtils.getDefaultClassLoader().getResource("").getPath();
        String filePath = path + "static"+ SystemConstant.SF_FILE_SEPARATOR+"sitemap.xml";
        FileWriter fwriter = null;
        try {
            fwriter = new FileWriter(filePath, false);
            fwriter.write(content);
        } catch (IOException ex) {
            ex.printStackTrace();
        } finally {
            try {
                fwriter.flush();
                fwriter.close();
            } catch (IOException ex) {
                ex.printStackTrace();
            }
        }
    }
}
打包
尽量不要以Jar包形式部署,为了以后方便部署,最好放置到 外置Tomcat 下。
pom.xml 中移除内置 Tomcat:
<dependency>
      <groupId>org.springframework.boot</groupId>
      <artifactId>spring-boot-starter-tomcat</artifactId>
      <scope>provided</scope>
</dependency>
修改启动类:
/**
 * 启动类
 * 创建者 科帮网
 * 创建时间	2019年7月21日
 */
@SpringBootApplication
@EnableCaching
@EnableScheduling
public class Application extends SpringBootServletInitializer {
    private static final Logger logger = LoggerFactory.getLogger(Application.class);

    public static void main(String[] args) {
        SpringApplication.run(Application.class, args);
        logger.info("项目启动");
    }

    @Override
    protected SpringApplicationBuilder configure(SpringApplicationBuilder application) {
        return application.sources(Application.class);
    }
}
代理
项目部署后,最好加一层代理服务,这里我们使用Nginx:
server {
    listen 80;
    server_name blog.52itstyle.top;
    return 301 https://$server_name$request_uri;
}
server{
    listen 443 ssl;
    server_name blog.52itstyle.top;
    #证书路径
    ssl_certificate    /usr/local/openresty/nginx/cert/2543486_blog.52itstyle.top.pem;
    #私钥路径
    ssl_certificate_key   /usr/local/openresty/nginx/cert/2543486_blog.52itstyle.top.key;
    #缓存有效期
    ssl_session_timeout 5m;
    #可选的加密算法,顺序很重要,越靠前的优先级越高.
    ssl_ciphers ECDHE-RSA-AES128-GCM-SHA256:ECDHE:ECDH:AES:HIGH:!NULL:!aNULL:!MD5:!ADH:!RC4;
    #安全链接可选的加密协议
    ssl_protocols TLSv1 TLSv1.1 TLSv1.2;
    ssl_prefer_server_ciphers on;
    location = /500.html {
        root   /usr/local/openresty/nginx/html;
    }
    error_page 500 502 503 504 = /503/503.html;
    location / {
        proxy_pass  http://127.0.0.1:8080;
    }
    location ~ /.ht {
        deny  all;
    }
}
动静分离,将静态文件交由Nginx处理,加速博客访问:
#静态文件交给nginx处理
location ~ .*.(js|css|gif|jpg|jpeg|png|bmp)?$
{
   root /home/tomcat8/webapps/ROOT/WEB-INF/classes/static;
   expires 2h;
}
源码:https://gitee.com/52itstyle/Python
列表:https://blog.52itstyle.top/index
详情:https://blog.52itstyle.top/49.shtml
小结
撸完整个项目,基本能接触的都用上了,前后端框架、连接池、限流、缓存、动静分离,HTTPS安全认证、百度收录等等,特别适合有一定开发基础的小伙伴!