Android-认识Service
学习自
郭霖的博客
https://developer.android.google.cn/reference/android/app/Service#WhatIsAService
https://developer.android.google.cn/guide/components/services
What is Service
A Service is an application component representing either an application's desire to perform a longer-running operation while not interacting with the user or to supply functionality for other applications to use. Each service class must have a corresponding AndroidManifest.xml. Services can be started withContext.startService() and Context.bindService().
Service 是一个应用程序组件,其代表着一个应用程序希望在不与用户交互的情况下执行一个长时间运行的操作或者为其他的应用程序提供功能。每一个Service都必须在Manifest.xml文件中有一个与之相对应的 <serivce> 标签。Service能有以 Context.startService 和 Context.bindService 的方式启动。
Note that services, like other application objects, run in the main thread of their hosting process. This means that, if your service is going to do any CPU intensive (such as MP3 playback) or blocking (such as networking) operations, it should spawn its own thread in which to do that work.
请注意服务像其他的应用程序对象一样,运行在其托管进程的主线程中。这意味着,如果你的服务打算做任何CPU密集型任务(比如播放MP3)或者堵塞线程的操作(比如链接网络).那么它应该生成自己的线程来做这些工作。
理解官方文档
从官方文档我们了解到,服务是一个运行与后台的并且是运行在主线程中的应用程序组件,服务经常会被用来做一些长时间运行的操作,但是如果是CPU密集型的操作或者网络请求操作的话,需要再开启线程来完成这些操作。
我们可以通过 startService 和 bindService 两种方式来开启服务。
服务的基本用法
首先呢,我们先来新建一个服务并启动它,与Activity相同,同样是通过Intent来启动服务。
Step 1 新建一个类来继承Service
class TestService : Service() {

    override fun onBind(intent: Intent?): IBinder {
        TODO("not implemented")
    }

    override fun onCreate() {
        super.onCreate()
        "onCreate".logE()
    }

    override fun onStartCommand(intent: Intent?, flags: Int, startId: Int): Int {
        "onStartCommand".logE()
        return super.onStartCommand(intent, flags, startId)
    }

    override fun onDestroy() {
        super.onDestroy()
        "onDestroy".logE()
    }
}
Step2 在Manifest文件中声明
<application
    android:allowBackup="true"
    android:icon="@mipmap/ic_launcher"
    android:label="@string/app_name"
    android:roundIcon="@mipmap/ic_launcher_round"
    android:supportsRtl="true"
    android:theme="@style/AppTheme">
    <activity android:name=".MainActivity">
        <intent-filter>
            <action android:name="android.intent.action.MAIN" />
            <category android:name="android.intent.category.LAUNCHER" />
        </intent-filter>
    </activity>
    <!--声明服务-->
    <service android:name=".TestService" />
</application>
Step3: 开启服务
界面布局文件
<?xml version="1.0" encoding="utf-8"?>
<LinearLayout xmlns:android="http://schemas.android.com/apk/res/android"
    xmlns:app="http://schemas.android.com/apk/res-auto"
    xmlns:tools="http://schemas.android.com/tools"
    android:layout_width="match_parent"
    android:layout_height="match_parent"
    android:gravity="center_vertical|center_horizontal"
    android:orientation="vertical"
    tools:context="top.littledavid.studyservice.MainActivity">

    <Button
        android:id="@+id/startBtn"
        android:layout_width="wrap_content"
        android:layout_height="wrap_content"
        android:onClick="startService"
        android:text="Start Service"
        android:textAllCaps="false" />

    <Button
        android:id="@+id/stopBtn"
        android:onClick="stopService"
        android:layout_width="wrap_content"
        android:layout_height="wrap_content"
        android:layout_marginTop="5dp"
        android:text="Stop Service"
        android:textAllCaps="false" />

</LinearLayout>
Activity
//开启服务
fun startService(view: View) {
    val testServiceIntent = Intent(this, TestService::class.java)
    this.startService(testServiceIntent)
}

//关闭服务
fun stopService(view: View) {
    val stopTestServiceIntent = Intent(this, TestService::class.java)
    this.stopService(stopTestServiceIntent)
}
Step 4 运行程序查看Log
当点击Start Service按钮的时候Log如下:
onCreate
onStartCommand
但是当我们在点击一次StartService按钮的时候,Log如下
onStartCommand
这是因为当我们在点击第一次Start Service的时候因为Service还有创建,这时候需要先创建服务,所以执行了 onCreate 声明周期方法,然后紧接着这时候Service已经创建完成开始运行,执行了 onStartCommand 声明周期方法,当我们第二次点击Start Service按钮的时候,因为此时刚刚创建的Service并没有被销毁,所以仅仅执行了 onStartCommand 方法,onStartCommand 可以多次执行,但是onCreate方法只会在创建Service的时候执行。
当我们点击 Stop Service的时候然后再点击Start Service的时候Log如下:
onDestroy
onCreate
onStartCommand
当点击 Stop Service 服务会被销毁,然后如果我们再次点击 Start Service 的时候,因为服务已经被销毁所以,服务重新被创建,onCreate方法再次执行,这正好印证了我们上面的说法。
Start方式开启Service的生命周期
开启Service有两种方式,一种是startService,一种是bindService,上面例子中开启服务是通过startService的方式,start的方式开启服务与bind方式开启的Service的声明周期不太相同,我们先来看一下start方式的生命周期。
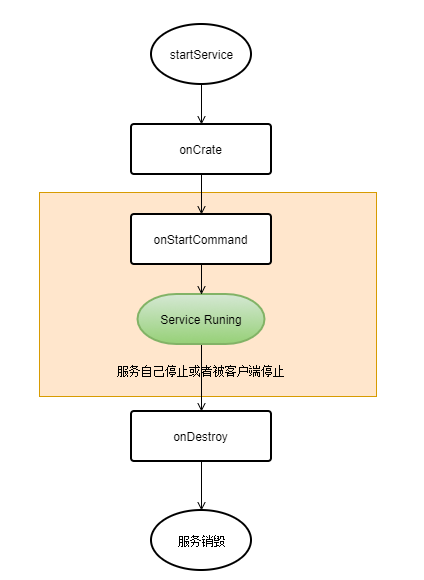
上图就是startService的方式开启的服务的声明周期,当服务创建以后如果不是内存不足服务被系统杀死,或者客户端停止服务,那么服务将会一直存在,尽管没有执行任何的业务。
bindService-Service与Activity通信
在上面我们学习了,通过start的方式启动Activity,但是start方式开启服务的Activity与Service之间的联系实在是太过于松散了,Activity不能够对服务进行有效的控制,可不能获取服务的实时状态,start方式仅仅能够控制服务的开启和技术,然而更具体地控制服务的话就没有办法了,那么有没有其他的办法呢?有的!那就是通过bind的方式开启Service。
我们继续基于我们的TestService来修改,在TestService中一直有一个 onBind 方法我们没有用到,这个方法就是用来与Activity建立联系的方法。
Step 1 修改原来的TestService
class TestService : Service() {
    private val mTestBinder = TestBinder()

    /**
     * 返回Binder
     * */
    override fun onBind(intent: Intent?): IBinder {
        return mTestBinder
    }

    override fun onCreate() {
        super.onCreate()
        "onCreate".logE()
    }

    override fun onStartCommand(intent: Intent?, flags: Int, startId: Int): Int {
        "onStartCommand".logE()
        return super.onStartCommand(intent, flags, startId)
    }

    override fun onDestroy() {
        super.onDestroy()
        "onDestroy".logE()
    }
    //建立我们的Binder类
    inner class TestBinder : Binder() {
        fun startDownload() = "Downloading".logE()
    }
}
在上面的代码中,建立了一个继承自Binder的内部类,并在在 onBind 方法执行的时候,将TestBinder的实例返回了出去,在Activity中将会通过这个类来与Service交互。这里仅仅是模拟一下,所以只打了个Log。
Step 2 向布局文件中在添加几个Button,用来与服务交互
<?xml version="1.0" encoding="utf-8"?>
<LinearLayout xmlns:android="http://schemas.android.com/apk/res/android"
    xmlns:app="http://schemas.android.com/apk/res-auto"
    xmlns:tools="http://schemas.android.com/tools"
    android:layout_width="match_parent"
    android:layout_height="match_parent"
    android:gravity="center_vertical|center_horizontal"
    android:orientation="vertical"
    tools:context="top.littledavid.studyservice.MainActivity">
    <!--OLD CODE-->
    <Button
        android:id="@+id/bindingServiceBtn"
        android:layout_width="wrap_content"
        android:layout_height="wrap_content"
        android:onClick="bindingService"
        android:text="Binding Service"
        android:textAllCaps="false" />

    <Button
        android:id="@+id/unbindingBtn"
        android:layout_width="wrap_content"
        android:layout_height="wrap_content"
        android:layout_marginTop="5dp"
        android:onClick="unbindingService"
        android:text="Unbinding Service"
        android:textAllCaps="false" />

    <Button
        android:id="@+id/downloadBtn"
        android:layout_width="wrap_content"
        android:layout_height="wrap_content"
        android:layout_marginTop="5dp"
        android:onClick="downloadFile"
        android:text="Download"
        android:textAllCaps="false" />

</LinearLayout>
Step 3 调用Service
class MainActivity : AppCompatActivity() {
    private var mBinder: TestService.TestBinder? = null
    override fun onCreate(savedInstanceState: Bundle?) {
        super.onCreate(savedInstanceState)
        setContentView(R.layout.activity_main)
    }
    //....OLD CODE

    //绑定服务
    fun bindingService(view: View) {
        var bindingIntent = Intent(this, TestService::class.java)
        this.bindService(bindingIntent, serviceConnection, android.app.Service.BIND_AUTO_CREATE)
    }
    //解绑服务
    fun unbindingService(view: View) {
        this.mBinder = null
        this.unbindService(serviceConnection)
    }
    //通过Binder与Service交互
    fun downloadFile(view: View) {
        mBinder?.startDownload() ?: "mBinder has been released".logE()
    }
    /**
     * ServiceConnection 是一个用来监测Service状态的接口
     * 当与Service建立联系后,会调用相应的方法来通知Activity
     * */
    private val serviceConnection = object : ServiceConnection {

        override fun onServiceDisconnected(name: ComponentName?) {
        }
        //在与Service建立链接后会执行此方法,在此方法中我们可以获取到对应服务的Binder
        override fun onServiceConnected(name: ComponentName?, service: IBinder?) {
            this@MainActivity.mBinder = service as TestService.TestBinder
            "链接建立".logE()
        }
    }
}
Step4 运行程序查看Log bindService -> Download-> unbindService->Download
onCreate
链接建立
Downloading
onDestroy
mBinder has been released
在Activity中的代码中,我们建立了一个 ServiceConnection 接口的匿名实现类, 在此接口我们用到了 onServiceConnected 方法。在这个方法中,有个 service IBinder类型的参数,该参数就是我们该TestService服务中声明的TestBinder的实例,我们将它向下转型后,就可以获取到TestBinder的实例。但是 onServiceConnected 方法时在与Service建立链接后采用获取到的。
当我们点击了BindService按钮后,会执行bindService方法,该方法有三个参数 第一个开启服务的Intent,第二个是 ServiceConnection 的匿名实现类(在与服务完成连接后,将会调用onServiceConnected方法),第三个是一个Flag位,BIND_AUTO_CREATE 表示,当链接到服务后服务会自动创建并执行 onCreate 方法。
当执行完bindService我们就可以拿到Binder对象了,这时候我们就可以与Service进行交互了。
如果想要解除绑定调用unbindService方法即可。
Bind方式开启服务的声明周期
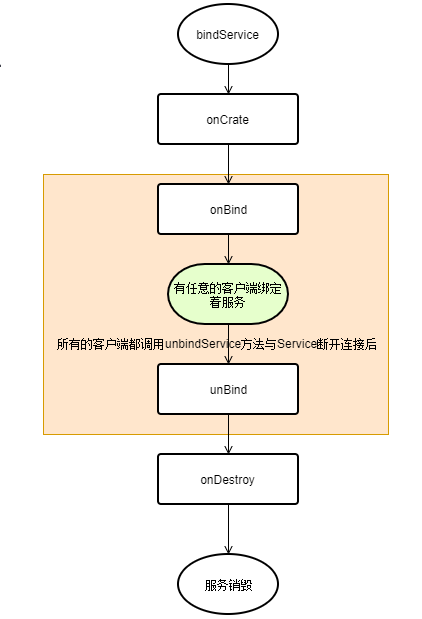
上图是通过Bind的方式开启的服务的声明周期,首先不相同的,Bind方式的声明周期并没有调用 onStartCommand 声明周期方法,仅仅是调用了onCreate方法,然就紧接着调用了onBind 方法获取Binder。这里我们需要注意一下。
并且Bind方式开启的服务的存活时间相对于Start方式开启的Service比较特殊,众所周知,Service并不是为某一个特定了Activity而提供的,而是在任意的地方都可以开启和结束。对同一个Service可以Bind多次,所以当有任何一个bind操作没有被unbind的话Service是不会被销毁的(即只存在任何与Service的链接,那么服务都不会被销毁),所以我们要注意Unbind Service,通常的做法是: 在Activity的onCreate方法中Bind Service 然后在Activity的onDestroy方法中Unbind Service。
override fun onCreate(savedInstanceState: Bundle?) {
    super.onCreate(savedInstanceState)
    setContentView(R.layout.activity_main)
    var bindingIntent = Intent(this, TestService::class.java)
    this.bindService(bindingIntent, serviceConnection, android.app.Service.BIND_AUTO_CREATE)
}

override fun onDestroy() {
    super.onDestroy()
    this.unbindService(this.serviceConnection)
}
结语
本文主要介绍了如何通过start方式和bind的方式开启服务以及各自的特点。正好篇幅也比较长了,正好就到此为止,接下来的内容将会在新的一章中继续学习,在下一张,将会学习start和bind结合的方式来开启服务。