什么是nginx?
Nginx 是一个高性能的轻量级的HTTP和反向代理服务器,也是一个邮件服务器。
下载地址
本人使用的是Tengine,它是由淘宝网发起的Web服务器项目。它在Nginx的基础上,针对大访问量网站的需求,添加了很多高级功能和特性。Tengine的性能和稳定性已经在大型的网站如淘宝网,天猫商城等得到了很好的检验。它的最终目标是打造一个高效、稳定、安全、易用的Web平台。下载地址是:http://tengine.taobao.org/download.html
安装
首先需要安装依赖,执行命令:
yum install -y gcc pcre-devel openssl-devel zlib-devel
编译:
make && make install
默认安装在路径:/usr/local/nginx
添加nginx为linux系统服务(service nginx start/stop/reload)
1、在/etc/init.d/目录下创建脚本文件,名为nginx


  1 #!/bin/sh
  2 #
  3 # nginx - this script starts and stops the nginx daemon
  4 #
  5 # chkconfig:   - 85 15
  6 # description: Nginx is an HTTP(S) server, HTTP(S) reverse
  7 #               proxy and IMAP/POP3 proxy server
  8 # processname: nginx
  9 # config:      /etc/nginx/nginx.conf
 10 # config:      /etc/sysconfig/nginx
 11 # pidfile:     /var/run/nginx.pid
 12
 13 # Source function library.
 14 . /etc/rc.d/init.d/functions
 15
 16 # Source networking configuration.
 17 . /etc/sysconfig/network
 18
 19 # Check that networking is up.
 20 [ "$NETWORKING" = "no" ] && exit 0
 21
 22 nginx="/usr/local/nginx/sbin/nginx"
 23 prog=$(basename $nginx)
 24
 25 NGINX_CONF_FILE="/usr/local/nginx/conf/nginx.conf"
 26
 27 [ -f /etc/sysconfig/nginx ] && . /etc/sysconfig/nginx
 28
 29 lockfile=/var/lock/subsys/nginx
 30
 31 start() {
 32     [ -x $nginx ] || exit 5
 33     [ -f $NGINX_CONF_FILE ] || exit 6
 34     echo -n $"Starting $prog: "
 35     daemon $nginx -c $NGINX_CONF_FILE
 36     retval=$?
 37     echo
 38     [ $retval -eq 0 ] && touch $lockfile
 39     return $retval
 40 }
 41
 42 stop() {
 43     echo -n $"Stopping $prog: "
 44     killproc $prog -QUIT
 45     retval=$?
 46     echo
 47     [ $retval -eq 0 ] && rm -f $lockfile
 48     return $retval
 49 killall -9 nginx
 50 }
 51
 52 restart() {
 53     configtest || return $?
 54     stop
 55     sleep 1
 56     start
 57 }
 58
 59 reload() {
 60     configtest || return $?
 61     echo -n $"Reloading $prog: "
 62     killproc $nginx -HUP
 63 RETVAL=$?
 64     echo
 65 }
 66
 67 force_reload() {
 68     restart
 69 }
 70
 71 configtest() {
 72 $nginx -t -c $NGINX_CONF_FILE
 73 }
 74
 75 rh_status() {
 76     status $prog
 77 }
 78
 79 rh_status_q() {
 80     rh_status >/dev/null 2>&1
 81 }
 82
 83 case "$1" in
 84     start)
 85         rh_status_q && exit 0
 86     $1
 87         ;;
 88     stop)
 89         rh_status_q || exit 0
 90         $1
 91         ;;
 92     restart|configtest)
 93         $1
 94         ;;
 95     reload)
 96         rh_status_q || exit 7
 97         $1
 98         ;;
 99     force-reload)
100         force_reload
101         ;;
102     status)
103         rh_status
104         ;;
105     condrestart|try-restart)
106         rh_status_q || exit 0
107             ;;
108     *)
109       echo $"Usage: $0 {start|stop|status|restart|condrestart|try-restart|reload|force-reload|configtest}"
110         exit 2
111 esac
2、修改脚本权限: chmod 755 /etc/init.d/nginx
3、添加到系统服务并开机自动启动nginx: chkconfig nginx on
4、nginx启动、停止、无间断服务重新加载
[root@hadoop1-1 conf]#  service nginx stop
Stopping nginx: [  OK  ]
[root@hadoop1-1 conf]#  service nginx start
Starting nginx: [  OK  ]
[root@hadoop1-1 conf]#  service nginx reload
nginx: the configuration file /usr/local/nginx/conf/nginx.conf syntax is ok
nginx: configuration file /usr/local/nginx/conf/nginx.conf test is successful
Reloading nginx: [  OK  ]
nginx反向代理设置
1、之前讲过Apache httpd的反向代理,关于反向代理的基础在这里不做重复解释,有兴趣可以查看另一篇博客:http://www.cnblogs.com/skyfeng/articles/6628903.html
2、环境:
nginx:192.168.2.100
tomcat1:192.168.2.110
tomcat2:192.168.2.120
3、配置配置文件nginx.conf
    #设定负载均衡的应用服务器列表
    #weigth参数表示权值,值越大被分配到的概率越大
    upstream tomcat{
        server 192.168.2.110:8088 weight=2;
        server 192.168.2.120:8088 weight=1;
    }

    server{
        listen       8080;
        server_name  localhost;
        location /tomcat {
           proxy_pass http://tomcat/; #在这里设置一个代理,和upstream的名字一样
           proxy_redirect off;
           #后端的Web服务器可以通过X-Forwarded-For获取用户真实IP
           proxy_set_header Host $host;
           proxy_set_header X-Real-IP $remote_addr;
           proxy_set_header X-Forwarded-For $proxy_add_x_forwarded_for;
        }
    }
测试
修改完成之后执行命令:service nginx reload
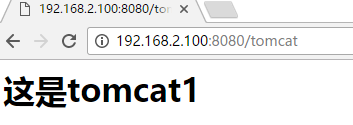
在浏览器中输入地址:http://192.168.2.100:8080/tomcat
进行刷新,出现如下图页面表示nginx反向代理设置成功!!!