使用maven打包java的jar包时,通常有两种情况:
将依赖打到外部文件夹,将源码单独打jar包运行;
将依赖和源码一起打到jar包中运行。
下面举例说明这两种情况:
建立如下测试类,依赖一个common-lang包(用于测试外部依赖):
package mvnDemo;

import org.apache.commons.lang3.StringUtils;

public class MvnDemo {

    public static void main(String[] args) {
        System.out.println(StringUtils.upperCase("hello mvn"));
    }
}
POM配置如下:
<?xml version="1.0" encoding="UTF-8"?>
<project xmlns="http://maven.apache.org/POM/4.0.0"
         xmlns:xsi="http://www.w3.org/2001/XMLSchema-instance"
         xsi:schemaLocation="http://maven.apache.org/POM/4.0.0 http://maven.apache.org/xsd/maven-4.0.0.xsd">
    <modelVersion>4.0.0</modelVersion>

    <groupId>org.example</groupId>
    <artifactId>testDemo</artifactId>
    <version>1.0-SNAPSHOT</version>

    <dependencies>
        <dependency>
            <groupId>org.apache.commons</groupId>
            <artifactId>commons-lang3</artifactId>
            <version>3.11</version>
        </dependency>
        <dependency>
            <groupId>junit</groupId>
            <artifactId>junit</artifactId>
            <version>RELEASE</version>
            <scope>compile</scope>
        </dependency>

    </dependencies>
    <build>
        <plugins>
            <!--指定项目源码的jdk版本和编译后的jdk版本。-->
            <plugin>
                <groupId>org.apache.maven.plugins</groupId>
                <artifactId>maven-compiler-plugin</artifactId>
                <configuration>
                    <source>8</source>
                    <target>8</target>
                </configuration>
            </plugin>

            <!--指定打成jar包的mainClass;设置添加classpath;设置classpath的前缀
            https://maven.apache.org/plugins/maven-jar-plugin/-->
            <plugin>
                <groupId>org.apache.maven.plugins</groupId>
                <artifactId>maven-jar-plugin</artifactId>
                <version>3.2.0</version>
                <configuration>
                    <archive>
                        <manifest>
                            <mainClass>
                                mvnDemo.MvnDemo
                            </mainClass>
                            <addClasspath>
                                true
                            </addClasspath>
                            <classpathPrefix>
                                lib
                            </classpathPrefix>
                        </manifest>
                    </archive>
                </configuration>
            </plugin>

            <!--将所需依赖拷贝到当前jar包所在目录的lib文件夹下。
            maven官网示例地址: https://maven.apache.org/plugins/maven-dependency-plugin/examples/copying-project-dependencies.html-->
            <plugin>
                <groupId>org.apache.maven.plugins</groupId>
                <artifactId>maven-dependency-plugin</artifactId>
                <version>3.2.0</version>
                <executions>
                    <execution>
                        <id>copy-dependencies</id>
                        <phase>package</phase>
                        <goals>
                            <goal>copy-dependencies</goal>
                        </goals>
                        <configuration>
                            <outputDirectory>${project.build.directory}/lib</outputDirectory>
                        </configuration>
                    </execution>
                </executions>
            </plugin>

            <!--将所需依赖一并打到jar包中。
            mvn官网案例 https://maven.apache.org/plugins/maven-shade-plugin/-->
            <plugin>
                <groupId>org.apache.maven.plugins</groupId>
                <artifactId>maven-shade-plugin</artifactId>
                <version>3.2.4</version>
                <executions>
                    <execution>
                        <phase>package</phase>
                        <goals>
                            <goal>shade</goal>
                        </goals>
                        <configuration>
                            <filters>
                                <filter>
                                    <artifact>*:*</artifact>
                                    <excludes>
                                        <exclude>META-INF/*.SF</exclude>
                                        <exclude>META-INF/*.DSA</exclude>
                                        <exclude>META-INF/*.RSA</exclude>
                                    </excludes>
                                </filter>
                            </filters>
                            <transformers>
                                <transformer implementation="org.apache.maven.plugins.shade.resource.ManifestResourceTransformer">
                                    <mainClass>mvnDemo.MvnDemo</mainClass>
                                </transformer>
                            </transformers>
                        </configuration>
                    </execution>
                </executions>
            </plugin>
        </plugins>
    </build>

</project>
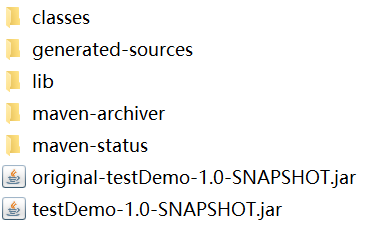
打完的jar如下:

lib中存放的是相关依赖jar包(比如common-lang包);
original-testDemo-1.0-SNAPSHOT.jar是仅含源码的jar包;
testDemo-1.0-SNAPSHOT.jar是既包含源码又包含相关依赖的jar包。
上述两个jar包分别使用java -jar original-testDemo-1.0-SNAPSHOT.jar java -jar testDemo-1.0-SNAPSHOT.jar运行都能得到
HELLO MVN
的运行结果。