用python写爬虫时,有两个很好用第三方模块requests库和beautifulsoup库,简单学习了下模块用法:
1,requests模块
Python标准库中提供了:urllib、urllib2、httplib等模块以供Http请求,使用起来较为麻烦。requests是基于Python开发的HTTP 第三方库,在Python内置模块的基础上进行了高度的封装,使用了更简单,代码量更少。 官方文档:http://docs.python-requests.org/zh_CN/latest/user/quickstart.html
requests的api 主要包括了八个方法:
def get(url, params=None, **kwargs):
def options(url, **kwargs):
def head(url, **kwargs):
def post(url, data=None, json=None, **kwargs):
def put(url, data=None, **kwargs):
def patch(url, data=None, **kwargs):
def delete(url, **kwargs):

#上面方法都是基于request方法实现的(method参数)
def request(method, url, **kwargs):
最常用的主要是get方法和post方法,其源码如下,都是基于request方法,参数和request方法一样。
def get(url, params=None, **kwargs):
    """Sends a GET request.
    :param url: URL for the new :class:`Request` object.
    :param params: (optional) Dictionary or bytes to be sent in the query string for the :class:`Request`.
    :param **kwargs: Optional arguments that ``request`` takes.
    :return: :class:`Response <Response>` object
    :rtype: requests.Response
    """
    kwargs.setdefault('allow_redirects', True)
    return request('get', url, params=params, **kwargs)   # 发送get请求,基于request方法,method=‘get’

def post(url, data=None, json=None, **kwargs):
    """Sends a POST request.

    :param url: URL for the new :class:`Request` object.
    :param data: (optional) Dictionary, bytes, or file-like object to send in the body of the :class:`Request`.
    :param json: (optional) json data to send in the body of the :class:`Request`.
    :param **kwargs: Optional arguments that ``request`` takes.
    :return: :class:`Response <Response>` object
    :rtype: requests.Response
    """
    return request('post', url, data=data, json=json, **kwargs)  # 发送post请求,基于request方法,method=‘post‘’
request方法源码如下:
def request(method, url, **kwargs):
    """Constructs and sends a :class:`Request <Request>`.

    :param method: method for the new :class:`Request` object.     #method,对应‘get’,‘post’,‘put’,'delete'等。必须参数
    :param url: URL for the new :class:`Request` object.       # url,必须参数
    :param params: (optional) Dictionary or bytes to be sent in the query string for the :class:`Request`.      # params,url中的查询字符窜,字典或字节类型,urlencode方法
    :param data: (optional) Dictionary, bytes, or file-like object to send in the body of the :class:`Request`.  #data, 发送的数据,字典,字节,和类文件对象
    :param json: (optional) json data to send in the body of the :class:`Request`.                   #json, 发送的数据,json格式的
    :param headers: (optional) Dictionary of HTTP Headers to send with the :class:`Request`.              # headers,请求头,字典格式
    :param cookies: (optional) Dict or CookieJar object to send with the :class:`Request`.                # cookies,字典或CookieJar对象
    :param files: (optional) Dictionary of ``'name': file-like-objects`` (or ``{'name': file-tuple}``) for multipart encoding upload. #字典{‘name’:file-like obj}
        ``file-tuple`` can be a 2-tuple ``('filename', fileobj)``, 3-tuple ``('filename', fileobj, 'content_type')``           #或字典{‘name’:file-tuple} (嵌套元组)
        or a 4-tuple ``('filename', fileobj, 'content_type', custom_headers)``, where ``'content-type'`` is a string
        defining the content type of the given file and ``custom_headers`` a dict-like object containing additional headers
        to add for the file.
    :param auth: (optional) Auth tuple to enable Basic/Digest/Custom HTTP Auth.         #auth,元组
    :param timeout: (optional) How long to wait for the server to send data        #超时时间,浮点数或元组
        before giving up, as a float, or a :ref:`(connect timeout, read
        timeout) <timeouts>` tuple.
      :type timeout: float or tuple
    :param allow_redirects: (optional) Boolean. Set to True if POST/PUT/DELETE redirect following is allowed.  #allow_redirects,是否允许重定向,
      :type allow_redirects: bool
    :param proxies: (optional) Dictionary mapping protocol to the URL of the proxy.   #代理服务器,协议和url字典 {'http':proxy_ip}
    :param verify: (optional) whether the SSL cert will be verified. A CA_BUNDLE path can also be provided. Defaults to ``True``.   #verify,是否ssl认证,默认为True
    :param stream: (optional) if ``False``, the response content will be immediately downloaded.    # stream,默认为false,会直接下载到内存,文件较大时应设置为True
    :param cert: (optional) if String, path to ssl client cert file (.pem). If Tuple, ('cert', 'key') pair.
    :return: :class:`Response <Response>` object
      :rtype: requests.Response

    Usage::

      >>> import requests
      >>> req = requests.request('GET', 'http://httpbin.org/get')
      <Response [200]>
    """

    # By using the 'with' statement we are sure the session is closed, thus we
    # avoid leaving sockets open which can trigger a ResourceWarning in some
    # cases, and look like a memory leak in others.
    with sessions.Session() as session:
        return session.request(method=method, url=url, **kwargs)
相关参数注意:data数据类型可以为字典,但若是嵌套字典时需要用json。参数举例如下:
method:
    # requests.request(method='get', url='http://127.0.0.1:8000/test/')
    # requests.request(method='post', url='http://127.0.0.1:8000/test/')
params:
    # - 可以是字典
    # - 可以是字符串
    # - 可以是字节(ascii编码以内)

    # requests.request(method='get',
    # url='http://127.0.0.1:8000/test/',
    # params={'k1': 'v1', 'k2': '水电费'})

    # requests.request(method='get',
    # url='http://127.0.0.1:8000/test/',
    # params="k1=v1&k2=水电费&k3=v3&k3=vv3")

    # requests.request(method='get',
    # url='http://127.0.0.1:8000/test/',
    # params=bytes("k1=v1&k2=k2&k3=v3&k3=vv3", encoding='utf8'))

    # 错误
    # requests.request(method='get',
    # url='http://127.0.0.1:8000/test/',
    # params=bytes("k1=v1&k2=水电费&k3=v3&k3=vv3", encoding='utf8'))
data:
    # 可以是字典
    # 可以是字符串
    # 可以是字节
    # 可以是文件对象

    # requests.request(method='POST',
    # url='http://127.0.0.1:8000/test/',
    # data={'k1': 'v1', 'k2': '水电费'})

    # requests.request(method='POST',
    # url='http://127.0.0.1:8000/test/',
    # data="k1=v1; k2=v2; k3=v3; k3=v4"
    # )

    # requests.request(method='POST',
    # url='http://127.0.0.1:8000/test/',
    # data="k1=v1;k2=v2;k3=v3;k3=v4",
    # headers={'Content-Type': 'application/x-www-form-urlencoded'}
    # )

    # requests.request(method='POST',
    # url='http://127.0.0.1:8000/test/',
    # data=open('data_file.py', mode='r', encoding='utf-8'), # 文件内容是:k1=v1;k2=v2;k3=v3;k3=v4
    # headers={'Content-Type': 'application/x-www-form-urlencoded'}
    # )
json:
    # 将json中对应的数据进行序列化成一个字符串,json.dumps(...)
    # 然后发送到服务器端的body中,并且Content-Type是 {'Content-Type': 'application/json'}
    requests.request(method='POST',
                     url='http://127.0.0.1:8000/test/',
                     json={'k1': 'v1', 'k2': '水电费'})

headers:
    # 发送请求头到服务器端
    requests.request(method='POST',
                     url='http://127.0.0.1:8000/test/',
                     json={'k1': 'v1', 'k2': '水电费'},
                     headers={'Content-Type': 'application/x-www-form-urlencoded'}
                     )
cookies():
    # 发送Cookie到服务器端
    requests.request(method='POST',
                     url='http://127.0.0.1:8000/test/',
                     data={'k1': 'v1', 'k2': 'v2'},
                     cookies={'cook1': 'value1'},
                     )
    # 也可以使用CookieJar(字典形式就是在此基础上封装)
    from http.cookiejar import CookieJar
    from http.cookiejar import Cookie
    obj = CookieJar()
    obj.set_cookie(Cookie(version=0, name='c1', value='v1', port=None, domain='', path='/', secure=False, expires=None,
                          discard=True, comment=None, comment_url=None, rest={'HttpOnly': None}, rfc2109=False,
                          port_specified=False, domain_specified=False, domain_initial_dot=False, path_specified=False)
                   )
    requests.request(method='POST',
                     url='http://127.0.0.1:8000/test/',
                     data={'k1': 'v1', 'k2': 'v2'},
                     cookies=obj)
files:
    # 发送文件
    # file_dict = {
    # 'f1': open('readme', 'rb')
    # }
    # requests.request(method='POST',
    # url='http://127.0.0.1:8000/test/',
    # files=file_dict)

    # 发送文件,定制文件名
    # file_dict = {
    # 'f1': ('test.txt', open('readme', 'rb'))
    # }
    # requests.request(method='POST',
    # url='http://127.0.0.1:8000/test/',
    # files=file_dict)

    # 发送文件,定制文件名
    # file_dict = {
    # 'f1': ('test.txt', "hahsfaksfa9kasdjflaksdjf")
    # }
    # requests.request(method='POST',
    # url='http://127.0.0.1:8000/test/',
    # files=file_dict)

    # 发送文件,定制文件名
    # file_dict = {
    #     'f1': ('test.txt', "hahsfaksfa9kasdjflaksdjf", 'application/text', {'k1': '0'})
    # }
    # requests.request(method='POST',
    #                  url='http://127.0.0.1:8000/test/',
    #                  files=file_dict)

auth:  认证方法
    from requests.auth import HTTPBasicAuth, HTTPDigestAuth
    ret = requests.get('https://api.github.com/user', auth=HTTPBasicAuth('wupeiqi', 'sdfasdfasdf'))
    print(ret.text)

    # ret = requests.get('http://192.168.1.1',
    # auth=HTTPBasicAuth('admin', 'admin'))
    # ret.encoding = 'gbk'
    # print(ret.text)

    # ret = requests.get('http://httpbin.org/digest-auth/auth/user/pass', auth=HTTPDigestAuth('user', 'pass'))
    # print(ret)
   timeout: 超时时间
    # ret = requests.get('http://google.com/', timeout=1)
    # print(ret)

    # ret = requests.get('http://google.com/', timeout=(5, 1))
    # print(ret)

allow_redirects:
    ret = requests.get('http://127.0.0.1:8000/test/', allow_redirects=False)
    print(ret.text)

proxies:
    # proxies = {
    # "http": "61.172.249.96:80",
    # "https": "http://61.185.219.126:3128",
    # }

    # proxies = {'http://10.20.1.128': 'http://10.10.1.10:5323'}

    # ret = requests.get("http://www.proxy360.cn/Proxy", proxies=proxies)
    # print(ret.headers)

    # from requests.auth import HTTPProxyAuth
    #
    # proxyDict = {
    # 'http': '77.75.105.165',
    # 'https': '77.75.105.165'
    # }
    # auth = HTTPProxyAuth('username', 'mypassword')
    #
    # r = requests.get("http://www.google.com", proxies=proxyDict, auth=auth)
    # print(r.text)

stream:
    ret = requests.get('http://127.0.0.1:8000/test/', stream=True)     #默认为false,会直接将文件下载到内存,文件过大时会撑满内存,
    print(ret.content)
    ret.close()

    # from contextlib import closing
    # with closing(requests.get('http://httpbin.org/get', stream=True)) as r:
    # # 在此处理响应。
    # for i in r.iter_content():   # 设置成True时,遍历内容时才开始下载
    # print(i)
request方法的最后调用了Session 类,其内部也实现了request,get,post等方法,部分源码如下:
class Session(SessionRedirectMixin):
    """A Requests session.
    Provides cookie persistence, connection-pooling, and configuration.
    Basic Usage::

      >>> import requests
      >>> s = requests.Session()
      >>> s.get('http://httpbin.org/get')
      <Response [200]>

    Or as a context manager::

      >>> with requests.Session() as s:
      >>>     s.get('http://httpbin.org/get')
      <Response [200]>
1.1 Seeeion 对象
下面代码两者的区别:requests.get相当于每次请求时都新建了一个session对象,而requests.session()是新建一个session对象,然后重复利用该session对象,从而实现保持session对象的cookie,参数等在不同请求中保持持久化。(所以Session对象拥有requests的所有http method)
官方文档:http://docs.python-requests.org/en/latest/user/advanced/#session-objects
参考博客:https://stackabuse.com/the-python-requests-module/
#利用Session
client = requests.session()
resp = client.get(url='...')

#利用requests
resp = requests.get(url='...')
不同session的cookie保持:如下面的代码,对于first_session每次请求都会带上{"cookies":{"cookieone":"111"}}, 而对于second_session,每次请求都会带上{"cookies":{"cookietwo":"222"}};
import requests

first_session = requests.Session()
second_session = requests.Session()

first_session.get('http://httpbin.org/cookies/set/cookieone/111')
r = first_session.get('http://httpbin.org/cookies')
print(r.text)

second_session.get('http://httpbin.org/cookies/set/cookietwo/222')
r = second_session.get('http://httpbin.org/cookies')
print(r.text)

r = first_session.get('http://httpbin.org/anything')
print(r.text)
output:
{"cookies":{"cookieone":"111"}}

{"cookies":{"cookietwo":"222"}}

{"args":{},"data":"","files":{},"form":{},"headers":{"Accept":"*/*","Accept-Encoding":"gzip, deflate","Connection":"close","Cookie":"cookieone=111","Host":"httpbin.org","User-Agent":"python-requests/2.9.1"},"json":null,"method":"GET","origin":"103.9.74.222","url":"http://httpbin.org/anything"}
session的cookie更新: 如下面代码中,通过first_session.cookies更新的cookie会跟随每次请求,而first_session.get() 请求中cookies参数传入的cookie,只对该请求有效,不会被持久化。
import requests

first_session = requests.Session()

first_session.cookies.update({'default_cookie': 'default'})

r = first_session.get('http://httpbin.org/cookies', cookies={'first-cookie': '111'})
print(r.text)

r = first_session.get('http://httpbin.org/cookies')
print(r.text)
output:
{"cookies":{"default_cookie":"default","first-cookie":"111"}}

{"cookies":{"default_cookie":"default"}}
session应用举例:
def requests_session():
    import requests

    session = requests.Session()

    ### 1、首先登陆任何页面,获取cookie

    i1 = session.get(url="http://dig.chouti.com/help/service")

    ### 2、用户登陆,携带上一次的cookie,后台对cookie中的 gpsd 进行授权
    i2 = session.post(
        url="http://dig.chouti.com/login",
        data={
            'phone': "8615131255089",
            'password': "xxxxxx",
            'oneMonth': ""
        }
    )
  # 3,保持会话,自动带着授权的cookie进行访问
    i3 = session.post(
        url="http://dig.chouti.com/link/vote?linksId=8589623",
    )
    print(i3.text)
1.2 Response
request的返回值为Response对象,其有很多有用的属性和方法,如下:
通过response.cookies,response.headers,response.status_code,encoding可以拿到服务器返回的cookies, 响应头,状态码,编码等信息。
通过response.content和text,可以分别拿到响应网页的二进制和unicode数据。
class Response(object):
    """The :class:`Response <Response>` object, which contains a
    server's response to an HTTP request.
    """
    __attrs__ = [
        '_content', 'status_code', 'headers', 'url', 'history',
        'encoding', 'reason', 'cookies', 'elapsed', 'request'
    ]
  @property
  def content(self):   """Content of the response, in bytes."""
  @property
  def text(self):   """Content of the response, in unicode."""
另外下载文件时的官方推荐写法如下,stream=True表示采用数据流,边下载边写入,而不是一次性全部写入内存,r.iter_content(chunk_size=256)表示每次下载256字节数据。
import requests

r = requests.get('https://cdn.pixabay.com/photo/2018/07/05/02/50/sun-hat-3517443_1280.jpg', stream=True)
downloaded_file = open("sun-hat.jpg", "wb")
for chunk in r.iter_content(chunk_size=256):
    if chunk:
        downloaded_file.write(chunk)
#下面方法能拿到原始的数据
import requests
r = requests.get("http://exampleurl.com", stream=True)
r.raw
2,BeautifulSoup模块
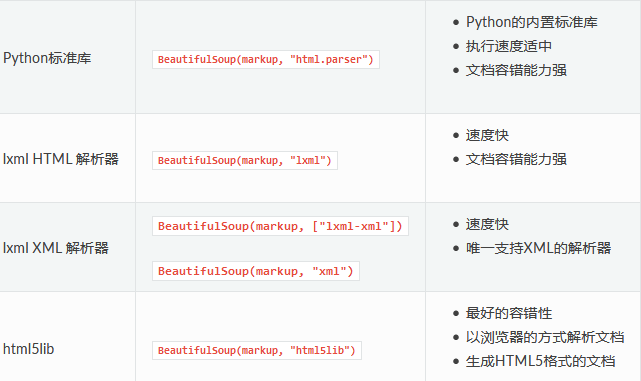
BeautifulSopu模块是一个可以从HTML或XML文件中提取数据的Python第三方库。其接受一个html或xml字符串(或html,xml文档句柄),将文档被转换成Unicode,利用解析器来解析这段文档。BeautifulSoup支持几种不同的解析器:python标准库中的html.parser,以及第三方库lxml,lxml-xml和html5lib。Beautiful Soup最终将复杂HTML文档转换成一个复杂的树形结构,每个节点都是Python对象,所有对象可以归纳为4种: Tag , NavigableString , BeautifulSoup , Comment .
官方文档:https://beautifulsoup.readthedocs.io/zh_CN/v4.4.0/
BeautifulSoup的构造方法接受html文档后,得到实例化BeautifulSoup对象,由于该对象继承了Tag类,拥有Tag类的属性和方法。Beautiful部分源码:
class BeautifulSoup(Tag):
    ROOT_TAG_NAME = u'[document]'
    DEFAULT_BUILDER_FEATURES = ['html', 'fast']
    ASCII_SPACES = 'x20x0ax09x0cx0d'
    NO_PARSER_SPECIFIED_WARNING = "No parser was explicitly specified, so I'm using the best available %(markup_type)s parser for this system ("%(parser)s"). This usually isn't a problem, but if you run this code on another system, or in a different virtual environment, it may use a different parser and behave differently.

The code that caused this warning is on line %(line_number)s of the file %(filename)s. To get rid of this warning, change code that looks like this:

 BeautifulSoup([your markup])

to this:

 BeautifulSoup([your markup], "%(parser)s")
"
    def __init__(self, markup="", features=None, builder=None,
                 parse_only=None, from_encoding=None, exclude_encodings=None,
                 **kwargs):
        """The Soup object is initialized as the 'root tag', and the
        provided markup (which can be a string or a file-like object)
        is fed into the underlying parser."""
Tag对象与XML或HTML原生文档中的tag相同,Tag类中有很多方法和属性来遍历html文档中节点和属性:
html_doc = """
<html><head><title>The Dormouse's story</title></head>
    <body>
<p class="title"><b>The Dormouse's story</b></p>

<p class="story">Once upon a time there were three little sisters; and their names were
<a href="http://example.com/elsie" class="sister" id="link1">Elsie</a>,
<a href="http://example.com/lacie" class="sister" id="link2">Lacie</a> and
<a href="http://example.com/tillie" class="sister" id="link3">Tillie</a>;
and they lived at the bottom of a well.</p>

<p class="story">...</p>
"""
from bs4 import BeautifulSoup
soup = BeautifulSoup(html_doc, 'html.parser')
对于上面的BeautifulSoup对象:
name, 标签名字:
# tag = soup.find('a')
# name = tag.name # 获取
# print(name)
# tag.name = 'span' # 设置
# print(soup)
# soup.head   #拿到head标签
attrs, 标签属性
# tag = soup.find('a')
# attrs = tag.attrs    # 获取
# print(attrs)
# tag.attrs = {'ik':123} # 设置
# tag.attrs['id'] = 'iiiii' # 设置
# print(soup)
#tag['id']   #直接拿到属性
children, 所有子标签,返回生成器
contents,所有子标签,返回列表
parent,父节点
next_sibling,下一个兄弟节点
previous_sibling,上一个兄弟节点
# body = soup.find('body')
# v = body.children #
v = body.contents[0]
decendants, 所有的子孙节点
parents,所有父辈节点
next_siblings,下面所有兄弟节点
previous_siblings,上面所有兄弟节点
# body = soup.find('body')
# v = body.descendants
string: tag只有一个 NavigableString 类型子节点,那么这个tag可以使用 .string 得到子节点    (NavigableString,类似一个unicode字符窜,string拿到文本)
strings: tag中包含多个字符串 [2] ,可以使用 .strings 来循环获取
stripped_strings: 输出的字符串中可能包含了很多空格或空行,使用 .stripped_strings 可以去除多余空白内容:
# tag = soup.find('a')
#tag.string
#for string in tag.strings:
#    print(repr(string))
clear(),将标签的所有子标签全部清空(保留标签名)
# tag = soup.find('body')
# tag.clear()
decompose(), 递归的删除所有的标签(不保留标签名)
# body = soup.find('body')
# body.decompose()
extract(),递归的删除所有的标签,并获取删除的标签
# body = soup.find('body')
# v = body.extract()
decode,转换数据为字符串(含当前标签);decode_contents(不含当前标签)
# body = soup.find('body')
# v = body.decode()
# v = body.decode_contents()
# print(v)
def decode(self, indent_level=None,eventual_encoding=DEFAULT_OUTPUT_ENCODING, formatter="minimal"):
        """Returns a Unicode representation of this tag and its contents.
默认encoding=‘utf-8’
encode,转换为字节(含当前标签);encode_contents(不含当前标签)
# body = soup.find('body')
# v = body.encode()
# v = body.encode_contents()
# print(v)
def encode(self, encoding=DEFAULT_OUTPUT_ENCODING,indent_level=None, formatter="minimal",errors="xmlcharrefreplace"):
默认encoding=‘utf-8’
find_all() :搜索当前tag的所有tag子节点,获取匹配的所有标签,以列表形式返回

def find_all(self, name=None, attrs={}, recursive=True, text=None, limit=None, **kwargs):
        """Extracts a list of Tag objects that match the given
        criteria.  You can specify the name of the Tag and any
        attributes you want the Tag to have.
        The value of a key-value pair in the 'attrs' map can be a
        string, a list of strings, a regular expression object, or a
        callable that takes a string and returns whether or not the
        string matches for some custom definition of 'matches'. The
        same is true of the tag name."""
name:查找所有名字为 name 的tag   (name可以为字符串,正则表达式,列表,方法,True)  #True匹配任意标签名
# tags = soup.find_all('a')
# print(tags)

# tags = soup.find_all('a',limit=1)   # limit,只匹配一次;类似于find()
# print(tags)

attrs参数:tag的属性值包含筛选条件
# tags = soup.find_all(name='a', attrs={'class': 'sister'}, recursive=True, text='Lacie')
# # tags = soup.find(name='a', class_='sister', recursive=True, text='Lacie')
soup.find_all("a", class_="sister")
# print(tags)

# ####### 列表 #######
# v = soup.find_all(name=['a','div'])
# print(v)
# v = soup.find_all(class_=['sister0', 'sister'])   #class 为python关键字,所以加下划线
# print(v)
# v = soup.find_all(text=['Tillie'])
# print(v, type(v[0]))
# v = soup.find_all(id=['link1','link2'])
# print(v)
# v = soup.find_all(href=['link1','link2'])
# print(v)


# ####### 正则 #######
import re
# rep = re.compile('p')
# rep = re.compile('^p')
# v = soup.find_all(name=rep)
# print(v)

# rep = re.compile('sister.*')
# v = soup.find_all(class_=rep)
# print(v)

# rep = re.compile('http://www.oldboy.com/static/.*')
# v = soup.find_all(href=rep)
# print(v)

# ####### 方法筛选 #######
# def func(tag):
# return tag.has_attr('class') and tag.has_attr('id')
# v = soup.find_all(name=func)
# print(v
find(),获取匹配的第一个标签
# tag = soup.find('a')
# print(tag)
# tag = soup.find(name='a', attrs={'class': 'sister'}, recursive=True, text='Lacie')
# tag = soup.find(name='a', class_='sister', recursive=True, text='Lacie')
# print(tag)
get(),获取标签属性
def get(self, key, default=None):
    return self.attrs.get(key, default)
# tag = soup.find('a')
# v = tag.get('id')
#类似于tag.attrs['id'] # print(v)
has_attr(),检查标签是否具有该属性
# tag = soup.find('a')
# v = tag.has_attr('id')
# print(v)
def has_attr(self, key):
        return key in self.attrs
get_text(),获取标签内部文本内容  #类似string
# tag = soup.find('a')
# v = tag.get_text('id')
# print(v)
 index(),检查标签在某标签中的索引位置
    def index(self, element):
        """
        Find the index of a child by identity, not value. Avoids issues with
        tag.contents.index(element) getting the index of equal elements.
        """
        for i, child in enumerate(self.contents):
            if child is element:
                return i
        raise ValueError("Tag.index: element not in tag")
# tag = soup.find('body')
# v = tag.index(tag.find('div'))
# print(v)
is_empty_element(),是否是空标签(是否可以是空)或者自闭合标签,
  判断是否是如下标签:'br' , 'hr', 'input', 'img', 'meta','spacer', 'link', 'frame', 'base'
# tag = soup.find('br')
# v = tag.is_empty_element
# print(v)
select,select_one, CSS选择器  (和css选择器一样)
soup.select("title")
soup.select("p nth-of-type(3)")   #父元素中第三个p标签
soup.select("body a")
soup.select("html head title")
tag = soup.select("span,a")
soup.select("head > title")
soup.select("p > a")
soup.select("p > a:nth-of-type(2)")
soup.select("p > #link1")
soup.select("body > a")
soup.select("#link1 ~ .sister")
soup.select("#link1 + .sister")
soup.select(".sister")
soup.select("[class~=sister]")
soup.select("#link1")
soup.select("a#link2")
soup.select('a[href]')
soup.select('a[href="http://example.com/elsie"]')
soup.select('a[href^="http://example.com/"]')
soup.select('a[href$="tillie"]')
soup.select('a[href*=".com/el"]')

from bs4.element import Tag
def default_candidate_generator(tag):
    for child in tag.descendants:
        if not isinstance(child, Tag):
            continue
        if not child.has_attr('href'):
            continue
        yield child
tags = soup.find('body').select("a", _candidate_generator=default_candidate_generator)
print(type(tags), tags)


from bs4.element import Tag
def default_candidate_generator(tag):
    for child in tag.descendants:
        if not isinstance(child, Tag):
            continue
        if not child.has_attr('href'):
            continue
        yield child
tags = soup.find('body').select("a", _candidate_generator=default_candidate_generator, limit=1)
print(type(tags), tags)
修改文档树标签的内容
# tag = soup.find('span')
# print(tag.string)          # 获取
# tag.string = 'new content' # 设置
# print(soup)

# tag = soup.find('body')
# print(tag.string)
# tag.string = 'xxx'
# print(soup)

# tag = soup.find('body')
# v = tag.stripped_strings  # 递归内部获取所有标签的文本
# print(v)

append():在当前标签内部追加一个标签
# tag = soup.find('body') # tag.append(soup.find('a')) # print(soup) # from bs4.element import Tag # obj = Tag(name='i',attrs={'id': 'it'}) # obj.string = '我是一个新来的' # tag = soup.find('body') # tag.append(obj) # print(soup) # tag = soup.find('body') # tag.insert(2, obj) # print(soup)# tag = soup.find('div')# a = soup.find('a')# tag.setup(previous_sibling=a)# print(tag.previous_sibling)# tag = soup.find('a')# v = tag.wrap(soup.find('p')) #a包裹p
# print(soup)# tag = soup.find('a')# v = tag.unwrap() # a包裹的标签
# print(soup)示例:使用BeautifulSoup模块解析当前网页,并提取出所有链接属性和文本内容,代码如下:
#coding:utf-8

import requestsfrom bs4 import BeautifulSoup

#下载当前网页html文件
 response  = requests.get("https://www.cnblogs.com/silence-cho/p/9786069.html")
print type(response.text)
with open('python.html','w') as f:
    f.write(response.text.encode('utf-8'))
with open('python.html','r') as f:
    html_file = f.read().decode('utf-8')

#使用Beautiful模块
soup = BeautifulSoup(html_file,'lxml')
a_tags = soup.find_all('a')
for a_tag in a_tags:
    if a_tag.has_attr('href'):
        print a_tag.attrs['href']

text = soup.get_text().encode('gbk',errors='ignore') #使用get_text()方法,拿到所有文本
with open('text1.txt','w') as f:
    f.write(text)

strings = soup.strings     #使用strings属性,拿到所有文本
with open('string.txt','w') as f:
    for string in strings:  #strings 为generator类型,包含拿到的所有文本
        f.write(string.encode('gbk',errors='ignore'))
3,爬虫应用
登录抽屉


'''
自动登录抽屉热搜榜流程:先访问主页,获取cookie1,然后携带用户名,密码和cookie1访问登陆页面对cookie1授权,随后就能利用cookie1直接访问个人主页等。
注意真正起作用的是cookie1里面gpsd': '2c805bc26ead2dfcc09ef738249abf65,第二次进行登陆时对这个值进行了认证,
随后就能利用cookie1进行访问了,进行登录时也会返回cookie2,但cookie2并不起作用
'''

import requests
from bs4 import BeautifulSoup

#访问首页
response=requests.get(
    url="https://dig.chouti.com/",
    headers={"User-Agent":"Mozilla/5.0 (Windows NT 6.1; rv:62.0) Gecko/20100101 Firefox/62.0"}
)
cookie_dict = response.cookies.get_dict()
print cookie_dict

#登录页面,发送post
response2= requests.post(
    url="https://dig.chouti.com/login",
    data={
        "oneMonth":"1",
        "password":"你自己的密码",
        "phone":"8618626429847",
    },
    headers={"User-Agent":"Mozilla/5.0 (Windows NT 6.1; rv:62.0) Gecko/20100101 Firefox/62.0"},
    cookies=cookie_dict,
)

#携带cookie,访问首页,显示为登录状态
response3= requests.get(
    url="https://dig.chouti.com/",
    headers={"User-Agent":"Mozilla/5.0 (Windows NT 6.1; rv:62.0) Gecko/20100101 Firefox/62.0"},
    cookies = cookie_dict
)

#携带cookie,进行点赞,返回推送成功
response4 = requests.post(
    url="https://dig.chouti.com/link/vote?linksId=22650731",
    headers={"User-Agent":"Mozilla/5.0 (Windows NT 6.1; rv:62.0) Gecko/20100101 Firefox/62.0"},
    cookies = cookie_dict
)
print response4.text
#{"result":{"code":"9999", "message":"推荐成功", "data":{"jid":"cdu_53961215992","likedTime":"1539697099953000","lvCount":"13","nick":"silence624","uvCount":"1","voteTime":"小于1分钟前"}}}
登陆github
import requests
from bs4 import BeautifulSoup
response1 = requests.get(
    url="https://github.com/login",   #url为https://github.com/时拿到的cookie不行
    headers={"User-Agent":"Mozilla/5.0 (Windows NT 6.1; rv:62.0) Gecko/20100101 Firefox/62.0"},

)
cookie_dict = response1.cookies.get_dict()  #拿到cookie
print cookie_dict
soup = BeautifulSoup(response1.text,features='html.parser')
tag = soup.find(name='input',attrs={"name":"authenticity_token"})
authenticity_token = tag.attrs.get('value')    # 从前端页面拿到跨站伪造请求token值
print authenticity_token
response = requests.post(
    url='https://github.com/session',
    data={
        "authenticity_token":authenticity_token,
        "commit":"Sign+in",
        "login":"xxx",
        "password":"xxx",
        "utf8":""
    },
    headers={"User-Agent":"Mozilla/5.0 (Windows NT 6.1; rv:62.0) Gecko/20100101 Firefox/62.0"},
    cookies = cookie_dict,
)
# print response.text
c2=response.cookies.get_dict()
cookie_dict.update(c2)    #自动登录,对cookie值进行更新

r = requests.get(url="https://github.com/settings/repositories",cookies=cookie_dict)   #利用更新后的cookie保持会话,拿到仓库名
soup2 = BeautifulSoup(r.text,features='html.parser')
tags = soup2.find_all(name='a',attrs={'class':'mr-1'})
for item in tags:
    print item.get_text()
参考博客:http://www.cnblogs.com/wupeiqi/articles/6283017.html