接着扯YOLO v2
相比较于YOLO v1,作者在之前模型上,先修修补补了一番,提出了YOLO v2模型。并基于imagenet的分类数据集和coco的对象检测数据集,提出了wordnet模型,并成功的提出了YOLO9000模型。这里暂时只讲YOLO v2.
作者说yolo v1相比较其他基于区域的模型比如faster r-cnn还是有些不足的,比如更多定位错误,更低召回率,所以第二个版本开始主要解决这两个问题。
0 - 作者对yolo v1的补丁
1 - 在所有卷积层上用BN,并扔掉dropout
2 - yolo 的训练过程(两个版本都是)为:分类模型的预训练和检测模型的微调。作者觉得yolo v1的预训练不够好,所以这里直接拿imagenet的分辨率为(448*448)的图片微调10个epoch,然后在将前面的卷积层留待检测模型用。
3 - 使用anchor box(而这几个anchor box是基于训练集数据的标签中(w,h)聚类出来的),加快模型收敛
4 - 去掉全连接层,扔掉最后一层池化层,并且将网络的输入端resize为(416*416),从而输出的是一个(13*13*channel)的卷积层
5 - 在预测(x,y,w,h)的时候是基于anchor box,且与RPN略有不同的方法去预测。
6 - 加了一个passthrough层
1 - 基础网络
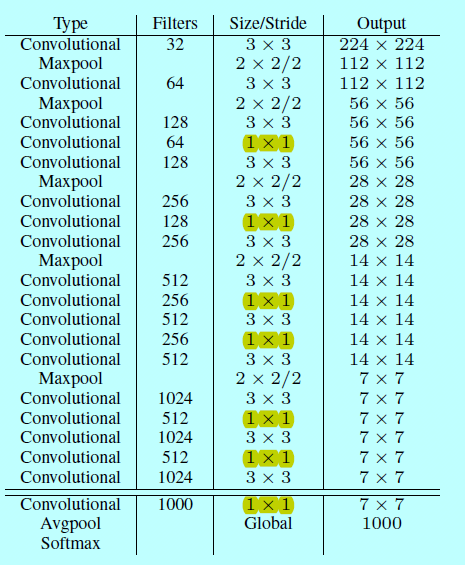
为了结合Googlenet和VGG的优势,作者提出了图1这样一种网络结构,将其作为yolo分类模型的基础模型。

图1.darknet-19
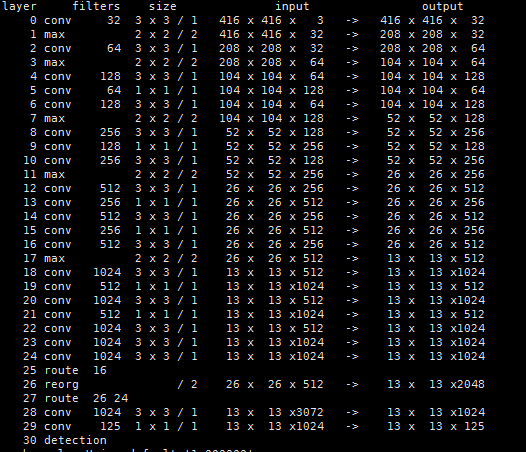
上图就是darknet-19,作者先在imagenet上以(224*224)先初始化训练,然后用(448*448)的分辨率图片跑10个epoch。跑完之后,丢弃最后的卷积层和全局池化层,换上3个(3*3*1024)的卷积层,然后跟一层1*1的卷积层,最后输出(13*13*125),如下图所示

图2.yolov2网络结构图
上图是通过官网darknet命令生成的网络结构,从中可以发现有几点疑惑,比如论文中的passthrough到底是什么操作?
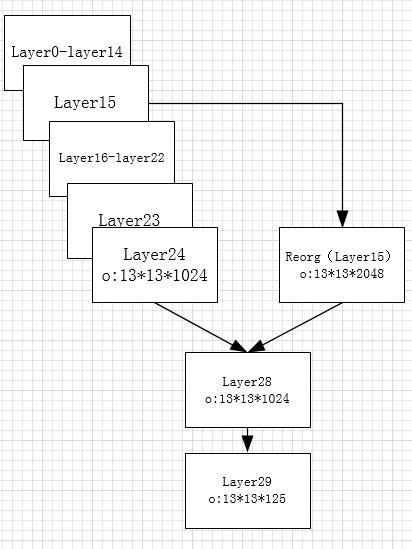
图2中layer0-layer22层就是darknet-19的前面部分,,具体对照如下图:

图3.darknet19到yolov2结构的示意图
2 - 训练
yolov2模型的训练基本就分下面三步:
i)首先拿darknet19在imagenet上以分辨率(224*224)跑160回,然后以分辨率(448*448)跑10回;
ii)然后如上面所示,将darknet19网络变成yolov2网络结构,并resize输入为(416*416)
iii)对增加的层随机初始化,并接着在对象检测数据集上训练160回,且在【60,90】的时候降低学习率
而第三步中,因为v2的目标函数和增加的anchor box,而与v1在概念上有所不同。
3 - v2中较难理解的补丁
如图2所示,最后会输出一个(13*13*125)的张量,其中的(13*13)如yolo v1一样,是表示网格划分的意思,后面的125就是当前网格的操作所在。之前yolov1时,作者拿了B=2,而这里B=5,且这里的5个预测候选框是事先得到的(下面待续),也就是给定了5个框的(w,h),预测得到的是(5(4+1+20)),分别为(x,y,w,h);(confidence);(class)。
没错,在yolo1的时候是出现2个候选框,然后只有一条20维度表示类别,这里是每个anchor box都会有预测类别,所以相对的目标函数会略有改动,作者说了在v2还是预测(IOU_{truth}{pred})和基于当前有对象基础上预测类别(P(class|object))。
3.1 anchor box的生成
如论文中所说,相对其他rpn网络,yolo v2的事先准备的几个预测候选框(也叫做anchor box)大小是基于训练集算出来的。如作者代码
中:
[region]
anchors = 1.08,1.19,  3.42,4.41,  6.63,11.38,  9.42,5.11,  16.62,10.52
bias_match=1
classes=20
coords=4
num=5
上述代码中anchors保存的就是各自的width和height,也就是论文中的符号(p_w,p_h)。
原理就是基于所有训练集的标签中,先计算得出所有的width和对应的height,将其作为样本,采用kmean的方法,只不过距离函数换成了(d(box,center)=1-IOU(box,center))
这里需要5个anchor,那么就会得到5个不同样本中心,记得乘以(32/416);假设锚点值为x,则(frac{x}{centerids}=frac{32}{416})
如5个样本中心:
[[ 103.84071465   29.09785553]
 [  40.14028782   21.66632026]
 [ 224.79420059  102.18148749]
 [  61.79184575   39.21399017]
 [ 126.37797981   60.03186796]]
对应的锚点:
7.98774728074, 2.23829657922, 3.08771444772, 1.66664002, 17.2918615841, 7.86011442226, 4.75321890422, 3.01646078194, 9.72138306269, 4.61783599681
3.2 坐标预测
作者先引用了下faster r-cnn的rpn网络,然后罗列的2个式子(x = (t_x*w_a) +x_a);(y = (t_y*h_a) +y_a),并说直接Anchor Box回归导致模型不稳定,该公式没有任何约束,中心点可能会出现在图像任何位置,这就有可能导致回归过程震荡,甚至无法收敛,然后作者基于此稍微改进了下:
$b_x = sigma(t_x) + c_x (
)b_y = sigma(t_y) + c_y(
)b_w = p_we^{t_w}(
)b_h = p_he^{t_h}(
其中)t_w=log(frac{w}{w_p})(;)t_h=log(frac{h}{h_p})(
如下图:

图4.论文中图3
如上图所示,模型预测输出的坐标系中四个值分别为)t_x,t_y,t_w,t_h(:
(1)通过计算当前网格本身的偏移量,加上在当前网格内部所在的比例,即为第0层输入层图片上预测框的中心坐标;
(2)而预测的)t_w,t_h(是相对当前候选框的一个缩放比例,通过公式)t_w=log(frac{w}{w_p})(;)t_h=log(frac{h}{h_p})(反推回去,即为)b_w = p_we^{t_w}(;)b_h = p_he^{t_h}$
3.3 passthrough操作
通过github找到star最多的yolo 2-pytorch,研读了部分代码,找到如下部分:
#darknet.py
        self.reorg = ReorgLayer(stride=2)   # stride*stride times the channels of conv1s
#reorg_layer.py
    def forward(self, x):
        stride = self.stride

        bsize, c, h, w = x.size()
        out_w, out_h, out_c = int(w / stride), int(h / stride), c * (stride * stride)
        out = torch.FloatTensor(bsize, out_c, out_h, out_w)

        if x.is_cuda:
            out = out.cuda()
            reorg_layer.reorg_cuda(x, out_w, out_h, out_c, bsize, stride, 0, out)
        else:
            reorg_layer.reorg_cpu(x, out_w, out_h, out_c, bsize, stride, 0, out)

        return out
//reorg_cpu.c
int reorg_cpu(THFloatTensor *x_tensor, int w, int h, int c, int batch, int stride, int forward, THFloatTensor *out_tensor)
{
    // Grab the tensor
    float * x = THFloatTensor_data(x_tensor);
    float * out = THFloatTensor_data(out_tensor);

    // https://github.com/pjreddie/darknet/blob/master/src/blas.c
    int b,i,j,k;
    int out_c = c/(stride*stride);

    for(b = 0; b < batch; ++b){
        //batch_size
        for(k = 0; k < c; ++k){
           //channel
            for(j = 0; j < h; ++j){
                //height
                for(i = 0; i < w; ++i){
                    //width
                    int in_index  = i + w*(j + h*(k + c*b));
                    int c2 = k % out_c;
                    int offset = k / out_c;
                    int w2 = i*stride + offset % stride;
                    int h2 = j*stride + offset / stride;
                    int out_index = w2 + w*stride*(h2 + h*stride*(c2 + out_c*b));
                    if(forward) out[out_index] = x[in_index];
                    else out[in_index] = x[out_index];
                }
            }
        }
    }

    return 1;
}
从上述c代码可以看出,这里ReorgLayer层就是将(26*26*512)的张量中(26*26)切割成4个(13*13)然后连接起来,使得原来的512通道变成了2048。
3.4 目标函数计算
同样通过github上现有的最多stars的那份代码,找到对应的损失计算部分
#darknet.py
    def loss(self):
        #可以看出,损失值也是基于预测框bbox,预测的iou,分类三个不同的误差和
        return self.bbox_loss + self.iou_loss + self.cls_loss

    def forward(self, im_data, gt_boxes=None, gt_classes=None, dontcare=None):
        conv1s = self.conv1s(im_data)
        conv2 = self.conv2(conv1s)
        conv3 = self.conv3(conv2)
        conv1s_reorg = self.reorg(conv1s)
        cat_1_3 = torch.cat([conv1s_reorg, conv3], 1)
        conv4 = self.conv4(cat_1_3)
        conv5 = self.conv5(conv4)   # batch_size, out_channels, h, w
        ……
        ……
        # tx, ty, tw, th, to -> sig(tx), sig(ty), exp(tw), exp(th), sig(to)
        '''预测tx ty'''
        xy_pred = F.sigmoid(conv5_reshaped[:, :, :, 0:2])
        '''预测tw th '''
        wh_pred = torch.exp(conv5_reshaped[:, :, :, 2:4])
        bbox_pred = torch.cat([xy_pred, wh_pred], 3)
        '''预测置信度to '''
        iou_pred = F.sigmoid(conv5_reshaped[:, :, :, 4:5])
        '''预测分类class  '''
        score_pred = conv5_reshaped[:, :, :, 5:].contiguous()
        prob_pred = F.softmax(score_pred.view(-1, score_pred.size()[-1])).view_as(score_pred)

        # for training
        if self.training:
            bbox_pred_np = bbox_pred.data.cpu().numpy()
            iou_pred_np = iou_pred.data.cpu().numpy()
            _boxes, _ious, _classes, _box_mask, _iou_mask, _class_mask = self._build_target(
                                         bbox_pred_np, gt_boxes, gt_classes, dontcare, iou_pred_np)
            _boxes = net_utils.np_to_variable(_boxes)
            _ious = net_utils.np_to_variable(_ious)
            _classes = net_utils.np_to_variable(_classes)
            box_mask = net_utils.np_to_variable(_box_mask, dtype=torch.FloatTensor)
            iou_mask = net_utils.np_to_variable(_iou_mask, dtype=torch.FloatTensor)
            class_mask = net_utils.np_to_variable(_class_mask, dtype=torch.FloatTensor)

            num_boxes = sum((len(boxes) for boxes in gt_boxes))

            # _boxes[:, :, :, 2:4] = torch.log(_boxes[:, :, :, 2:4])
            box_mask = box_mask.expand_as(_boxes)
            #计算预测的平均bbox损失值
            self.bbox_loss = nn.MSELoss(size_average=False)(bbox_pred * box_mask, _boxes * box_mask) / num_boxes
           #计算预测的平均iou损失值
            self.iou_loss = nn.MSELoss(size_average=False)(iou_pred * iou_mask, _ious * iou_mask) / num_boxes
           #计算预测的平均分类损失值
            class_mask = class_mask.expand_as(prob_pred)
            self.cls_loss = nn.MSELoss(size_average=False)(prob_pred * class_mask, _classes * class_mask) / num_boxes

        return bbox_pred, iou_pred, prob_pred
可以从上述代码窥见一斑,yolo v2的目标函数和yolo v1在概念及结构上相差无几。