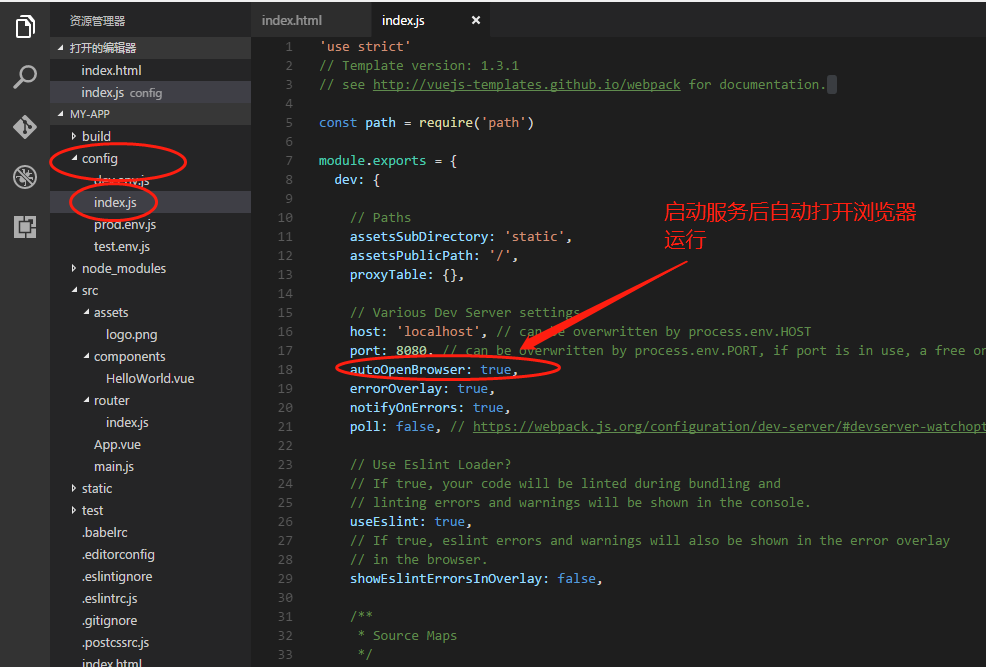
一、启动服务自动打开浏览器运行
二、配置简要说明
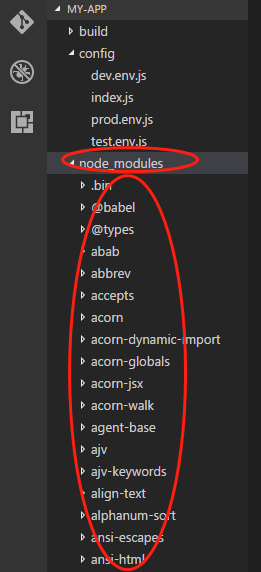
1、node_modules
安装好的依赖文件,中间件等,所在位置
2、package.jason
配置当前项目要安装的中间件和依赖文件
{
  "name": "my-app",
  "version": "1.0.0",
  "description": "A Vue.js project",
  "author": "",
  "private": true,
  "scripts": {
    "dev": "webpack-dev-server --inline --progress --config build/webpack.dev.conf.js",
    "start": "npm run dev",//项目的启动方式
    "unit": "jest --config test/unit/jest.conf.js --coverage",
    "e2e": "node test/e2e/runner.js",
    "test": "npm run unit && npm run e2e",
    "lint": "eslint --ext .js,.vue src test/unit test/e2e/specs",
    "build": "node build/build.js"//项目如何打包
  },
  "dependencies": {
    "vue": "^2.5.2",
    "vue-router": "^3.0.1"
  },
  "devDependencies": {//当前项目要安装的依赖文件,后边是版本
    "autoprefixer": "^7.1.2",
    "babel-core": "^6.22.1",
    "babel-eslint": "^8.2.1",
    "babel-helper-vue-jsx-merge-props": "^2.0.3",
    "babel-jest": "^21.0.2",
    "babel-loader": "^7.1.1",
    "babel-plugin-dynamic-import-node": "^1.2.0",
    "babel-plugin-syntax-jsx": "^6.18.0",
    "babel-plugin-transform-es2015-modules-commonjs": "^6.26.0",
    "babel-plugin-transform-runtime": "^6.22.0",
    "babel-plugin-transform-vue-jsx": "^3.5.0",
    "babel-preset-env": "^1.3.2",
    "babel-preset-stage-2": "^6.22.0",
    "babel-register": "^6.22.0",
    "chalk": "^2.0.1",
    "chromedriver": "^2.27.2",
    "copy-webpack-plugin": "^4.0.1",
    "cross-spawn": "^5.0.1",
    "css-loader": "^0.28.0",
    "eslint": "^4.15.0",
    "eslint-config-standard": "^10.2.1",
    "eslint-friendly-formatter": "^3.0.0",
    "eslint-loader": "^1.7.1",
    "eslint-plugin-import": "^2.7.0",
    "eslint-plugin-node": "^5.2.0",
    "eslint-plugin-promise": "^3.4.0",
    "eslint-plugin-standard": "^3.0.1",
    "eslint-plugin-vue": "^4.0.0",
    "extract-text-webpack-plugin": "^3.0.0",
    "file-loader": "^1.1.4",
    "friendly-errors-webpack-plugin": "^1.6.1",
    "html-webpack-plugin": "^2.30.1",
    "jest": "^22.0.4",
    "jest-serializer-vue": "^0.3.0",
    "nightwatch": "^0.9.12",
    "node-notifier": "^5.1.2",
    "optimize-css-assets-webpack-plugin": "^3.2.0",
    "ora": "^1.2.0",
    "portfinder": "^1.0.13",
    "postcss-import": "^11.0.0",
    "postcss-loader": "^2.0.8",
    "postcss-url": "^7.2.1",
    "rimraf": "^2.6.0",
    "selenium-server": "^3.0.1",
    "semver": "^5.3.0",
    "shelljs": "^0.7.6",
    "uglifyjs-webpack-plugin": "^1.1.1",
    "url-loader": "^0.5.8",
    "vue-jest": "^1.0.2",
    "vue-loader": "^13.3.0",
    "vue-style-loader": "^3.0.1",
    "vue-template-compiler": "^2.5.2",
    "webpack": "^3.6.0",
    "webpack-bundle-analyzer": "^2.9.0",
    "webpack-dev-server": "^2.9.1",
    "webpack-merge": "^4.1.0"
  },
  "engines": {
    "node": ">= 6.0.0",
    "npm": ">= 3.0.0"
  },
  "browserslist": [
    "> 1%",
    "last 2 versions",
    "not ie <= 8"
  ]
}
node_modules文件夹下的文件就是这里定义需要安装的依赖文件或中间件等。
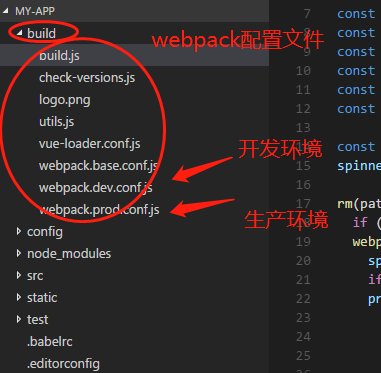
3、build文件夹
webpack的一些配置文件
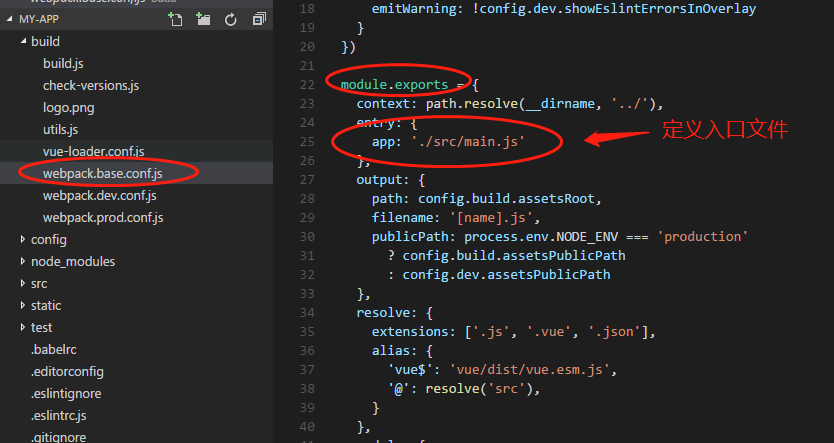
main.js入口文件定义
webpack.base.conf.js中定义
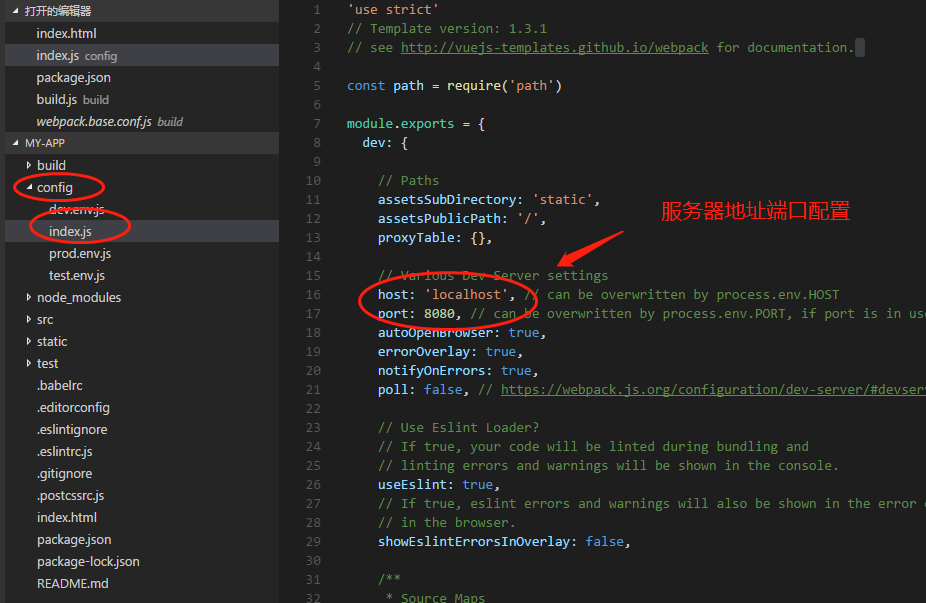
4、config
项目核心配置
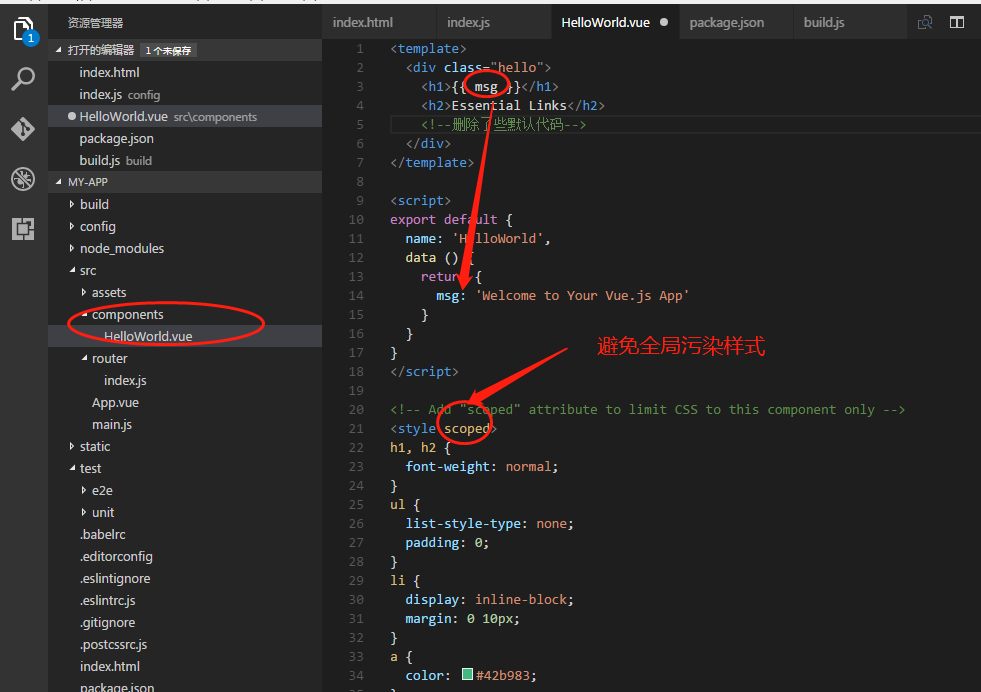
5、src

6、static
静态文件资源也可以放这里
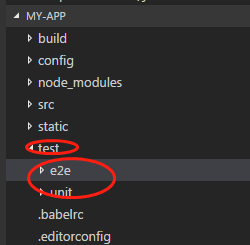
7、test
测试相关
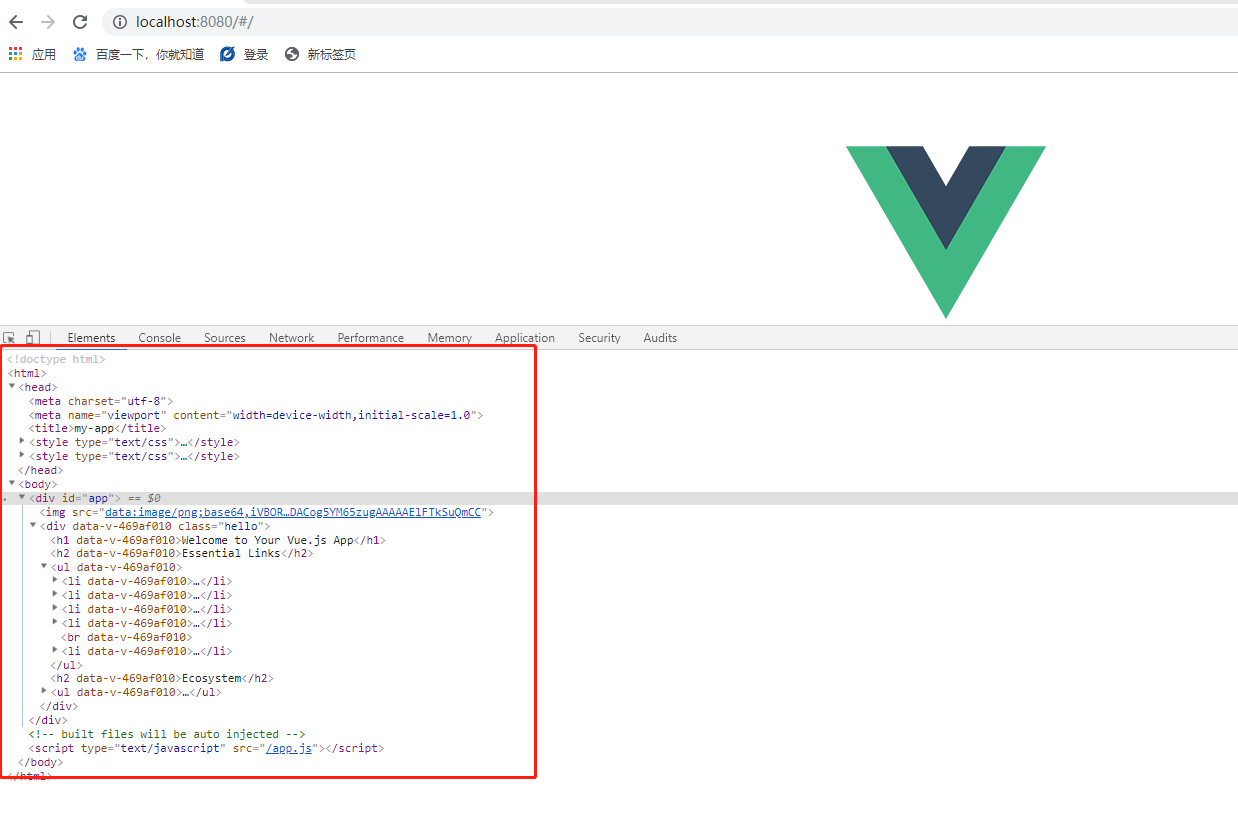
webpack打包后,会成为常规的html,js,css,再放到服务里执行,不会把这些源文件放到服务器执行。对这么多类别文件该解析的解析,该处理的处理,该丢弃的丢弃。
三、模块化 代码说明

模块化:把一个较大的项目拆分成很多小的互相有依赖的部分,主要有两个命令 import 输入其他模块, export 对外输出接口,如
入口main.js里边的代码
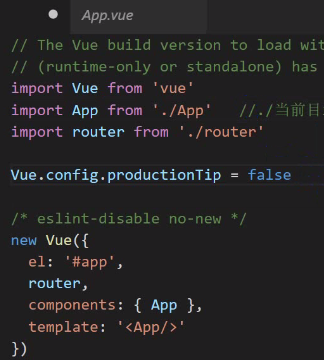
 导入的中间件或依赖文件,在node_modules文件夹下
 ./当前目录
 阻止vue在启动时候生产生产提示
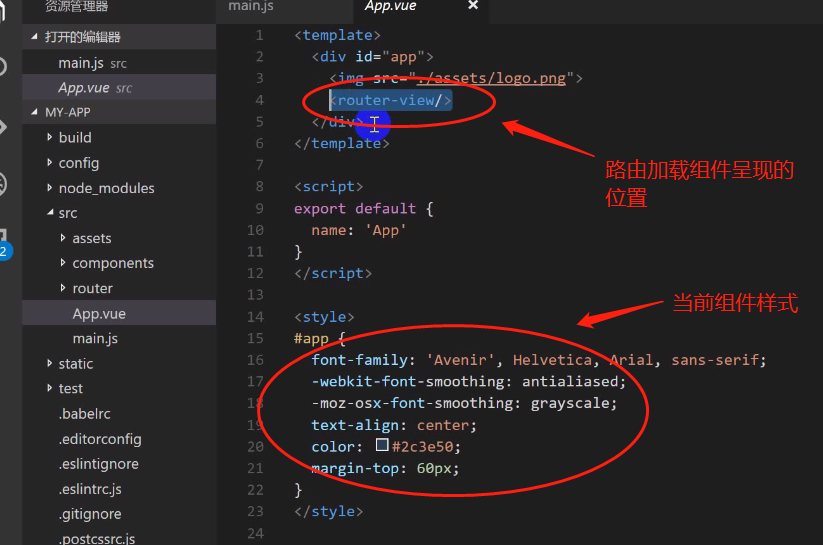
入口组件App.vue
路由 index.js

加载的组件HelloWorld.vue
脚手架文件main.js、App.vue、index.html、index.js详解
vue-cli的相关文件以及其调用关系
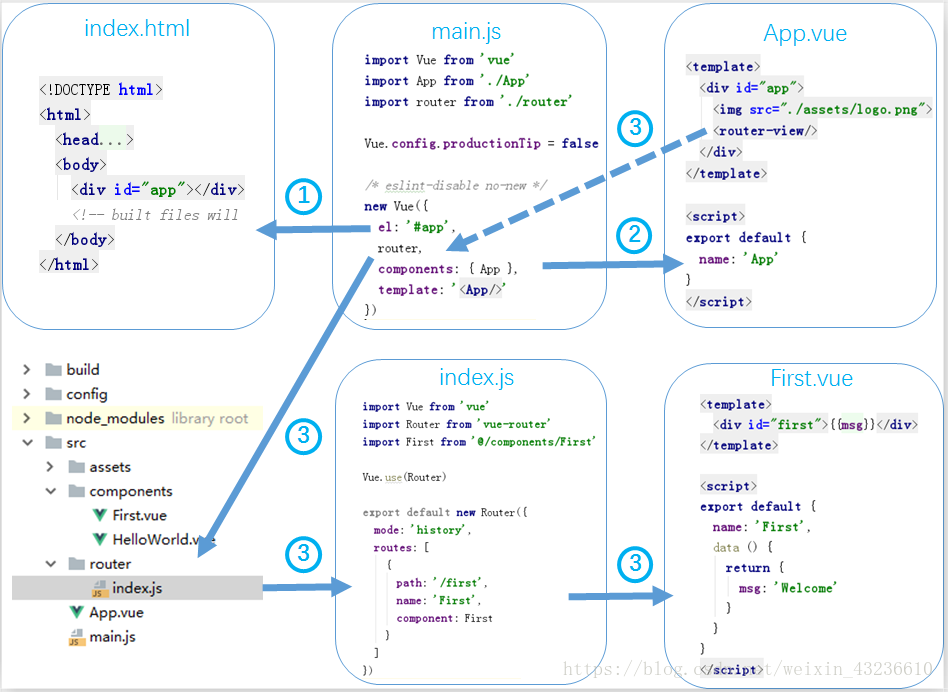
使用到vue项目的文件包括一个.html,两个.js,两个.vue文件,关系如上图所示
1、index.html为vue项目默认首页,里面默认引用了app.vue根组件
2、main.js为vue项目的入口文件,加载了各种公共组件(需要引用和初始化组件实例)。比如app.vue
main.js中引入相关资源文件

引入Vue实际完整写法是 import Vue from "../node_modules/vue/dist/vue.js,即从node_modules中加载相应名称的模块
import App from './App'就是引入同目录层次下的App.vue文件
import router from './router',引入路由文件
初始化组件实例
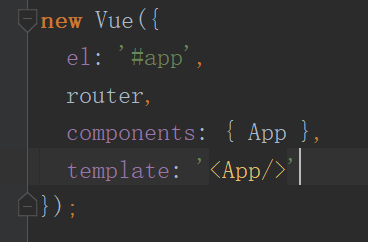
其中new Vue的参数,解释如下:
el:官方解释为实例提供挂载的元素。此处为index.html中的<div id="app"><div>。
router:为router:router,的简写,指向引入文件中的routes:[]
components:注册哪些组件,需在顶部引入文件。
template:替换挂载元素的模板组件,而挂载元素的内容都将被忽略。即用template替换index.html里面的<div id="app"></div>
<App/>使用了组件app.vue
如果vue实例中有template属性,会将该属性值进行编译,将编译后的虚拟dom直接替换掉vue实例绑定的元素(即el绑定的那个元素);
index.js路由文件
首页看看index.js文件的内容
import Vue from 'vue'
import Router from 'vue-router'
import HelloWorld from '@/components/HelloWorld'
import First from '@/components/First'

Vue.use(Router)

export default new Router({
  model:'history',
  routes: [
   {
      path: '/hello',
      name: 'HelloWorld',
      component: HelloWorld
    },
    {
      path: '/',
      name: 'First',
      component: First
    }
  ]
})
路由写法见前几篇
首页的html生成如下
四、Import/Export
1、导出一个export default 导出一个组件
testB.vue
<template>
  <div>
    <h1>{{ msg }}</h1>
  </div>
</template>

<script>
export default {--只导出一个
  name: 'testB',
  data () {
    return {
      msg: 'testbbbb'
    }
  }
}
</script>
export default 只可以导出一个
APP.vue导入使用:
<template>
  <div id="app">
    <img src="./assets/logo.png">
    <testA/><!--3、模板里使用-->
  </div>
</template>

<script>
import testA from './components/testA';--1、导入testA和export的name保持一致
export default {
  name: 'App',
  data(){
    return {
     a:'a'
    }
  },
  components:{
    testA --2、引用组件
  }
}
</script>

<style>
#app {
  font-family: 'Avenir', Helvetica, Arial, sans-serif;
  -webkit-font-smoothing: antialiased;
  -moz-osx-font-smoothing: grayscale;
  text-align: center;
  color: #2c3e50;
  margin-top: 60px;
}
</style>
2、导出多个
var name='sonia';
var age = 18;
var msg = 'hello';
export {name,age,msg};--导出多个
<template>
  <div id="app">
    <img src="./assets/logo.png">
    {{name}}--3、使用
  </div>
</template>
<script>
import {name,age,msg} from './components/testA';--1、导入需要一个{}
export default {
  name: 'App',
  data(){
    return {
      name:name--2、要使用先要放到data中
    }
  }
}
</script>

<style>
#app {
  font-family: 'Avenir', Helvetica, Arial, sans-serif;
  -webkit-font-smoothing: antialiased;
  -moz-osx-font-smoothing: grayscale;
  text-align: center;
  color: #2c3e50;
  margin-top: 60px;
}
</style>
3、将多个导出一个对象
export default {
     name:'12345',
     age:20
}
<template>
  <div id="app">
    <img src="./assets/logo.png">
    {{name.age}}--对象的使用方法
  </div>
</template>
<script>
import abc from './components/testA';--一个abc是个对象,就是export default只是是一个对象
export default {
  name: 'App',
  data(){
    return {
      name:abc--放到一个属性上
    }
  }
}
</script>

<style>
#app {
  font-family: 'Avenir', Helvetica, Arial, sans-serif;
  -webkit-font-smoothing: antialiased;
  -moz-osx-font-smoothing: grayscale;
  text-align: center;
  color: #2c3e50;
  margin-top: 60px;
}
</style>
4、导出函数
function num(x,y) {
     alert(x+y);
 };
export {num};
<template>
  <div id="app">
    <img src="./assets/logo.png">
    {{num(1,2)}}--3、函数调用
  </div>
</template>
<script>
import {num} from './components/testA';--1、导入函数,需要{},因为导出就是以多个的方式导出
export default {
  name: 'App',
  data(){
    return {
      num:num--2、附加到data
    }
  }
}
</script>

<style>
#app {
  font-family: 'Avenir', Helvetica, Arial, sans-serif;
  -webkit-font-smoothing: antialiased;
  -moz-osx-font-smoothing: grayscale;
  text-align: center;
  color: #2c3e50;
  margin-top: 60px;
}
</style>
5、爷父子组件引用
APP.vue 包含TestA.vue,其又包含TestB.vue
TestB.vue
<template>
  <div>
    <h1>{{ msg }}</h1>
  </div>
</template>

<script>
export default {
  name: 'testB',
  data () {
    return {
      msg: 'testbbbb'
    }
  }
}
</script>
TestA.vue
<template>
  <div>
    <testB/> --使用组件testB
  </div>
</template>

<script>
import testB from './testB';--导入组件testB
export default {
  name: 'testA',
  data () {
    return {
      msg: 'testAAAA'
    }
  },
  components:{
    testB--引用组件testB
  }
}
</script>
<template>
  <div id="app">
    <img src="./assets/logo.png">
    <testA/>--使用组件A
  </div>
</template>
<script>
import testA from './components/testA';--导入组件testA
export default {
  name: 'App',
  data(){
    return {
      a:"a"
    }
  },
  components:{
    testA--引用组件testA
  }
}
</script>
五、轮播脚手架写法例子
分两个组件banner.vue,list.vue,一个轮播组件,一个列表组件
banner.vue
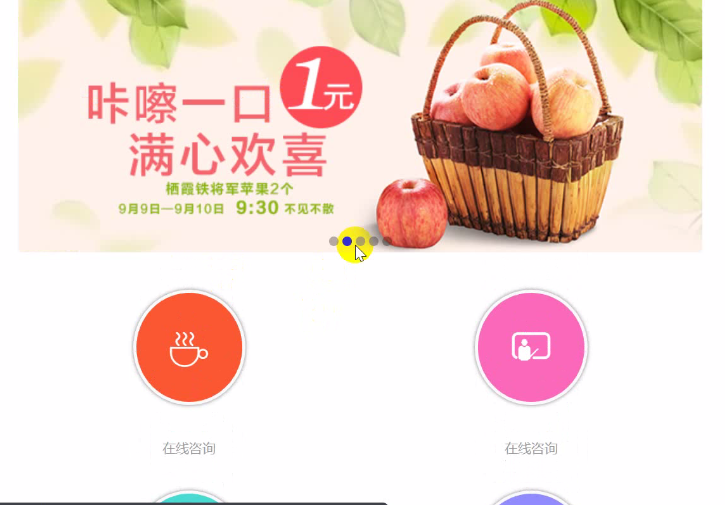
<template>
  <div class="banner">
        <img v-for="(img,index) in imges" :src="img" v-show="index==num"/>
        <div class="banner-circle">
            <ul>
                <li v-for="(img,index) in imges" :class="{'selected':index==num}"></li>
            </ul>
        </div>
    </div>
</template>

<script>
export default {
  //name: 'testB',
  data () {
    return {
        num:0,
        imges:[require('../assets/img/banner1.jpg'),--本地图片要导入需要用require要不webpack不认识
            require('../assets/img/banner2.jpg'),
            require('../assets/img/banner3.jpg'),
            require('../assets/img/banner4.jpg'),
            require('../assets/img/banner5.jpg')],
    }
  },
    mounted:function(){   //生命周期  挂载完成
        this.play();
    },
    methods:{   //方法
        autoPlay:function(){
            this.num++;
            if(this.num == this.imges.length){
                this.num = 0;
            }
        },
        play:function(){
            setInterval(this.autoPlay,2000);
        }

    }
}
</script>
<style>
*{
    margin:0;
    padding:0;
}
ul {
    list-style-type:none;
}
body {
    font-size: 14px;
    background: #fff;
    overflow-y:scroll;
    overflow-x:hidden;
}
html,body {
    max-width:720px;
    height:100%;
    margin:0 auto;
}
/*index*/
.banner {
    position: relative;
}
.banner .banner-circle {
    position: absolute;
    bottom: 5px;
    left: 0;
    right: 0;
    color: #fff;
}
.banner .banner-circle li{
    display:inline-block;
    background: rgba(0,0,0,.3);
    border-radius: 50%;
    padding:5px;
    margin:2px;
}
.banner .banner-circle ul {
    text-align: center;
}
.banner .banner-circle .selected {
    background: rgba(0,0,0,.8);
}
.banner img {
    width: 100%;
    margin: 0;
    padding: 0;
}
</style>
list.vue
<template>
  <div class="index-category">
        <div class="category" v-for="list in lists"><i class="iconfont" v-bind:class="list.icon"></i><label>{{list.title}}</label></div>
  </div>
</template>

<script>
export default {
  //name: 'testB',
  data () {
    return {
      lists:[{title:'在线咨询',icon:'icon-shenghuo'},
                {title:'在线咨询',icon:'icon-jiaoyu'},
                {title:'在线咨询',icon:'icon-11'},
                {title:'在线咨询',icon:'icon-jiazheng'},
                {title:'在线咨询',icon:'icon-shenghuo'},
                {title:'在线咨询',icon:'icon-shenghuo'}]
    }
  }
}
</script>
<style>
/*index-category*/
.index-category {
    margin-top: 5%;
}
.index-category .category {
    width: 50%;
    float:left;
    text-align:center;
}
.index-category .category .iconfont {
    font-size: 40px;
    display:inline-block;
    padding: 10%;
    border-radius: 50%;
    color:#fff;
    border: 3px solid #f9f9f9;
    box-shadow: 0px 0px 6px rgba(0,0,0,.5);
}
.index-category .category:nth-child(1) .iconfont{
    background: #f95730;
}
.index-category .category:nth-child(2)  .iconfont{
    background: #fa69b9;
}
.index-category .category:nth-child(3)  .iconfont{
    background: #49dacf;
}
.index-category .category:nth-child(4)  .iconfont{
    background: #908cfd;
}
.index-category .category:nth-child(5)  .iconfont{
    background: #92d85c;
}
.index-category .category:nth-child(6)  .iconfont{
    background: #ecbe35;
}
.index-content .index-category .category label {
    display: block;
    padding: 10% 0;
    color: #999;
}
/*index-category end*/

</style>
APP.vue使用上边两个组件
<template>
  <div id="app">
    <banner/>--使用两个组件
    <list/>
  </div>
</template>
<script>
import banner from './components/banner';--导入两个组件
import list from './components/list';
export default {
  name: 'App',
  data(){
    return {
    }
  },
  components:{
    banner,--引用两个组件
    list
  }
}
</script>

<style>
#app {
  font-family: 'Avenir', Helvetica, Arial, sans-serif;
  -webkit-font-smoothing: antialiased;
  -moz-osx-font-smoothing: grayscale;
  text-align: center;
  color: #2c3e50;
  margin-top: 60px;
}
</style>