WCF Web API支持多个宿主环境:自宿主(windows服务或者控制台)和IIS宿主(asp.net webform/mvc)。这个入门文章主要演示在ASP.NET MVC3网站宿主,主要演示如何在一个Web API上允许更新:
- 如何检索一个特定项的资源
- 如何在API上启用HTTP POST, PUT和DELETE方法
- 如何通过HTML表单发送一个POST到API
这篇入门文章的场景是允许客户端添加、删除和更新系统的联系人。
1、解压启动器代码
要快速开始练习,请到这里下载代码,下载解压后,打开Start目录下的ContactManager项目。代码和入门:构建简单的Web API的主要区别是实体代码重构到一个内存 ContactManagerRepository。
public interface IRepository<T>
   {
       T Find(int id);
       IQueryable<T> FindAll();
       void Add(T entity);
       void Remove(int id);
       void Save();
   }
using System;
using System.Collections.Generic;
using System.Linq;
using ContactManager.Repositories;

namespace ContactManager.Infrastructure
{
    public abstract class InMemoryRepository<T> : IRepository<T> where T:new()
    {
        protected List<T> entities;
        protected int nextId;
        static InMemoryRepository<T> instance;
        static object lockObject = new object();

        public T Find(int id)
        {
            return entities.SingleOrDefault(e => IsEntityWithId(e, id));
        }

        public IQueryable<T> FindAll()
        {
            return entities.AsQueryable();
        }

        public void Add(T entity)
        {
            OnAdd(entity, nextId++);
            entities.Add(entity);
        }

        public void Remove(int id)
        {
            entities.RemoveAll(e => IsEntityWithId(e, id));
        }

        public void Save()
        {
            throw new InvalidOperationException();
        }

        protected abstract bool IsEntityWithId(T contact, int id);

        protected abstract void OnAdd(T entity, int newId);
    }
}
using ContactManager.Infrastructure;
using ContactManager.Resources;

namespace ContactManager.Repositories
{
    public interface IContactRepository : IRepository<Contact>
    {
    }
}
2、启用检索一个单一的资源并和HttpResponseException协同工作
目前我们的API只支持获取一个联系人集合。另一个通常的场景是通过一个URI返回一个单一的资源,如果找不到相关的资源应该返回一个404状态码。
- 打开ContactsAp.cs
- 复制以下方法
[WebGet(UriTemplate="{id}")]

public Contact GetItem(int id)

{

    var contact = repository.Find(id);

    if (contact == null)

        throw new HttpResponseException(HttpStatusCode.NotFound);

    return contact;

}
- 注意GET方法接受一个ID参数映射到{id} uri模板参数。如果你的请求API是http://localhost:9000/api/contacts/1 的ID将被设置为1,Web API支持将模板参数自动转换为原生类型int。
- 如果联系人不存在,就抛出HttpResponseException 并设置状态码
- 编译并运行(F5)
- 打开Fiddler并在“Request builder”栏输入地址“http://localhost:9000/api/contacts/1”
- 拷贝以下内容到header
Accept: application/json
- 运行执行按钮,Contract 1按json格式返回
HTTP/1.1 200 OK
Server: ASP.NET Development Server/10.0.0.0
Date: Tue, 19 Jul 2011 13:04:26 GMT
X-AspNet-Version: 4.0.30319
Content-Length: 35
Cache-Control: private
Content-Type: application/json; charset=utf-8
Connection: Close

{"ContactId":1,"Name":"Phil Haack"}
3、添加对POST的支持
以下代码是添加一个新的Post方法,添加一个新的Contract
[WebInvoke(UriTemplate = "", Method="POST")]

public Contact Post(Contact contact)

{

    repository.Add(contact);

    return contact;

}
-
运行项目
-
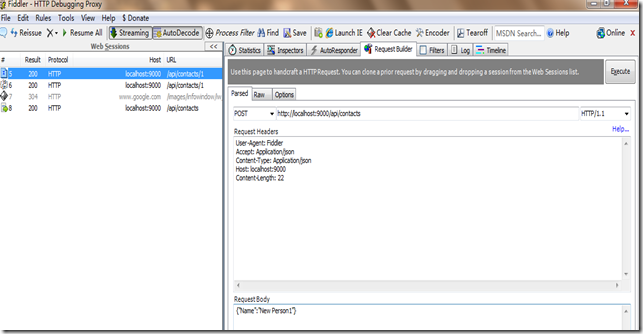
启动Fiddler并切换到“Request Builder”
-
选择“POST”方法,输入以下Uri:http://localhost:9000/api/contacts
-
拷贝以下内容到“Request Headers”
Accept: application/json

Content-Type: application/json
-
按下“Execute”,返回Json格式的新的Contact ,id为7
HTTP/1.1 200 OK
Server: ASP.NET Development Server/10.0.0.0
Date: Tue, 19 Jul 2011 13:12:57 GMT
X-AspNet-Version: 4.0.30319
Content-Length: 36
Cache-Control: private
Content-Type: application/json; charset=utf-8
Connection: Close

{"ContactId":7,"Name":"New Person1"}
5、以XML格式发送数据
-
以xml方式发布,需要替换“Request Headers”为以下内容
Content-Type: application/xml

Accept: application/xml -
替换“Request Body”为以下内容
<Contact>
  <Name>New Person2</Name>
</Contact>
- 按下“Execute”,然后双击左窗格中的结果,选择“RAW”标签,返回的结果应该是XML,并显示创建了ID为8的一个联系人
HTTP/1.1 200 OK
Server: ASP.NET Development Server/10.0.0.0
Date: Tue, 19 Jul 2011 13:25:50 GMT
X-AspNet-Version: 4.0.30319
Content-Length: 105
Cache-Control: private
Content-Type: application/xml; charset=utf-8
Connection: Close

<?xml version="1.0" encoding="utf-8"?><Contact><ContactId>8</ContactId><Name>New Person2</Name></Contact>
6、从一个简单的HTML表单发送内容
Web API包含从HTML表单的内容发送的直接支持,下面,你添加一个ContactsContrller和相应的View,通过一个HTML表单向Web API发送请求并创建一个Contact
- 右键单击项目并选择添加Contrller,输入名字为ContactsController 并按下添加
- 拷贝以下代码到ContactsController
public ActionResult Create()
{
    return View();

}
-
右键Create方法选择 Add-〉New View,并按下”Enter”
-
打开“Create.cshtml”并把以下代码贴进去
@{

    Layout = null;

}

<!DOCTYPE html>

<html>

<head>

    <title>Create new Contact</title>

</head>

<body>

    <h1>Create new Contact</h1>

    <form method="post" action="/api/contacts" id="addContact"

        enctype="application/x-www-form-urlencoded">

    <table>

        <tr>

            <td>

                Name

            </td>

            <td>

                <input type="text" name="Name" />

            </td>

        </tr>

        <tr>

            <td colspan="2" align="center">

                <input type="submit" value="Add" />

            </td>

        </tr>

    </table>

    </form>

</body>

</html>
-
运行项目,在浏览器里输入http://localhost:9000/contacts/create 加载创建Contact页面,输入“NewContact”按下Create
-
创建的Contact被返回
-
7、添加PUT的支持
添加对PUT和DELETE的支持是非常容易的,像POST一样也是使用WebInvoke 制定PUT和DELETE
-
打开ConactApi.cs把以下代码拷进去
[WebInvoke(UriTemplate ="{id}", Method = "PUT")]和DELETE类似,PUT方法在没有找到Contact的情况下,返回一个404状态码
public Contact Put(Contact contact, int id)
{
var existingContact = repository.Find(id);
if (existingContact == null)
{
throw new HttpResponseException(HttpStatusCode.NotFound);
}
existingContact.Name = contact.Name;
return existingContact;
}
-
编译运行(F5)
-
启动Fiddler,并切换到“Request Builder”,设置方法为PUT,输入http://localhost:9000/api/contacts/1,在Request Header输入以下内容
Content-Type: application/json
-
拷贝以下内容到“Request Body”
{

  "Name":"Updated Contact"

}
-
按下“Execute”
-
被更新的contact返回,结果如下表明PUT成功
HTTP/1.1 200 OK
Server: ASP.NET Development Server/10.0.0.0
Date: Tue, 19 Jul 2011 13:50:28 GMT
X-AspNet-Version: 4.0.30319
Content-Length: 40
Cache-Control: private
Content-Type: application/json; charset=utf-8
Connection: Close

{"ContactId":1,"Name":"Updated Contact"
8、添加对DELETE的支持
- 切换到ContactApi.cs并复制以下内容:
[WebInvoke(UriTemplate = "{id}", Method = "DELETE")]

public Contact Delete(int id)

{

    var contact = repository.Find(id);

    if (contact == null)

    {

        throw new HttpResponseException(HttpStatusCode.NotFound);

    }

    repository.Remove(id);

    return contact;

}
-
运行项目(F5)
-
在Fiddler 上把方法切换为DELETE,URL 为输入http://localhost:9000/api/contacts/1,结果如下表明PUT成功
HTTP/1.1 200 OK
Server: ASP.NET Development Server/10.0.0.0
Date: Tue, 19 Jul 2011 13:55:23 GMT
X-AspNet-Version: 4.0.30319
Content-Length: 40
Cache-Control: private
Content-Type: application/json; charset=utf-8
Connection: Close

{"ContactId":1,"Name":"Updated Contact"}
-
切换Fiddler的方法为GET,然后执行,返回状态码为404
HTTP/1.1 404 Not Found
Server: ASP.NET Development Server/10.0.0.0
Date: Tue, 19 Jul 2011 13:58:08 GMT
X-AspNet-Version: 4.0.30319
Cache-Control: private
Content-Length: 0
Connection: Close
-
再次切换方法为DELETE,然后执行,也返回状态码404
总结:在这篇入门文章里我们学习了以下内容:
- 如何添加检索一个单一的资源
- 如何设置一个方法返回一个404 处理异常情况下的HTTP 响应。
- 如何支持POST和URL编码形式。
- 如何支持PUT和DELETE。

