Socket Buffer的缺陷
对于例如TCP/IP这种基于流的传输协议实现,接收到的数据会被存储在socket的接受缓冲区内。不幸的是,这种基于流的传输缓冲区并不是一个包队列,而是一个字节队列。这意味着,即使你以两个数据包的形式发送了两条消息,操作系统却不会把它们看成是两条消息,而仅仅是一个批次的字节序列。因此,在这种情况下我们就无法保证收到的数据恰好就是远程节点所发送的数据。例如,让我们假设一个操作系统的TCP/IP堆栈收到了三个数据包:

由于这种流传输协议的普遍性质,在你的应用中有较高的可能会把这些数据读取为另外一种形式:

因此对于数据的接收方,不管是服务端还是客户端,应当重构这些接收到的数据,让其变成一种可让你的应用逻辑易于理解的更有意义的数据结构。在上面所述的这个例子中,接收到的数据应当重构为下面的形式:

第一种解决方案(使用特殊字符分割)
Netty提供了一个分隔符类DelimiterBasedFrameDecoder(自定义分隔符)
下面的开发我是居于我的Netty第一个开发程序来讲的,没看过我的这篇文章可以先看看,想信你在Netty第一个开发程序会捕获很多你想不到的知识。
服务端
public class Server {

    public static void main(String[] args) throws Exception{
        //1 创建2个线程,一个是负责接收客户端的连接。一个是负责进行数据传输的
        EventLoopGroup pGroup = new NioEventLoopGroup();
        EventLoopGroup cGroup = new NioEventLoopGroup();

        //2 创建服务器辅助类
        ServerBootstrap b = new ServerBootstrap();
        b.group(pGroup, cGroup)
         .channel(NioServerSocketChannel.class)
         .option(ChannelOption.SO_BACKLOG, 1024)
         .option(ChannelOption.SO_SNDBUF, 32*1024)
         .option(ChannelOption.SO_RCVBUF, 32*1024)
         .childHandler(new ChannelInitializer<SocketChannel>() {
            @Override
            protected void initChannel(SocketChannel sc) throws Exception {
                //1 设置特殊分隔符
                ByteBuf buf = Unpooled.copiedBuffer("$_".getBytes());
                //2
                sc.pipeline().addLast(new DelimiterBasedFrameDecoder(1024, buf));
                //3 设置字符串形式的解码
                sc.pipeline().addLast(new StringDecoder());
                sc.pipeline().addLast(new ServerHandler());
            }
        });

        //4 绑定连接
        ChannelFuture cf = b.bind(8765).sync();

        //等待服务器监听端口关闭
        cf.channel().closeFuture().sync();
        pGroup.shutdownGracefully();
        cGroup.shutdownGracefully();

    }

}
关于EventLoopGroup、ServerBootstrap等等之类的我都在Netty的第一个程序都讲得很清楚了,需要了解的可以参考我的第一篇文章。
代码说明:
1、 Unpooled.copiedBuffer(“$_”.getBytes()) 这个是设置特殊分隔符返回的是Netty中的ByteBuf类型这里我设置的是 $_
2、DelimiterBasedFrameDecoder()是处理分隔符的类
3、StringDecoder() 设置字符串形式的解码
服务端业务处理
public class ServerHandler extends ChannelHandlerAdapter {

    @Override
    public void channelActive(ChannelHandlerContext ctx) throws Exception {
        System.out.println(" server channel active... ");
    }

    @Override
    public void channelRead(ChannelHandlerContext ctx, Object msg) throws Exception {
        String request = (String)msg;
        System.out.println("Server :" + msg);
        String response = "服务器响应:" + msg + "$_";
        ctx.writeAndFlush(Unpooled.copiedBuffer(response.getBytes()));
    }

}
由于在服务端就使用了StringDecoder()解码成字符串形式,这里不需要用ByteBuf去转换成字符串。
客户端
public class Client {

    public static void main(String[] args) throws Exception {

        EventLoopGroup group = new NioEventLoopGroup();

        Bootstrap b = new Bootstrap();
        b.group(group)
         .channel(NioSocketChannel.class)
         .handler(new ChannelInitializer<SocketChannel>() {
            @Override
            protected void initChannel(SocketChannel sc) throws Exception {
                //1
                ByteBuf buf = Unpooled.copiedBuffer("$_".getBytes());
                //2
                sc.pipeline().addLast(new DelimiterBasedFrameDecoder(1024, buf));
                //3
                sc.pipeline().addLast(new StringDecoder());
                sc.pipeline().addLast(new ClientHandler());
            }
        });

        ChannelFuture cf = b.connect("127.0.0.1", 8765).sync();

        cf.channel().writeAndFlush(Unpooled.wrappedBuffer("777$_".getBytes()));
        cf.channel().writeAndFlush(Unpooled.wrappedBuffer("666$_".getBytes()));
        cf.channel().writeAndFlush(Unpooled.wrappedBuffer("888$_".getBytes()));


        //等待客户端端口关闭
        cf.channel().closeFuture().sync();
        group.shutdownGracefully();

    }
}
由于这里客户端也接收服务端返回的数据所以也采用了与服务端一样的处理方式。
客户端业务处理
public class ClientHandler extends ChannelHandlerAdapter{

    @Override
    public void channelActive(ChannelHandlerContext ctx) throws Exception {
        System.out.println("client channel active... ");
    }

    @Override
    public void channelRead(ChannelHandlerContext ctx, Object msg) throws Exception {
        try {
            String response = (String)msg;
            System.out.println("Client: " + response);
        } finally {
            ReferenceCountUtil.release(msg);
        }
    }
}
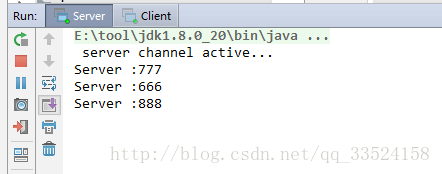
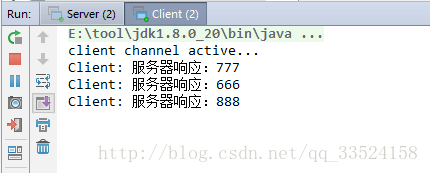
好!到这第一种解决方案就编写结束了,先启动服务端,再启动客户端
客户端打印如下:
客户端签到后服务端的打印如下:

第二种解决方案(定长)
Netty提供了一个定长类FixdeLengthFraneDecoder。
使用这个定长的有个弊端:如果由多个字段比如可变长度的字段组成时这个时候并解决不了什么问题,建议使用第一个解决方案。
FixdeLengthFraneDecoder的使用跟DelimiterBasedFrameDecoder差不多,由于代码都差不多一样这里我不做太多的说明。
服务端
public class Server {

    public static void main(String[] args) throws Exception{
        //创建2个线程,一个是负责接收客户端的连接。一个是负责进行数据传输的
        EventLoopGroup pGroup = new NioEventLoopGroup();
        EventLoopGroup cGroup = new NioEventLoopGroup();

        //创建服务器辅助类
        ServerBootstrap b = new ServerBootstrap();
        b.group(pGroup, cGroup)
         .channel(NioServerSocketChannel.class)
         .option(ChannelOption.SO_BACKLOG, 1024)
         .option(ChannelOption.SO_SNDBUF, 32*1024)
         .option(ChannelOption.SO_RCVBUF, 32*1024)
         .childHandler(new ChannelInitializer<SocketChannel>() {
            @Override
            protected void initChannel(SocketChannel sc) throws Exception {
                //1  设置定长字符串接收
                sc.pipeline().addLast(new FixedLengthFrameDecoder(3));
                //2  设置字符串形式的解码
                sc.pipeline().addLast(new StringDecoder());
                sc.pipeline().addLast(new ServerHandler());
            }
        });

        //4 绑定连接
        ChannelFuture cf = b.bind(8765).sync();

        //等待服务器监听端口关闭
        cf.channel().closeFuture().sync();
        pGroup.shutdownGracefully();
        cGroup.shutdownGracefully();

    }

}
1、FixedLengthFrameDecoder(3) 这里设置定长字符串接收具体设置多长自己定。
2、StringDecoder() 设置字符串形式的解码。
服务端业务处理
public class ServerHandler extends ChannelHandlerAdapter {


    @Override
    public void channelActive(ChannelHandlerContext ctx) throws Exception {
        System.out.println(" server channel active... ");
    }

    @Override
    public void channelRead(ChannelHandlerContext ctx, Object msg) throws Exception {
        String request = (String)msg;
        System.out.println("Server :" + msg);
        String response =  request ;
        ctx.writeAndFlush(Unpooled.copiedBuffer(response.getBytes()));
    }
}
服务端
public class Client {

    public static void main(String[] args) throws Exception {

        EventLoopGroup group = new NioEventLoopGroup();

        Bootstrap b = new Bootstrap();
        b.group(group)
         .channel(NioSocketChannel.class)
         .handler(new ChannelInitializer<SocketChannel>() {
            @Override
            protected void initChannel(SocketChannel sc) throws Exception {
                sc.pipeline().addLast(new FixedLengthFrameDecoder(3));
                sc.pipeline().addLast(new StringDecoder());
                sc.pipeline().addLast(new ClientHandler());
            }
        });

        ChannelFuture cf = b.connect("127.0.0.1", 8765).sync();

        cf.channel().writeAndFlush(Unpooled.wrappedBuffer("777".getBytes()));
        cf.channel().writeAndFlush(Unpooled.wrappedBuffer("666".getBytes()));
        cf.channel().writeAndFlush(Unpooled.wrappedBuffer("888".getBytes()));

        //等待客户端端口关闭
        cf.channel().closeFuture().sync();
        group.shutdownGracefully();

    }
}
客户端业务处理
public class ClientHandler extends ChannelHandlerAdapter{

    @Override
    public void channelActive(ChannelHandlerContext ctx) throws Exception {
        System.out.println("client channel active... ");
    }

    @Override
    public void channelRead(ChannelHandlerContext ctx, Object msg) throws Exception {
        try {
            String response = (String)msg;
            System.out.println("Client: " + response);
        } finally {
            ReferenceCountUtil.release(msg);
        }
    }
}
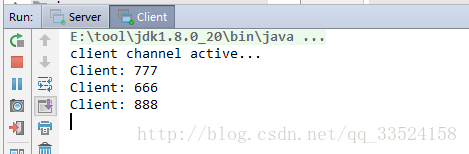
好!到这第二种解决方案就编写结束了,先启动服务端,再启动客户端
客户端打印如下:
客户端签到后服务端的打印如下: