1.Channel基本概念和使用
什么是Channel?
channel是一个管道,用于连接字节缓冲区Buf和另一端的实体,这个实例可以是Socket,也可以是File, 在Nio网络编程模型中, 服务端和客户端进行IO数据交互(得到彼此推送的信息)的媒介就是Channel。
Channel通过ChannelPipeline中的多个Handler处理器,Channel使用它处理IO数据。
Netty对Jdk原生的ServerSocketChannel进行了封装和增强封装成了NioXXXChannel, 相对于原生的JdkChannel, Netty的Channel增加了如下的组件:
- id 标识唯一身份信息
- 可能存在的parent Channel
- 管道 pepiline
- 用于数据读写的unsafe内部类
- 关联上相伴终生的NioEventLoop
Channel 生命周期
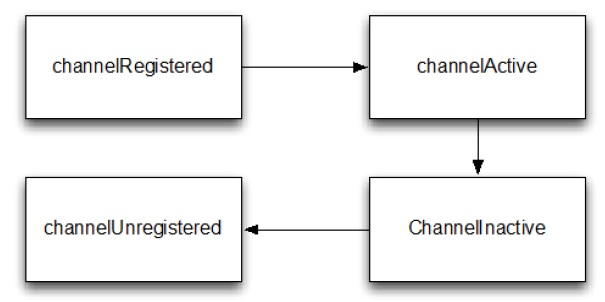
Channel 有个简单但强大的状态模型,与 ChannelInboundHandler API 密切相关。下面表格是 Channel 的四个状态
Table 1 Channel lifeycle states
| 状态 | 描述 |
|---|---|
| channelUnregistered | channel已创建但未注册到一个 EventLoop. |
| channelRegistered | channel 注册到一个 EventLoop. |
| channelActive | channel 变为活跃状态(连接到了远程主机),现在可以接收和发送数据了 |
| channelInactive | channel 处于非活跃状态,没有连接到远程主机 |
Channel 的正常的生命周期如下图,当状态出现变化,就会触发对应的事件,这样就能与 ChannelPipeline 中的 ChannelHandler进行及时的交互。

Channel类型
下面列出Java NIO中最重要的集中Channel的实现:
(1)FileChannel
(2)DatagramChannel
(3)SocketChannel
(4)ServerSocketChannel
四种通道的说明如下:
FileChannel用于文件的数据读写。
DatagramChannel用于UDP的数据读写。
SocketChannel用于TCP的数据读写。
ServerSocketChannel允许我们监听TCP链接请求,每个请求会创建会一个SocketChannel。
这个四种通道,涵盖了 UDP 和 TCP网络 IO以及文件 IO的操作。下面从通道的新建、读取、写入、关闭等四个操作,四种通道进行简单的介绍。
1). FileChannel
FileChannel 是操作文件的Channel,我们可以通过 FileChannel 从一个文件中读取数据,也可以将数据写入到文件中。
注意,FileChannel 不能设置为非阻塞模式。
//操作一:打开 FileChannel通道
RandomAccessFile aFile     = new RandomAccessFile("test.txt","rw");

FileChannel      inChannel = aFile.getChannel();

//操作二:读取数据
ByteBuffer buf = ByteBuffer.allocate(48);

int bytesRead = inChannel.read(buf);

//操作三:写入数据
String newData = "New String to write to file..." + System.currentTimeMillis();

ByteBuffer buf = ByteBuffer.allocate(48);

buf.clear();

buf.put(newData.getBytes());

buf.flip();

while(buf.hasRemaining())
{
    channel.write(buf);
}

//操作四:关闭
channel.close();

//当我们对 FileChannel 的操作完成后,必须将其关闭。

//操作五:强制刷新磁盘
channel.force(true);
FileChannel的force()方法将所有未写入的数据从通道刷新到磁盘中。在你调用该force()方法之前,出于性能原因,操作系统可能会将数据缓存在内存中,因此您不能保证写入通道的数据实际上写入磁盘。
2). SocketChannel
有两种Socket通道,一个是客户端的SocketChannel,一个是负责服务器端的Socket通道ServerSocketChannel。SocketChannel与OIO中的Socket类对应,ServerSocketChannel对应于OIO中的ServerSocket类相NIO。
两种Socket通道新增的通道都支持阻塞和非阻塞两种模式。在阻塞模式下的通道的创建、关闭、读写操作如下:
//操作一:创建
SocketChannel socketChannel = SocketChannel.open();

socketChannel.connect(new InetSocketAddress("127.0.0.1",80));

//这个是客户端的创建。当一个服务器端的ServerSocketChannel 接受到连接请求时,也会返回一个 SocketChannel 对象。

//操作二:读取
ByteBuffer buf = ByteBuffer.allocate(48);

int bytesRead = socketChannel.read(buf);
//如果 read()返回 -1,那么表示连接中断了.

//操作三:写入数据
String newData = "New String to write to file..." + System.currentTimeMillis();

ByteBuffer buf = ByteBuffer.allocate(48);

buf.clear();

buf.put(newData.getBytes());

buf.flip();

while(buf.hasRemaining()) {

    channel.write(buf);

}

//操作四:关闭
socketChannel.close();

//在非阻塞模式,我们可以设置 SocketChannel 为异步模式,这样我们的 connect,read,write 都是异步的了.
//操作一:连接
socketChannel.configureBlocking(false);

socketChannel.connect(new InetSocketAddress("127.0.0.1",80));

while(! socketChannel.finishConnect() ){
    //wait,or do something else...
}
//在异步模式中,或许连接还没有建立,socketChannel.connect 方法就返回了,因此我们不断的自旋,检查当前是否是连接到了主机。

//操作二:非阻塞读写
//在异步模式下,读写的方式是一样的.
//在读取时,因为是异步的,因此我们必须检查 read 的返回值,来判断当前是否读取到了数据.
ServerSocketChannel

ServerSocketChannel 顾名思义,是用在服务器为端的,可以监听客户端的 TCP 连接,例如:

ServerSocketChannel serverSocketChannel = ServerSocketChannel.open();

serverSocketChannel.socket().bind(new InetSocketAddress(9999));

while(true){

    SocketChannel socketChannel =
            serverSocketChannel.accept();
    //do something with socketChannel...
}

//操作四:关闭
ServerSocketChannel serverSocketChannel = ServerSocketChannel.open();

serverSocketChannel.close();
2.1). 监听连接
我们可以使用ServerSocketChannel.accept()方法来监听客户端的 TCP 连接请求,accept()方法会阻塞,直到有连接到来,当有连接时,这个方法会返回一个 SocketChannel 对象:
while(true){

SocketChannel socketChannel =

serverSocketChannel.accept();

//do something with socketChannel...

}
2.2). 非阻塞模式
在非阻塞模式下,accept()是非阻塞的,因此如果此时没有连接到来,那么 accept()方法会返回null:
ServerSocketChannel serverSocketChannel = ServerSocketChannel.open();

serverSocketChannel.socket().bind(new InetSocketAddress(9999));

serverSocketChannel.configureBlocking(false);

while(true){

    SocketChannel socketChannel =

            serverSocketChannel.accept();

    if(socketChannel != null){

        //do something with socketChannel...

        }

}
3). DatagramChannel
DatagramChannel 是用来处理 UDP 连接的.
操作一:打开

DatagramChannel channel = DatagramChannel.open();

channel.socket().bind(new InetSocketAddress(9999));

操作二:读取数据

ByteBuffer buf = ByteBuffer.allocate(48);

buf.clear();

channel.receive(buf);
操作三:发送数据

String newData = "New String to write to file..."

                    + System.currentTimeMillis();

ByteBuffer buf = ByteBuffer.allocate(48);

buf.clear();

buf.put(newData.getBytes());

buf.flip();

int bytesSent = channel.send(buf,new InetSocketAddress("example.com",80));
因为 UDP 是非连接的,因此这个的 connect 并不是向 TCP 一样真正意义上的连接,因此我们仅仅可以从指定的地址中读取或写入数据.
channel.connect(new InetSocketAddress("example.com",80));
2.Channel 源码分析
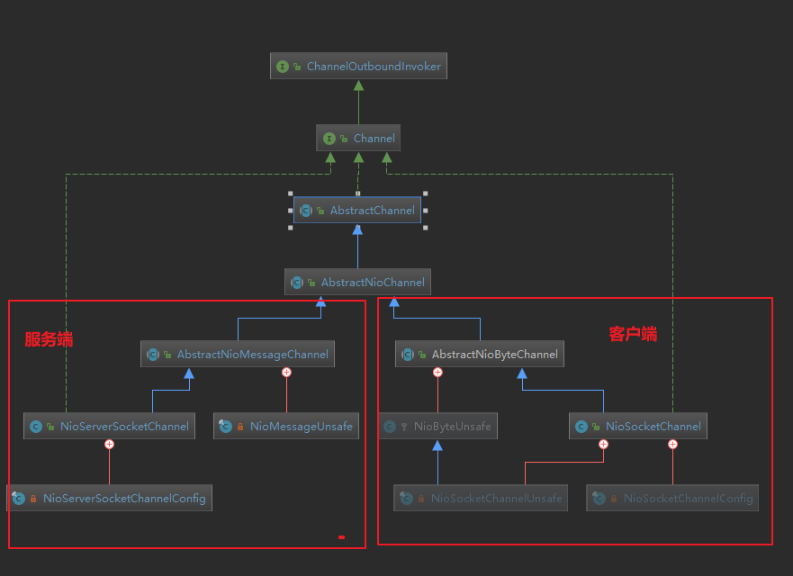
从图中可以看到,从顶级接口Channel开始,在接口中定义了一套方法当作规范,紧接着的是来两个抽象的接口实现类,在这个抽象类中对接口中的方法,进行了部分实现,然后开始根据不同的功能分支,分成服务端的Channel和客户端的Channel

Channel的分类
根据服务端和客户端,Channel可以分成两类(这两大类的分支见上图):
- 服务端:
NioServerSocketChannel - 客户端:
NioSocketChannel
Channel重要的内部接口 unsafe
Netty中,真正帮助Channel完成IO读写操作的是它的内部类unsafe, 源码如下, 很多重要的功能在这个接口中定义, 下面列举的常用的方法:
interface Unsafe {
//  把channel注册进EventLoop
void register(EventLoop eventLoop, ChannelPromise promise);

 // todo 给channel绑定一个 adress,
void bind(SocketAddress localAddress, ChannelPromise promise);

// 把channel注册进Selector
void deregister(ChannelPromise promise);

// 从channel中读取IO数据
void beginRead();

// 往channe写入数据
void write(Object msg, ChannelPromise promise);
接着往下看,下面来到Channel接口的直接实现类,AbstractChannel 他是个抽象类, AbstractChannel重写部分Channel接口预定义的方法, 它的抽象内部类AbstractUnsafe实现了Channel的内部接口unsafe。当我们创建对象使用的时候其实是使用的特化的对象,创建特化的对象就难免会调层层往上调用父类的构造方法, 所以我们看看AbstractChannel的构造方法干了什么活? 源码如下:
protected AbstractChannel(Channel parent) {
    this.parent = parent;
    // todo channelId 代表Chanel唯一的身份标志
    id = newId();
    // todo 创建一个unsafe对象
    unsafe = newUnsafe();
    // todo 在这里初始化了每一个channel都会有的pipeline组件
    pipeline = newChannelPipeline();
}
AbstractChannel构造函数, 接受的子类传递进来的参数只有一个parent CHannel,而且,还不有可能为空, 所以在AbstractChannel是没有维护jdk底层的Channel的, 相反他会维护着Channel关联的EventLoop,我是怎么知道的呢? 首先,它的属性中存在这个字段,而且,将channel注册进selector的Register()方法是AbastractChannel重写的,Selector在哪呢? 在EventLoop里面,它怎么得到的呢? 它的子类传递了给了它
终于看出来点眉目,构造方法做了四件事
- 设置parent
- 如果当前创建的channel是客户端的channel,把parent初始化为他对应的parent
- 如果为服务端的channel,这就是null
- 创建唯一的id
- 创建针对channel进行io读写的
unsafe - 创建channel的处理器handler链
channelPipeline
AbstractChannel中维护着EventLoop
AbstractChanel的重要抽象内部类AbstractUnsafe 继承了Channel的内部接口Unsafe
他的源码如下,我贴出来了两个重要的方法, 关于这两个方法的解析,我写在代码的下面:
protected abstract class AbstractUnsafe implements Unsafe {

@Override
// todo 入参 eventLoop == SingleThreadEventLoop   promise == NioServerSocketChannel + Executor
public final void register(EventLoop eventLoop, final ChannelPromise promise) {
    if (eventLoop == null) {
        throw new NullPointerException("eventLoop");
    }
    if (isRegistered()) {
        promise.setFailure(new IllegalStateException("registered to an event loop already"));
        return;
    }
    if (!isCompatible(eventLoop)) {
        promise.setFailure(
                new IllegalStateException("incompatible event loop type: " + eventLoop.getClass().getName()));
        return;
    }
    // todo 赋值给自己的 事件循环, 把当前的eventLoop赋值给当前的Channel上  作用是标记后续的所有注册的操作都得交给我这个eventLoop处理, 正好对应着下面的判断
    // todo 保证了 即便是在多线程的环境下一条channel 也只能注册关联上唯一的eventLoop,唯一的线程
    AbstractChannel.this.eventLoop = eventLoop;

    // todo 下面的分支判断里面执行的代码是一样的!!, 为什么? 这是netty的重点, 它大量的使用线程, 线程之间就会产生同步和并发的问题
    // todo 下面的分支,目的就是把线程可能带来的问题降到最低限度
    // todo 进入inEventLoop() --> 判断当前执行这行代码的线程是否就是 SingleThreadEventExecutor里面维护的那条唯一的线程
    // todo 解释下面分支的必要性, 一个eventLoop可以注册多个channel, 但是channel的整个生命周期中所有的IO事件,仅仅和它关联上的thread有关系
    // todo 而且,一个eventLoop在他的整个生命周期中,只和唯一的线程进行绑定,
    //
    // todo 当我们注册channel的时候就得确保给他专属它的thread,
    // todo 如果是新的连接到了,
    if (eventLoop.inEventLoop()) {
        // todo 进入regist0()
        register0(promise);
    } else {
        try {
            // todo 如果不是,它以一个任务的形式提交  事件循环 , 新的任务在新的线程开始,  规避了多线程的并发
            // todo 他是SimpleThreadEventExucutor中execute()实现的,把任务添加到执行队列执行
            eventLoop.execute(new Runnable() {
                @Override
                public void run() {
                    register0(promise);
                }
            });
        } catch (Throwable t) {
            logger.warn(
                    "Force-closing a channel whose registration task was not accepted by an event loop: {}",
                    AbstractChannel.this, t);
            closeForcibly();
            closeFuture.setClosed();
            safeSetFailure(promise, t);
        }
    }
}

private void register0(ChannelPromise promise) {
    try {
        // check if the channel is still open as it could be closed in the mean time when the register
        // call was outside of the eventLoop
        if (!promise.setUncancellable() || !ensureOpen(promise)) {
            return;
        }
        boolean firstRegistration = neverRegistered;
        // todo 进入这个方法doRegister()
        // todo 它把系统创建的ServerSocketChannel 注册进了选择器
        doRegister();
        neverRegistered = false;
        registered = true;

        // Ensure we call handlerAdded(...) before we actually notify the promise. This is needed as the
        // user may already fire events through the pipeline in the ChannelFutureListener.
        // todo 确保在 notify the promise前调用 handlerAdded(...)
        // todo 这是必需的,因为用户可能已经通过ChannelFutureListener中的管道触发了事件。
        // todo 如果需要的话,执行HandlerAdded()方法
        // todo 正是这个方法, 回调了前面我们添加 Initializer 中添加 Accpter的重要方法
        pipeline.invokeHandlerAddedIfNeeded();

        // todo  !!!!!!!  观察者模式!!!!!!  通知观察者,谁是观察者?  暂时理解ChannelHandler 是观察者
        safeSetSuccess(promise);

        // todo 传播行为, 传播什么行为呢?   在head---> ServerBootStraptAccptor ---> tail传播事件ChannelRegistered  , 也就是挨个调用它们的ChannelRegisted函数
        pipeline.fireChannelRegistered();
        // Only fire a channelActive if the channel has never been registered. This prevents firing
        // multiple channel actives if the channel is deregistered and re-registered.
        // todo 对于服务端:  javaChannel().socket().isBound(); 即  当Channel绑定上了端口   isActive()才会返回true
        // todo 对于客户端的连接 ch.isOpen() && ch.isConnected(); 返回true , 就是说, Channel是open的 打开状态的就是true
        if (isActive()) {
            if (firstRegistration) {
                // todo 在pipeline中传播ChannelActive的行为,跟进去
                pipeline.fireChannelActive();
            } else if (config().isAutoRead()) {
                // This channel was registered before and autoRead() is set. This means we need to begin read
                // again so that we process inbound data.
                //
                // See https://github.com/netty/netty/issues/4805
                // todo 可以接受客户端的数据了
                beginRead();
            }
        }
    } catch (Throwable t) {
        // Close the channel directly to avoid FD leak.
        closeForcibly();
        closeFuture.setClosed();
        safeSetFailure(promise, t);
    }
}

@Override
public final void bind(final SocketAddress localAddress, final ChannelPromise promise) {
    assertEventLoop();

    if (!promise.setUncancellable() || !ensureOpen(promise)) {
        return;
    }

    // See: https://github.com/netty/netty/issues/576
    if (Boolean.TRUE.equals(config().getOption(ChannelOption.SO_BROADCAST)) &&
        localAddress instanceof InetSocketAddress &&
        !((InetSocketAddress) localAddress).getAddress().isAnyLocalAddress() &&
        !PlatformDependent.isWindows() && !PlatformDependent.maybeSuperUser()) {
        // Warn a user about the fact that a non-root user can't receive a
        // broadcast packet on *nix if the socket is bound on non-wildcard address.
        logger.warn(
                "A non-root user can't receive a broadcast packet if the socket " +
                "is not bound to a wildcard address; binding to a non-wildcard " +
                "address (" + localAddress + ") anyway as requested.");
    }

    boolean wasActive = isActive();
    // todo 由于端口的绑定未完成,所以 wasActive是 false

    try {
        // todo 绑定端口, 进去就是NIO原生JDK绑定端口的代码
        doBind(localAddress);
        // todo 端口绑定完成  isActive()是true
    } catch (Throwable t) {
        safeSetFailure(promise, t);
        closeIfClosed();
        return;
    }
    // todo 根据上面的逻辑判断, 结果为 true
    if (!wasActive && isActive()) {
        invokeLater(new Runnable() {
            // todo 来到这里很重要, 向下传递事件行为, 传播行为的时候, 从管道的第一个节点开始传播, 第一个节点被封装成 HeadContext的对象
           // todo 进入方法, 去 HeadContext里面查看做了哪些事情
            // todo 她会触发channel的read, 最终重新为 已经注册进selector 的 chanel, 二次注册添加上感性趣的accept事件
            @Override
            public void run() {
                pipeline.fireChannelActive();
            }
        });
    }

    // todo 观察者模式, 设置改变状态, 通知观察者的方法回调
    safeSetSuccess(promise);
AbstractChannel抽象内部类的register(EventLoop,channelPromise)方法
这个方法,是将channel注册进EventLoop的Selector, 它的调用顺序如下:
本类方法 regist()--> 本类方法 register0() --> 本类抽象方法doRegister()
doRegister() 在这里设计成抽象方法,等着子类去具体的实现, 为啥这样做呢?
刚才说了,AbstractChannel本身就是个模板,而且它仅仅维护了EventLoop,没有拿到channel引用的它根本不可能进行注册的逻辑,那谁有jdk原生channel的引用呢? 它的直接子类AbstractNioChannel下面是AbstractNioChannel的构造方法, 它自己维护jdk原生的Channel,所以由他重写doRegister()
*/ // todo 无论是服务端的channel 还是客户端的channel都会使用这个方法进行初始化
// // TODO: 2019/6/23                null        ServerSocketChannel       accept
// todo  如果是在创建NioSocketChannel  parent==NioServerSocketChannel  ch == SocketChanel
protected AbstractNioChannel(Channel parent, SelectableChannel ch, int readInterestOp) {
    super(parent);// todo  继续向上跟,创建基本的组件
    // todo 如果是创建NioSocketChannel   这就是在保存原生的jdkchannel
    // todo 如果是创建NioServerSocketChannel   这就是在保存ServerSocketChannel
    this.ch = ch;
    // todo 设置上感兴趣的事件
    this.readInterestOp = readInterestOp;
    try {
        // todo 作为服务端, ServerSocketChannel 设置为非阻塞的
        // todo 作为客户端   SocketChannel 设置为非阻塞的
        ch.configureBlocking(false);
    } catch (IOException e) {
AbstractChannel抽象内部类的bind()方法
bind()方法的调用顺序, 本类方法 bind()--> 本类的抽象方法 dobind()
private ChannelFuture doBind(final SocketAddress localAddress) {
    // 初始化及注册
    final ChannelFuture regFuture = initAndRegister();
    final Channel channel = regFuture.channel();
    if (regFuture.cause() != null) {
        return regFuture;
    }

    if (regFuture.isDone()) {
        // At this point we know that the registration was complete and successful.
        ChannelPromise promise = channel.newPromise();
        // 调用 doBind0
        doBind0(regFuture, channel, localAddress, promise);
        return promise;
    } else {
        ....
    }
}
doBind 方法又会调用 doBind0() 方法, 在 doBind0() 方法中会通过 EventLoop 去执行 channel 的 bind()任务.
private static void doBind0(
        final ChannelFuture regFuture, final Channel channel,
        final SocketAddress localAddress, final ChannelPromise promise) {

    channel.eventLoop().execute(new Runnable() {
        @Override
        public void run() {
            if (regFuture.isSuccess()) {
                // 调用channel.bind接口
                channel.bind(localAddress, promise).addListener(ChannelFutureListener.CLOSE_ON_FAILURE);
            } else {
                promise.setFailure(regFuture.cause());
            }
        }
    });
}
doBind0() 方法往下会调用到 pipeline.bind(localAddress, promise); 方法, 通过 pipeline 的传播机制, 最终会调用到 AbstractChannel.AbstractUnsafe.bind() 方法, 这个方法主要做两件事情:
- 调用
doBind(): 调用底层JDK API进行 Channel 的端口绑定. - 调用
pipeline.fireChannelActive().
方法的目的是给Channel绑定上属于它的端口,同样有一个抽象方法,等着子类去实现,因为我们已经知道了AbstractChannel不维护channel的引用,于是我就去找dobind()这个抽象函数的实现, 结果发现,AbstractChannel的直接子类AbstractNioChannel中根本不没有他的实现,这是被允许的,因为AbstractNioChannel本身也是抽象类, 到底是谁实现呢? 如下图:在NioServerSocketChannel中获取出 Jdk原生的channel, 客户端和服务端的channel又不同,所以绑定端口这中特化的任务,交给他们自己实现

AbstractChannel的beginRead()()方法
上面完成注册之后,就去绑定端口,当端口绑定完成,就会channel处于active状态,下一步就是执行beginRead() ,执行的流程如下
本类抽象方法 beginRead() --> 本类抽象方法doBeginRead()
这个read() 就是从已经绑定好端口的channel中读取IO数据,和上面的方法一样,对于没有channel引用的AbstractChannel来说,netty把它设计成抽象方法,交给拥有jdk 原生channel引用的AbstractNioChannel实现
小结:
AbstractChannel作为Channel的直接实现类,本身又是抽象类,于是它实现了Channel的预留的一些抽象方法, 初始化了channel的四个组件 id pipeline unsafe parent, 更为重要的是它的抽象内部类 实现了 关于nettyChannel的注册,绑定,读取数据的逻辑,而且以抽象类的方法,挖好了填空题等待子类的特化实现
递进AbstractNioChannel
跟进构造方法
依然是来到AbstractNioChannel的构造方法,发现它做了如下的构造工作:
- 把parent传递给了
AbstractChannel - 把子类传递过来的Channel要告诉Selector的感兴趣的选项保存
- 设置channel为非阻塞
-
重写了它父类的
doRegister()
AbstractNioChannel维护channel的引用,真正的实现把 jdk 原生的 channel注册进 Selector中:
@Override
protected void doRegister() throws Exception {
boolean selected = false;
for (;;) {
try {
    // todo  javaChannel() -- 返回SelectableChanel 可选择的Channel,换句话说,可以和Selector搭配使用,他是channel体系的顶级抽象类, 实际的类型是 ServerSocketChannel
    // todo  eventLoop().unwrappedSelector(), -- >  获取选择器, 现在在AbstractNioChannel中 获取到的eventLoop是BossGroup里面的
    // todo  到目前看, 他是把ServerSocketChannel(系统创建的) 注册进了 EventLoop的选择器
    // todo 这里的 最后一个参数是  this是当前的channel , 意思是把当前的Channel当成是一个 attachment(附件) 绑定到selector上 作用???
    // todo  现在知道了attachment的作用了
     //    todo 1. 当channel在这里注册进 selector中返回一个selectionKey, 这个key告诉selector 这个channel是自己的
     //    todo 2. 当selector轮询到 有channel出现了自己的感兴趣的事件时, 需要从成百上千的channel精确的匹配出 出现Io事件的channel,
    //     todo     于是seleor就在这里提前把channel存放入 attachment中, 后来使用
    // todo 最后一个 this 参数, 如果是服务启动时, 他就是NioServerSocketChannel   如果是客户端他就是 NioSocketChannel
    // todo 到目前为止, 虽然注册上了,但是它不关心任何事件
    selectionKey = javaChannel().register(eventLoop().unwrappedSelector(), 0, this);
    return;
} catch (CancelledKeyException e) {
新增内部接口
AbstractNioChannel新添加了一个内部接口,作为原Channel的扩展,源码如下, 我们着重关心的就是这个新接口的 read()方法, 它的作用是从channel去读取IO数据,作为接口的抽象方法,它规范服务端和客户端根据自己需求去不同的实现这个read()
怎么特化实现这个read方法呢? 若是服务端,它read的结果就是一个新的客户端的连接, 如果是客户端,它read的结果就是 客户端发送过来的数据,所以这个read()很有必要去特化
/**
 * Read from underlying {@link SelectableChannel}
 */
// todo 两个实现类, NioByteUnsafe , 处理关于客户端发来的信息
// todo NioMessageUnsafe   处理客户端新进来的连接
void read();


/**
* Special {@link Unsafe} sub-type which allows to access the underlying {@link SelectableChannel}
*/
public interface NioUnsafe extends Unsafe {
/**
 * Return underlying {@link SelectableChannel}
 */
SelectableChannel ch();

/**
 * Finish connect
 */
void finishConnect();


void forceFlush();
}
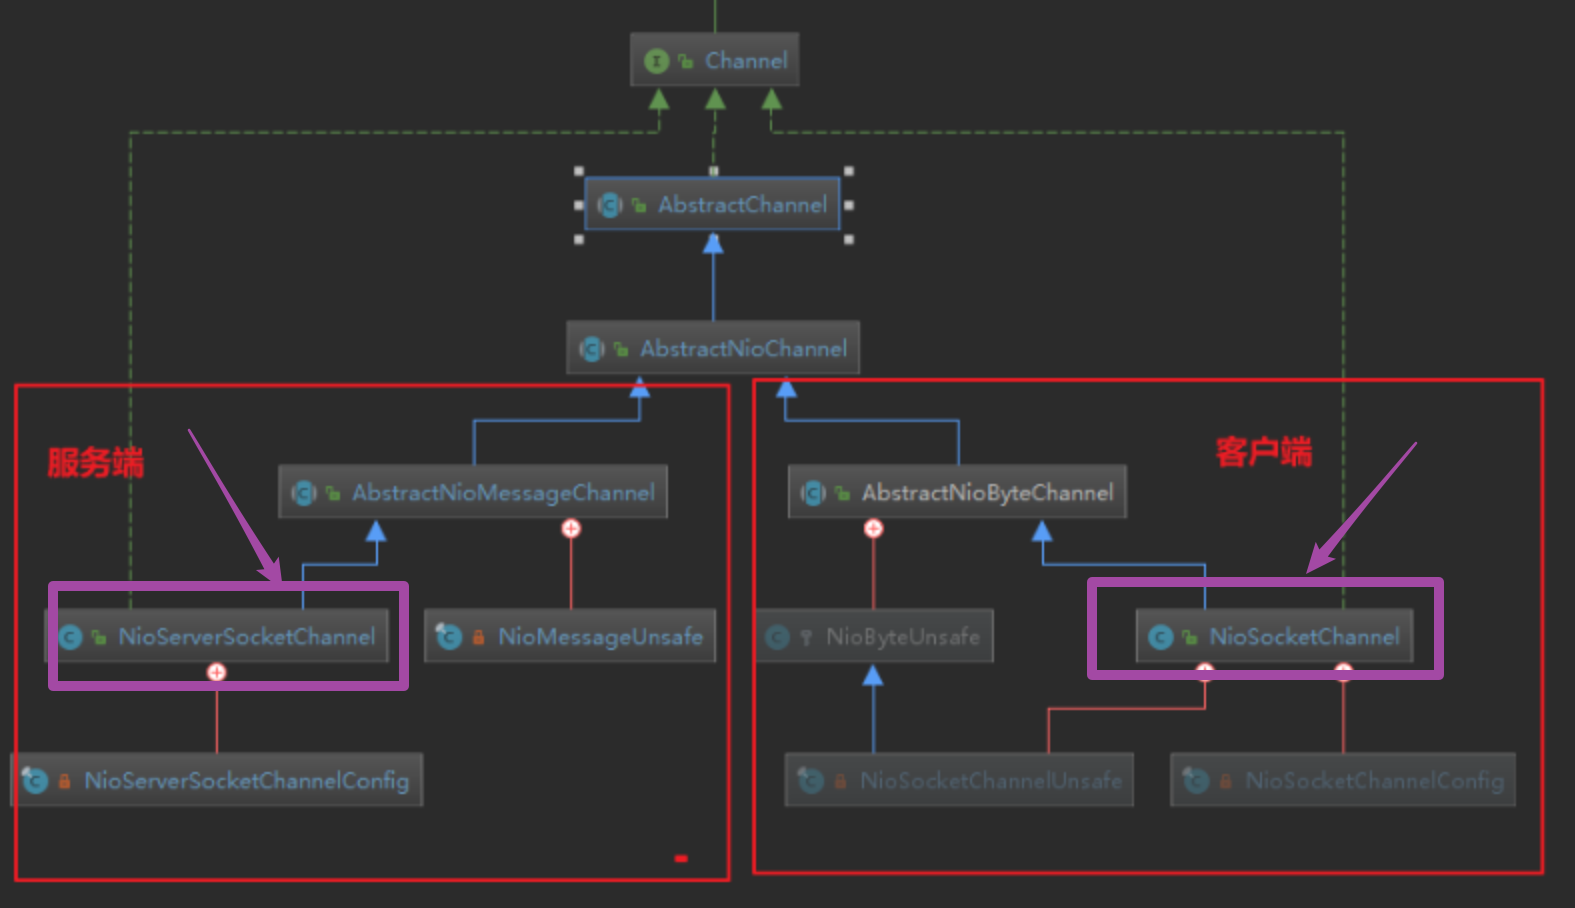
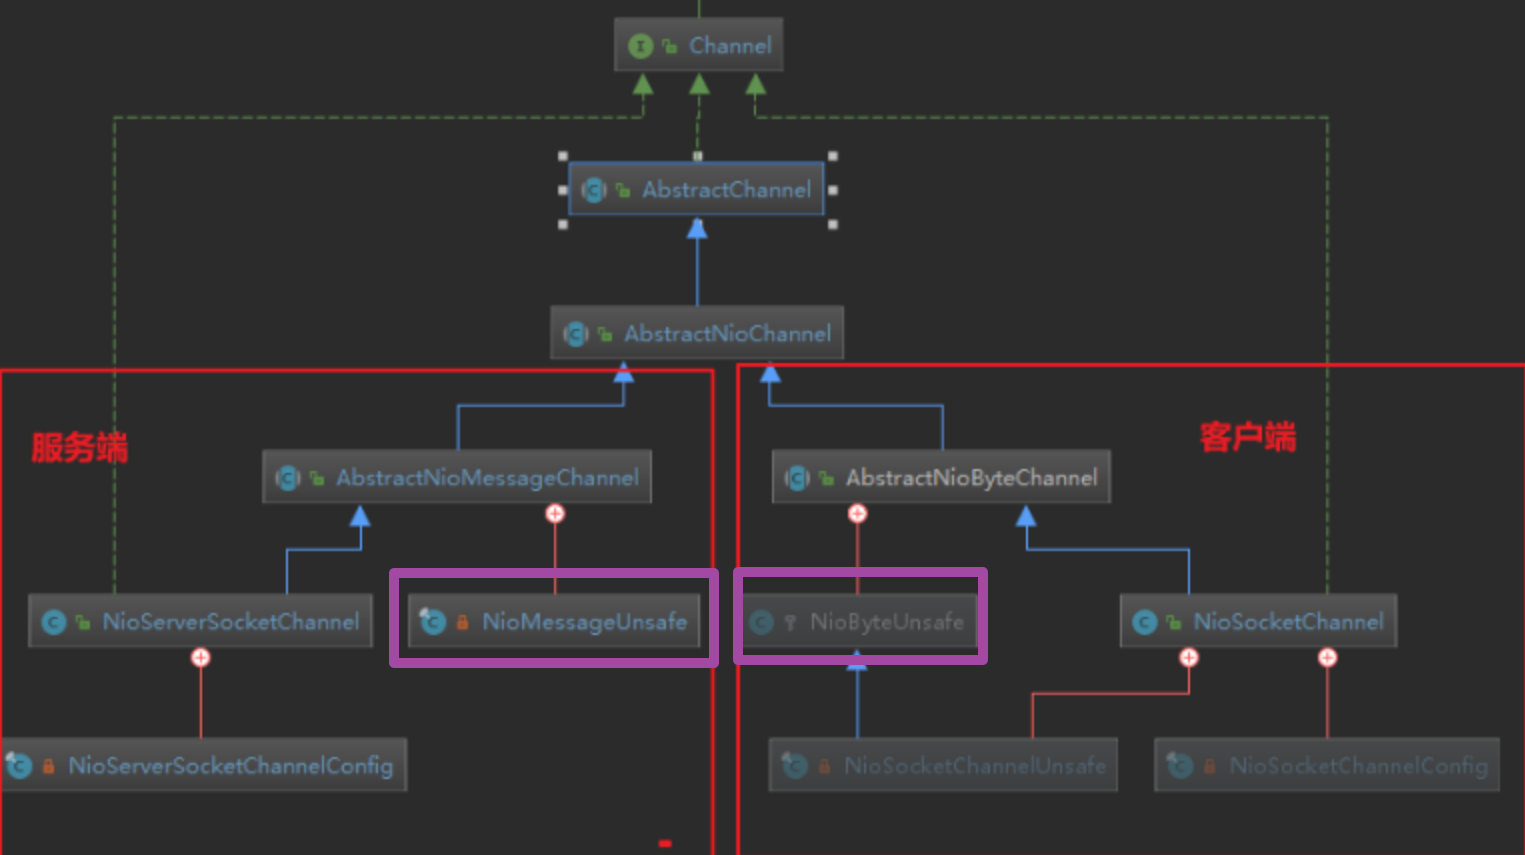
AbstractNioChannel的抽象内部内同类时继承了它父类的AbstractUnsafe实现了当前的NioUnsafe, 再往后看, 问题来了, 服务端和客户端在的针对read的特化实现在哪里呢? 想想看肯定在它子类的unsafe内部类中,如下图,紫框:

再进一步 AbstractNioMessageChannel
它的构造函数如下, 只是调用父类的构造函数,传递参数
protected AbstractNioMessageChannel(Channel parent, SelectableChannel ch, int readInterestOp) {
    // todo 在进去
    // todo  null  ServerSocketChannel   accept
    super(parent, ch, readInterestOp);
}
AbstractNioMessageChannel的MessageNioUnsafe对read()特化实现
在read方法中,我们可以看到,他调用是本类的抽象方法doReadMessages(List<Object> buf), 方法的实现类是继承体系的最底层的NioServerSocketChannel, 因为他就是那个特化的服务端channel
当然如果我们一开始跟进read()时,来到的客户端的AbstractNioByteChannel,现在我们找到的doReadMessage()就是由 客户端的channelNioSocketChannel完成的doReadBytes()
// todo 用于处理新链接进来的内部类
private final class NioMessageUnsafe extends AbstractNioUnsafe {

// todo 这个容器用于存放临时读到的连接
private final List<Object> readBuf = new ArrayList<Object>();

// todo 接受新链接的 read来到这里
@Override
public void read() {
    ...
    doBeginRead(buf);
    ...
}

// todo 处理新的连接 是在 NioServerSocketChannel中实现的, 进入查看
protected abstract int doReadMessages(List<Object> buf) throws Exception;
最终,特化的channel实现
现在我们就来到了最底层,整张继承图就全部展现在眼前了,下面就去看看,特化的服务端Channel NioServerSocketChannel和NioSocketChannel对 doReadMessages()和doReadBytes()的各自实现
服务端, 我们看到了,它的特化read()是在创建新的 Jdk远程channel, 因为它在创建新的连接chanel
 @Override
protected int doReadMessages(List<Object> buf) throws Exception {
    // todo java Nio底层在这里 创建jdk底层的 原生channel
    SocketChannel ch = SocketUtils.accept(javaChannel());

    try {
        if (ch != null) {
            // todo  把java原生的channel, 封装成 Netty自定义的封装的channel , 这里的buf是list集合对象,由上一层传递过来的
            // todo  this  --  NioServerSocketChannel
            // todo  ch --     SocketChnnel
            buf.add(new NioSocketChannel(this, ch));
            return 1;
        }
客户端, 读取客户端发送过来的IO数据
@Override
protected int doReadBytes(ByteBuf byteBuf) throws Exception {
    final RecvByteBufAllocator.Handle allocHandle = unsafe().recvBufAllocHandle();
    allocHandle.attemptedBytesRead(byteBuf.writableBytes());
    return byteBuf.writeBytes(javaChannel(), allocHandle.attemptedBytesRead());
}
小结:
可以牢记几个点
AbstractChannel维护NioChannel的EventLoopAbstractNioChannel维护jdk原生channelAbstractChannel中的AbstractUnsafe主要是定义了一套模板,给子类提供了填空题,下面的三个填空- 注册 把chanel注册进Selector
- 绑定 把chanel绑定上端口
- 添加感兴趣的事件, 给创建出来的channel二次注册上netty可以处理的感兴趣的事件
- channel的io操作是unsafe内部类完成的
- 服务端从channel,读取出新连接
NioMessageUnsafe - 客户端从channel,读取出数据
NioByteUnsafe
- 服务端从channel,读取出新连接
参考:
https://www.cnblogs.com/ZhuChangwu/p/11204057.html
https://www.cnblogs.com/crazymakercircle/p/9826883.html