在我们的程序中有时候需要去实现动态更换皮肤的效果,从而完成一些个性化的设置,那么我们究竟怎样去实现动态换皮肤的效果呢?那么我们经常用到的就是设置不同的Style,并且在主程序的xaml文件中通过DynamicResource引用这些Style,当我们点击更换皮肤时我们就动态去改变这些Style,从而实现动态去更换皮肤的操作。我们知道当我们使用Style="{DynamicResource styleBanner}"这种类型的代码时,我们的编译器首先会到App.xaml下面去寻找当前x:key为styleBanner的Style,如果能够找到,那么我们就可以将当前的Style设置为查找到的值,如果找不到会去MainWindow中查找相关的资源,并将查找到的资源赋值给该Style,如果还是找不到的话,会沿着MainWindow的子元素一级级去查找相关资源,直到最后找到相关的类型资源,如果找不到那么Style值为null;
在我们的程序中我们通过右键菜单来完成背景的切换,首先看一下我们的ContextMenu的代码:
 <Grid.ContextMenu>
      <ContextMenu MenuItem.Click="OnMenuItemClick">
        <MenuItem Tag=".ResourcesSkinsBlackSkin.xaml" IsChecked="True">
          <MenuItem.Header>
            <Rectangle Width="120" Height="40" Fill="Black" />
          </MenuItem.Header>
        </MenuItem>
        <MenuItem Tag=".ResourcesSkinsGreenSkin.xaml">
          <MenuItem.Header>
            <Rectangle Width="120" Height="40" Fill="Green" />
          </MenuItem.Header>
        </MenuItem>
        <MenuItem Tag=".ResourcesSkinsBlueSkin.xaml">
          <MenuItem.Header>
            <Rectangle Width="120" Height="40" Fill="Blue" />
          </MenuItem.Header>
        </MenuItem>
      </ContextMenu>
    </Grid.ContextMenu>
我们把每一个资源文件的相对路径作为一个Tag附加到每一个MenuItem上,这样当我们点击其中的某一个MenuItem的时候,我们就能够查找到相关的资源,从而加载该资源,另外这里有一个小技巧,当我们需要为每一个MenuItem执行相同的Click事件的时候,我们不必进行重复去写,我们可以在MenuItem的上一级ContextMenu 中添加附加属性MenuItem.Click="OnMenuItemClick",这样就可以不用重复去定义Click事件了。下面就是关键的OnMenuItemClick事件的代码了。
void OnMenuItemClick(object sender, RoutedEventArgs e)
		{
			MenuItem item = e.OriginalSource as MenuItem;

			// Update the checked state of the menu items.
			Grid mainGrid = this.Content as Grid;
			foreach (MenuItem mi in mainGrid.ContextMenu.Items)
				mi.IsChecked = mi == item;

			// Load the selected skin.
			this.ApplySkinFromMenuItem(item);
		}
这里通过e.OriginalSource来查找触发的事件源,这里每选择其中的一项时会将其他的项的IsChecked属性设置为false,这段代码里调用了一个核心的函数叫做ApplySkinFromMenuItem,那么我们来看看具体是怎么实现的。
void ApplySkinFromMenuItem(MenuItem item)
		{
			// Get a relative path to the ResourceDictionary which
			// contains the selected skin.
			string skinDictPath = item.Tag as string;
			Uri skinDictUri = new Uri(skinDictPath, UriKind.Relative);

			// Tell the Application to load the skin resources.
			DemoApp app = Application.Current as DemoApp;
			app.ApplySkin(skinDictUri);
		}
我们把每个Tag中定义的不同皮肤的Xaml文件的路径传入DemoApp下面的ApplySkin函数中,记住使用Application.Current能够获取当前应用程序中唯一的APP,我们来看看我们的DemoAPP中定义的这个方法。
namespace SkinnableApp
{
	public partial class DemoApp : Application
	{
		public void ApplySkin(Uri skinDictionaryUri)
		{
			// Load the ResourceDictionary into memory.
			ResourceDictionary skinDict = Application.LoadComponent(skinDictionaryUri) as ResourceDictionary;

			Collection<ResourceDictionary> mergedDicts = base.Resources.MergedDictionaries;

			// Remove the existing skin dictionary, if one exists.
			// NOTE: In a real application, this logic might need
			// to be more complex, because there might be dictionaries
			// which should not be removed.
			if (mergedDicts.Count > 0)
				mergedDicts.Clear();

			// Apply the selected skin so that all elements in the
			// application will honor the new look and feel.
			mergedDicts.Add(skinDict);
		}
	}
}
ResourceDictionary skinDict = Application.LoadComponent(skinDictionaryUri) as ResourceDictionary这行代码是用于加载位于指定统一资源标识符 (URI) 处的 XAML 文件,并将其转换为由该 XAML 文件的根元素指定的对象的实例,也就是将每一个MenuItem的Tag中标识的路径下的XAML文件的根元素指定的对象的实例获取到。我们获取到了该ResourceDictionary 接下来我们就需要将该ResourceDictionary 加载到Appliciton的MergedDictionaries(获取 System.Windows.ResourceDictionary 字典的集合,这些字典构成了合并的字典中的各种资源字典。)下面,通过Collection<ResourceDictionary> mergedDicts = base.Resources.MergedDictionaries;我们能够获取到当前Application级别下所有的资源字典,这里需要注意的就是在我们将新的ResourceDictionary 添加到mergedDicts 下面之前,我们需要先清除掉原来里面的内容,这是因为我们的
每一个xaml文件中使用的key都是相同的,为了避免混淆,所以首先清除掉原来的内容,其实每一次加载的时候即使有相同的key值编译器也只会默认加载最后面的一个,但是我们的操作会不断重复操作,所以mergedDicts 里面的内容会越加越多,所以这在程序中是一种不合理的方式。
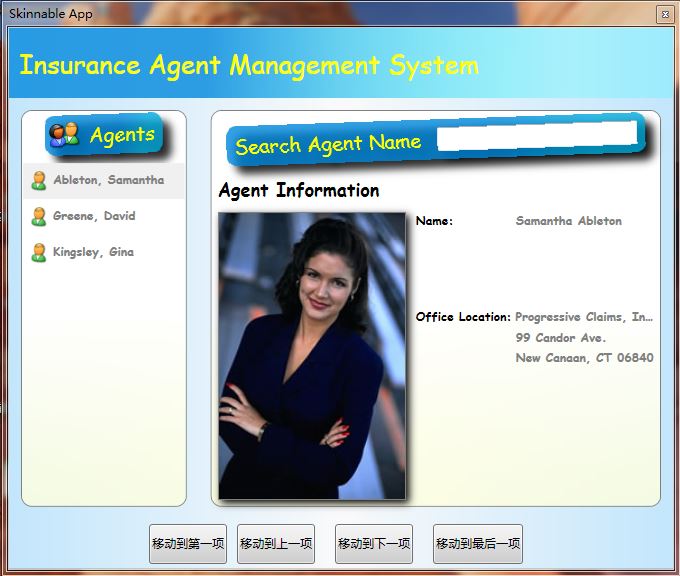
在清除完毕之后,将我们的新的xaml文件作为ResourceDictionary 添加到里面去。这样我们的MainWindow.xaml就会查找到这些相关的内容。下面贴出相关的代码以及换肤后的图片内容。
MainWindow.xaml文件:
<Window
  x:Class="SkinnableApp.MainWindow"
  xmlns="http://schemas.microsoft.com/winfx/2006/xaml/presentation"
  xmlns:x="http://schemas.microsoft.com/winfx/2006/xaml"
  xmlns:scm="clr-namespace:System.ComponentModel;assembly=WindowsBase"
  xmlns:local="clr-namespace:SkinnableApp"
  SizeToContent="Height"
  ResizeMode="NoResize"
  Title="Skinnable App"
  Width="680"
  WindowStartupLocation="CenterScreen"
  WindowStyle="ToolWindow">
  <Grid x:Name="Root" Style="{DynamicResource styleBackground}">
    <Grid.RowDefinitions>
      <RowDefinition Height="Auto" />
      <RowDefinition Height="*" />
      <RowDefinition Height="50" />
        </Grid.RowDefinitions>
    <Grid.ColumnDefinitions>
      <ColumnDefinition Width="*" />
      <ColumnDefinition Width="2.5*" />
    </Grid.ColumnDefinitions>
    <!-- CONTEXT MENU -->
    <Grid.ContextMenu>
      <ContextMenu MenuItem.Click="OnMenuItemClick">
        <MenuItem Tag=".ResourcesSkinsBlackSkin.xaml" IsChecked="True">
          <MenuItem.Header>
            <Rectangle Width="120" Height="40" Fill="Black" />
          </MenuItem.Header>
        </MenuItem>
        <MenuItem Tag=".ResourcesSkinsGreenSkin.xaml">
          <MenuItem.Header>
            <Rectangle Width="120" Height="40" Fill="Green" />
          </MenuItem.Header>
        </MenuItem>
        <MenuItem Tag=".ResourcesSkinsBlueSkin.xaml">
          <MenuItem.Header>
            <Rectangle Width="120" Height="40" Fill="Blue" />
          </MenuItem.Header>
        </MenuItem>
      </ContextMenu>
    </Grid.ContextMenu>

    <!-- AGENTS DATA SOURCE -->
    <Grid.DataContext>
      <CollectionViewSource>
        <CollectionViewSource.Source>
          <XmlDataProvider Source=".ResourcesDataagents.xml" XPath="Agents/Agent" />
        </CollectionViewSource.Source>
        <CollectionViewSource.SortDescriptions>
          <scm:SortDescription PropertyName="Name/Last" />
          <scm:SortDescription PropertyName="Name/First" />
        </CollectionViewSource.SortDescriptions>
      </CollectionViewSource>
    </Grid.DataContext>

    <!-- BANNER -->
    <Grid Grid.ColumnSpan="2" Height="70" Style="{DynamicResource styleBanner}" >
      <TextBlock FontSize="26" Padding="10,0,10,0" Text="Insurance Agent Management System" VerticalAlignment="Center"/>
    </Grid>

    <!-- AGENT SELECTOR -->
    <local:AgentSelectorControl  Grid.Row="1" Grid.Column="0"/>
    <!-- AGENT DETAILS -->
    <local:AgentDetailsControl   Grid.Row="1" Grid.Column="1"/>
        <StackPanel Height="40"  Orientation="Horizontal" Grid.Row="2" Grid.Column="0" Grid.ColumnSpan="2" HorizontalAlignment="Center" VerticalAlignment="Center">
            <Button Content="移动到第一项" Click="MoveToFirstItem"></Button>
            <Button Content="移动到上一项" Click="MoveToForwardItem" Margin="10,0,10,0"></Button>
            <Button Content="移动到下一项" Click="MoveToNextItem" Margin="10,0,10,0"></Button>
            <Button Content="移动到最后一项" Click="MoveToLastItem" Margin="10,0,10,0"></Button>
        </StackPanel>
    </Grid>
</Window>
这里列举其中的一种皮肤的样式:BlueSkin.xaml
<ResourceDictionary
  xmlns="http://schemas.microsoft.com/winfx/2006/xaml/presentation"
  xmlns:x="http://schemas.microsoft.com/winfx/2006/xaml" >
  <ResourceDictionary.MergedDictionaries>
    <ResourceDictionary Source=".BaseSkin.xaml" />
  </ResourceDictionary.MergedDictionaries>

  <!-- Background Style -->
  <Style x:Key="styleBackground">
    <Setter Property="Control.Background">
      <Setter.Value>
        <LinearGradientBrush StartPoint="0,0.5" EndPoint="1,0.5" Opacity="0.5">
          <GradientStop Color="LightSkyBlue" Offset="0" />
          <GradientStop Color="WhiteSmoke" Offset="0.5" />
          <GradientStop Color="LightSkyBlue" Offset="1" />
        </LinearGradientBrush>
      </Setter.Value>
    </Setter>
  </Style>

  <!-- Banner Style -->
  <Style x:Key="styleBanner">
    <Setter Property="StackPanel.Background">
      <Setter.Value>
        <LinearGradientBrush StartPoint="0,0.25" EndPoint="1,0.5">
          <GradientStop Color="#CC0088DD" Offset="0.3" />
          <GradientStop Color="#3300FFFF" Offset="0.85" />
        </LinearGradientBrush>
      </Setter.Value>
    </Setter>
    <Setter Property="TextBlock.Foreground" Value="Yellow" />
    <Setter Property="TextBlock.FontFamily" Value="Comic Sans MS" />
  </Style>

  <!-- Content Area Style -->
  <Style x:Key="styleContentArea" BasedOn="{StaticResource styleContentArea_Base}">
    <Setter Property="Border.Background">
      <Setter.Value>
        <LinearGradientBrush StartPoint="0.5,0" EndPoint="0.5,1">
          <GradientStop Color="#FFFFFFFF" Offset="0.5" />
          <GradientStop Color="#CCFFFFDD" Offset="1" />
        </LinearGradientBrush>
      </Setter.Value>
    </Setter>
    <Setter Property="Border.BorderBrush" Value="Gray" />
    <Setter Property="TextBlock.FontFamily" Value="Comic Sans MS" />
  </Style>

  <!-- Content Area Header Brush -->
  <LinearGradientBrush x:Key="contentAreaHeaderBrush" StartPoint="0.5,0" EndPoint="1,0.5">
    <GradientStop Color="#CC0088DD" Offset="0.3" />
    <GradientStop Color="#CC00AADD" Offset="0.75" />
  </LinearGradientBrush>

  <!-- Content Area Header Style -->
  <Style x:Key="styleContentAreaHeader" BasedOn="{StaticResource styleContentAreaHeader_Base}">
    <Setter Property="Border.Background" Value="{StaticResource contentAreaHeaderBrush}" />
    <Setter Property="TextBlock.Foreground" Value="Yellow" />
    <Setter Property="FrameworkElement.BitmapEffect">
      <Setter.Value>
        <DropShadowBitmapEffect ShadowDepth="12" />
      </Setter.Value>
    </Setter>
    <Setter Property="FrameworkElement.LayoutTransform">
      <Setter.Value>
        <RotateTransform Angle="-2" />
      </Setter.Value>
    </Setter>
  </Style>

  <!-- Agent Image Border Style -->
  <Style x:Key="styleAgentImageBorder" TargetType="Border" BasedOn="{StaticResource styleAgentImageBorder_Base}">
    <Setter Property="BitmapEffect">
      <Setter.Value>
        <DropShadowBitmapEffect />
      </Setter.Value>
    </Setter>
    <Setter Property="BorderBrush" Value="Gray" />
    <Setter Property="BorderThickness" Value="1" />
  </Style>

</ResourceDictionary>
下面贴出几更换皮肤的图片。