GoogLeNet
GoogLeNet和vgg分别是2014的ImageNet挑战赛的冠亚军.GoogLeNet则做了更加大胆的网络结构尝试,虽然深度只有22层,但大小却比AlexNet和VGG小很多,GoogleNet参数为500万个,AlexNet参数个数是GoogleNet的12倍,VGGNet参数又是AlexNet的3倍,因此在内存或计算资源有限时,GoogleNet是比较好的选择;从模型结果来看,GoogLeNet的性能却更加优越。
之前转过一篇文章,详细描述了GoogLeNet的演化,有兴趣的可以去看看:https://www.cnblogs.com/sdu20112013/p/11308388.html
基本结构Inception
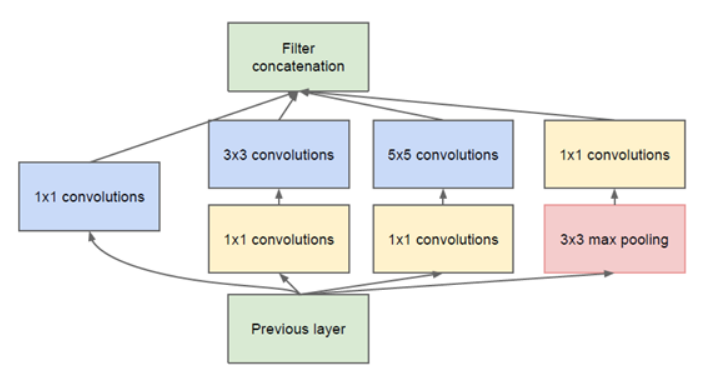
GoogleNet的基础结构叫Inception.如下所示:

这个结构的好处主要是:
- 增加了网络宽度(增加了每一层的神卷积核的数量),提高了模型学习的能力.
- 使用了不同大小的卷积核,增加了对不同模式的特征的提取能力.也增强了模型对不同尺度的适应性.
Inception中3x3和5x5之前的1x1主要用于降低channel维度数量,减少计算量.
这个结构中的每一个通路的卷积核的数量是超参数,可调的.
那么,我们定义inception结构
class Inception(nn.Module):
    def __init__(self,in_c,c1,c2,c3,c4):
        super(Inception, self).__init__()
        self.branch1 = nn.Conv2d(in_c,c1,kernel_size=1)

        self.branch2_1 = nn.Conv2d(in_c,c2[0],kernel_size=1)
        self.branch2_2 = nn.Conv2d(c2[0],c2[1],kernel_size=3,padding=1)

        self.branch3_1 = nn.Conv2d(in_c,c3[0],kernel_size=1)
        self.branch3_2 = nn.Conv2d(c3[0],c3[1],kernel_size=5,padding=2)

        self.branch4_1 = nn.MaxPool2d(kernel_size=3, stride=1, padding=1)
        self.branch4_2 = nn.Conv2d(in_c,c4,kernel_size=1)

    def forward(self,x):
        o1 = self.branch1(x)
        o1 = F.relu(o1)
        print("o1:",o1.shape)

        o2 = self.branch2_1(x)
        o2 = F.relu(o2)
        o2 = self.branch2_2(o2)
        o2 = F.relu(o2)
        print("o2:",o2.shape)

        o3 = self.branch3_1(x)
        o3 = F.relu(o3)
        o3 = self.branch3_2(o3)
        o3 = F.relu(o3)
        print("o3:",o3.shape)

        o4 = self.branch4_1(x)
        o4 = self.branch4_2(o4)
        o4 = F.relu(o4)
        print("o4:",o4.shape)

        concat = torch.cat((o1,o2,o3,o4),dim=1)
        print("concat:",concat.shape)

        return concat
如前所示,inception分为4个分支.每个分支的卷积核的数量是可调的参数.
GoogLeNet完整结构
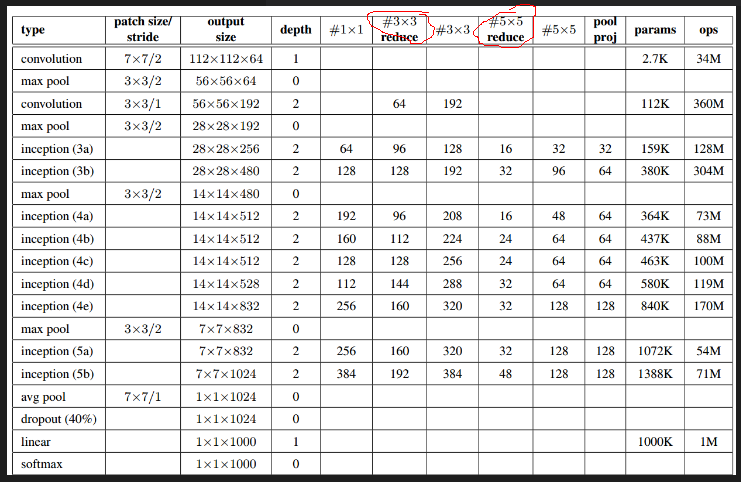
我们根据论文里的结构来实现GoogleNet.

上图里的红圈处代表的即3x3或5x5卷积之前的用于降维的1x1卷积.
第一层是普通卷积,64组卷积核,卷积核大小7x7,stride=2.池化层窗口大小为3x3,stride=2.
第二层是先做1x1卷积,再做3x3卷积.
可写出以下代码:
X = torch.randn((1,1,224,224))
conv1 = nn.Conv2d(1,64,kernel_size=7,stride=2,padding=3)
max_pool1 = nn.MaxPool2d(kernel_size=3,stride=2,padding=1)
o=conv1(X)
print(o.shape) #[1,64,112,112]
o=max_pool1(o)
print(o.shape) #[1,64,56,56]

conv2_1 = nn.Conv2d(64,64,kernel_size=1)
conv2_2 = nn.Conv2d(64,192,kernel_size=3,stride=1,padding=1)
max_pool2 = nn.MaxPool2d(kernel_size=3,stride=2,padding=1)
o=conv2_1(o)
print(o.shape) #[1,64,56,56]
o=conv2_2(o)
print(o.shape) #[1,192,56,56]
o=max_pool2(o)
print(o.shape) #[1,192,28,28]
接下来是第一个inception结构.
inception_3a = Inception(192,64,(96,128),(16,32),32)
o=inception_3a(o)
print(o.shape)
输出
o1: torch.Size([1, 64, 28, 28])
o2: torch.Size([1, 128, 28, 28])
o3: torch.Size([1, 32, 28, 28])
o4: torch.Size([1, 32, 28, 28])
concat: torch.Size([1, 256, 28, 28])
torch.Size([1, 256, 28, 28])
依次类推,最终我们可以给出模型定义:
class GoogLeNet(nn.Module):
    def __init__(self):
        super(GoogLeNet,self).__init__()
        self.conv1 = nn.Sequential(
            nn.Conv2d(1,64,kernel_size=7,stride=2,padding=3),
            nn.ReLU(),
            nn.MaxPool2d(kernel_size=3,stride=2,padding=1),
        )

        self.conv2 = nn.Sequential(
            nn.Conv2d(64,64,kernel_size=1),
            nn.ReLU(),
            nn.Conv2d(64,192,kernel_size=3,padding=1),
            nn.ReLU(),
            nn.MaxPool2d(kernel_size=3,stride=2,padding=1),
        )

        self.inception_3a = Inception(192,64,(96,128),(16,32),32)
        self.inception_3b = Inception(256,128,(128,192),(32,96),64)
        self.max_pool3 = nn.MaxPool2d(kernel_size=3,stride=2,padding=1)

        self.inception_4a = Inception(480,192,(96,208),(16,48),64)
        self.inception_4b = Inception(512,160,(112,224),(24,64),64)
        self.inception_4c = Inception(512,128,(128,256),(24,64),64)
        self.inception_4d = Inception(512,112,(144,288),(32,64),64)
        self.inception_4e = Inception(528,256,(160,320),(32,128),128)
        self.max_pool4 = nn.MaxPool2d(kernel_size=3,stride=2,padding=1)

        self.inception_5a = Inception(832,256,(160,320),(32,128),128)
        self.inception_5b = Inception(832,384,(192,384),(48,128),128)

        self.avg_pool = nn.AvgPool2d(kernel_size=7)
        self.dropout = nn.Dropout(p=0.4)

        self.fc = nn.Linear(1024,10,bias=True)

    def forward(self,x):
        feature = self.conv1(x)
        feature = self.conv2(feature)

        feature = self.inception_3a(feature)
        feature = self.inception_3b(feature)
        feature = self.max_pool3(feature)

        feature = self.inception_4a(feature)
        feature = self.inception_4b(feature)
        feature = self.inception_4c(feature)
        feature = self.inception_4d(feature)
        feature = self.inception_4e(feature)
        feature = self.max_pool4(feature)

        feature = self.inception_5a(feature)
        feature = self.inception_5b(feature)

        feature = self.avg_pool(feature)
        feature = self.dropout(feature)

        out = self.fc(feature.view(x.shape[0],-1))

        return out
测试一下输出
X=torch.randn((1,1,224,224))
net = GoogLeNet()
# for name,module in net.named_children():
#     X=module(X)
#     print(name,X.shape)

out = net(X)
print(out.shape)
输出
torch.Size([1, 10])
上面的代码只是看起来复杂,其实对着前面图里描述的GoogleNet结构实现起来并不难.比如先写出
class GoogLeNet(nn.Module):
    def __init__(self):
        super(GoogLeNet,self).__init__()
        self.conv1 = nn.Sequential(
            nn.Conv2d(1,64,kernel_size=7,stride=2,padding=3),
            nn.ReLU(),
            nn.MaxPool2d(kernel_size=3,stride=2,padding=1),
        )
然后用
X=torch.randn((1,1,224,224))
net = GoogLeNet()
for name,module in net.named_children():
    X=module(X)
    print(name,X.shape)
测试一下输出,如果不对,就调整代码,看看是kernel_size,padding还是哪里写错了.如果正确就继续扩展代码为
class GoogLeNet(nn.Module):
    def __init__(self):
        super(GoogLeNet,self).__init__()
        self.conv1 = nn.Sequential(
            nn.Conv2d(1,64,kernel_size=7,stride=2,padding=3),
            nn.ReLU(),
            nn.MaxPool2d(kernel_size=3,stride=2,padding=1),
        )

        self.conv2 = nn.Sequential(
            nn.Conv2d(64,64,kernel_size=1),
            nn.ReLU(),
            nn.Conv2d(64,192,kernel_size=3,padding=1),
            nn.ReLU(),
            nn.MaxPool2d(kernel_size=3,stride=2,padding=1),
        )
再次测试输出的shape,如此,一层层layer添加下去,最终就可以完成整个模型的定义.
加载数据
batch_size,num_workers=16,4
train_iter,test_iter = learntorch_utils.load_data(batch_size,num_workers,resize=224)
定义模型
net = GoogLeNet().cuda()
print(net)
定义损失函数
loss = nn.CrossEntropyLoss()
定义优化器
opt = torch.optim.Adam(net.parameters(),lr=0.001)
定义评估函数
def test():
    start = time.time()
    acc_sum = 0
    batch = 0
    for X,y in test_iter:
        X,y = X.cuda(),y.cuda()
        y_hat = net(X)
        acc_sum += (y_hat.argmax(dim=1) == y).float().sum().item()
        batch += 1
    #print('acc_sum %d,batch %d' % (acc_sum,batch))

    acc = 1.0*acc_sum/(batch*batch_size)
    end = time.time()
    print('acc %3f,test for test dataset:time %d' % (acc,end - start))

    return acc
训练
num_epochs = 3
save_to_disk = False
def train():
    for epoch in range(num_epochs):
        train_l_sum,batch,acc_sum = 0,0,0
        start = time.time()
        for X,y in train_iter:
            # start_batch_begin = time.time()
            X,y = X.cuda(),y.cuda()
            y_hat = net(X)
            acc_sum += (y_hat.argmax(dim=1) == y).float().sum().item()

            l = loss(y_hat,y)
            opt.zero_grad()
            l.backward()

            opt.step()
            train_l_sum += l.item()

            batch += 1

            mean_loss = train_l_sum/(batch*batch_size) #计算平均到每张图片的loss
            start_batch_end = time.time()
            time_batch = start_batch_end - start

            train_acc = acc_sum/(batch*batch_size)
            if batch % 100 == 0:
                print('epoch %d,batch %d,train_loss %.3f,train_acc:%.3f,time %.3f' %
                    (epoch,batch,mean_loss,train_acc,time_batch))

            if save_to_disk and batch % 1000 == 0:
                model_state = net.state_dict()
                model_name = 'nin_epoch_%d_batch_%d_acc_%.2f.pt' % (epoch,batch,train_acc)
                torch.save(model_state,model_name)

        print('***************************************')
        mean_loss = train_l_sum/(batch*batch_size) #计算平均到每张图片的loss
        train_acc = acc_sum/(batch*batch_size)     #计算训练准确率
        test_acc = test()                           #计算测试准确率
        end = time.time()
        time_per_epoch =  end - start
        print('epoch %d,train_loss %f,train_acc %f,test_acc %f,time %f' %
                (epoch + 1,mean_loss,train_acc,test_acc,time_per_epoch))

train()
实验发现googlenet收敛比较慢.可能和全连接层用全局平均池化取代有关.因为用全局平均池化的话,相当于在全局平均池化之前,提取到的特征就是有高级语义的了,每一个feature map就代表了一个类别,所以前面负责特征提取的卷积部分就需要提取出更高级的特征.所以收敛会变慢.