centos7 ssh默认为openssh7.4p1版本:
[root@localhost ~]# cat /etc/redhat-release
CentOS Linux release 7.6.1810 (Core)
[root@localhost ~]#
[root@localhost ~]# ssh -V
OpenSSH_7.4p1, OpenSSL 1.0.2k-fips  26 Jan 2017
[root@localhost ~]#
一、安装telnet服务
1.为了防止ssh连接失败无法登录到主机,先安装一个telnet
yum install -y telnet-server xinetd
2.运行telnet服务
systemctl enable xinetd.service
systemctl enable telnet.socket
systemctl start telnet.socket
systemctl start xinetd.service
3.默认情况下,系统是不允许root用户telnet远程登录的。如果要使用root用户直接登录,需设置如下内容:
echo -e 'pts/0
pts/1
pts/2
pts/3'  >>/etc/securetty
4.重启telnet服务
systemctl restart xinetd.service
5.测试
可以停止sshd服务或者杀掉sshd进程,远程终端将无法连接主机,可以使用telnet ip连接,则配置成功.
systemctl stop sshd.service
telnet ip
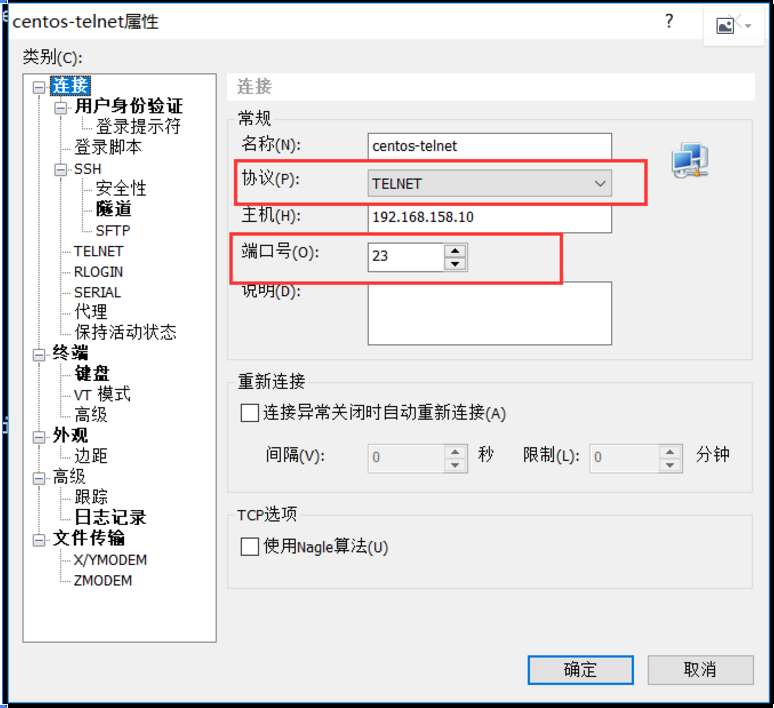
也可以使用xshell连接,修改协议为telnet,端口改为23端口,如图配置.
二、安装依赖包
1.切换到telnet方式登录,以后的操作都在telnet终端下操作,防止ssh连接意外中断造成升级失败.
2.升级需要几个组件,有些是和编译相关的等
# yum install -y gcc gcc-c++ glibc make autoconf openssl openssl-devel pcre-devel pam-devel
3.安装pam和zlib等.
# yum install -y pam* zlib*
三、下载openssh包和openssl的包
openssh下载地址:
https://openbsd.hk/pub/OpenBSD/OpenSSH/portable/
openssl下载地址:
https://ftp.openssl.org/source/
此处我下载的是新的版本,分别是:
openssh-8.0p1.tar.gz
openssl-1.0.2r.tar.gz
四、开始安装 openssl:
1.开始安装openssl,把安装包上传至/root/soft目录下,并解压.
[root@localhost soft]# tar xfz openssl-1.0.2r.tar.gz
现在是系统默认的版本,等会升级完毕对比下
[root@localhost soft]# openssl version
OpenSSL 1.0.2k-fips  26 Jan 2017
2.备份下面2个文件或目录(如果存在的话就执行)
[root@localhost soft]# ll /usr/bin/openssl
-rwxr-xr-x. 1 root root 555288 Aug  9 09:38 /usr/bin/openssl
[root@localhost soft]#
[root@localhost soft]# mv /usr/bin/openssl /usr/bin/openssl_bak
[root@localhost soft]#
[root@localhost soft]# ll /usr/include/openssl
total 1864
-rw-r--r--. 1 root root   6146 Aug  9 09:38 aes.h
-rw-r--r--. 1 root root  63204 Aug  9 09:38 asn1.h
-rw-r--r--. 1 root root  24435 Aug  9 09:38 asn1_mac.h
-rw-r--r--. 1 root root  34475 Aug  9 09:38 asn1t.h
...
[root@localhost soft]#
[root@localhost soft]# mv /usr/include/openssl /usr/include/openssl_bak
[root@localhost soft]#
3.编译安装新版本的openssl
[root@localhost soft]# cd openssl-1.0.2r
[root@localhost openssl-1.0.2r]# ./config shared && make && make install

以上命令执行完毕,echo $?查看下最后的make install是否有报错,0表示没有问题
[root@localhost openssl-1.0.2r]# echo $?
0
[root@localhost openssl-1.0.2r]#
4.下面2个文件或者目录做软链接
[root@localhost openssl-1.0.2r]# ln -s /usr/local/ssl/bin/openssl /usr/bin/openssl
[root@localhost openssl-1.0.2r]# ln -s /usr/local/ssl/include/openssl /usr/include/openssl
[root@localhost openssl-1.0.2r]# ll /usr/bin/openssl
lrwxrwxrwx. 1 root root 26 Oct 31 23:14 /usr/bin/openssl -> /usr/local/ssl/bin/openssl
[root@localhost openssl-1.0.2r]# ll /usr/include/openssl -ld
lrwxrwxrwx. 1 root root 30 Oct 31 23:14 /usr/include/openssl -> /usr/local/ssl/include/openssl
[root@localhost openssl-1.0.2r]#
5.命令行执行下面2个命令加载新配置
[root@localhost openssl-1.0.2r]# echo "/usr/local/ssl/lib" >> /etc/ld.so.conf
[root@localhost openssl-1.0.2r]# /sbin/ldconfig
6.查看确认版本,没问题
[root@localhost openssl-1.0.2r]# openssl version
OpenSSL 1.0.2r  26 Feb 2019
五、安装openssh
1.上传并解压openssh
[root@localhost soft]# tar xfz openssh-8.0p1.tar.gz
[root@localhost soft]# cd openssh-8.0p1
[root@localhost openssh-8.0p1]# chown -R root.root /root/soft/openssh-8.0p1
2.命令行删除原先ssh的配置文件和目录,然后配置、编译、安装
[root@localhost openssh-8.0p1]# rm -rf /etc/ssh/*
[root@localhost openssh-8.0p1]# ./configure --prefix=/usr/ --sysconfdir=/etc/ssh  --with-openssl-includes=/usr/local/ssl/include
 --with-ssl-dir=/usr/local/ssl   --with-zlib   --with-md5-passwords   --with-pam  && make && make install
[root@localhost openssh-8.0p1]# echo $?
0
[root@localhost openssh-8.0p1]#
3.安装完成后,需要对配置进行修改,不然可能会遇到root登录不上去的情况.最终添加如下两个内容,其他的不要动
[root@localhost ~]# grep "^PermitRootLogin"  /etc/ssh/sshd_config
PermitRootLogin yes
[root@localhost ~]# grep  "UseDNS"  /etc/ssh/sshd_config
UseDNS no
[root@localhost ~]#
4.从原先的解压的包中拷贝一些文件到目标位置(如果目标目录存在就覆盖)
[root@localhost openssh-8.0p1]# cp -a contrib/redhat/sshd.init /etc/init.d/sshd
[root@localhost openssh-8.0p1]# cp -a contrib/redhat/sshd.pam /etc/pam.d/sshd.pam
[root@localhost openssh-8.0p1]# chmod +x /etc/init.d/sshd
[root@localhost openssh-8.0p1]# chkconfig --add sshd
[root@localhost openssh-8.0p1]# systemctl enable sshd

 #把原先的systemd管理的sshd文件删除或者移走或者删除,不移走的话影响我们重启sshd服务
[root@localhost openssh-8.0p1]# mv  /usr/lib/systemd/system/sshd.service  /tmp/
5.设置sshd服务开机启动
[root@localhost openssh-8.0p1]# chkconfig sshd on
Note: Forwarding request to 'systemctl enable sshd.socket'.
Created symlink from /etc/systemd/system/sockets.target.wants/sshd.socket to /usr/lib/systemd/system/sshd.socket.

[root@localhost openssh-8.0p1]# systemctl restart sshd.service
[root@localhost openssh-8.0p1]# netstat -lntp
Active Internet connections (only servers)
Proto Recv-Q Send-Q Local Address           Foreign Address         State       PID/Program name
tcp        0      0 0.0.0.0:111             0.0.0.0:*               LISTEN      1/systemd
tcp        0      0 0.0.0.0:20048           0.0.0.0:*               LISTEN      6139/rpc.mountd
tcp        0      0 0.0.0.0:41811           0.0.0.0:*               LISTEN      -
tcp        0      0 0.0.0.0:22              0.0.0.0:*               LISTEN      1869/sshd
tcp        0      0 0.0.0.0:46303           0.0.0.0:*               LISTEN      6108/rpc.statd
tcp        0      0 0.0.0.0:2049            0.0.0.0:*               LISTEN      -
[root@localhost openssh-8.0p1]#
6.测试版本.都正常
[root@localhost openssh-8.0p1]# ssh -V
OpenSSH_8.0p1, OpenSSL 1.0.2r  26 Feb 2019
7.测试没问题后可以把telnet服务关闭了
[root@localhost ~]# systemctl disable xinetd.service
[root@localhost ~]# systemctl stop xinetd.service
[root@localhost ~]# systemctl disable telnet.socket
Removed symlink /etc/systemd/system/sockets.target.wants/telnet.socket.
[root@localhost ~]# systemctl stop telnet.socket
[root@localhost ~]# netstat -lntp
Active Internet connections (only servers)
Proto Recv-Q Send-Q Local Address           Foreign Address         State       PID/Program name
tcp        0      0 0.0.0.0:111             0.0.0.0:*               LISTEN      1/systemd
tcp6       0      0 :::3306                 :::*                    LISTEN      3798/mysqld
tcp6       0      0 :::111                  :::*                    LISTEN      1/systemd
tcp6       0      0 :::22                   :::*                    LISTEN      1/systemd
[root@localhost ~]#
一键脚本安装如下:


#!/bin/bash
# script openssh-update.sh

# Check if user is root
if [ $(id -u) != "0" ]; then
    echo "Error: You must be root to run this script!!"
    exit 1
fi

#下载安装包:
openssh="openssh-8.0p1"
openssl="openssl-1.0.2r"

#Download the installation package
if [ ! -f ${openssh}.tar.gz ]
then
  wget -c https://openbsd.hk/pub/OpenBSD/OpenSSH/portable/${openssh}.tar.gz
else
  echo 'Skipping: openssh already downloaded'
fi

if [ ! -f ${openssl}.tar.gz ]
then
  wget -c wget https://ftp.openssl.org/source/old/1.0.2/${openssl}.tar.gz
else
  echo 'Skipping:  openssl already downloaded'
fi
#
dir=$(cd $(dirname "$0");pwd)

#安装依赖包
yum install -y telnet-server xinetd
yum install  -y gcc gcc-c++ glibc make autoconf openssl openssl-devel pcre-devel  pam-devel
yum install  -y pam* zlib*

systemctl enable xinetd.service
systemctl enable telnet.socket
systemctl start telnet.socket
systemctl start xinetd.service

echo -e 'pts/0
pts/1
pts/2
pts/3'  >>/etc/securetty

systemctl restart xinetd.service
echo "telnet 启动成功"
sleep 3
echo "########################################################"

tar xfz openssl-1.0.2r.tar.gz
echo "备份OpenSSL..."
mv /usr/bin/openssl /usr/bin/openssl_bak
mv /usr/include/openssl /usr/include/openssl_bak

echo "开始安装OpenSSL..."
sleep 3
cd openssl-1.0.2r
./config shared && make && make install

[ $? -eq 0 ] && echo "openssl安装成功..."

ln -s /usr/local/ssl/bin/openssl /usr/bin/openssl
ln -s /usr/local/ssl/include/openssl /usr/include/openssl
echo "加载动态库..."
echo "/usr/local/ssl/lib" >> /etc/ld.so.conf
/sbin/ldconfig
echo "查看确认版本。。。"
openssl version
echo "OpenSSL 升级完成..."
echo "开始升级OPENSSH。。。。。"
sleep 5
cd $dir
/usr/bin/tar -zxvf openssh-8.0p1.tar.gz
cd openssh-8.0p1
chown -R root.root openssh-8.0p1
./configure --prefix=/usr/ --sysconfdir=/etc/ssh  --with-openssl-includes=/usr/local/ssl/include
 --with-ssl-dir=/usr/local/ssl   --with-zlib   --with-md5-passwords   --with-pam  && make && make install

[ $? -eq 0] && echo "openssh 升级成功..."
cp -a contrib/redhat/sshd.init /etc/init.d/sshd
cp -a contrib/redhat/sshd.pam /etc/pam.d/sshd.pam
chmod +x /etc/init.d/sshd
systemctl enable sshd

#[ $? -eq 0] && echo "sshd服务添加为启动项 ..."

mv  /usr/lib/systemd/system/sshd.service  /tmp/
systemctl restart sshd.service
netstat -lntp
echo "查看SSH版本信息。。。"
ssh -V
sleep 3
echo "telnet服务关闭..."
systemctl disable xinetd.service
systemctl stop xinetd.service
systemctl disable telnet.socket
systemctl stop telnet.socket
echo "所有服务升级完成,进行堡垒机连接测试..."
sleep 3
exit
#!/bin/bash

# Check if user is root
if [ $(id -u) != "0" ]; then
    echo "Error: You must be root to run this script!!"
    exit 1
fi

#下载安装包:
openssh="openssh-8.0p1"
openssl="openssl-1.0.2r"

#Download the installation package
if [ ! -f ${openssh}.tar.gz ]
then
  wget -c https://openbsd.hk/pub/OpenBSD/OpenSSH/portable/${openssh}.tar.gz
else
  echo 'Skipping: openssh already downloaded'
fi

if [ ! -f ${openssl}.tar.gz ]
then
  wget -c wget https://ftp.openssl.org/source/old/1.0.2/${openssl}.tar.gz
else
  echo 'Skipping:  openssl already downloaded'
fi
#
dir=$(cd $(dirname "$0");pwd)

#安装依赖包
yum install -y telnet-server xinetd
yum install  -y gcc gcc-c++ glibc make autoconf openssl openssl-devel pcre-devel  pam-devel
yum install  -y pam* zlib*

systemctl enable xinetd.service
systemctl enable telnet.socket
systemctl start telnet.socket
systemctl start xinetd.service

echo -e 'pts/0
pts/1
pts/2
pts/3'  >>/etc/securetty

systemctl restart xinetd.service
echo "telnet 启动成功"
sleep 3
echo "########################################################"

tar xfz openssl-1.0.2r.tar.gz
echo "备份OpenSSL..."
mv /usr/bin/openssl /usr/bin/openssl_bak
mv /usr/include/openssl /usr/include/openssl_bak

echo "开始安装OpenSSL..."
sleep 3
cd openssl-1.0.2r
./config --prefix=/usr/ shared && make && make install

[ $? -eq 0 ] && echo "openssl编译安装成功!!!"

ln -s /usr/local/ssl/bin/openssl /usr/bin/openssl
ln -s /usr/local/ssl/include/openssl /usr/include/openssl
echo "加载动态库..."
echo "/usr/local/ssl/lib" >> /etc/ld.so.conf
/sbin/ldconfig
echo "查看确认版本。。。"
openssl version
echo "OpenSSL 升级完成..."
echo "开始升级OPENSSH。。。。。"
sleep 5
cd $dir
/usr/bin/tar -zxvf openssh-8.0p1.tar.gz
cd openssh-8.0p1
chown -R root.root openssh-8.0p1
rm -rf /etc/ssh/*
chmod 600 /etc/ssh/ssh_host_*
install -v -m755 contrib/ssh-copy-id /usr/bin
install -v -m644 contrib/ssh-copy-id.1 /usr/share/man/man1
install -v -m755 -d /usr/share/doc/openssh-8.0p1
install -v -m644 INSTALL LICENCE OVERVIEW README* /usr/share/doc/openssh-8.0p1

#编译安装
./configure --prefix=/usr/ --sysconfdir=/etc/ssh
 --with-ssl-dir=/usr/local/ssl   --with-zlib   --with-md5-passwords   --with-pam  && make && make install

[ $? -eq 0 ] && echo "openssh 编译安装成功..."

cp -a contrib/redhat/sshd.init /etc/init.d/sshd
cp -a contrib/redhat/sshd.pam /etc/pam.d/sshd.pam

#更改配置文件
echo 'UsePAM yes' >> /etc/ssh/sshd_config
echo 'PermitRootLogin yes' >> /etc/ssh/sshd_config
chmod +x /etc/init.d/sshd
systemctl daemon-reload
systemctl enable sshd.socket
systemctl enable sshd
mv  /usr/lib/systemd/system/sshd.service  /tmp/
systemctl restart sshd.service
netstat -lntp
echo "查看SSH版本信息。。。"
ssh -V
sleep 3
echo "telnet服务关闭..."
systemctl disable xinetd.service
systemctl stop xinetd.service
systemctl disable telnet.socket
systemctl stop telnet.socket
echo "所有服务升级完成,进行堡垒机连接测试..."
sleep 3
exit
#!/bin/bash
#date 2020/04/27

# Check if user is root
if [ $(id -u) != "0" ]; then
    echo "Error: You must be root to run this script!!"
    exit 1
fi

#下载安装包:
openssh="openssh-8.2p1"
openssl="openssl-1.1.1g"

#Download the installation package
if [ ! -f ${openssh}.tar.gz ]
then
  wget -c https://openbsd.hk/pub/OpenBSD/OpenSSH/portable/${openssh}.tar.gz
else
  echo 'Skipping: openssh already downloaded'
fi

if [ ! -f ${openssl}.tar.gz ]
then
  wget -c https://ftp.openssl.org/source/${openssl}.tar.gz
else
  echo 'Skipping:  openssl already downloaded'
fi

#
dir=$(cd $(dirname "$0");pwd)

#安装依赖包
yum install -y telnet-server xinetd
yum install  -y gcc gcc-c++ glibc make autoconf openssl openssl-devel pcre-devel  pam-devel zlib-devel
yum install  -y pam* zlib*

systemctl enable xinetd.service
systemctl enable telnet.socket
systemctl start telnet.socket
systemctl start xinetd.service

echo -e 'pts/0
pts/1
pts/2
pts/3'  >>/etc/securetty

systemctl restart xinetd.service
echo "telnet 启动成功"
sleep 3
echo "########################################################"

tar xfz ${openssl}.tar.gz
echo "备份OpenSSL..."
mv /usr/bin/openssl /usr/bin/openssl_bak
mv /usr/include/openssl /usr/include/openssl_bak

echo "开始安装OpenSSL..."
sleep 3
cd ${openssl}
./config --prefix=/usr shared && make && make install
[ $? -eq 0 ] && echo "openssl安装成功..."

echo "加载动态库..."
echo "/usr/local/ssl/lib" >> /etc/ld.so.conf
/sbin/ldconfig
echo "查看确认版本。。。"
openssl version
echo "OpenSSL 升级完成..."
echo "开始升级OPENSSH。。。。。"
sleep 5
cd $dir
/usr/bin/tar -zxvf ${openssh}.tar.gz
cd ${openssh}
chown -R root.root openssh*
rm -rf /etc/ssh/*
chmod 600 /etc/ssh/ssh_host_*
install -v -m755 contrib/ssh-copy-id /usr/bin
install -v -m644 contrib/ssh-copy-id.1 /usr/share/man/man1
install -v -m755 -d /usr/share/doc/openssh-8.2p1
install -v -m644 INSTALL LICENCE OVERVIEW README* /usr/share/doc/openssh-8.2p1

./configure --prefix=/usr/ --sysconfdir=/etc/ssh
 --with-ssl-dir=/usr/local/ssl   --with-zlib   --with-md5-passwords   --with-pam  && make && make install

cp -a contrib/redhat/sshd.init /etc/init.d/sshd
cp -a contrib/redhat/sshd.pam /etc/pam.d/sshd.pam

#更改配置文件
echo 'UsePAM yes' >> /etc/ssh/sshd_config
echo 'PermitRootLogin yes' >> /etc/ssh/sshd_config
chmod +x /etc/init.d/sshd
systemctl daemon-reload
systemctl enable sshd.socket
systemctl enable sshd
mv /usr/lib/systemd/system/sshd.service  /tmp/
chkconfig sshd on
systemctl restart sshd.service
netstat -lntp
echo "查看SSH版本信息。。。"
ssh -V
sleep 3
echo "telnet服务关闭..."
systemctl disable xinetd.service
systemctl stop xinetd.service
systemctl disable telnet.socket
systemctl stop telnet.socket
echo "所有服务升级完成,进行堡垒机连接测试..."
sleep 3
exit