所需的库有:
import numpy as np
from matplotlib import pyplot as plt
from tqdm import tqdm
1. 模型模板
class Module(object):
    def __init__(self) -> None:
        self.training = True

    def __call__(self, x: np.ndarray) -> np.ndarray:
        return self.forward(x)

    def forward(self, x: np.ndarray):
        ...

    def backward(self, dy: np.ndarray) -> np.ndarray:
        return dy

    def train(self):
        if 'training' in vars(self):
            self.training = True
        for attr in vars(self).values():
            if isinstance(attr, Module):
                Module.train()
                """递归调用train函数"""

    def eval(self):
        if 'training' in vars(self):
            self.training = False
        for attr in vars(self).values():
            if isinstance(attr, Module):
                Module.eval()
2. tensor
import numpy as np


class Tensor(np.ndarray): # 基于np.ndarray 添加新属性grad,并且可以添加自定义其他属性
    """Derived Class of np.ndarray."""
    def __init__(self, *args, **kwargs):
        self.grad = None


def tensor(shape):
    """Return a tensor with a normal Gaussian distribution."""
    return random(shape)


def from_array(arr):
    """Convert the input array-like to a tensor."""
    t = arr.view(Tensor)
    t.grad = None
    return t


def zeros(shape):
    """Return a new tensor of given shape, filled with zeros."""
    t = Tensor(shape)
    t.fill(0)
    return t


def ones(shape):
    """Return a new tensor of given shape, filled with ones."""
    t = Tensor(shape)
    t.fill(1)
    return t


def ones_like(tensor):
    """Return a new tensor with the same shape as the given tensor,
       filled with ones."""
    return ones(tensor.shape)


def random(shape, loc=0.0, scale=1):
    """Return a new tensor of given shape, from normal distribution."""
    return from_array(np.random.normal(loc=loc, scale=scale, size=shape))
3. 基于Module的线性层
class Linear(Module):
    def __init__(self, in_length: int, out_length: int):
        self.w = tensor((in_length+1, out_length))

    def forward(self, x):
        self.x = x
        return np.dot(x, self.w[1:]) + self.w[0]

    def backward(self, dy):
        self.w.grad = np.vstack((np.sum(dy, axis=0), np.dot(self.x.T, dy)))
        # 反向传播,先计算参数的本地grad然后再与后层传过来的dy相乘得到向后传播的新的grad
        return np.dot(dy, self.w[1:].T)
4. BatchNorm1d层
class BatchNorm1d(Module):
    def __init__(self, length: int, momentum: float=0.9):
        super(BatchNorm1d, self).__init__()

        self.running_mean = np.zeros((length,))
        self.running_var = np.zeros((length,))
        self.gamma = ones((length,))
        self.beta = zeros((length,))
        self.momentum = momentum
        self.eps = 1e-5

    def forward(self, x):
        if self.training:
            self.mean = np.mean(x, axis=0)
            self.var = np.var(x, axis=0)
            self.running_mean = self.momentum * self.running_mean + \
                                (1 - self.momentum) * self.mean
            self.running_var = self.momentum * self.running_var + \
                               (1 - self.momentum) * self.var
            self.x = (x - self.mean) / np.sqrt(self.var + self.eps)
        else:
            self.x = (x - self.running_mean) / np.sqrt(
                     self.running_var + self.eps)
        return self.gamma * self.x + self.beta

    def backward(self, dy):
        self.gamma.grad = np.sum(dy * self.x, axis = 0)
        self.beta.grad = np.sum(dy, axis = 0)
        N = dy.shape[0]
        dx = N * dy - np.sum(dy, axis=0) - self.x * np.sum(dy * self.x, axis=0)
        return dx / N / np.sqrt(self.var + self.eps)
5. ReLU层和Softmax层(激活函数层)
class ReLU(Module):
    def forward(self, x):
        self.x = x
        return np.maximum(x, 0)

    def backward(self, dy):
        return np.where(self.x>0, dy, 0)

class Softmax(Module):
    def forward(self, x):
        exps = np.exp(x)
        self.probs = exps/np.sum(exps, axis=1, keepdims=True)
        return self.probs

    def backward(self, dy):
        ret = []
        for i in range(dy.shape[0]): # 将一个batch一个个处理,然后拼接
            dout = np.dot(dy[i], np.diag(self.probs[i]) - np.outer(self.probs[i], self.probs[i]))
            ret.append(dout)
        return np.array(ret)
6. 损失函数
class Loss(object): # 先定义一个分类器的损失函数的基类
    def __init__(self, n_classes):
        self.n_classes = n_classes

    def __call__(self, probs, targets):
        self.probs = probs
        self.targets = targets
        return self

    def backward(self): # 需要重写
        ...

class CrossEntropyLoss(Loss):
    def __call__(self, probs, targets):
        super(CrossEntropyLoss, self).__call__(probs, targets)
        self.value = np.sum(-np.eye(self.n_classes)[targets] * np.log(probs))
        return self

    def backward(self):
        return self.probs - np.eye(self.n_classes)[self.targets]
7. 优化器Optimizer
class Optim(object): # 定义优化器的基类, 用来操作更新模型的。
    def __init__(self, module, lr): # 传入学习率以及要优化的对象
        self.module = module
        self.lr = lr

    def step(self):
        self._step_module(self.module) # 传入模型进行优化

    def _step_module(self, module):
        for attr in vars(module).values():
            if isinstance(attr, Tensor):
                if hasattr(attr, 'grad'):
                    self._update_weight(attr)
            if isinstance(attr, Module):
                self._step_module(attr)
            if isinstance(attr, list):
                for item in attr:
                    self._step_module(item)

    def _update_weight(self, tensor):
        tensor -= self.lr * tensor.grad

class SGD(Optim):
    def __init__(self, module, lr, momentum: float = 0):
        super(SGD, self).__init__(module, lr)
        self.momentum = momentum

    def _update_weight(self, tensor):
        tensor.v = self.momentum * tensor.v + self.lr * tensor.grad \
            if 'v' in vars(tensor) else self.lr * tensor.grad
        tensor -= tensor.v
8. 数据加载器DataLoader
# 自定义数据加载器, 输入data,解析后输出batch个(X, y), 分批次输出
class DataLoader(object):
    def __init__(self, data, batch_size = None):
        self.X, self.y = data # data是一个元组(X, y)
        self.batch = batch_size

    def __iter__(self): # 可遍历
        if self.batch is None:
            yield self.X, self.y # 直接输出所有的(X, y)
        else:
            n = 0
            while n + self.batch <= self.X.shape[0]:
                yield self.X[n:n+self.batch], self.y[n:n+self.batch]
                n += self.batch
            # 每次输出batch个

    def __len__(self):
        return (self.X.shape[0]/self.batch) if self.batch is not None else 1
9. 加载数据
def load_mnist(mode="train", n_samples = None, flatten = True):
    """n_samples 用来取样,这里取前面n_samples个数据输出"""
    data_path = './data/'
    images = data_path + ('train-images-idx3-ubyte' if mode == 'train' else 't10k-images-idx3-ubyte')
    labels = data_path + ('train-labels-idx1-ubyte' if mode == 'train' else 't10k-labels-idx1-ubyte')
    length = 60000 if mode == 'train' else 10000
    X = np.fromfile(open(images), np.uint8)[16:].reshape(
        (length, 28, 28)).astype(np.int32)
    if flatten:
        X = X.reshape(length, -1)
    y = np.fromfile(open(labels), np.uint8)[8:].reshape(
        (length)).astype(np.int32)
    return (X[:n_samples] if n_samples is not None else X,
            y[:n_samples] if n_samples is not None else y)
10. 模型搭建
class Model(Module):
    def __init__(self, lengths: list) -> None:
        self.layers = []
        for i in range(len(lengths)-1):
            self.layers.append(Linear(lengths[i], lengths[i+1]))
            self.layers.append(BatchNorm1d(lengths[i+1], lengths[i+1]))
            self.layers.append(ReLU() if i != len(lengths)-2 else Softmax())

    def forward(self, x):
        for layer in self.layers:
            x = layer(x)
        return x

    def backward(self, delta):
        for layer in reversed(self.layers):
            delta = layer.backward(delta)
11. 结果可视化
def vis_demo(model):
    X, y = load_mnist('test', 20)
    probs = model.forward(X)
    preds = np.argmax(probs, axis=1)
    fig = plt.subplots(nrows=4, ncols=5, sharex='all',
                       sharey='all')[1].flatten()
    for i in range(20):
        img = X[i].reshape(28, 28)
        fig[i].set_title(preds[i])
        fig[i].imshow(img, cmap='Greys', interpolation='nearest')
    fig[0].set_xticks([])
    fig[0].set_yticks([])
    plt.tight_layout()
    plt.savefig("vis.png")
    plt.show()
    # 结果可视化
12. 开始训练
n_features = 28*28
n_classes = 10
n_epochs = 20
bs = 1000
lr = 1e-3
lengths = (n_features, 512, n_classes)
np.random.seed(0)
trainloader = DataLoader(load_mnist('train'), batch_size=bs) # bs = 1000
testloader = DataLoader(load_mnist('test'))

model = Model(lengths) # 初始化模型
optimizer = SGD(model, lr=lr, momentum=0.9) # 使用SGD优化器
criterion = CrossEntropyLoss(n_classes=n_classes) # 通过CrossEntropyLoss来作为评价函数
train_acc, test_acc, loss_val= 0, 0, 0
result={'train_acc':[], 'test_acc':[], 'loss_val':[]}
for i in range(n_epochs):
    bar = tqdm(trainloader, total=6e4 / bs) # 总共有6e4/bs个batch,每次加载一个batch,tqdm是一个很好用的进度条工具,其会自动调用加载器
    # 每个epoch都要重新装载数据,每个epoch都会有一个进度条
    bar.set_description(f'epoch  {i:2}') # 进度条描述设置
    for X, y in bar: # 加载X, y,并显示进度条
        probs = model.forward(X) # 模型训练得到结果
        loss = criterion(probs, y) # 计算损失函数
        model.backward(loss.backward()) # 利用损失函数的梯度反向传播更新参数的grad
        optimizer.step() # 利用参数的grad以及lr、momentum更新参数
        preds = np.argmax(probs, axis=1) # 输出结果是概率,转为预测结果,axis=1 说明安第二维遍历取最大值的第二维度的index
        train_acc = np.sum(preds == y) / len(y) * 100
        loss_val = loss.value
        bar.set_postfix_str(f'train acc={train_acc:.1f} loss={loss_val:.3f}') # 输出这个epoch的训练集的正确率
    for X, y in testloader: # 每个epoch训练集上训练完后,会在测试集上进行测试,此时不用更新参数
        probs = model.forward(X)
        preds = np.argmax(probs, axis=1)
        test_acc = np.sum(preds == y) / len(y) * 100
        print(f' test acc: {test_acc:.1f}') # 输出训练集上的正确率
    result['train_acc'].append(train_acc)
    result['test_acc'].append(test_acc)
    result['loss_val'].append(loss_val)
vis_demo(model)
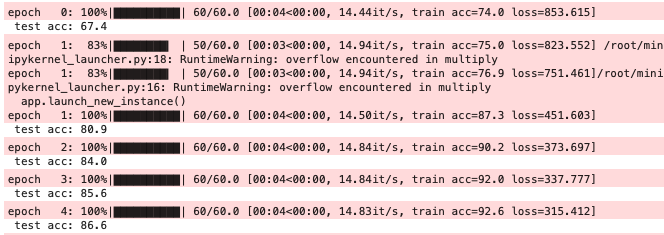
13. 训练结果
部分截图:其中第二个epoch发生了溢出,不知道问题出在哪,猜测应该出现在BatchNorm1d层。
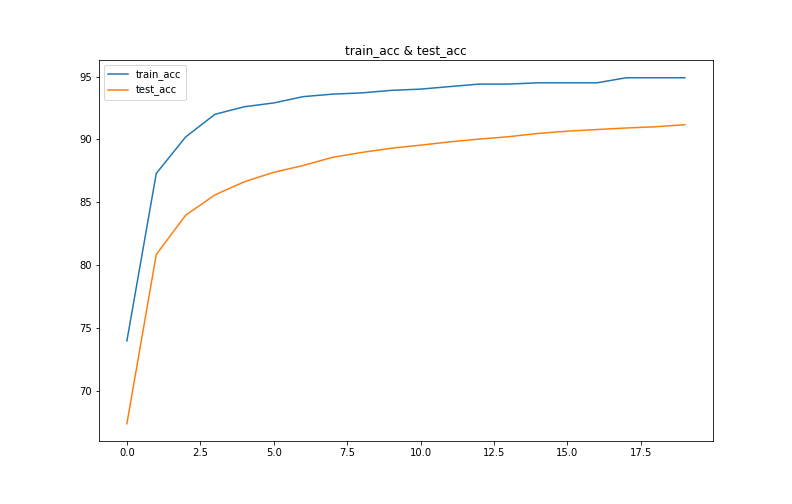
# 使用训练得到的result绘制图像
plt.figure(figsize=(11,7))
plt.plot(result['train_acc'],label='train_acc')
plt.plot(result['test_acc'],label='test_acc')
plt.title('train_acc & test_acc')
plt.legend()
plt.savefig("train_test_acc.png")
plt.show()
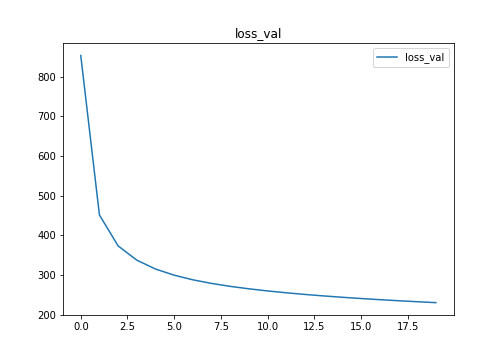
plt.figure(figsize=(7,5))
plt.plot(result['loss_val'],label='loss_val')
plt.title('loss_val')
plt.legend()
plt.savefig("loss_val.png")
plt.show()
训练数据在这里