1、实现基于MYSQL验证的vsftpd虚拟用户访问
首先环境说明,数据库服务器是192.168.0.10,vsftpd服务器是192.168.0.30
1)安装vsftpd
[root@test-centos7-node3 ~]#
[root@test-centos7-node3 ~]# ip a s ens33
2: ens33: <BROADCAST,MULTICAST,UP,LOWER_UP> mtu 1500 qdisc pfifo_fast state UP qlen 1000
    link/ether 00:0c:29:4a:bd:74 brd ff:ff:ff:ff:ff:ff
    inet 192.168.0.30/24 brd 192.168.0.255 scope global ens33
       valid_lft forever preferred_lft forever
    inet6 fe80::20c:29ff:fe4a:bd74/64 scope link
       valid_lft forever preferred_lft forever
[root@test-centos7-node3 ~]# yum install -y vsftpd
Loaded plugins: fastestmirror
base                                                                      | 3.6 kB  00:00:00
epel                                                                      | 5.3 kB  00:00:00
extras                                                                    | 2.9 kB  00:00:00
updates                                                                   | 2.9 kB  00:00:00
Loading mirror speeds from cached hostfile
 * base: mirrors.aliyun.com
 * extras: mirrors.aliyun.com
 * updates: mirrors.aliyun.com
Resolving Dependencies
--> Running transaction check
---> Package vsftpd.x86_64 0:3.0.2-25.el7 will be installed
--> Finished Dependency Resolution

Dependencies Resolved

=================================================================================================
 Package              Arch                 Version                      Repository          Size
=================================================================================================
Installing:
 vsftpd               x86_64               3.0.2-25.el7                 base               171 k

Transaction Summary
=================================================================================================
Install  1 Package

Total download size: 171 k
Installed size: 353 k
Downloading packages:
vsftpd-3.0.2-25.el7.x86_64.rpm                                            | 171 kB  00:00:00
Running transaction check
Running transaction test
Transaction test succeeded
Running transaction
  Installing : vsftpd-3.0.2-25.el7.x86_64                                                    1/1
  Verifying  : vsftpd-3.0.2-25.el7.x86_64                                                    1/1

Installed:
  vsftpd.x86_64 0:3.0.2-25.el7

Complete!
[root@test-centos7-node3 ~]#
2)编译安装pam-mysql
2.1、安装编译环境依赖包
[root@test-centos7-node3 ~]# yum groupinstall -y "development tools"
Loaded plugins: fastestmirror
Loading mirror speeds from cached hostfile
 * base: mirrors.aliyun.com
 * extras: mirrors.aliyun.com
 * updates: mirrors.aliyun.com
Maybe run: yum groups mark install (see man yum)
No packages in any requested group available to install or update
[root@test-centos7-node3 ~]# yum -y install mariadb-devel pam-devel
Loaded plugins: fastestmirror
Loading mirror speeds from cached hostfile
 * base: mirrors.aliyun.com
 * extras: mirrors.aliyun.com
 * updates: mirrors.aliyun.com
Package 1:mariadb-devel-5.5.64-1.el7.x86_64 already installed and latest version
Package pam-devel-1.1.8-22.el7.x86_64 already installed and latest version
Nothing to do
[root@test-centos7-node3 ~]#
说明:以上提示我们需要的包组和包都已经安装好了
2.2、上传pam_mysql-0.7RC1.tar.gz,解压、编译安装
[root@test-centos7-node3 ~]# rz
rz waiting to receive.
 zmodem trl+C ȡ

  100%     326 KB  326 KB/s 00:00:01       0 Errorsgz...

[root@test-centos7-node3 ~]# ls
pam_mysql-0.7pre3.tar.gz
[root@test-centos7-node3 ~]# tar xf pam_mysql-0.7pre3.tar.gz
[root@test-centos7-node3 ~]# ls
pam_mysql-0.7pre3  pam_mysql-0.7pre3.tar.gz
[root@test-centos7-node3 ~]# cd pam_mysql-0.7pre3
[root@test-centos7-node3 pam_mysql-0.7pre3]# ./configure --with-pam-mods-dir=/lib64/security
checking for a BSD-compatible install... /usr/bin/install -c
checking whether build environment is sane... yes
checking whether make sets $(MAKE)... yes
checking for working aclocal-1.4... missing
checking for working autoconf... found
……省略部分内容
checking for crypt... yes
configure: creating ./config.status
config.status: creating Makefile
config.status: creating pam_mysql.spec
config.status: creating config.h
config.status: executing default-1 commands
[root@test-centos7-node3 pam_mysql-0.7pre3]#
提示:如果预编译的环境检查没有ERROR的错误出现,接下来我们就可以编译和安装了。预编译选项 就只需要指定模块的存放位置即可,pam相关的模块存放路径都是lib64/security目录下,我们指定其存放位置即可
2.3、编译、安装pam-mysql
[root@test-centos7-node3 pam_mysql-0.7pre3]# make -j 4 && make install
提示:-j表示指定几个进程来同时编译,如果不指定默认是1个进程
[root@test-centos7-node3 pam_mysql-0.7pre3]# make -j 4 && make install
/bin/sh ./libtool --mode=compile gcc -DHAVE_CONFIG_H -I. -I. -I. -I/usr/include/security -I/usr/include    -g -O2 -I/usr/include/mysql    -c pam_mysql.c
mkdir .libs
 gcc -DHAVE_CONFIG_H -I. -I. -I. -I/usr/include/security -I/usr/include -g -O2 -I/usr/include/mysql -c pam_mysql.c  -fPIC -DPIC -o .libs/pam_mysql.o
pam_mysql.c: In function 'pam_mysql_converse':
pam_mysql.c:3179:4: warning: passing argument 2 of 'conv->conv' from incompatible pointer type [enabled by default]
    conv->appdata_ptr))) {
    ^
pam_mysql.c:3179:4: note: expected 'const struct pam_message **' but argument is of type 'struct pam_message **'
/bin/sh ./libtool --mode=link gcc  -g -O2 -I/usr/include/mysql     -o pam_mysql.la -rpath /lib64/security -module -avoid-version pam_mysql.lo  -L/usr/lib64/mysql -lmysqlclient -lpthread -lz -lm -ldl -lssl -lcrypto    -lcrypt
gcc -shared  .libs/pam_mysql.o  -L/usr/lib64/mysql -lmysqlclient -lpthread -lz -lm -ldl -lssl -lcrypto -lcrypt  -Wl,-soname -Wl,pam_mysql.so -o .libs/pam_mysql.so
creating pam_mysql.la
(cd .libs && rm -f pam_mysql.la && ln -s ../pam_mysql.la pam_mysql.la)
make[1]: Entering directory `/root/pam_mysql-0.7pre3'
/bin/sh ./mkinstalldirs /lib64/security
/bin/sh ./libtool  --mode=install /usr/bin/install -c pam_mysql.la /lib64/security/pam_mysql.la
/usr/bin/install -c .libs/pam_mysql.so /lib64/security/pam_mysql.so
/usr/bin/install -c .libs/pam_mysql.lai /lib64/security/pam_mysql.la
PATH="$PATH:/sbin" ldconfig -n /lib64/security
----------------------------------------------------------------------
Libraries have been installed in:
   /lib64/security

If you ever happen to want to link against installed libraries
in a given directory, LIBDIR, you must either use libtool, and
specify the full pathname of the library, or use the `-LLIBDIR'
flag during linking and do at least one of the following:
   - add LIBDIR to the `LD_LIBRARY_PATH' environment variable
     during execution
   - add LIBDIR to the `LD_RUN_PATH' environment variable
     during linking
   - use the `-Wl,--rpath -Wl,LIBDIR' linker flag
   - have your system administrator add LIBDIR to `/etc/ld.so.conf'

See any operating system documentation about shared libraries for
more information, such as the ld(1) and ld.so(8) manual pages.
----------------------------------------------------------------------
make[1]: Nothing to be done for `install-data-am'.
make[1]: Leaving directory `/root/pam_mysql-0.7pre3'
[root@test-centos7-node3 pam_mysql-0.7pre3]#
提示:当然这个编译速度很快,我们可以去对应的目录看看是不是我们需要的模块已经安装对应的目录了
[root@test-centos7-node3 pam_mysql-0.7pre3]# ll /lib64/security/ |grep pam_mysql
-rwxr-xr-x  1 root root    882 Feb 16 02:57 pam_mysql.la
-rwxr-xr-x  1 root root 140904 Feb 16 02:57 pam_mysql.so
[root@test-centos7-node3 pam_mysql-0.7pre3]#
到此,vsftpd基于mysql认证的模块已经完成了安装,接下来我们需要配置vsftpd,让其认证基于mysql来认证
3)配置vsftpd,让其认证是基于mysql来做认证
创建vsftpd调用pam_mysql的配置文件
[root@test-centos7-node3 ~]# cat /etc/pam.d/vsftpd.mysql
auth required pam_mysql.so user=vsftpd passwd=admin123.com host=192.168.0.10 db=vsftpd table=users usercolumn=name passwdcolumn=password crypt=2
account required pam_mysql.so user=vsftpd passwd=admin123.com host=192.168.0.10 db=vsftpd table=users usercolumn=name passwdcolumn=password crypt=2
[root@test-centos7-node3 ~]#
提示:有关pam_mysql的用法我们可以在源码包里看README文件
修改vsftpd配置文件,指定pam的配置文件为vsftpd.mysql
[root@test-centos7-node3 ~]# grep pam /etc/vsftpd/vsftpd.conf
pam_service_name=vsftpd.mysql
[root@test-centos7-node3 ~]#
在Linux系统创建一个用于登录FTP系统映射的一个系统账号,比如vuser
[root@test-centos7-node3 ~]# getent passwd vuser
[root@test-centos7-node3 ~]# useradd -s /sbin/nologin -d /var/ftproot/ vuser
[root@test-centos7-node3 ~]# chmod 555 /var/ftproot/
[root@test-centos7-node3 ~]# ll -d /var/ftproot/
dr-xr-xr-x 2 vuser vuser 62 Feb 16 04:40 /var/ftproot/
[root@test-centos7-node3 ~]# mkdir /var/ftproot/{upload,pub}
[root@test-centos7-node3 ~]# setfacl -m u:vuser:rwx /var/ftproot/upload
[root@test-centos7-node3 ~]# getfacl /var/ftproot/upload
getfacl: Removing leading '/' from absolute path names
# file: var/ftproot/upload
# owner: root
# group: root
user::rwx
user:vuser:rwx
group::r-x
mask::rwx
other::r-x

[root@test-centos7-node3 ~]#
提示:ftp对登录的根目录是登录被映射成的那个用户的家目录,被映射的用户是不能对其有写的权限的,其他目录无所谓,有写权限表示可以上传文件,没有写权限表示不能上传文件
在/etc/vsftpd/vsftpd.conf中指定开启guest用户,并指定其映射成vuser
[root@test-centos7-node3 ~]# grep guest /etc/vsftpd/vsftpd.conf
guest_enable=YES
guest_username=vuser
[root@test-centos7-node3 ~]#
提示:到此vsftpd就配置好了,接下来准备数据库和表
[root@test-centos7-node1 ~]# ip a s ens33
2: ens33: <BROADCAST,MULTICAST,UP,LOWER_UP> mtu 1500 qdisc pfifo_fast state UP qlen 1000
    link/ether 00:0c:29:f2:82:0c brd ff:ff:ff:ff:ff:ff
    inet 192.168.0.10/24 brd 192.168.0.255 scope global ens33
       valid_lft forever preferred_lft forever
    inet6 fe80::20c:29ff:fef2:820c/64 scope link
       valid_lft forever preferred_lft forever
[root@test-centos7-node1 ~]# mysql
Welcome to the MariaDB monitor.  Commands end with ; or g.
Your MariaDB connection id is 5
Server version: 5.5.56-MariaDB MariaDB Server

Copyright (c) 2000, 2017, Oracle, MariaDB Corporation Ab and others.

Type 'help;' or 'h' for help. Type 'c' to clear the current input statement.

MariaDB [(none)]> show databases;
+--------------------+
| Database           |
+--------------------+
| information_schema |
| Syslog             |
| mysql              |
| performance_schema |
| test               |
| wordpress          |
+--------------------+
6 rows in set (0.00 sec)

MariaDB [(none)]> create database vsftpd;
Query OK, 1 row affected (0.00 sec)

MariaDB [(none)]> use vsftpd
Database changed
MariaDB [vsftpd]> create table users(
    -> id int auto_increment not null primary key,
    -> name char(50) binary not null,
    -> password char(48) binary not null);
Query OK, 0 rows affected (0.01 sec)

MariaDB [vsftpd]> desc users;
+----------+----------+------+-----+---------+----------------+
| Field    | Type     | Null | Key | Default | Extra          |
+----------+----------+------+-----+---------+----------------+
| id       | int(11)  | NO   | PRI | NULL    | auto_increment |
| name     | char(50) | NO   |     | NULL    |                |
| password | char(48) | NO   |     | NULL    |                |
+----------+----------+------+-----+---------+----------------+
3 rows in set (0.02 sec)

MariaDB [vsftpd]>
提示:这个数据库名称和表的名称参照上面的vsftpd.mysql里面指定的名称来
创建用于vsftpd连接mysql的账号,这个账号也是参照vsftpd.mysql的配置文件里指定的来创建
MariaDB [vsftpd]> grant all on vsftpd.* to vsftpd@'192.168.0.%' identified by 'admin123.com';
Query OK, 0 rows affected (0.00 sec)

MariaDB [vsftpd]>
在数据库服务器上添加虚拟账号
MariaDB [vsftpd]> desc users;
+----------+----------+------+-----+---------+----------------+
| Field    | Type     | Null | Key | Default | Extra          |
+----------+----------+------+-----+---------+----------------+
| id       | int(11)  | NO   | PRI | NULL    | auto_increment |
| name     | char(50) | NO   |     | NULL    |                |
| password | char(48) | NO   |     | NULL    |                |
+----------+----------+------+-----+---------+----------------+
3 rows in set (0.00 sec)

MariaDB [vsftpd]> insert users(name,password) values('tom',password('tompass')),('jerry',password('jerrypass'));
Query OK, 2 rows affected (0.01 sec)
Records: 2  Duplicates: 0  Warnings: 0

MariaDB [vsftpd]> select * from users;
+----+-------+-------------------------------------------+
| id | name  | password                                  |
+----+-------+-------------------------------------------+
|  1 | tom   | *25C2DC5924C8A153CFC4075267C2C1438B48A509 |
|  2 | jerry | *D38B663230A8D7BD6F2B1C5A6E262431CE5D9293 |
+----+-------+-------------------------------------------+
2 rows in set (0.00 sec)

MariaDB [vsftpd]>
提示:到此我们在数据库里把虚拟账号给建立起来了,接下来我们启动vsftpd,然后用建立好的两个虚拟账号登录ftp系统
[root@test-centos7-node3 ~]# ftp 192.168.0.30
Connected to 192.168.0.30 (192.168.0.30).
220 (vsFTPd 3.0.2)
Name (192.168.0.30:root): tom
331 Please specify the password.
Password:
230 Login successful.
Remote system type is UNIX.
Using binary mode to transfer files.
ftp> ls
227 Entering Passive Mode (192,168,0,30,53,71).
150 Here comes the directory listing.
drwxr-xr-x    2 0        0               6 Feb 16 09:41 pub
drwxrwxr-x    2 0        0               6 Feb 16 09:41 upload
226 Directory send OK.
ftp> pwd
257 "/"
ftp> bye
221 Goodbye.
[root@test-centos7-node3 ~]# ftp 192.168.0.30
Connected to 192.168.0.30 (192.168.0.30).
220 (vsFTPd 3.0.2)
Name (192.168.0.30:root): jerry
331 Please specify the password.
Password:
230 Login successful.
Remote system type is UNIX.
Using binary mode to transfer files.
ftp> ls
227 Entering Passive Mode (192,168,0,30,94,10).
150 Here comes the directory listing.
drwxr-xr-x    2 0        0               6 Feb 16 09:41 pub
drwxrwxr-x    2 0        0               6 Feb 16 09:41 upload
226 Directory send OK.
ftp> bye
221 Goodbye.
[root@test-centos7-node3 ~]#
提示:可看到我们在数据库里添加的用户是可以登录到ftp系统的
以上两个用户都是拥有一样的权限,不能下载(默认是可以下载所有权限位有r的文件),不能上传文件,我们给tom添加上传权限,对jerry不做权限修改。
在/etc/vsftpd/vsftpd.conf文件中user_config_dir=/etc/vsftpd/vuser_conf/,然后创建对应的目录,在其目录里面新建一个和用户名一模一样的文件,然后在新建的文件里面写对应的权限
[root@test-centos7-node3 ~]# grep user_config_dir /etc/vsftpd/vsftpd.conf
user_config_dir=/etc/vsftpd/vuser_config/
[root@test-centos7-node3 ~]# mkdir /etc/vsftpd/vuser_config
[root@test-centos7-node3 ~]# cd /etc/vsftpd/vuser_config
[root@test-centos7-node3 vuser_config]# touch tom
[root@test-centos7-node3 vuser_config]# cat > tom
anon_upload_enable=YES
anon_mkdir_write_enable=YES
anon_world_readable_only=NO
^C
[root@test-centos7-node3 vuser_config]# cat tom
anon_upload_enable=YES
anon_mkdir_write_enable=YES
anon_world_readable_only=NO
[root@test-centos7-node3 vuser_config]#
提示:以上表示给tom用户授权可以上传下载文件,新建目录等,这个前提是对应的映射到用户要对其文件系统有写权限
重启vsftpd,然后验证tom和jerry的权限
[root@test-centos7-node3 ~]# ftp 192.168.0.30
Connected to 192.168.0.30 (192.168.0.30).
220 (vsFTPd 3.0.2)
Name (192.168.0.30:root): tom
331 Please specify the password.
Password:
230 Login successful.
Remote system type is UNIX.
Using binary mode to transfer files.
ftp> ls
227 Entering Passive Mode (192,168,0,30,49,80).
150 Here comes the directory listing.
drwxr-xr-x    2 0        0               6 Feb 16 09:41 pub
drwxrwxr-x    2 0        0               6 Feb 16 10:02 upload
226 Directory send OK.
ftp> cd upload
250 Directory successfully changed.
ftp> ls
227 Entering Passive Mode (192,168,0,30,240,251).
150 Here comes the directory listing.
226 Directory send OK.
ftp> mkdir aa
257 "/upload/aa" created
ftp> ls
227 Entering Passive Mode (192,168,0,30,91,141).
150 Here comes the directory listing.
drwx------    2 1000     1000            6 Feb 16 10:03 aa
226 Directory send OK.
ftp> put pam_mysql-0.7pre3.tar.gz
local: pam_mysql-0.7pre3.tar.gz remote: pam_mysql-0.7pre3.tar.gz
227 Entering Passive Mode (192,168,0,30,185,200).
150 Ok to send data.
226 Transfer complete.
333992 bytes sent in 0.000498 secs (670666.62 Kbytes/sec)
ftp> ls
227 Entering Passive Mode (192,168,0,30,142,95).
150 Here comes the directory listing.
drwx------    2 1000     1000            6 Feb 16 10:03 aa
-rw-------    1 1000     1000       333992 Feb 16 10:04 pam_mysql-0.7pre3.tar.gz
226 Directory send OK.
ftp> bye
221 Goodbye.
[root@test-centos7-node3 ~]# ftp 192.168.0.30
[root@test-centos7-node3 ~]# ftp 192.168.0.30
Connected to 192.168.0.30 (192.168.0.30).
220 (vsFTPd 3.0.2)
Name (192.168.0.30:root): jerry
331 Please specify the password.
Password:
230 Login successful.
Remote system type is UNIX.
Using binary mode to transfer files.
ftp> ls
227 Entering Passive Mode (192,168,0,30,30,110).
150 Here comes the directory listing.
drwxr-xr-x    2 0        0               6 Feb 16 09:41 pub
drwxrwxr-x    3 0        0              48 Feb 16 10:04 upload
226 Directory send OK.
ftp> cd upload
250 Directory successfully changed.
ftp> ls
227 Entering Passive Mode (192,168,0,30,160,189).
150 Here comes the directory listing.
drwx------    2 1000     1000            6 Feb 16 10:03 aa
-rw-------    1 1000     1000       333992 Feb 16 10:04 pam_mysql-0.7pre3.tar.gz
226 Directory send OK.
ftp> mkdir bb
550 Permission denied.
ftp> put pam_mysql-0.7pre3.tar.gz
local: pam_mysql-0.7pre3.tar.gz remote: pam_mysql-0.7pre3.tar.gz
227 Entering Passive Mode (192,168,0,30,177,120).
550 Permission denied.
ftp> bye
221 Goodbye.
[root@test-centos7-node3 ~]#
提示:以上测试说明,我们可以对不同的用户单独授权。有关ftp的其他配置请参考本人博客https://www.cnblogs.com/qiuhom-1874/p/12106900.html
2、通过NFS实现服务器/www共享访问。
实验环境,NFS服务器192.168.0.30,客户机192.168.0.10
在192.168.0.30安装nfs-utils
[root@test-centos7-node3 ~]# ip a s ens33
2: ens33: <BROADCAST,MULTICAST,UP,LOWER_UP> mtu 1500 qdisc pfifo_fast state UP qlen 1000
    link/ether 00:0c:29:4a:bd:74 brd ff:ff:ff:ff:ff:ff
    inet 192.168.0.30/24 brd 192.168.0.255 scope global ens33
       valid_lft forever preferred_lft forever
    inet6 fe80::20c:29ff:fe4a:bd74/64 scope link
       valid_lft forever preferred_lft forever
[root@test-centos7-node3 ~]# yum install nfs-utils -y
Loaded plugins: fastestmirror
Loading mirror speeds from cached hostfile
 * base: mirrors.aliyun.com
 * extras: mirrors.aliyun.com
 * updates: mirrors.aliyun.com
Resolving Dependencies
--> Running transaction check
---> Package nfs-utils.x86_64 1:1.3.0-0.65.el7 will be installed
--> Processing Dependency: libtirpc >= 0.2.4-0.7 for package: 1:nfs-utils-1.3.0-0.65.el7.x86_64
--> Processing Dependency: gssproxy >= 0.7.0-3 for package: 1:nfs-utils-1.3.0-0.65.el7.x86_64
--> Processing Dependency: rpcbind for package: 1:nfs-utils-1.3.0-0.65.el7.x86_64
……省略部分内容
Installed:
  nfs-utils.x86_64 1:1.3.0-0.65.el7

Dependency Installed:
  gssproxy.x86_64 0:0.7.0-26.el7           keyutils.x86_64 0:1.5.8-3.el7             libbasicobjects.x86_64 0:0.1.1-32.el7        libcollection.x86_64 0:0.7.0-32.el7
  libevent.x86_64 0:2.0.21-4.el7           libini_config.x86_64 0:1.3.1-32.el7       libnfsidmap.x86_64 0:0.25-19.el7             libpath_utils.x86_64 0:0.2.1-32.el7
  libref_array.x86_64 0:0.1.5-32.el7       libtirpc.x86_64 0:0.2.4-0.16.el7          libverto-libevent.x86_64 0:0.2.5-4.el7       quota.x86_64 1:4.01-19.el7
  quota-nls.noarch 1:4.01-19.el7           rpcbind.x86_64 0:0.2.0-48.el7             tcp_wrappers.x86_64 0:7.6-77.el7

Updated:
  selinux-policy.noarch 0:3.13.1-252.el7_7.6

Dependency Updated:
  libsemanage.x86_64 0:2.5-14.el7                 policycoreutils.x86_64 0:2.5-33.el7                 selinux-policy-targeted.noarch 0:3.13.1-252.el7_7.6

Complete!
[root@test-centos7-node3 ~]#
提示:安装nfs-utils 它会把其依赖包rpcbind给一起安装上
新建共享目录/www
[root@test-centos7-node3 ~]# ls /
bin  boot  data  dev  etc  home  lib  lib64  media  mnt  opt  proc  root  run  sbin  srv  sys  tmp  tools  usr  var
[root@test-centos7-node3 ~]# mkdir /www
[root@test-centos7-node3 ~]# ls /
bin  boot  data  dev  etc  home  lib  lib64  media  mnt  opt  proc  root  run  sbin  srv  sys  tmp  tools  usr  var  www
[root@test-centos7-node3 ~]#
配置nfs共享/www目录
[root@test-centos7-node3 ~]# cat /etc/exports
/www 192.168.0.10(rw,root_squash,all_squash)
[root@test-centos7-node3 ~]#
提示:以上配置表示把/www目录只共享给192.168.0.10这台主机,并且以只读、压榨所有用户权限方式共享
启动nfs-server
[root@test-centos7-node3 ~]# systemctl status rpcbind nfs-server
● rpcbind.service - RPC bind service
   Loaded: loaded (/usr/lib/systemd/system/rpcbind.service; enabled; vendor preset: enabled)
   Active: inactive (dead)

● nfs-server.service - NFS server and services
   Loaded: loaded (/usr/lib/systemd/system/nfs-server.service; disabled; vendor preset: disabled)
   Active: inactive (dead)
[root@test-centos7-node3 ~]# systemctl start nfs-server
[root@test-centos7-node3 ~]# systemctl status rpcbind nfs-server
● rpcbind.service - RPC bind service
   Loaded: loaded (/usr/lib/systemd/system/rpcbind.service; enabled; vendor preset: enabled)
   Active: active (running) since Sun 2020-02-16 05:33:51 EST; 2s ago
  Process: 16255 ExecStart=/sbin/rpcbind -w $RPCBIND_ARGS (code=exited, status=0/SUCCESS)
 Main PID: 16256 (rpcbind)
   CGroup: /system.slice/rpcbind.service
           └─16256 /sbin/rpcbind -w

Feb 16 05:33:51 test-centos7-node3 systemd[1]: Starting RPC bind service...
Feb 16 05:33:51 test-centos7-node3 systemd[1]: Started RPC bind service.

● nfs-server.service - NFS server and services
   Loaded: loaded (/usr/lib/systemd/system/nfs-server.service; disabled; vendor preset: disabled)
   Active: active (exited) since Sun 2020-02-16 05:33:51 EST; 2s ago
  Process: 16290 ExecStartPost=/bin/sh -c if systemctl -q is-active gssproxy; then systemctl reload gssproxy ; fi (code=exited, status=0/SUCCESS)
  Process: 16273 ExecStart=/usr/sbin/rpc.nfsd $RPCNFSDARGS (code=exited, status=0/SUCCESS)
  Process: 16270 ExecStartPre=/usr/sbin/exportfs -r (code=exited, status=0/SUCCESS)
 Main PID: 16273 (code=exited, status=0/SUCCESS)
   CGroup: /system.slice/nfs-server.service

Feb 16 05:33:51 test-centos7-node3 systemd[1]: Starting NFS server and services...
Feb 16 05:33:51 test-centos7-node3 systemd[1]: Started NFS server and services.
[root@test-centos7-node3 ~]# ss -ntl
State       Recv-Q Send-Q                                        Local Address:Port                                                       Peer Address:Port
LISTEN      0      128                                                       *:111                                                                   *:*
LISTEN      0      128                                                       *:20048                                                                 *:*
LISTEN      0      128                                                       *:53457                                                                 *:*
LISTEN      0      128                                                       *:22                                                                    *:*
LISTEN      0      100                                               127.0.0.1:25                                                                    *:*
LISTEN      0      64                                                        *:35199                                                                 *:*
LISTEN      0      64                                                        *:2049                                                                  *:*
LISTEN      0      128                                            192.168.0.30:9000                                                                  *:*
LISTEN      0      128                                                      :::111                                                                  :::*
LISTEN      0      128                                                      :::20048                                                                :::*
LISTEN      0      32                                                       :::21                                                                   :::*
LISTEN      0      128                                                      :::22                                                                   :::*
LISTEN      0      100                                                     ::1:25                                                                   :::*
LISTEN      0      64                                                       :::32961                                                                :::*
LISTEN      0      64                                                       :::2049                                                                 :::*
LISTEN      0      128                                                      :::60355                                                                :::*
[root@test-centos7-node3 ~]#
提示:在centos7上启动nfs-server它会把rpcbind服务一起启动起来,在centos6上需要手动启动rpcbind
在客户端挂载共享目录/www
[root@test-centos7-node1 ~]# ip a s ens33
2: ens33: <BROADCAST,MULTICAST,UP,LOWER_UP> mtu 1500 qdisc pfifo_fast state UP qlen 1000
    link/ether 00:0c:29:f2:82:0c brd ff:ff:ff:ff:ff:ff
    inet 192.168.0.10/24 brd 192.168.0.255 scope global ens33
       valid_lft forever preferred_lft forever
    inet6 fe80::20c:29ff:fef2:820c/64 scope link
       valid_lft forever preferred_lft forever
[root@test-centos7-node1 ~]# showmount -e 192.168.0.30
Export list for 192.168.0.30:
/www 192.168.0.10
[root@test-centos7-node1 ~]# mount 192.168.0.30:/www /mnt
[root@test-centos7-node1 ~]# df
Filesystem        1K-blocks    Used Available Use% Mounted on
/dev/sda3          48209924 1664784  46545140   4% /
devtmpfs            1922828       0   1922828   0% /dev
tmpfs               1932652       0   1932652   0% /dev/shm
tmpfs               1932652    8744   1923908   1% /run
tmpfs               1932652       0   1932652   0% /sys/fs/cgroup
/dev/sda1           2086912  137672   1949240   7% /boot
tmpfs                386532       0    386532   0% /run/user/0
192.168.0.30:/www  48210432 1717760  46492672   4% /mnt
[root@test-centos7-node1 ~]#
提示:在客户端如果没有showmount命令,需要安装nfs-utils即可
测试,客户端挂载好共享目录,客户端在其共享目录里新建文件,看看服务端是否能够正常访问?
[root@test-centos7-node1 ~]# cd /mnt
[root@test-centos7-node1 mnt]# ls
[root@test-centos7-node1 mnt]# cp /etc/fstab .
cp: cannot create regular file ‘./fstab’: Permission denied
[root@test-centos7-node1 mnt]# touch aa
touch: cannot touch ‘aa’: Permission denied
[root@test-centos7-node1 mnt]#
提示:它告诉我们所没有权限,这是因为我们当前用户是root,访问nfs共享目录时把其权限压榨成nfsnobody用户的权限,因为在nfs服务端共享的目录是root属主,root组,其他用户对其目录没有写权限,所以我们不能在里面创建文件等有写的操作。
在nfs服务端授权nfsnobody用户对/www目录有读写执行权限
[root@test-centos7-node3 ~]# setfacl -m u:nfsnobody:rwx /www
[root@test-centos7-node3 ~]# getfacl /www
getfacl: Removing leading '/' from absolute path names
# file: www
# owner: root
# group: root
user::rwx
user:nfsnobody:rwx
group::r-x
mask::rwx
other::r-x

[root@test-centos7-node3 ~]#
在客户机上在对其挂载的共享目录创建文件或目录,在服务器端看看能否看到和使用呢?
[root@test-centos7-node1 ~]# df
Filesystem        1K-blocks    Used Available Use% Mounted on
/dev/sda3          48209924 1664764  46545160   4% /
devtmpfs            1922828       0   1922828   0% /dev
tmpfs               1932652       0   1932652   0% /dev/shm
tmpfs               1932652    8744   1923908   1% /run
tmpfs               1932652       0   1932652   0% /sys/fs/cgroup
/dev/sda1           2086912  137672   1949240   7% /boot
tmpfs                386532       0    386532   0% /run/user/0
192.168.0.30:/www  48210432 1717760  46492672   4% /mnt
[root@test-centos7-node1 ~]# cd /mnt
[root@test-centos7-node1 mnt]# ls
[root@test-centos7-node1 mnt]# cp /etc/fstab .
[root@test-centos7-node1 mnt]# ls
fstab
[root@test-centos7-node1 mnt]# touch aa
[root@test-centos7-node1 mnt]# mkdir test
[root@test-centos7-node1 mnt]#
[root@test-centos7-node3 ~]# ll /www/
total 4
-rw-r--r-- 1 nfsnobody nfsnobody   0 Feb 16 05:45 aa
-rw-r--r-- 1 nfsnobody nfsnobody 501 Feb 16 05:45 fstab
drwxr-xr-x 2 nfsnobody nfsnobody   6 Feb 16 05:45 test
[root@test-centos7-node3 ~]#
提示:在服务端可以看到客户端新建的文件和目录。这里需要注意一点的是,服务端往共享目录里放文件,需要注意权限,如果是root属主root属组,客户端那边可以能没有办法对文件进行修改操作。到此nfs共享/www目录就完成了,更多nfs的使用和说明请参考本人博客https://www.cnblogs.com/qiuhom-1874/p/12237964.html
3、配置samba共享,实现/www目录共享
环境说明:smb服务器上192.168.0.30,客户机上192.168.0.10
1)安装samba
[root@test-centos7-node3 ~]# ip a s ens33
2: ens33: <BROADCAST,MULTICAST,UP,LOWER_UP> mtu 1500 qdisc pfifo_fast state UP qlen 1000
    link/ether 00:0c:29:4a:bd:74 brd ff:ff:ff:ff:ff:ff
    inet 192.168.0.30/24 brd 192.168.0.255 scope global ens33
       valid_lft forever preferred_lft forever
    inet6 fe80::20c:29ff:fe4a:bd74/64 scope link
       valid_lft forever preferred_lft forever
[root@test-centos7-node3 ~]# yum install -y samba
Loaded plugins: fastestmirror
Loading mirror speeds from cached hostfile
 * base: mirrors.aliyun.com
 * extras: mirrors.aliyun.com
 * updates: mirrors.aliyun.com
Resolving Dependencies
--> Running transaction check
---> Package samba.x86_64 0:4.9.1-10.el7_7 will be installed
--> Processing Dependency: samba-libs = 4.9.1-10.el7_7 for package: samba-4.9.1-10.el7_7.x86_64
……省略部分内容
Installed:
  samba.x86_64 0:4.9.1-10.el7_7

Dependency Installed:
  cups-libs.x86_64 1:1.6.3-40.el7       libldb.x86_64 0:1.4.2-1.el7                libtalloc.x86_64 0:2.1.14-1.el7             libtdb.x86_64 0:1.3.16-1.el7
  libtevent.x86_64 0:0.9.37-1.el7       libwbclient.x86_64 0:4.9.1-10.el7_7        pytalloc.x86_64 0:2.1.14-1.el7              samba-client-libs.x86_64 0:4.9.1-10.el7_7
  samba-common.noarch 0:4.9.1-10.el7_7  samba-common-libs.x86_64 0:4.9.1-10.el7_7  samba-common-tools.x86_64 0:4.9.1-10.el7_7  samba-libs.x86_64 0:4.9.1-10.el7_7

Dependency Updated:
  dbus.x86_64 1:1.10.24-13.el7_6                                                    dbus-libs.x86_64 1:1.10.24-13.el7_6

Complete!
[root@test-centos7-node3 ~]#
2)配置samba共享/www目录
[root@test-centos7-node3 ~]# tail -6 /etc/samba/smb.conf
[share_www]
        comment = share /www
        path = /www
        read only =no
        create mask = 0664
        directory mask = 0775
[root@test-centos7-node3 ~]#
3)检查samba配置文件
[root@test-centos7-node3 ~]# testparm
rlimit_max: increasing rlimit_max (1024) to minimum Windows limit (16384)
Registered MSG_REQ_POOL_USAGE
Registered MSG_REQ_DMALLOC_MARK and LOG_CHANGED
Load smb config files from /etc/samba/smb.conf
rlimit_max: increasing rlimit_max (1024) to minimum Windows limit (16384)
Processing section "[homes]"
Processing section "[printers]"
Processing section "[print$]"
Processing section "[share_www]"
Loaded services file OK.
WARNING: The 'netbios name' is too long (max. 15 chars).

Server role: ROLE_STANDALONE

Press enter to see a dump of your service definitions

# Global parameters
[global]
        printcap name = cups
        security = USER
        workgroup = SAMBA
        idmap config * : backend = tdb
        cups options = raw


[homes]
        browseable = No
        comment = Home Directories
        inherit acls = Yes
        read only = No
        valid users = %S %D%w%S


[printers]
        browseable = No
        comment = All Printers
        create mask = 0600
        path = /var/tmp
        printable = Yes


[print$]
        comment = Printer Drivers
        create mask = 0664
        directory mask = 0775
        force group = @printadmin
        path = /var/lib/samba/drivers
        write list = @printadmin root


[share_www]
        comment = share /www
        create mask = 0664
        directory mask = 0775
        path = /www
        read only = No
[root@test-centos7-node3 ~]#
4)启动samba服务
[root@test-centos7-node3 ~]# systemctl start smb
[root@test-centos7-node3 ~]# ss -ntl
State       Recv-Q Send-Q                                        Local Address:Port                                                       Peer Address:Port
LISTEN      0      50                                                        *:139                                                                   *:*
LISTEN      0      128                                                       *:111                                                                   *:*
LISTEN      0      128                                                       *:20048                                                                 *:*
LISTEN      0      128                                                       *:53457                                                                 *:*
LISTEN      0      128                                                       *:22                                                                    *:*
LISTEN      0      100                                               127.0.0.1:25                                                                    *:*
LISTEN      0      50                                                        *:445                                                                   *:*
LISTEN      0      64                                                        *:35199                                                                 *:*
LISTEN      0      64                                                        *:2049                                                                  *:*
LISTEN      0      128                                            192.168.0.30:9000                                                                  *:*
LISTEN      0      50                                                       :::139                                                                  :::*
LISTEN      0      128                                                      :::111                                                                  :::*
LISTEN      0      128                                                      :::20048                                                                :::*
LISTEN      0      32                                                       :::21                                                                   :::*
LISTEN      0      128                                                      :::22                                                                   :::*
LISTEN      0      100                                                     ::1:25                                                                   :::*
LISTEN      0      50                                                       :::445                                                                  :::*
LISTEN      0      64                                                       :::32961                                                                :::*
LISTEN      0      64                                                       :::2049                                                                 :::*
LISTEN      0      128                                                      :::60355                                                                :::*
[root@test-centos7-node3 ~]#
提示:smb默认工作在tcp的445端口
5)在客户端使用smbclient查看是否能够看到smb服务端共享的目录
[root@test-centos7-node1 ~]# smbclient -L \192.168.0.30
Enter SAMBA
oot's password:
Anonymous login successful
Domain=[TEST-CENTOS7-NODE3] OS=[Windows 6.1] Server=[Samba 4.9.1]

        Sharename       Type      Comment
        ---------       ----      -------
        print$          Disk      Printer Drivers
        share_www       Disk      share /www
        IPC$            IPC       IPC Service (Samba 4.9.1)
Anonymous login successful
Domain=[TEST-CENTOS7-NODE3] OS=[Windows 6.1] Server=[Samba 4.9.1]

        Server               Comment
        ---------            -------

        Workgroup            Master
        ---------            -------
[root@test-centos7-node1 ~]#
提示:如果提示smbclient未找到该命令,需要安装samba-client这个包;从上面的提示看,在客户机上是可以正常的看到samba服务器共享出来的名为share_www目录
6)在samba服务器上添加一个samba账号
[root@test-centos7-node3 ~]# getent passwd tom
[root@test-centos7-node3 ~]# useradd -s /sbin/nologin tom
[root@test-centos7-node3 ~]# getent passwd tom
tom:x:1001:1001::/home/tom:/sbin/nologin
[root@test-centos7-node3 ~]# smbpasswd -a tom
New SMB password:
Retype new SMB password:
Added user tom.
[root@test-centos7-node3 ~]# pdbedit -L
tom:1001:
[root@test-centos7-node3 ~]#
提示:samba服务的用户必须是Linux主机上存在的用户,为了安全我们创建用户时需要指定其shell类型为/sbin/nologin
在客户机上用新建的用户去连接samba服务
[root@test-centos7-node1 ~]# smbclient //192.168.0.30/share_www -U tom%admin
Domain=[TEST-CENTOS7-NODE3] OS=[Windows 6.1] Server=[Samba 4.9.1]
smb: > ls
  .                                   D        0  Sun Feb 16 05:45:53 2020
  ..                                  D        0  Sun Feb 16 05:23:56 2020
  fstab                               N      501  Sun Feb 16 05:45:45 2020
  aa                                  N        0  Sun Feb 16 05:45:49 2020
  test                                D        0  Sun Feb 16 05:45:53 2020

                48209924 blocks of size 1024. 46455356 blocks available
smb: > q
[root@test-centos7-node1 ~]#
提示:在客户机上用服务端添加的smb账号是可以看到samba共享出来的目录,以及目录里的文件
[root@test-centos7-node1 ~]# smbclient //192.168.0.30/share_www -U tom%admin
Domain=[TEST-CENTOS7-NODE3] OS=[Windows 6.1] Server=[Samba 4.9.1]
smb: > ls
  .                                   D        0  Sun Feb 16 05:45:53 2020
  ..                                  D        0  Sun Feb 16 05:23:56 2020
  fstab                               N      501  Sun Feb 16 05:45:45 2020
  aa                                  N        0  Sun Feb 16 05:45:49 2020
  test                                D        0  Sun Feb 16 05:45:53 2020

                48209924 blocks of size 1024. 46455336 blocks available
smb: > !ls
test.php
smb: > put test.php
NT_STATUS_ACCESS_DENIED opening remote file 	est.php
smb: > get fstab
getting file fstab of size 501 as fstab (69.9 KiloBytes/sec) (average 69.9 KiloBytes/sec)
smb: > !ls
fstab  test.php
smb: > q
[root@test-centos7-node1 ~]#
提示:我们新建的tom用户在客户端操作没有上传权限,只有下载权限。这是因为samba虽然指定了共享目录可写,但是对于tom用户在服务端上的文件系统没有授权为可写,所以tom用户暂时没法上传,需要上传文件我们就必须要对其文件系统赋予tom用户有写的权限才行
在服务端授权tom用户可以对共享目录有读写执行权限
[root@test-centos7-node3 ~]# setfacl -m u:tom:rwx /www
[root@test-centos7-node3 ~]# getfacl /www
getfacl: Removing leading '/' from absolute path names
# file: www
# owner: root
# group: root
user::rwx
user:tom:rwx
user:nfsnobody:rwx
group::r-x
mask::rwx
other::r-x

[root@test-centos7-node3 ~]#
测试,在客户端用tom用户访问共享目录,然后上传文件,看是否能够正常上传文件?
[root@test-centos7-node1 ~]# smbclient //192.168.0.30/share_www -U tom%admin
Domain=[TEST-CENTOS7-NODE3] OS=[Windows 6.1] Server=[Samba 4.9.1]
smb: > ls
  .                                   D        0  Sun Feb 16 05:45:53 2020
  ..                                  D        0  Sun Feb 16 05:23:56 2020
  fstab                               N      501  Sun Feb 16 05:45:45 2020
  aa                                  N        0  Sun Feb 16 05:45:49 2020
  test                                D        0  Sun Feb 16 05:45:53 2020

                48209924 blocks of size 1024. 46455776 blocks available
smb: > !ls
fstab  test.php
smb: > put test.php
putting file test.php as 	est.php (1.1 kb/s) (average 1.1 kb/s)
smb: > ls
  .                                   D        0  Sun Feb 16 06:30:30 2020
  ..                                  D        0  Sun Feb 16 05:23:56 2020
  fstab                               N      501  Sun Feb 16 05:45:45 2020
  aa                                  N        0  Sun Feb 16 05:45:49 2020
  test                                D        0  Sun Feb 16 05:45:53 2020
  test.php                            A       20  Sun Feb 16 06:30:30 2020

                48209924 blocks of size 1024. 46455752 blocks available
smb: > q
[root@test-centos7-node1 ~]#
提示:修改了文件系统权限后,tom用户就可以往共享目录里上传文件了,更多samba服务端配置和说明请参考本人博客https://www.cnblogs.com/qiuhom-1874/p/12237973.html
4、使用rsync+inotify实现/www目录实时同步
实验环境说明:rsync服务器是192.168.0.30,客户机上192.168.0.10
1)安装inotify-tools
[root@test-centos7-node3 ~]# ip a s ens33
2: ens33: <BROADCAST,MULTICAST,UP,LOWER_UP> mtu 1500 qdisc pfifo_fast state UP qlen 1000
    link/ether 00:0c:29:4a:bd:74 brd ff:ff:ff:ff:ff:ff
    inet 192.168.0.30/24 brd 192.168.0.255 scope global ens33
       valid_lft forever preferred_lft forever
    inet6 fe80::20c:29ff:fe4a:bd74/64 scope link
       valid_lft forever preferred_lft forever
[root@test-centos7-node3 ~]# yum install inotify-tools -y
Loaded plugins: fastestmirror
Loading mirror speeds from cached hostfile
 * base: mirrors.aliyun.com
 * extras: mirrors.aliyun.com
 * updates: mirrors.aliyun.com
Resolving Dependencies
--> Running transaction check
---> Package inotify-tools.x86_64 0:3.14-9.el7 will be installed
--> Finished Dependency Resolution

Dependencies Resolved

===========================================================================================================================================================================
 Package                                      Arch                                  Version                                      Repository                           Size
===========================================================================================================================================================================
Installing:
 inotify-tools                                x86_64                                3.14-9.el7                                   epel                                 51 k

Transaction Summary
===========================================================================================================================================================================
Install  1 Package

Total download size: 51 k
Installed size: 111 k
Downloading packages:
inotify-tools-3.14-9.el7.x86_64.rpm                                                                                                                 |  51 kB  00:00:00
Running transaction check
Running transaction test
Transaction test succeeded
Running transaction
  Installing : inotify-tools-3.14-9.el7.x86_64                                                                                                                         1/1
  Verifying  : inotify-tools-3.14-9.el7.x86_64                                                                                                                         1/1

Installed:
  inotify-tools.x86_64 0:3.14-9.el7

Complete!
[root@test-centos7-node3 ~]# rpm -ql inotify-tools
/usr/bin/inotifywait
/usr/bin/inotifywatch
/usr/lib64/libinotifytools.so.0
/usr/lib64/libinotifytools.so.0.4.1
/usr/share/doc/inotify-tools-3.14
/usr/share/doc/inotify-tools-3.14/AUTHORS
/usr/share/doc/inotify-tools-3.14/COPYING
/usr/share/doc/inotify-tools-3.14/ChangeLog
/usr/share/doc/inotify-tools-3.14/NEWS
/usr/share/doc/inotify-tools-3.14/README
/usr/share/man/man1/inotifywait.1.gz
/usr/share/man/man1/inotifywatch.1.gz
[root@test-centos7-node3 ~]#
提示:inotify是内核的一个功能,我们要使用内核的功能,必须要在用户空间安装对应的工具才可以对内核功能发起调用操作
2)安装rsync
[root@test-centos7-node3 ~]# yum install -y rsync
Loaded plugins: fastestmirror
Loading mirror speeds from cached hostfile
 * base: mirrors.aliyun.com
 * extras: mirrors.aliyun.com
 * updates: mirrors.aliyun.com
Package rsync-3.1.2-6.el7_6.1.x86_64 already installed and latest version
Nothing to do
[root@test-centos7-node3 ~]#
提示:系统告诉我们rsync这个包已经安装好了
3)配置rsync服务,让其工作为守护进程模式
[root@test-centos7-node3 ~]# cat /etc/rsyncd.conf
# /etc/rsyncd: configuration file for rsync daemon mode

# See rsyncd.conf man page for more options.

# configuration example:

# uid = nobody
# gid = nobody
# use chroot = yes
# max connections = 4
# pid file = /var/run/rsyncd.pid
# exclude = lost+found/
# transfer logging = yes
# timeout = 900
# ignore nonreadable = yes
# dont compress   = *.gz *.tgz *.zip *.z *.Z *.rpm *.deb *.bz2

# [ftp]
#        path = /home/ftp
#        comment = ftp export area
uid = root
gid = root
use chroot = no
max connections = 0
ignore errors
exclude = lost+found/
log file = /var/log/rsyncd.log
pid file = /var/run/rsyncd.pid
lock file = /var/run/rsyncd.lock
reverse lookup = no
hosts allow = 192.168.0.0/24
[backup]
path = /backup/
comment = share backup
read only = no
auth users = jerry
secrets file = /etc/rsync.pass
[root@test-centos7-node3 ~]#
4)新建/backup目录和/etc/rsync.pass文件,并且配置一个用户和密码用于rsync同步
[root@test-centos7-node3 ~]# mkdir /backup
[root@test-centos7-node3 ~]# ll /backup
total 0
[root@test-centos7-node3 ~]# echo "jerry:admin" > /etc/rsync.pass
[root@test-centos7-node3 ~]# cat /etc/rsync.pass
jerry:admin
[root@test-centos7-node3 ~]# chmod 600 /etc/rsync.pass
[root@test-centos7-node3 ~]#
提示:rsync.pass文件用于存放rsync同步数据时用到的用户和密码,这个文件的格式是用户名:密码,这些都是明文的,为了其内容的安全,通常我们把其权限设置为非root用户不可读写的权限
5)启动rsysnc服务
[root@test-centos7-node3 ~]# rsync --daemon
[root@test-centos7-node3 ~]# ss -ntl
State       Recv-Q Send-Q                                        Local Address:Port                                                       Peer Address:Port
LISTEN      0      128                                                       *:22                                                                    *:*
LISTEN      0      100                                               127.0.0.1:25                                                                    *:*
LISTEN      0      128                                            192.168.0.30:9000                                                                  *:*
LISTEN      0      5                                                         *:873                                                                   *:*
LISTEN      0      128                                                      :::22                                                                   :::*
LISTEN      0      100                                                     ::1:25                                                                   :::*
LISTEN      0      5                                                        :::873                                                                  :::*
[root@test-centos7-node3 ~]#
提示:rsync默认工作在tcp的873端口
6)在客户机上安装inotify-tools,并创建用于连接rsync服务器上的用户对应的密码文件和创建/www目录
[root@test-centos7-node1 ~]# ip a s ens33
2: ens33: <BROADCAST,MULTICAST,UP,LOWER_UP> mtu 1500 qdisc pfifo_fast state UP qlen 1000
    link/ether 00:0c:29:f2:82:0c brd ff:ff:ff:ff:ff:ff
    inet 192.168.0.10/24 brd 192.168.0.255 scope global ens33
       valid_lft forever preferred_lft forever
    inet6 fe80::20c:29ff:fef2:820c/64 scope link
       valid_lft forever preferred_lft forever
[root@test-centos7-node1 ~]# yum install -y inotify-tools
Loaded plugins: fastestmirror
Loading mirror speeds from cached hostfile
Resolving Dependencies
--> Running transaction check
---> Package inotify-tools.x86_64 0:3.14-9.el7 will be installed
--> Finished Dependency Resolution

Dependencies Resolved

===========================================================================================================================================================================
 Package                                      Arch                                  Version                                      Repository                           Size
===========================================================================================================================================================================
Installing:
 inotify-tools                                x86_64                                3.14-9.el7                                   epel                                 51 k

Transaction Summary
===========================================================================================================================================================================
Install  1 Package

Total download size: 51 k
Installed size: 111 k
Downloading packages:
inotify-tools-3.14-9.el7.x86_64.rpm                                                                                                                 |  51 kB  00:00:00
Running transaction check
Running transaction test
Transaction test succeeded
Running transaction
  Installing : inotify-tools-3.14-9.el7.x86_64                                                                                                                         1/1
  Verifying  : inotify-tools-3.14-9.el7.x86_64                                                                                                                         1/1

Installed:
  inotify-tools.x86_64 0:3.14-9.el7

Complete!
[root@test-centos7-node1 ~]# echo "admin" > /etc/rsync.pass
[root@test-centos7-node1 ~]# chmod 600 /etc/rsync.pass
[root@test-centos7-node1 ~]# cat /etc/rsync.pass
admin
[root@test-centos7-node1 ~]# ll /etc/rsync.pass
-rw------- 1 root root 6 Feb 16 07:15 /etc/rsync.pass
[root@test-centos7-node1 ~]#
[root@test-centos7-node1 ~]# mkdir /www
[root@test-centos7-node1 ~]# ll /www
total 0
[root@test-centos7-node1 ~]#
7)在客户端上编写脚本,实现实时监控/www目录下的资源,如有变动,立刻同步至rsync服务器对应的目录下
[root@test-centos7-node1 ~]# cat inotify_rsync.sh
#!/bin/bash
SRC='/www/'
DEST='jerry@192.168.0.30::backup'
inotifywait -mrq --timefmt '%Y-%m-%d %H:%M' --format '%T %w %f' -e create,delete,moved_to,close_write ${SRC} |while read DATE TIME DIR FILE;do
        FILEPATH=${DIR}${FILE}
        rsync -az --delete --password-file=/etc/rsync.pass $SRC $DEST &&
        echo "At ${TIME} on ${DATE}, file $FILEPATH was backuped up via rsync" >> /var/log/changelist.log
done
[root@test-centos7-node1 ~]#
8)运行脚本,然后在/www目录下新建文件,看看能不能及时同步到rsync服务器上去
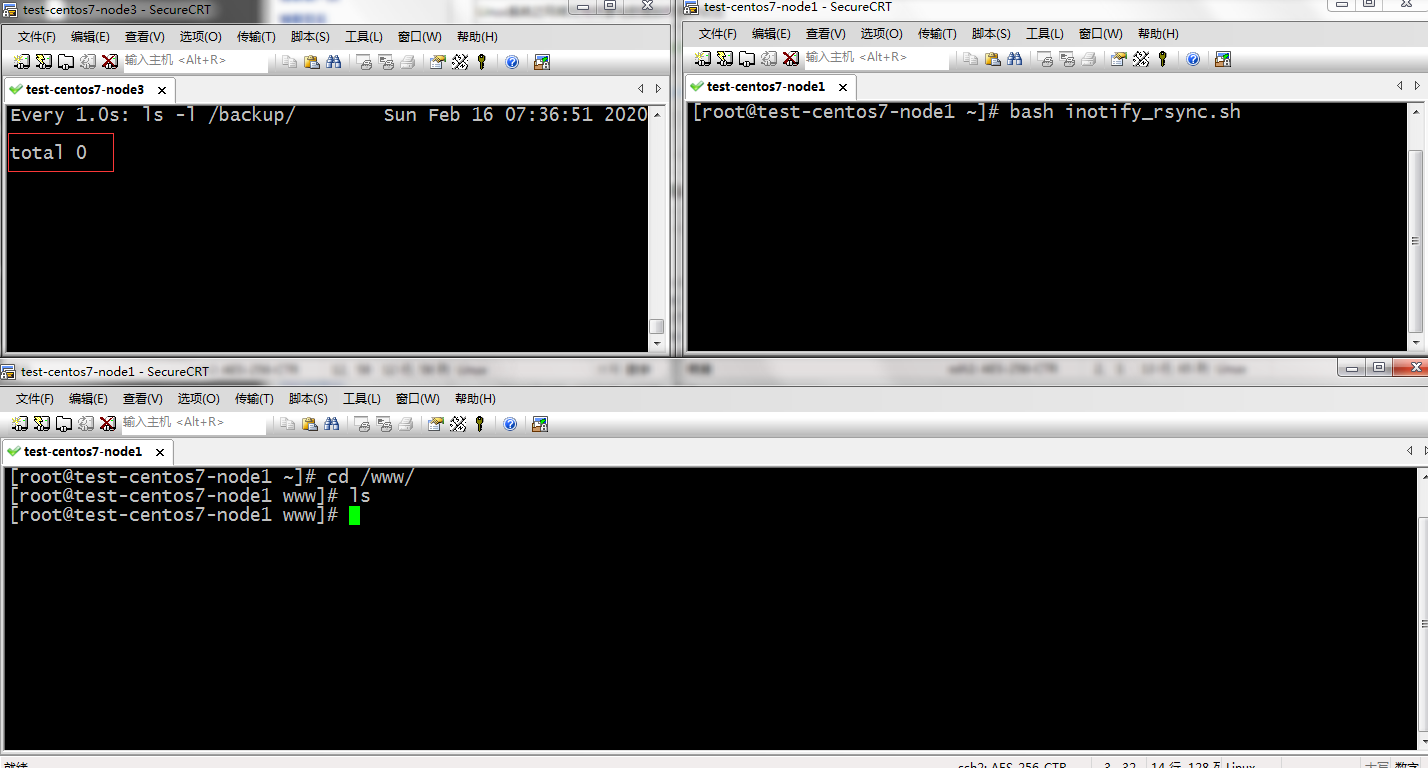
提示:没有在/www目录里创建文件时,rsync服务器上对应的目录是没有任何文件的,是一个空目录
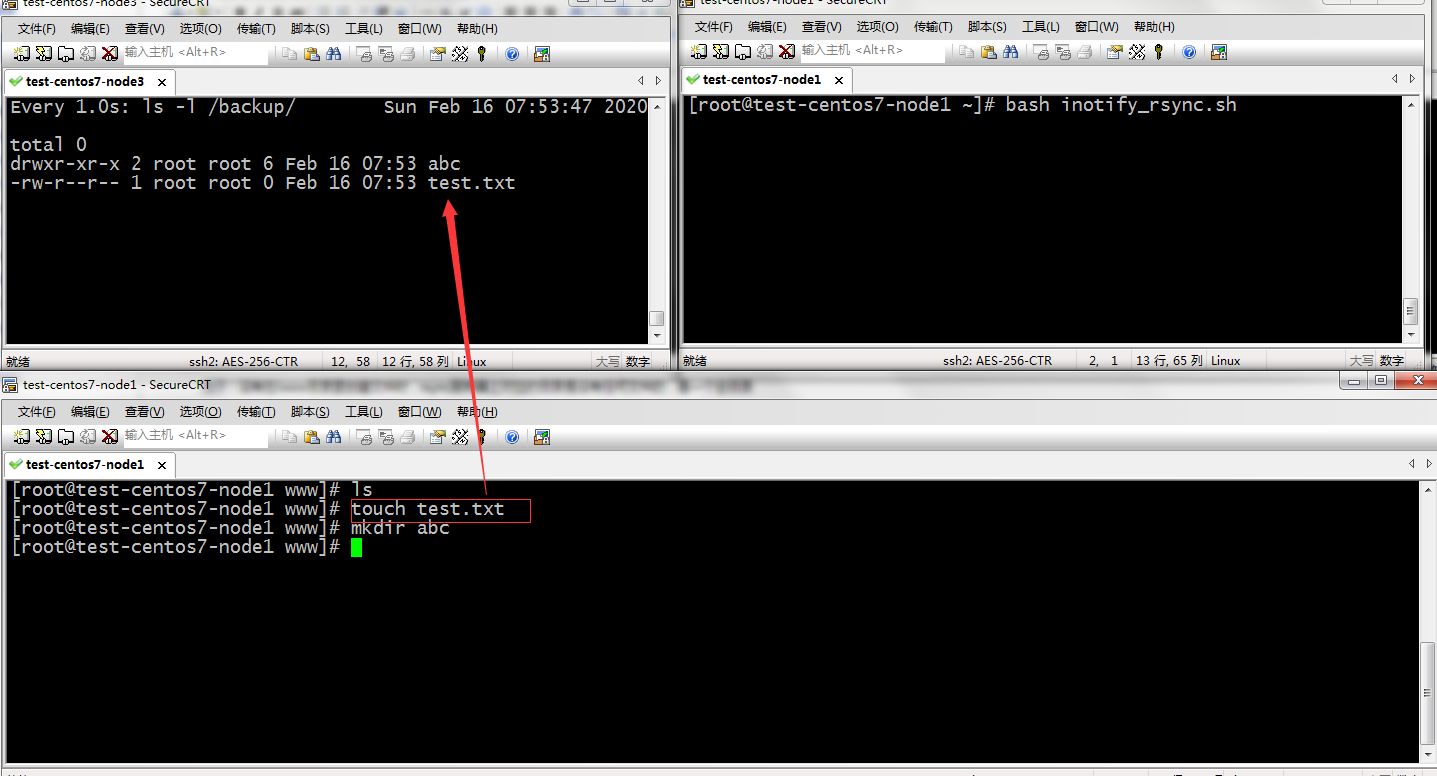
提示:可以看到我们在客户端的/www目录下新建文件和目录能够及时的同步到rsync对应的/backup目录下;更多关于inotify和rsync的说明请参考https://www.cnblogs.com/qiuhom-1874/p/12246660.html
5、使用iptable实现: 放行telnet, ftp, web服务,放行samba服务,其他端口服务全部拒绝
1)加载nf_conntrack_ftp模块
[root@test-centos7-node3 ~]# lsmod |grep ftp
[root@test-centos7-node3 ~]# modprobe nf_conntrack_ftp
[root@test-centos7-node3 ~]# lsmod |grep ftp
nf_conntrack_ftp       18638  0
nf_conntrack          133387  3 xt_conntrack,nf_conntrack_ftp,nf_conntrack_ipv4
[root@test-centos7-node3 ~]#
2)编写规则
[root@test-centos7-node3 ~]# ip a s ens33
2: ens33: <BROADCAST,MULTICAST,UP,LOWER_UP> mtu 1500 qdisc pfifo_fast state UP qlen 1000
    link/ether 00:0c:29:4a:bd:74 brd ff:ff:ff:ff:ff:ff
    inet 192.168.0.30/24 brd 192.168.0.255 scope global ens33
       valid_lft forever preferred_lft forever
    inet6 fe80::20c:29ff:fe4a:bd74/64 scope link
       valid_lft forever preferred_lft forever
[root@test-centos7-node3 ~]# iptables -nvL
Chain INPUT (policy ACCEPT 52 packets, 3952 bytes)
 pkts bytes target     prot opt in     out     source               destination

Chain FORWARD (policy ACCEPT 0 packets, 0 bytes)
 pkts bytes target     prot opt in     out     source               destination

Chain OUTPUT (policy ACCEPT 38 packets, 4088 bytes)
 pkts bytes target     prot opt in     out     source               destination
[root@test-centos7-node3 ~]# iptables -A INPUT -p tcp -m state --state RELATED,ESTABLISHED -j ACCEPT
[root@test-centos7-node3 ~]# iptables -A OUTPUT -p tcp -m state --state NEW,ESTABLISHED -j ACCEPT
[root@test-centos7-node3 ~]# iptables -A INPUT -p tcp -m multiport --dports 21:23,80,139,445 -m state --state NEW -j ACCEPT
[root@test-centos7-node3 ~]# iptables -A INPUT -j DROP
[root@test-centos7-node3 ~]# iptables -A OUTPUT -j DROP
[root@test-centos7-node3 ~]# iptables -nvL
Chain INPUT (policy ACCEPT 0 packets, 0 bytes)
 pkts bytes target     prot opt in     out     source               destination
  181 12960 ACCEPT     tcp  --  *      *       0.0.0.0/0            0.0.0.0/0            state RELATED,ESTABLISHED
    0     0 ACCEPT     tcp  --  *      *       0.0.0.0/0            0.0.0.0/0            multiport dports 21:23,80,139,445 state NEW
    0     0 DROP       all  --  *      *       0.0.0.0/0            0.0.0.0/0

Chain FORWARD (policy ACCEPT 0 packets, 0 bytes)
 pkts bytes target     prot opt in     out     source               destination

Chain OUTPUT (policy ACCEPT 0 packets, 0 bytes)
 pkts bytes target     prot opt in     out     source               destination
   81  8524 ACCEPT     tcp  --  *      *       0.0.0.0/0            0.0.0.0/0            state NEW,ESTABLISHED
    0     0 DROP       all  --  *      *       0.0.0.0/0            0.0.0.0/0
[root@test-centos7-node3 ~]#
测试:在客户机上访问192.168.0.30上的telent 、ftp、 web、samba服务,看看客户端访问这些服务是不是正常放行的
[root@test-centos7-node1 ~]# ip a s ens33
2: ens33: <BROADCAST,MULTICAST,UP,LOWER_UP> mtu 1500 qdisc pfifo_fast state UP qlen 1000
    link/ether 00:0c:29:f2:82:0c brd ff:ff:ff:ff:ff:ff
    inet 192.168.0.10/24 brd 192.168.0.255 scope global ens33
       valid_lft forever preferred_lft forever
    inet6 fe80::20c:29ff:fef2:820c/64 scope link
       valid_lft forever preferred_lft forever
[root@test-centos7-node1 ~]# telnet 192.168.0.30
Trying 192.168.0.30...
Connected to 192.168.0.30.
Escape character is '^]'.
test-centos7-node3 login: qiuhom
Password:
Last login: Sun Feb 16 09:44:25 from ::ffff:192.168.0.10
[qiuhom@test-centos7-node3 ~]$ ip a s ens33
2: ens33: <BROADCAST,MULTICAST,UP,LOWER_UP> mtu 1500 qdisc pfifo_fast state UP qlen 1000
    link/ether 00:0c:29:4a:bd:74 brd ff:ff:ff:ff:ff:ff
    inet 192.168.0.30/24 brd 192.168.0.255 scope global ens33
       valid_lft forever preferred_lft forever
    inet6 fe80::20c:29ff:fe4a:bd74/64 scope link
       valid_lft forever preferred_lft forever
[qiuhom@test-centos7-node3 ~]$ exit
logout
Connection closed by foreign host.
[root@test-centos7-node1 ~]# curl -I http://192.168.0.30/index.html
HTTP/1.1 200 OK
Date: Sun, 16 Feb 2020 14:46:01 GMT
Server: Apache/2.4.6 (CentOS)
Last-Modified: Sun, 16 Feb 2020 13:16:09 GMT
ETag: "1f5-59eb13dfb0e13"
Accept-Ranges: bytes
Content-Length: 501
Content-Type: text/html; charset=UTF-8

[root@test-centos7-node1 ~]# ftp 192.168.0.30
Connected to 192.168.0.30 (192.168.0.30).
220 (vsFTPd 3.0.2)
Name (192.168.0.30:root): tom
331 Please specify the password.
Password:
230 Login successful.
Remote system type is UNIX.
Using binary mode to transfer files.
ftp> ls
227 Entering Passive Mode (192,168,0,30,56,188).
150 Here comes the directory listing.
drwxr-xr-x    2 0        0               6 Feb 16 09:41 pub
drwxrwxr-x    3 0        0              48 Feb 16 10:04 upload
226 Directory send OK.
ftp> cd upload
250 Directory successfully changed.
ftp> ls
227 Entering Passive Mode (192,168,0,30,91,55).
150 Here comes the directory listing.
drwx------    2 1000     1000            6 Feb 16 10:03 aa
-rw-------    1 1000     1000       333992 Feb 16 10:04 pam_mysql-0.7pre3.tar.gz
226 Directory send OK.
ftp> get pam_mysql-0.7pre3.tar.gz
local: pam_mysql-0.7pre3.tar.gz remote: pam_mysql-0.7pre3.tar.gz
227 Entering Passive Mode (192,168,0,30,211,130).
150 Opening BINARY mode data connection for pam_mysql-0.7pre3.tar.gz (333992 bytes).
226 Transfer complete.
333992 bytes received in 0.0109 secs (30532.22 Kbytes/sec)
ftp> bye
221 Goodbye.
[root@test-centos7-node1 ~]# smbclient //192.168.0.30/share_www -U tom%admin
Domain=[TEST-CENTOS7-NODE3] OS=[Windows 6.1] Server=[Samba 4.9.1]
smb: > ls
  .                                   D        0  Sun Feb 16 06:30:30 2020
  ..                                  D        0  Sun Feb 16 07:24:16 2020
  fstab                               N      501  Sun Feb 16 05:45:45 2020
  aa                                  N        0  Sun Feb 16 05:45:49 2020
  test                                D        0  Sun Feb 16 05:45:53 2020
  test.php                            A       20  Sun Feb 16 06:30:30 2020

                48209924 blocks of size 1024. 46442924 blocks available
smb: > get aa
getting file aa of size 0 as aa (0.0 KiloBytes/sec) (average 0.0 KiloBytes/sec)
smb: > ls
  .                                   D        0  Sun Feb 16 06:30:30 2020
  ..                                  D        0  Sun Feb 16 07:24:16 2020
  fstab                               N      501  Sun Feb 16 05:45:45 2020
  aa                                  N        0  Sun Feb 16 05:45:49 2020
  test                                D        0  Sun Feb 16 05:45:53 2020
  test.php                            A       20  Sun Feb 16 06:30:30 2020

                48209924 blocks of size 1024. 46442924 blocks available
smb: > !ls
aa  fstab  inotify_rsync.sh  pam_mysql-0.7pre3.tar.gz  test.php
smb: > q
[root@test-centos7-node1 ~]#
提示:可以看到在客户端访问telnet、web、ftp、samba服务都是不受任何影响的;有关iptables的用法和说明可以参考本人系列博文https://www.cnblogs.com/qiuhom-1874/category/1642473.html