《综合》实时增量备份
1 使用binlog日志
1.1 问题
利用binlog恢复库表,要求如下:
- 启用binlog日志
- 创建db1库tb1表,插入3条记录
- 删除tb1表中刚插入的3条记录
- 使用mysqlbinlog恢复删除的3条记录
1.2 步骤
实现此案例需要按照如下步骤进行。
步骤一:启用binlog日志
1)调整/etc/my.cnf配置,并重启服务
- [root@dbsvr1 ~]# vim /etc/my.cnf
- [mysqld]
- .. ..
- log-bin-index=mysql-bin //启用二进制日志,并指定前缀
- server_id=1
- binlog_format=STATEMENT //在Mysql5.7中,binlog日志格式默认为ROW,但它不记录sql语句上下文相关信息。需要将binlog日志格式修改为STATEMENT
- .. ..
- [root@dbsvr1 ~]# systemctl restart mysqld.service
2)确认binlog日志文件
新启用binlog后,每次启动MySQl服务都会新生成一份日志文件:
- [root@dbsvr1 ~]# ls /var/lib/mysql/mysql-bin.*
- /var/lib/mysql/mysql-bin.000001 /var/lib/mysql/mysql-bin.index
其中mysql-bin.index文件记录了当前保持的二进制文件列表:
- [root@dbsvr1 ~]# cat /var/lib/mysql/mysql-bin.index
- ./mysql-bin.000001
重启MySQL服务程序,或者执行SQL操作“FLUSH LOGS;”,会生成一份新的日志:
- [root@dbsvr1 ~]# ls /var/lib/mysql/mysql-bin.*
- /var/lib/mysql/mysql-bin.000001 /var/lib/mysql/mysql-bin.index
- /var/lib/mysql/mysql-bin.000002
- [root@dbsvr1 ~]# cat /var/lib/mysql/mysql-bin.index
- ./mysql-bin.000001
- ./mysql-bin.000002
步骤二:利用binlog日志重做数据库操作
1)执行数据库表添加操作
创建db1·库tb1表,表结构自定义:
- mysql> CREATE DATABASE db1;
- Query OK, 1 row affected (0.05 sec)
- mysql> USE db1;
- Database changed
- mysql> CREATE TABLE tb1(
- -> id int(4) NOT NULL,name varchar(24)
- -> );
- Query OK, 0 rows affected (0.28 sec)
插入3条表记录:
- mysql> INSERT INTO tb1 VALUES
- -> (1,'Jack'),
- -> (2,'Kenthy'),
- -> (3,'Bob');
- Query OK, 3 rows affected (0.12 sec)
- Records: 3 Duplicates: 0 Warnings: 0
确认插入的表记录数据:
- mysql> SELECT * FROM tb1;
- +----+--------+
- | id | name |
- +----+--------+
- | 1 | Jack |
- | 2 | Kenthy |
- | 3 | Bob |
- +----+--------+
- 3 rows in set (0.00 sec)
2)删除前一步添加的3条表记录
执行删除所有表记录操作:
- mysql> DELETE FROM tb1;
- Query OK, 3 rows affected (0.09 sec)
确认删除结果:
- mysql> SELECT * FROM tb1;
- Empty set (0.00 sec)
步骤三:通过binlog日志恢复表记录
binlog会记录所有的数据库、表更改操作,所以可在必要的时候重新执行以前做过的一部分数据操作,但对于启用binlog之前已经存在的库、表数据将不适用。
根据上述“恢复被删除的3条表记录”的需求,应通过mysqlbinlog工具查看相关日志文件,找到删除这些表记录的时间点,只要恢复此前的SQL操作(主要是插入那3条记录的操作)即可。
1)查看mysql-bin.000002日志内容
- [root@dbsvr1 ~]# mysqlbinlog /var/lib/mysql/mysql-bin.000002
- /*!50530 SET @@SESSION.PSEUDO_SLAVE_MODE=1*/;
- /*!50003 SET @OLD_COMPLETION_TYPE=@@COMPLETION_TYPE,COMPLETION_TYPE=0*/;
- DELIMITER /*!*/;
- # at 4
- #170412 12:05:32 server id 1 end_log_pos 123 CRC32 0x6d8c069c Start: binlog v 4, server v 5.7.17-log created 170412 12:05:32 at startup
- # Warning: this binlog is either in use or was not closed properly.
- ROLLBACK/*!*/;
- BINLOG '
- jKftWA8BAAAAdwAAAHsAAAABAAQANS43LjE3LWxvZwAAAAAAAAAAAAAAAAAAAAAAAAAAAAAAAAAA
- AAAAAAAAAAAAAAAAAACMp+1YEzgNAAgAEgAEBAQEEgAAXwAEGggAAAAICAgCAAAACgoKKioAEjQA
- AZwGjG0=
- '/*!*/;
- # at 123
- #170412 12:05:32 server id 1 end_log_pos 154 CRC32 0x17f50164 Previous-GTIDs
- # [empty]
- # at 154
- #170412 12:05:59 server id 1 end_log_pos 219 CRC32 0x4ba5a976 Anonymous_GTID last_committed=0 sequence_number=1
- SET @@SESSION.GTID_NEXT= 'ANONYMOUS'/*!*/;
- # at 219
- #170412 12:05:59 server id 1 end_log_pos 310 CRC32 0x5b66ae13 Query thread_id=3 exec_time=0 error_code=0
- SET TIMESTAMP=1491969959/*!*/;
- SET @@session.pseudo_thread_id=3/*!*/;
- SET @@session.foreign_key_checks=1, @@session.sql_auto_is_null=0, @@session.unique_checks=1, @@session.autocommit=1/*!*/;
- SET @@session.sql_mode=1436549152/*!*/;
- SET @@session.auto_increment_increment=1, @@session.auto_increment_offset=1/*!*/;
- /*!C utf8 *//*!*/;
- SET @@session.character_set_client=33,@@session.collation_connection=33,@@session.collation_server=8/*!*/;
- SET @@session.lc_time_names=0/*!*/;
- SET @@session.collation_database=DEFAULT/*!*/;
- CREATE DATABASE db1
- /*!*/;
- # at 310
- #170412 12:06:23 server id 1 end_log_pos 375 CRC32 0x2967cc28 Anonymous_GTID last_committed=1 sequence_number=2
- SET @@SESSION.GTID_NEXT= 'ANONYMOUS'/*!*/;
- # at 375
- #170412 12:06:23 server id 1 end_log_pos 502 CRC32 0x5de09aae Query thread_id=3 exec_time=0 error_code=0
- use `db1`/*!*/;
- SET TIMESTAMP=1491969983/*!*/;
- CREATE TABLE tb1(
- id int(4) NOT NULL,name varchar(24)
- )
- /*!*/;
- # at 502
- #170412 12:06:55 server id 1 end_log_pos 567 CRC32 0x0b8cd418 Anonymous_GTID last_committed=2 sequence_number=3
- SET @@SESSION.GTID_NEXT= 'ANONYMOUS'/*!*/;
- # at 567
- #170412 12:06:55 server id 1 end_log_pos 644 CRC32 0x7e8f2fa0 Query thread_id=3 exec_time=0 error_code=0
- SET TIMESTAMP=1491970015/*!*/;
- BEGIN
- /*!*/;
- # at 644
- #170412 12:06:55 server id 1 end_log_pos 772 CRC32 0x4e3f728e Query thread_id=3 exec_time=0 error_code=0 //插入表记录的起始时间点
- SET TIMESTAMP=1491970015/*!*/;
- INSERT INTO tb1 VALUES(1,'Jack'),(2,'Kenthy'), (3,'Bob')
- /*!*/;
- # at 772
- #170412 12:06:55 server id 1 end_log_pos 803 CRC32 0x6138b21f Xid = 10
- //确认事务的时间点
- COMMIT/*!*/;
- # at 803
- #170412 12:07:24 server id 1 end_log_pos 868 CRC32 0xbef3f472 Anonymous_GTID last_committed=3 sequence_number=4
- SET @@SESSION.GTID_NEXT= 'ANONYMOUS'/*!*/;
- # at 868
- #170412 12:07:24 server id 1 end_log_pos 945 CRC32 0x5684e92c Query thread_id=3 exec_time=0 error_code=0
- SET TIMESTAMP=1491970044/*!*/;
- BEGIN
- /*!*/;
- # at 945
- #170412 12:07:24 server id 1 end_log_pos 1032 CRC32 0x4c1c75fc Query thread_id=3 exec_time=0 error_code=0 //删除表记录的时间点
- SET TIMESTAMP=1491970044/*!*/;
- DELETE FROM tb1
- /*!*/;
- # at 1032
- #170412 12:07:24 server id 1 end_log_pos 1063 CRC32 0xccf549b2 Xid = 12
- COMMIT/*!*/;
- SET @@SESSION.GTID_NEXT= 'AUTOMATIC' /* added by mysqlbinlog */ /*!*/;
- DELIMITER ;
- # End of log file
- /*!50003 SET COMPLETION_TYPE=@OLD_COMPLETION_TYPE*/;
- /*!50530 SET @@SESSION.PSEUDO_SLAVE_MODE=0*/;
2) 执行指定Pos节点范围内的sql命令恢复数据
根据上述日志分析,只要恢复从2014.01.12 20:12:14到2014.01.12 20:13:50之间的操作即可。可通过mysqlbinlog指定时间范围输出,结合管道交给msyql命令执行导入重做:
- [root@dbsvr1 ~]# mysqlbinlog
- --start-datetime="2017-04-12 12:06:55"
- --stop-datetime="2017-04-12 12:07:23"
- /var/lib/mysql/mysql-bin.000002 | mysql -u root -p
- Enter password: //验证口令
3)确认恢复结果
- mysql> SELECT * FROM db1.tb1;
- +----+--------+
- | id | name |
- +----+--------+
- | 1 | Jack |
- | 2 | Kenthy |
- | 3 | Bob |
- +----+--------+
- 3 rows in set (0.00 sec)
- 安装XtraBackup软件包。
- 使用XtraBackup执行完整备份、增量备份。
- 准备数据恢复目录。
2 XtraBackup备份工具
2.1 问题
2.2 步骤
实现此案例需要按照如下步骤进行。
步骤一:安装XtraBackup软件包
1)了解软件包描述信息
- [root@dbsvr1 pub]# rpm -qpi percona-xtrabackup-24-2.4.6-2.el7.x86_64.rpm
- Name : percona-xtrabackup-24
- Version : 2.4.6
- Release : 2.el7
- Architecture: x86_64
- Install Date: (not installed)
- Group : Applications/Databases
- Size : 32416340
- License : GPLv2
- Signature : DSA/SHA1, 2017年02月27日 星期一 20时28分17秒, Key ID 1c4cbdcdcd2efd2a
- Source RPM : percona-xtrabackup-24-2.4.6-2.el7.src.rpm
- Build Date : 2017年02月27日 星期一 20时27分21秒
- Build Host : vps-centos7-x64-01.ci.percona.com
- Relocations : (not relocatable)
- URL : http://www.percona.com/software/percona-xtrabackup
- Summary : XtraBackup online backup for MySQL / InnoDB
- Description :
- Percona XtraBackup is OpenSource online (non-blockable) backup solution for InnoDB and XtraDB engines
2)安装依赖包perl-DBD-MySQL perl-Digest-MD5 libev
使用RHEL 7自带的即可,yum方式安装:
- [root@dbsvr1 pub]# yum -y install perl-DBD-MySQL perl-Digest-MD5
- libev使用网上找的rpm包 libev-4.15-1.el6.rf.x86_64.rpm //该包由讲师提供
- [root@dbsvr1 pub]#rpm –ivh libev-4.15-1.el6.rf.x86_64.rpm
如果未安装这些依赖包,则直接安装percona-xtrabackup时会报错:
3)安装percona-xtrabackup
- [root@dbsvr1 pub]#rpm -ivh percona-xtrabackup-*.rpm
- 警告:percona-xtrabackup-24-2.4.6-2.el7.x86_64.rpm: 头V4 DSA/SHA1 Signature, 密钥 ID cd2efd2a: NOKEY
- 准备中... ################################# [100%]
- 正在升级/安装...
- 1:percona-xtrabackup-24-2.4.6-2.el7################################# [ 33%]
- 2:percona-xtrabackup-test-24-2.4.6-################################# [ 67%]
- 3:percona-xtrabackup-24-debuginfo-2################################# [100%]
4)确认安装的主要程序/脚本
- [root@dbsvr1 pub]# rpm -ql percona-xtrabackup-24-2.4.6-2.el7.x86_64
- /usr/bin/innobackupex
- /usr/bin/xbcloud
- /usr/bin/xbcloud_osenv
- /usr/bin/xbcrypt
- /usr/bin/xbstream
- /usr/bin/xtrabackup
- /usr/share/doc/percona-xtrabackup-24-2.4.6
- /usr/share/doc/percona-xtrabackup-24-2.4.6/COPYING
- /usr/share/man/man1/innobackupex.1.gz
- /usr/share/man/man1/xbcrypt.1.gz
- /usr/share/man/man1/xbstream.1.gz
- /usr/share/man/man1/xtrabackup.1.gz
步骤二:使用XtraBackup执行数据库备份
--host 主机名
--port 3306
--user 用户名
--password 密码
--databases="库名"
--databases="库1 库2"
--databases="库.表"
--no-timestamp 不用日期命名备份文件存储的子目录,使用备份的数据库名做备份目录名
--no-timestmap 不使用日期命名备份目录名
1)做一个完整备份
默认情况下,备份文件存储的子目录会用日期命名,
innobackupex作为客户端工具,以mysql协议连入mysqld,将数据备份到/backup文件夹:
- [root@dbsvr1 ~]# innobackupex --user=root --password=1234567 /backup/mysql –no-timestamp
- 170425 11:05:44 innobackupex: Starting the backup operation
- IMPORTANT: Please check that the backup run completes successfully.
- At the end of a successful backup run innobackupex
- prints "completed OK!".
- Unrecognized character x01; marked by <-- HERE after <-- HERE near column 1 at - line 1374.
- 170425 11:05:45 Connecting to MySQL server host: localhost, user: root, password: set, port: not set, socket: not set
- Using server version 5.7.17
- innobackupex version 2.4.6 based on MySQL server 5.7.13 Linux (x86_64) (revision id: 8ec05b7)
- xtrabackup: uses posix_fadvise().
- xtrabackup: cd to /var/lib/mysql
- xtrabackup: open files limit requested 0, set to 1024
- xtrabackup: using the following InnoDB configuration:
- xtrabackup: innodb_data_home_dir = .
- xtrabackup: innodb_data_file_path = ibdata1:12M:autoextend
- xtrabackup: innodb_log_group_home_dir = ./
- xtrabackup: innodb_log_files_in_group = 2
- xtrabackup: innodb_log_file_size = 50331648
- InnoDB: Number of pools: 1
- 170425 11:05:45 >> log scanned up to (2543893)
- xtrabackup: Generating a list of tablespaces
- InnoDB: Allocated tablespace ID 2 for mysql/plugin, old maximum was 0
- 170425 11:05:45 [01] Copying ./ibdata1 to /backup/ibdata1
- 170425 11:05:45 [01] ...done
- 170425 11:05:46 [01] Copying ./mysql/plugin.ibd to /backup/mysql/plugin.ibd
- 170425 11:05:46 [01] ...done
- 170425 11:05:46 [01] Copying ./mysql/servers.ibd to /backup/mysql/servers.ibd
- 170425 11:05:46 [01] ...done
- 170425 11:05:46 [01] Copying ./mysql/help_topic.ibd to /backup/mysql/help_topic.ibd
- 170425 11:05:46 [01] ...done
- 170425 11:05:46 >> log scanned up to (2543893)
- .. ..
- 170425 11:06:00 [01] Copying ./sys/x@0024waits_global_by_latency.frm to /backup/sys/x@0024waits_global_by_latency.frm
- 170425 11:06:00 [01] ...done
- 170425 11:06:00 [01] Copying ./sys/session_ssl_status.frm to /backup/sys/session_ssl_status.frm
- 170425 11:06:00 [01] ...done
- 170425 11:06:00 [01] Copying ./db1/db.opt to /backup/db1/db.opt
- 170425 11:06:00 [01] ...done
- 170425 11:06:00 [01] Copying ./db1/tb1.frm to /backup/db1/tb1.frm
- 170425 11:06:00 [01] ...done
- 170425 11:06:00 Finished backing up non-InnoDB tables and files
- 170425 11:06:00 Executing FLUSH NO_WRITE_TO_BINLOG ENGINE LOGS...
- xtrabackup: The latest check point (for incremental): '2543884'
- xtrabackup: Stopping log copying thread.
- .170425 11:06:00 >> log scanned up to (2543893)
- 170425 11:06:00 Executing UNLOCK TABLES
- 170425 11:06:00 All tables unlocked
- 170425 11:06:00 [00] Copying ib_buffer_pool to /backup/ib_buffer_pool
- 170425 11:06:00 [00] ...done
- 170425 11:06:00 Backup created in directory '/backup/'
- 170425 11:06:00 [00] Writing backup-my.cnf
- 170425 11:06:00 [00] ...done
- 170425 11:06:00 [00] Writing xtrabackup_info
- 170425 11:06:00 [00] ...done
- xtrabackup: Transaction log of lsn (2543884) to (2543893) was copied.
- 170425 11:06:01 completed OK
确认备份好的文件数据:
- [root@dbsvr1 ~]#ls /backup/
- backup-my.cnf ib_buffer_pool mysql sys xtrabackup_info
- db1 ibdata1 performance_schema xtrabackup_checkpoints xtrabackup_logfile
2)做一个增量备份(基于前一步的完整备份)
随意做一些新增或更改库表的操作,比如在db1库中新建一个mytb的表:
- mysql> USE db1;
- Database changed
- mysql> CREATE TABLE mytb(id int(4), name varchar(24));
- Query OK, 0 rows affected (0.38 sec)
- mysql> INSERT INTO tb1 VALUES
- -> (1,'bon'),
- -> (2,'bo'),
- Query OK, 2 rows affected (0.12 sec)
- Records: 2 Duplicates: 0 Warnings: 0
- mysql> SELECT * FROM tb1;
- +------+------+
- | id | name |
- +------+------+
- | 1 | bob |
- | 2 | bo |
- +------+------+
- 2 rows in set (0.00 sec)
以前一次保存到/backup的完整备份为基础,做一个增量备份,保存到/incr01/,指定增量备份参照的基本目录(完整备份目录)需要用到选项--incremental-basedir。相关操作如下:
- [root@dbsvr1 ~]# innobackupex --user=root --password=12345678 --incremental /incr01 --incremental-basedir=/backup/ --no-timestamp
- 170425 11:30:14 innobackupex: Starting the backup operation
- IMPORTANT: Please check that the backup run completes successfully.
- At the end of a successful backup run innobackupex
- prints "completed OK!".
- Unrecognized character x01; marked by <-- HERE after <-- HERE near column 1 at - line 1374.
- 170425 11:30:14 Connecting to MySQL server host: localhost, user: root, password: set, port: not set, socket: not set
- Using server version 5.7.17
- innobackupex version 2.4.6 based on MySQL server 5.7.13 Linux (x86_64) (revision id: 8ec05b7)
- incremental backup from 2543884 is enabled.
- xtrabackup: uses posix_fadvise().
- xtrabackup: cd to /var/lib/mysql
- xtrabackup: open files limit requested 0, set to 1024
- xtrabackup: using the following InnoDB configuration:
- xtrabackup: innodb_data_home_dir = .
- xtrabackup: innodb_data_file_path = ibdata1:12M:autoextend
- xtrabackup: innodb_log_group_home_dir = ./
- xtrabackup: innodb_log_files_in_group = 2
- xtrabackup: innodb_log_file_size = 50331648
- InnoDB: Number of pools: 1
- 170425 11:30:14 >> log scanned up to (2549933)
- xtrabackup: Generating a list of tablespaces
- InnoDB: Allocated tablespace ID 2 for mysql/plugin, old maximum was 0
- xtrabackup: using the full scan for incremental backup
- 170425 11:30:15 [01] Copying ./ibdata1 to /incr01/ibdata1.delta
- 170425 11:30:15 [01] ...done
- 170425 11:30:15 >> log scanned up to (2549933)
- 170425 11:30:15 [01] Copying ./mysql/plugin.ibd to /incr01/mysql/plugin.ibd.delta
- 170425 11:30:15 [01] ...done
- ... ...
- 170425 11:30:35 Executing UNLOCK TABLES
- 170425 11:30:35 All tables unlocked
- 170425 11:30:35 [00] Copying ib_buffer_pool to /incr01/ib_buffer_pool
- 170425 11:30:35 [00] ...done
- 170425 11:30:35 Backup created in directory '/incr01/'
- 170425 11:30:35 [00] Writing backup-my.cnf
- 170425 11:30:35 [00] ...done
- 170425 11:30:35 [00] Writing xtrabackup_info
- 170425 11:30:35 [00] ...done
- xtrabackup: Transaction log of lsn (2549924) to (2549933) was copied.
- 170425 11:30:35 completed OK!
确认备份好的文件数据:
- [root@dbsvr1 ~]# ls /incr01/
- backup-my.cnf ib_buffer_pool ibdata1.meta performance_schema xtrabackup_checkpoints xtrabackup_logfile
- db1 ibdata1.delta mysql sys
对比完整备份、增量备份的大小:
- [root@dbsvr1 ~]# du -sh /backup/ /incr01/
- 142M /backup/ //完整备份的大小
- 3.5M /incr01/ //增量备份的大小
步骤三:准备用于恢复的数据库目录
通过XtraBackup工具备份的数据库目录,若要恢复到另一个MySQL服务器,需要先做一个“--apply-log --redo-only ”的准备操作。
1)准备恢复“完整备份”
完成准备以后,最终/backup可用来重建MySQL服务器。这种情况下,需要先做一个“--apply-log --redo-only ”的准备操作,以确保数据一致性:
- [root@dbsvr1 ~]#innobackupex --user=root --password=12345678 --apply-log --redo-only /backup/
- 170425 11:42:19 innobackupex: Starting the apply-log operation
- IMPORTANT: Please check that the apply-log run completes successfully.
- At the end of a successful apply-log run innobackupex
- prints "completed OK!".
- innobackupex version 2.4.6 based on MySQL server 5.7.13 Linux (x86_64) (revision id: 8ec05b7)
- xtrabackup: cd to /backup/
- xtrabackup: This target seems to be already prepared.
- InnoDB: Number of pools: 1
- xtrabackup: notice: xtrabackup_logfile was already used to '--prepare'.
- xtrabackup: using the following InnoDB configuration for recovery:
- xtrabackup: innodb_data_home_dir = .
- xtrabackup: innodb_data_file_path = ibdata1:12M:autoextend
- xtrabackup: innodb_log_group_home_dir = .
- xtrabackup: innodb_log_files_in_group = 2
- xtrabackup: innodb_log_file_size = 50331648
- xtrabackup: Starting InnoDB instance for recovery.
- xtrabackup: Using 104857600 bytes for buffer pool (set by --use-memory parameter)
- InnoDB: PUNCH HOLE support available
- InnoDB: Mutexes and rw_locks use GCC atomic builtins
- InnoDB: Uses event mutexes
- InnoDB: GCC builtin __atomic_thread_fence() is used for memory barrier
- InnoDB: Compressed tables use zlib 1.2.7
- InnoDB: Number of pools: 1
- InnoDB: Not using CPU crc32 instructions
- InnoDB: Initializing buffer pool, total size = 100M, instances = 1, chunk size = 100M
- InnoDB: Completed initialization of buffer pool
- InnoDB: page_cleaner coordinator priority: -20
- InnoDB: Highest supported file format is Barracuda.
- xtrabackup: starting shutdown with innodb_fast_shutdown = 1
- InnoDB: Starting shutdown...
- InnoDB: Shutdown completed; log sequence number 2544177
- InnoDB: Number of pools: 1
- 170425 11:42:20 completed OK!
准备恢复“增量备份”
- [root@dbsvr1 ~]#innobackupex --user=root --password=12345678 --apply-log --redo-only /backup/ --incremental-dir=/incr01
- 170425 11:42:55 innobackupex: Starting the apply-log operation
- IMPORTANT: Please check that the apply-log run completes successfully.
- At the end of a successful apply-log run innobackupex
- prints "completed OK!".
- innobackupex version 2.4.6 based on MySQL server 5.7.13 Linux (x86_64) (revision id: 8ec05b7)
- incremental backup from 2543884 is enabled.
- xtrabackup: cd to /backup/
- xtrabackup: This target seems to be already prepared with --apply-log-only.
- InnoDB: Number of pools: 1
- xtrabackup: xtrabackup_logfile detected: size=8388608, start_lsn=(2549924)
- xtrabackup: using the following InnoDB configuration for recovery:
- xtrabackup: innodb_data_home_dir = .
- xtrabackup: innodb_data_file_path = ibdata1:12M:autoextend
- xtrabackup: innodb_log_group_home_dir = /incr01/
- xtrabackup: innodb_log_files_in_group = 1
- xtrabackup: innodb_log_file_size = 8388608
- xtrabackup: Generating a list of tablespaces
- InnoDB: Allocated tablespace ID 2 for mysql/plugin, old maximum was 0
- xtrabackup: page size for /incr01//ibdata1.delta is 16384 bytes
- Applying /incr01//ibdata1.delta to ./ibdata1...
- ... ...
- 170425 11:43:09 [01] Copying /incr01/performance_schema/global_status.frm to ./performance_schema/global_status.frm
- 170425 11:43:09 [01] ...done
- 170425 11:43:09 [01] Copying /incr01/performance_schema/session_status.frm to ./performance_schema/session_status.frm
- 170425 11:43:09 [01] ...done
- 170425 11:43:09 [00] Copying /incr01//xtrabackup_info to ./xtrabackup_info
- 170425 11:43:09 [00] ...done
- 170425 11:43:10 completed OK!
2)关闭mysql服务,并将/var/lib/mysql/下的文件删除,假设数据被删除。
- [root@dbsvr1 ~]#systemctl stop mysqld
- [root@dbsvr1 ~]#rm -rf /var/lib/mysql
3)恢复“完整备份+增量备份”
完成准备以后,最终仍然是/backup用来重建MySQL服务器,但这种情况下需提前合并相关增量备份的数据
- [root@dbsvr1 ~]# innobackupex --user=root --password=12345678 --copy-back /backup/
- ... ...
- 170425 11:51:39 [01] Copying ./performance_schema/global_status.frm to /var/lib/mysql/performance_schema/glo.frm
- 170425 11:51:39 [01] ...done
- 170425 11:51:39 [01] Copying ./performance_schema/session_status.frm to /var/lib/mysql/performance_schema/seus.frm
- 170425 11:51:39 [01] ...done
- 170425 11:51:39 [01] Copying ./ib_buffer_pool to /var/lib/mysql/ib_buffer_pool
- 170425 11:51:39 [01] ...done
- 170425 11:51:39 [01] Copying ./ibtmp1 to /var/lib/mysql/ibtmp1
- 170425 11:51:39 [01] ...done
- 170425 11:51:39 [01] Copying ./xtrabackup_info to /var/lib/mysql/xtrabackup_info
- 170425 11:51:39 [01] ...done
- 170425 11:51:39 completed OK!
4)修改/var/lib/mysql/下文件属主与属组,查看数据:
恢复后,/var/lib/mysql下文件属组与属主皆为root,需要更改为mysql
- [root@dbsvr1 ~]#chown -R mysql:mysql /var/lib/mysql
- [root@dbsvr1 ~]#systemctl start mysqld.service
- [root@dbsvr1 ~]#mysql -uroot -p12345678 -e "select * from db1.tb1"
- mysql: [Warning] Using a password on the command line interface can be insecure.
- +------+------+
- | id | name |
- +------+------+
- | 1 | bob |
- | 2 | bo |
- +------+------+
- 配置2台MySQL服务器,实现 主-->从 同步。
- 其中Master服务器允许SQL查询、写入,Slave服务器只允许SQL查询
3 MySQL AB复制
3.1 问题
3.2 方案
使用2台RHEL 6虚拟机,如图-1所示。其中192.168.4.10是MySQL主服务器,负责提供同步源;另一台192.168.4.20作为MySQL从服务器,通过调取主服务器上的binlog日志,在本地重做对应的库、表,实现与主服务器的AB复制(同步)。
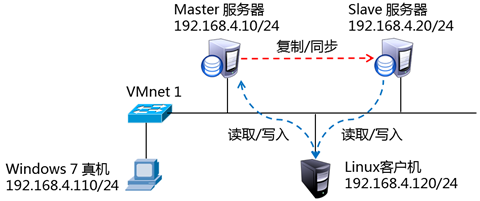
图-1
提前为两台MySQL服务器安装好MySQL-server、MySQL-Client软件包,并为数据库用户root修改密码;Linux客户机上则只需安装MySQL-Client软件包即可。
3.3 步骤
实现此案例需要按照如下步骤进行。
步骤一:初始化现有库
为了在启用binlog日志及同步之前保持主、从库的一致性,建议进行初始化——备份主服务器上现有的库,然后导入到从服务器上。
当现有库、表都采用MyISAM引擎时,可执行离线备份、恢复,这样更有效率;否则,可通过mysqldump等工具来实现库的导出、导入。
1)备份MySQL Master(192.168.4.10)上现有的库
如果服务器已经启用binlog,建议对日志做一次重置,否则可忽略:
- [root@dbsvr1 ~]# mysql -u root -p
- Enter password: //以数据库用户root登入
- .. ..
- mysql> RESET MASTER; //重置binlog日志
- Query OK, 0 rows affected (0.06 sec)
- mysql> quit //退出mysql> 环境
- Bye
以备份mysql库、sys库为例,导出操作如下:
- [root@dbsvr1 ~]# mysqldump -u root -p –all-databases > /root/mytest.sql
- Enter password: //验证口令
- [root@dbsvr1 ~]# ls -lh /root/mytest.sql //确认备份结果
- -rw-r--r--. 1 root root 777172 4月 23 12:21 /root/mytest.sql
2)在MySQL Slave(192.168.4.20)上导入备份的库
先清理目标库,避免导入时冲突。主要是采用InnoDB引擎的库,授权库mysql多采用MyISAM引擎,可不做清理。
- [root@dbsvr2 ~]# mysql -u root -p
- Enter password: //以数据库用户root登入
- .. ..
- mysql> DROP DATABASE test; //删除test库
- Query OK, 0 rows affected (0.03 sec)
- mysql> quit //退出mysql> 环境
- Bye
使用scp工具下载备份文件:
- [root@dbsvr2 ~]# scp /root/mytest.sql root@192.168.4.20:/
- root@dbsvr1's password: //验证对方系统用户root的口令
- mytest.sql 100% 759KB 759.0KB/s 00:00
- [root@dbsvr2 ~]# ls -lh mytest.sql //确认下载结果
- -rw-r--r--. 1 root root 759K 4月 23 12:22 /mytest.sql
执行导入操作:
- [root@dbsvr2 ~]# mysql -u root -p < /mytest.sql
- Enter password: //验证口令
导入成功后,可重新登入 mysql> 环境,确认清理的目标库已恢复:
- mysql> show databases;
- +--------------------+
- | Database |
- +--------------------+
- | information_schema |
- | mysql |
- | performance_schema |
- | sys |
- +--------------------+
- 4 rows in set (0.00 sec)
步骤二:配置MySQL Master(主服务器,192.168.4.10)
1)修改/etc/my.cnf配置,重新启动MySQL服务程序
指定服务器ID号、允许日志同步:
- [root@dbsvr1 mysql]# vim /etc/my.cnf
- [mysqld]
- log_bin=dbsvr1-bin //启用binlog日志,并指定文件名前缀
- server_id = 10 //指定服务器ID号
- ......
重启mysql服务:
- [root@dbsvr1 ~]# systemctl restart mysqld.service
2)新建一个备份用户,授予复制权限
需要的权限为REPLICATION SLAVE,允许其从Slave服务器访问:
- mysql> GRANT REPLICATION SLAVE ON *.* TO 'replicater'@'192.168.4.%' IDENTIFIED BY 'pwd123';
- Query OK, 0 rows affected, 1 warning (0.09 sec)
3)检查Master服务器的同步状态
在已经初始化现有库的情况下,查看MASTER状态,记录下当前的日志文件名、偏移的位置(下面SLAVE发起复制时需要用到):
- mysql> SHOW MASTER STATUSG
- *************************** 1. row ***************************
- File: dbsvr1-bin.000001 //记住当前的日志文件名
- Position: 154 //记住当前的位置
- Binlog_Do_DB:
- Binlog_Ignore_DB:
- Executed_Gtid_Set:
- 1 row in set (0.00 sec)
步骤三:配置MySQL Slave(从服务器,192.168.4.20)
1)修改/etc/my.cnf配置,重新启动MySQL服务程序
指定服务器ID号、允许日志同步:
- [root@dbsvr2 ~]# vim /etc/my.cnf
- [mysqld]
- log_bin=dbsvr2-bin //启动SQL日志,并指定文件名前缀
- server_id = 20 //指定服务器ID号,不要与Master的相同
- .. ..
在生产环境中,还可以根据需要设置更详细的同步选项。比如,指定当主、从网络中断时的重试超时时间(slave-net-timeout=60 )等,具体可参考MySQL手册。
配置完成后,重启mysql服务:
- [root@dbsvr2 ~]# systemctl restart mysqld.service
通过CHANGE MASTER语句指定MASTER服务器的IP地址、同步用户名/密码、起始日志文件、偏移位置(参考MASTER上的状态输出):
- mysql> CHANGE MASTER TO MASTER_HOST='192.168.4.10',
- -> MASTER_USER='replicater',
- -> MASTER_PASSWORD='pwd123',
- -> MASTER_LOG_FILE='dbsvr1-bin.000002', //对应Master的日志文件
- -> MASTER_LOG_POS=334; //对应Master的日志偏移位置
- Query OK, 0 rows affected, 2 warnings (0.12 sec)
然后执行START SLAVE(较早版本中为SLAVE START)启动复制:
- mysql> START SLAVE; //启动复制
- Query OK, 0 rows affected (0.00 sec)
注意:一旦启用SLAVE复制,当需要修改MASTER信息时,应先执行STOP SLAVE停止复制,然后重新修改、启动复制。
通过上述连接操作,MASTER服务器的设置信息自动存为master.info文件,以后每次MySQL服务程序时会自动调用并更新,无需重复设置。查看master.info文件的开头部分内容,可验证相关设置:
- [root@dbsvr2 ~]# ls -lh /var/lib/mysql/master.info
- -rw-r-----. 1 mysql mysql 132 4月 23 12:06 /var/lib/mysql/master.info
- [root@dbsvr2 ~]# head /var/lib/mysql/master.info
- 25
- dbsvr1-bin.000001
- 154
- 192.168.4.10
- replicater
- pwd123
- 3306
- 60
- 0
2)检查Slave服务器的同步状态
通过SHOW SLAVE STATUS语句可查看从服务器状态,确认其中的IO线程、SQL线程正常运行,才能成功同步:
- mysql> SHOW SLAVE STATUSG
- Slave_IO_State: Waiting for master to send event
- Master_Host: 192.168.4.1
- Master_User: replicater
- Master_Port: 3306
- Connect_Retry: 60
- Master_Log_File: dbsvr1-bin.000001
- Read_Master_Log_Pos: 154
- Relay_Log_File: db2-relay-bin.000003
- Relay_Log_Pos: 321
- Relay_Master_Log_File: dbsvr1-bin.000001
- Slave_IO_Running: Yes //IO线程应该已运行
- Slave_SQL_Running: Yes //SQL线程应该已运行
- Replicate_Do_DB:
- Replicate_Ignore_DB:
- Replicate_Do_Table:
- Replicate_Ignore_Table:
- Replicate_Wild_Do_Table:
- Replicate_Wild_Ignore_Table:
- Last_Errno: 0
- Last_Error:
- Skip_Counter: 0
- Exec_Master_Log_Pos: 154
- Relay_Log_Space: 2490
- Until_Condition: None
- Until_Log_File:
- Until_Log_Pos: 0
- Master_SSL_Allowed: No
- Master_SSL_CA_File:
- Master_SSL_CA_Path:
- Master_SSL_Cert:
- Master_SSL_Cipher:
- Master_SSL_Key:
- Seconds_Behind_Master: 0
- Master_SSL_Verify_Server_Cert: No
- Last_IO_Errno: 0
- Last_IO_Error:
- Last_SQL_Errno: 0
- Last_SQL_Error:
- Replicate_Ignore_Server_Ids:
- Master_Server_Id: 10
- Master_UUID: 2d4d8a11-27b7-11e7-ae78-52540055c180
- Master_Info_File: /var/lib/mysql/master.info
- SQL_Delay: 0
- SQL_Remaining_Delay: NULL
- Slave_SQL_Running_State: Slave has read all relay log; waiting for more updates
- Master_Retry_Count: 86400
- Master_Bind:
- Last_IO_Error_Timestamp:
- Last_SQL_Error_Timestamp:
- Master_SSL_Crl:
- Master_SSL_Crlpath:
- Retrieved_Gtid_Set:
- Executed_Gtid_Set:
- Auto_Position: 0
- Replicate_Rewrite_DB:
- Channel_Name:
- Master_TLS_Version:
- 1 row in set (0.00 sec)
若START SLAVE直接报错失败,请检查CHANGE MASTER相关设置是否有误,纠正后再重试;若IO线程或SQL线程有一个为“No”,则应检查服务器的错误日志,分析并排除故障后重启主从复制。
步骤四:测试主从同步效果
1)在Master上操作数据库、表、表记录
新建newdb库、newtable表,随意插入几条表记录:
- mysql> CREATE DATABASE newdb; //新建库newdb
- Query OK, 1 row affected (0.17 sec)
- mysql> USE newdb; //切换到newdb库
- Database changed
- mysql> CREATE TABLE newtable(id int(4)); //新建newtable表
- Query OK, 0 rows affected (0.46 sec)
- mysql> INSERT INTO newtable VALUES(1234),(5678); //插入2条表记录
- Query OK, 2 rows affected (0.24 sec)
- Records: 2 Duplicates: 0 Warnings: 0
- mysql> SELECT * FROM newtable; //确认表数据
- +------+
- | id |
- +------+
- | 1234 |
- | 5678 |
- +------+
- 2 rows in set (0.00 sec)
2)在Slave上确认自动同步的结果
直接切换到newdb库,并查询newtable表的记录,应该与Master上的一样,这才说明主从同步已经成功生效:
- mysql> USE newdb; //直接切换到newdb库
- Reading table information for completion of table and column names
- You can turn off this feature to get a quicker startup with -A
- Database changed
- mysql> SELECT * FROM newtable; //输出表记录
- +------+
- | id |
- +------+
- | 1234 |
- | 5678 |
- +------+
- 2 rows in set (0.02 sec)
3)在Master服务器上可查看Slave主机的信息
- mysql> SHOW SLAVE HOSTS;
- +-----------+------+------+-----------+--------------------------------------+
- | Server_id | Host | Port | Master_id | Slave_UUID |
- +-----------+------+------+-----------+--------------------------------------+
- | 2 | | 3306 | 10 | 512cf7c1-27c4-11e7-8f4b-5254007b030b |
- +-----------+------+------+-----------+--------------------------------------+
- 1 row in set (0.00 sec)
步骤五:将Slave服务器设为只读
一般来说,为了避免写入冲突,采用主、从复制结构时,不应该允许用户从Slave执行数据库写入操作,这样会导致双方数据的不一致性。
正因为如此,我们可以把Slave数据库限制为只读模式,这种情况下有SUPER权限的用户和SLAVE同步线程才能写入。相关验证操作及效果可参考以下过程。
1)新建一个测试用户rwuser(不能用root测试)
在Master上建立即可,会自动同步到Slave上:
- mysql> GRANT all ON newdb.* TO rwuser@localhost IDENTIFIED BY '1234567';
- Query OK, 0 rows affected, 1 warning (0.09 sec)
2)未启用只读前,验证从Slave写入
在Slave上以rwuser登入(不要用root哦):
- [root@dbsvr2 ~]# mysql -u rwuser -p
- Enter password:
- Welcome to the MySQL monitor. Commands end with ; or g.
- Your MySQL connection id is 30
- Server version: 5.7.17-log MySQL Community Server (GPL)
- Copyright (c) 2000, 2016, Oracle and/or its affiliates. All rights reserved.
- Oracle is a registered trademark of Oracle Corporation and/or its
- affiliates. Other names may be trademarks of their respective
- owners.
- Type 'help;' or 'h' for help. Type 'c' to clear the current input statement.
- mysql>
然后向newdb库中新建一个booker表:
- mysql> USE newdb; //切换到newdb库
- Reading table information for completion of table and column names
- You can turn off this feature to get a quicker startup with -A
- Database changed
- mysql> CREATE TABLE booker(id int(12)); //成功创建booker表
- Query OK, 0 rows affected (0.64 sec)
在Slave上可看到新建的booker表:
- mysql> SHOW TABLES;
- +-----------------+
- | Tables_in_newdb |
- +-----------------+
- | booker |
- | newtable |
- +-----------------+
- 2 rows in set (0.00 sec)
但是在Master上却看不到,导致主、从上的newdb出现不一致:
- mysql> USE newdb;
- Reading table information for completion of table and column names
- You can turn off this feature to get a quicker startup with -A
- Database changed
- mysql> SHOW TABLES; //看不到Slave上新建的表
- +-----------------+
- | Tables_in_newdb |
- +-----------------+
- | newtable |
- +-----------------+
- 1 row in set (0.00 sec)
完成上述验证后,在Slave上删除booker表,确保双方一致:
- mysql> DROP TABLE booker;
- Query OK, 0 rows affected (0.27 sec)
3)修改/etc/my.cnf文件,重载配置
- [root@dbsvr2 ~]# vim /etc/my.cnf
- [mysqld]
- .. ..
- read_only=1 //启动只读模式
- [root@dbsvr2 ~]# systemctl restart mysqld.service //重启服务
4)再次在Slave上验证数据库写入操作
仍然是以rwuser登入(不要用root哦)来验证,当尝试创建新表时会被拒绝:
- mysql> USE newdb; //切换到newdb库
- Reading table information for completion of table and column names
- You can turn off this feature to get a quicker startup with -A
- Database changed
- mysql> CREATE TABLE booker(id int(12)); //新建表的写入操作失败
- ERROR 1290 (HY000): The MySQL server is running with the --read-only option so it cannot execute this statement
- mysql> DROP TABLE mytable; //删除表的写入操作一样会失败
- ERROR 1290 (HY000): The MySQL server is running with the --read-only option so it cannot execute this statement