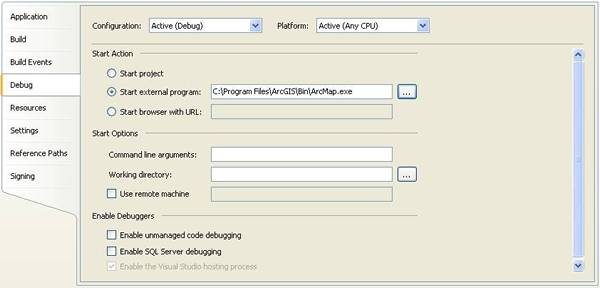
To debug an add-in, follow these steps:
- Confirm that the add-in is deployed to the well known folder where the Desktop applications will access it. Typically this is already done because add-ins created with the ESRI Visual Studio integrated development environment (IDE) template are automatically deployed each time they are built.
- Establish the target application in the project debug settings dialog box. For example, to use ArcMap.exe as the debugging application, do the following:
- Right-click the add-in project in the Solution Explorer window and click Properties.
- Click the Debug tab on the property page.
- Under Start Action, click the Start external program radio button to use ArcMap.exe in the Bin folder of your ArcGIS install directory as shown in the following screen shot:

Once an add-in has been loaded in an application, subsequent changes to the add-in project will not appear until the running application is restarted.
Depending on which version of .NET you are targeting, you may have to alter the Desktop application's configuration file to get debugging to work properly. For example, if you've written an add-in for ArcMap that uses .NET 4.0, make sure v4.0 is set as the supported run-time in ArcMap.exe.config which resides beside ArcMap.exe.
[XML]<?xml version="1.0" encoding="utf-8"?>
<configuration>
<startup>
<supportedRuntime version="v4.0.30319"/>
<!--<supportedRuntime version="v2.0.50727"/>-->
</startup>
...
</configuration>
Conversely, if you can't debug your .NET 3.5 (or under) add-in, make sure .NET 2.0 is listed as the supported run-time in your desktop configuration file.
[XML]<?xml version="1.0" encoding="utf-8"?>
<configuration>
<startup>
<supportedRuntime version="v2.0.50727"/>
<!--<supportedRuntime version="v4.0.30319"/>-->
</startup>
...
</configuration>
After changing a desktop configuration file, you may have to restart Visual Studio for the changes to take effect.