Python的WEB框架有Django、Tornado、Flask 等多种,Django相较与其他WEB框架其优势为:大而全,框架本身集成了ORM、模型绑定、模板引擎、缓存、Session等诸多功能。
1,基本配置
一、创建django程序
终端命令:django-admin startproject sitename
IDE 创建Django程序时,本质上都是自动执行上述命令
其他常用命令:
python manage.py runserver 0.0.0.0
python manage.py startapp appname
python manage.py syncdb
python manage.py makemigrations
python manage.py migrate
python manage.py createsuperuser
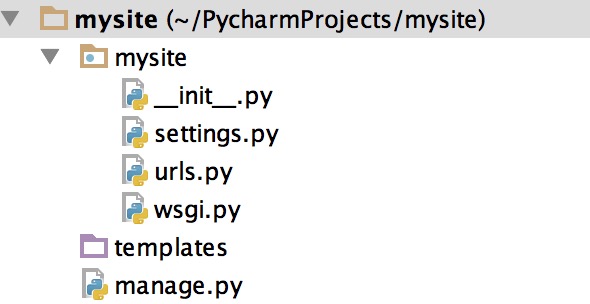
二,程序目录

三、配置文件
1、数据库
DATABASES = {
    'default': {
    'ENGINE': 'django.db.backends.mysql',
    'NAME':'dbname',
    'USER': 'root',
    'PASSWORD': 'xxx',
    'HOST': '',
    'PORT': '',
    }
}
# 由于Django内部连接MySQL时使用的是MySQLdb模块,而python3中还无此模块,所以需要使用pymysql来代替

# 如下设置放置的与project同名的配置的 __init__.py文件中

import pymysql
pymysql.install_as_MySQLdb()
2、模版
TEMPLATE_DIRS = (
        os.path.join(BASE_DIR,'templates'),
    )
3、静态文件
STATICFILES_DIRS = (
        os.path.join(BASE_DIR,'static'),
    )
model
到目前为止,当我们的程序涉及到数据库相关操作时,我们一般都会这么搞:
- 创建数据库,设计表结构和字段
- 使用 MySQLdb 来连接数据库,并编写数据访问层代码
- 业务逻辑层去调用数据访问层执行数数据库操作

import MySQLdb

def GetList(sql):
    db = MySQLdb.connect(user='root', db='wupeiqidb', passwd='1234', host='localhost')
    cursor = db.cursor()
    cursor.execute(sql)
    data = cursor.fetchall()
    db.close()
    return data

def GetSingle(sql):
    db = MySQLdb.connect(user='root', db='wupeiqidb', passwd='1234', host='localhost')
    cursor = db.cursor()
    cursor.execute(sql)
    data = cursor.fetchone()
    db.close()
    return data
django为使用一种新的方式,即:关系对象映射(Object Relational Mapping,简称ORM)。
PHP:activerecord
Java:Hibernate
C#:Entity Framework
django中遵循 Code Frist 的原则,即:根据代码中定义的类来自动生成数据库表。
一、创建表
1、基本结构
from django.db import models

class userinfo(models.Model):
    name = models.CharField(max_length=30)
    email = models.EmailField()
    memo = models.TextField()

1、models.AutoField  自增列 = int(11)
  如果没有的话,默认会生成一个名称为 id 的列,如果要显示的自定义一个自增列,必须将给列设置为主键 primary_key=True。
2、models.CharField  字符串字段
  必须 max_length 参数
3、models.BooleanField  布尔类型=tinyint(1)
  不能为空,Blank=True
4、models.ComaSeparatedIntegerField  用逗号分割的数字=varchar
  继承CharField,所以必须 max_lenght 参数
5、models.DateField  日期类型 date
  对于参数,auto_now = True 则每次更新都会更新这个时间;auto_now_add 则只是第一次创建添加,之后的更新不再改变。
6、models.DateTimeField  日期类型 datetime
  同DateField的参数
7、models.Decimal  十进制小数类型 = decimal
  必须指定整数位max_digits和小数位decimal_places
8、models.EmailField  字符串类型(正则表达式邮箱) =varchar
  对字符串进行正则表达式
9、models.FloatField  浮点类型 = double
10、models.IntegerField  整形
11、models.BigIntegerField  长整形
  integer_field_ranges = {
    'SmallIntegerField': (-32768, 32767),
    'IntegerField': (-2147483648, 2147483647),
    'BigIntegerField': (-9223372036854775808, 9223372036854775807),
    'PositiveSmallIntegerField': (0, 32767),
    'PositiveIntegerField': (0, 2147483647),
  }
12、models.IPAddressField  字符串类型(ip4正则表达式)
13、models.GenericIPAddressField  字符串类型(ip4和ip6是可选的)
  参数protocol可以是:both、ipv4、ipv6
  验证时,会根据设置报错
14、models.NullBooleanField  允许为空的布尔类型
15、models.PositiveIntegerFiel  正Integer
16、models.PositiveSmallIntegerField  正smallInteger
17、models.SlugField  减号、下划线、字母、数字
18、models.SmallIntegerField  数字
  数据库中的字段有:tinyint、smallint、int、bigint
19、models.TextField  字符串=longtext
20、models.TimeField  时间 HH:MM[:ss[.uuuuuu]]
21、models.URLField  字符串,地址正则表达式
22、models.BinaryField  二进制
23、models.ImageField   图片
24、models.FilePathField 文件

1、null=True
  数据库中字段是否可以为空
2、blank=True
  django的 Admin 中添加数据时是否可允许空值
3、primary_key = False
  主键,对AutoField设置主键后,就会代替原来的自增 id 列
4、auto_now 和 auto_now_add
  auto_now   自动创建---无论添加或修改,都是当前操作的时间
  auto_now_add  自动创建---永远是创建时的时间
5、choices
GENDER_CHOICE = (
        (u'M', u'Male'),
        (u'F', u'Female'),
    )
gender = models.CharField(max_length=2,choices = GENDER_CHOICE)
6、max_length
7、default  默认值
8、verbose_name  Admin中字段的显示名称
9、name|db_column  数据库中的字段名称
10、unique=True  不允许重复
11、db_index = True  数据库索引
12、editable=True  在Admin里是否可编辑
13、error_messages=None  错误提示
14、auto_created=False  自动创建
15、help_text  在Admin中提示帮助信息
16、validators=[]
17、upload-to
应用场景:

一对多:当一张表中创建一行数据时,有一个单选的下拉框(可以被重复选择)
例如:创建用户信息时候,需要选择一个用户类型【普通用户】【金牌用户】【铂金用户】等。
多对多:在某表中创建一行数据是,有一个可以多选的下拉框
例如:创建用户信息,需要为用户指定多个爱好
一对一:在某表中创建一行数据时,有一个单选的下拉框(下拉框中的内容被用过一次就消失了
例如:原有含10列数据的一张表保存相关信息,经过一段时间之后,10列无法满足需求,需要为原来的表再添加5列数据
二、操作表
1、基本操作

   # 增
    #
    # models.Tb1.objects.create(c1='xx', c2='oo')  增加一条数据,可以接受字典类型数据 **kwargs

    # obj = models.Tb1(c1='xx', c2='oo')
    # obj.save()

    # 查
    #
    # models.Tb1.objects.get(id=123)         # 获取单条数据,不存在则报错(不建议)
    # models.Tb1.objects.all()               # 获取全部
    # models.Tb1.objects.filter(name='seven') # 获取指定条件的数据

    # 删
    #
    # models.Tb1.objects.filter(name='seven').delete() # 删除指定条件的数据

    # 改
    # models.Tb1.objects.filter(name='seven').update(gender='0')  # 将指定条件的数据更新,均支持 **kwargs
    # obj = models.Tb1.objects.get(id=1)
    # obj.c1 = '111'
    # obj.save()                                                 # 修改单条数据
2、进阶操作(了不起的双下划线)
利用双下划线将字段和对应的操作连接起来

    # 获取个数
    #
    # models.Tb1.objects.filter(name='seven').count()

    # 大于,小于
    #
    # models.Tb1.objects.filter(id__gt=1)              # 获取id大于1的值
    # models.Tb1.objects.filter(id__lt=10)             # 获取id小于10的值
    # models.Tb1.objects.filter(id__lt=10, id__gt=1)   # 获取id大于1 且 小于10的值

    # in
    #
    # models.Tb1.objects.filter(id__in=[11, 22, 33])   # 获取id等于11、22、33的数据
    # models.Tb1.objects.exclude(id__in=[11, 22, 33])  # not in

    # contains
    #
    # models.Tb1.objects.filter(name__contains="ven")
    # models.Tb1.objects.filter(name__icontains="ven") # icontains大小写不敏感
    # models.Tb1.objects.exclude(name__icontains="ven")

    # range
    #
    # models.Tb1.objects.filter(id__range=[1, 2])   # 范围bettwen and

    # 其他类似
    #
    # startswith,istartswith, endswith, iendswith,

    # order by
    #
    # models.Tb1.objects.filter(name='seven').order_by('id')    # asc
    # models.Tb1.objects.filter(name='seven').order_by('-id')   # desc

    # limit 、offset
    #
    # models.Tb1.objects.all()[10:20]

    # group by
    from django.db.models import Count, Min, Max, Sum
    # models.Tb1.objects.filter(c1=1).values('id').annotate(c=Count('num'))
    # SELECT "app01_tb1"."id", COUNT("app01_tb1"."num") AS "c" FROM "app01_tb1" WHERE "app01_tb1"."c1" = 1 GROUP BY "app01_tb1"."id"
3、连表操作(了不起的双下划线)
利用双下划线和 _set 将表之间的操作连接起来
 创建表
创建表
from django.db import models

# Create your models here.

class UserInfo(models.Model):
    user = models.CharField(max_length=32)
    email = models.EmailField(max_length=32)
    pwd = models.CharField(max_length=64)
    user_type = models.ForeignKey('UserType')
class UserType(models.Model):
    nid = models.AutoField(primary_key=True)
    caption = models.CharField(max_length=16)

class Host(models.Model):
    hid = models.AutoField(primary_key=True)
    hostname = models.CharField(max_length=32)
    ip = models.CharField(max_length=32)
class Group(models.Model):
    gid = models.AutoField(primary_key=True)
    name = models.CharField(max_length=16)

    h2g = models.ManyToManyField('Host')

  # 三种创建数据方法
    # obj = models.Usertype(caption ='管理员' )
    # obj.save()
    #
    # models.Usertype.objects.create(caption='普通用户')
    #
    # obj = {
    #     'caption':'Guest'
    # }
    # models.Usertype.objects.create(**obj)


    # 建议使用这一种方法
    # userinfo_dict = {
    #     'user':'张岩林',
    #     'email':'123@qq.com',
    #     'pwd':'123',
    #     'user_type_id':1,
    # }
    # userinfo_dicts = {
    #     'user':'aylin',
    #     'email':'124@qq.com',
    #     'pwd':'1333',
    #     'user_type':models.Usertype.objects.get(uid=3),
    # }
    # models.Userinfo.objects.create(**userinfo_dict)
    # models.Userinfo.objects.create(**userinfo_dicts)

 # 单表查询,查询结果是queryset对象


    # ret = models.Usertype.objects.all()
    # print(ret)  # 结果<QuerySet [<Usertype: Usertype object>, <Usertype: Usertype object>, <Usertype: Usertype object>]>

    # for item in ret:
    #     print(item.caption)   # 取值管理员,普通用户,guest

    # 单独只取一列 vlaues
    # ret = models.Usertype.objects.all().values('caption')
    # print(ret)
    # for i in ret:
    #     print(i,type(i))  # {'caption': '管理员'} <class 'dict'>


    # 可以通过变量取到关联表的对象后面加入.caption取另一个表的内容
    # ret = models.Userinfo.objects.all()
    # print(ret,type(ret))
    # for item in ret:
    #     print(item.user,item.user_type.caption)   # item.user_type取到的是usertype的对象,所以可以取caption


    # 连表查询之双下划线
    # ret = models.Userinfo.objects.all().values('user','user_type__caption')
    # print(ret)

    # 过滤所有用户类型是管理员的用户(连表查询)
    # ret = models.Userinfo.objects.filter(user_type__caption="管理员").values('user', 'user_type__caption')
    # print(ret)


    # 反向查找_set

    # 过滤取出第一个是管理员的哪一行数据
    # obj = models.Usertype.objects.filter(caption='管理员').first()
    # print(obj.uid)
    # print(obj.caption)
    # print(obj.userinfo_set.all())
    # obj = models.Usertype.objects.filter(userinfo__user='张岩林').values('userinfo__user')
    # print(obj)

    # 多对多操作


    # 添加数据
    # models.Host.objects.create(hostname='c1', ip='1.1.1.1')
    # models.Host.objects.create(hostname='c2', ip='1.1.1.2')
    # models.Host.objects.create(hostname='c3', ip='1.1.1.3')
    # models.Host.objects.create(hostname='c4', ip='1.1.1.4')
    # models.Host.objects.create(hostname='c5', ip='1.1.1.5')
    #
    # models.Group.objects.create(name='财务部')
    # models.Group.objects.create(name='人事部')
    # models.Group.objects.create(name='公关部')
    # models.Group.objects.create(name='技术部')
    # models.Group.objects.create(name='运营部')
    # models.Group.objects.create(name='销售部')
    # models.Group.objects.create(name='客服部')

    # 将多台机器,分配给一组【财务部】
    # obj = models.Group.objects.get(gid=1)
    # obj.h2g.add(*models.Host.objects.all())
    # print(obj.h2g.all())
    # <QuerySet [<Host: Host object>, <Host: Host object>, <Host: Host object>, <Host: Host object>, <Host: Host object>]>

    # 将一台机器,分配给多个组

    # 方法一 只能一个一个添加
    # host = models.Host.objects.get(hid=1)
    # group = models.Group.objects.get(gid=4)
    # group.h2g.add(host)

    #  方法二 添加多条
    # h = models.Host.objects.get(hid=4)
    # h.group_set.add(*models.Group.objects.filter(gid__gt=3))

    # 方法三
    # h  =models.Host.objects.get(hid=2)
    # ret = h.group_set.set(models.Group.objects.filter(gid__gt=3))
    # print(ret,type(ret))


    # 删除语句
    # h = models.Host.objects.get(hid=2)
    # h.group_set.remove(*models.Group.objects.filter(gid__gt=3))

    # 危险删除方法,慎用,会把分组表里的分组也会给删掉
    # h.group_set.all().delete()


    # 补充,add添加可以添加数字
    # h = models.Host.objects.get(hid=1)
    # h.group_set.add(1)
    # h.group_set.add(models.Group.objects.get(gid=1))
    # h.group_set.add(*[2,3])
    # h.group_set.add(*models.Group.objects.filter(gid__gt=1))

    # 两个表都添加数据
    # h = models.Host.objects.get(hid=2)
    # h.group_set.get_or_create(name = "人事部")
    # h.group_set.update_or_create(name="技术部")


    return HttpResponse("OK")

# h = models.Host.objects.get(hid=1)
    #models.Host.objects.filter(hid__gt=5).delete()
    #会删除关系表的 也会删除原始表的
    # h.group_set.all().delete()
    # 只删除关系表中的数据
    # h.group_set.remove(*models.Group.objects.filter(gid__gt=2))
    # 修改 set 不能做修改 如果有就保留 删除其他
    # h.group_set.set(models.Group.objects.filter(gid=8))
    # 修改 set 如果有就保留 没有就添加
    # h.group_set.set(models.Group.objects.filter(gid__gt=2))
    # clear 默认是false 来行数据添加  clear=True 先清除后添加新数据
    #h.group_set.set(models.Group.objects.filter(gid=2),clear=True)
    # models.Group.objects.filter(gid__gt=5).delete()

    # h = models.Host.objects.get(hid=1)
    #关系表里面存在不管,如果不存在两个都加
    # h.group_set.update_or_create(name='人事部')
    #关系表里面存在不管,如果不存在两个都加
    # h.group_set.get_or_create(name='人事部')
注意:xx_set中的【_set】是多对多中的固定搭配
扩展:
