Day4 - Python基础4 迭代器、装饰器、软件开发规范
1.迭代器&生成器
生成器
背景:通过列表生成式能生成一个列表,但受内存限制,列表的容量肯定是有限的。而且当列表元素很多时,会占用大量内存空间,如果只是使用其中的一些元素,那其它元素会造成空间浪费
定义:基于以上原因,如果能通过算法推导出列表的元素,这样就不需要创建完整的list,可以节省空间。这种一边循环一边计算的机制,就叫生成器。
格式:只需把列表生成式[]改成()即可
方法:使用next()可以获取下一个元素,不过一般用for循环打印
函数生成器:在函数中加入yield,函数就变成了一个生成器;而且还可以利用此特性,实现协程的效果
 1 #普通列表
 2 list_normal = [0,1,2,3,4,5,6,7,8,9,10]  #手动生成列表
 3 print(list_normal)
 4 #列表生成式
 5 list_auto = [i for i in range(11)]  #利用算法生成列表
 6 print(list_auto)
 7
 8 #生成器
 9 list_generator = (i for i in range(11)) #把生成式[]改成()就是生成器了
10 print(list_generator)
11 #生成器方法
12 print(next(list_generator))
13 print(next(list_generator))
14 for i in list_generator:
15     print(i)


 1 #函数生成器
 2 def num_generator(num):
 3     i = 0
 4     while i <num:
 5         #print(i)
 6         yield i
 7         i +=1
 8     return 'done'
 9
10 nums = num_generator(5)
11 print(nums)
12 print(nums.__next__())
13 print(nums.__next__())
14 print("干点其它事")
15 print(nums.__next__())
16 print(nums.__next__())
17 print(nums.__next__())
18 #函数生成器异常捕获处理
19 while True:
20     try:
21         print("nums:",next(nums))
22     except StopIteration as e:
23         print("nums gererator return value:",e.value)
24         break
 1 #单线程实现并发运算
 2 import time,os
 3
 4 def command():
 5     print("开始ping啦")
 6     while True:
 7         addr = yield
 8         os.system("ping "+' '+ addr)
 9
10 def ips():
11     t = command()
12     t.__next__()
13     print("开始分配IP地址")
14     for i in range(2):
15         if i == 0:
16             continue
17         else:
18             address = "10.172.116.%s"%i
19             time.sleep(1)
20             t.send(address)
21 ips()
迭代器
可迭代对象Iterable:
可以被for循环的数据类型,包含二类:
1.集合数据类型:list、dict、tuple、set、str等
2.generator,包含生成器、带yield的generator function
1 from collections import Iterable
2 from collections import Iterator
3
4 #判断是否是可迭代对象
5 isinstance([],Iterable)
6 isinstance({},Iterable)
7 isinstance((),Iterable)
8 isinstance('string',Iterable)
9 isinstance(100,Iterable)    #数字不可迭代
迭代器Iterator:
定义:可以被next()函数调用并不断返回下一个值的对象称为迭代器
特性:
把Iterable变成Iterator可以使用Iter()函数
生成器都是Iterator对象,但list、tuple、dict等虽是Iterable,却不是Iterator
 1 #判断是否是迭代器
 2 isinstance([],Iterator)
 3 isinstance({},Iterator)
 4 isinstance((),Iterator)
 5 isinstance('string',Iterator)
 6 isinstance(100,Iterator)
 7 isinstance((x for x in range(10)),Iterator)
 8
 9 #迭代对象转换成迭代器方法
10 Iter_list = iter([1,2,3])
11 print(iter_list)
区别:
Iterator对象表示的是一个数据流,可以被next()函数调用并不断返回下一个数据,直到数据抛出StopIteration错误。可以把Iterator看成是一个有序序列,但我们却不能提前知道序列长度,它可以表示一个无限大的数据流,如自然数,而这是list办不到的。
for循环本质上是通过不断调用next()实现的
 1 #for循环
 2 for i in [1,2,3]:
 3     print(i)
 4
 5 #等同于下面的迭代器
 6 a = iter([1,2,3])
 7 while True:
 8     try:
 9         next(a)
10     except StopIteration:
11         break
2.装饰器
python装饰器:http://blog.51cto.com/egon09/1836763
定义:本质是函数,功能是装饰其它函数,就是为其它函数添加附加功能
原则:1.不能修改被装饰的函数的源代码(对被装饰函数是透明的)
2.不能修改被装饰的函数的调用方式
实现装饰器知识储备:(高阶函数+嵌套函数=装饰器)
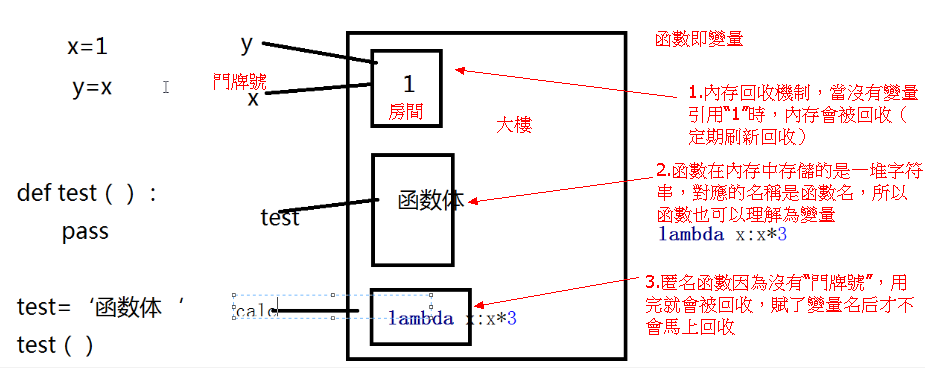
1.函数即“变量”
2.高阶函数
a.把一个函数名当做实参传给另一个函数(在不修改被装饰函数源代码的情况下为其添加功能)
b.返回值中包含函数名(不修改函数的调用方式)
 1 #高阶函数
 2 def bar():
 3      time.sleep(3)
 4      print('in the bar')
 5
 6 def test2(func):
 7     print(func)
 8     return func
 9
10 t = test2(bar)
11 t() #run bar
12
13 bar=test2(bar)  #把之前函数bar名称覆盖了
14 bar()
3.嵌套函数
定义:一个函数体内用def去声明一个新的函数
1 #嵌套函数
2 def foo():
3     print('in the foo')
4     def bar():
5         print('in the bar')
6     bar()
7 foo()
 1 #局部作用域和全局作用域的访问顺序
 2 x=0
 3 def grandpa():
 4     x=1
 5     def dad():
 6         x=2
 7         def son():
 8             x=3
 9             print(x)
10         son()
11     dad()
12 grandpa()   #结果是3,从最里面找变量
4.装饰器案例
 1 #装饰器案例1
 2 #运行test1-->等同于运行deco-->运行deco过程中会运行原来的test1函数-->并附加了计时功能
 3 def timer(func):    #嵌套函数 timer(test1) func=test1
 4     def deco():     #高阶函数
 5         start_time = time.time()
 6         func()      #run test1
 7         stop_time = time.time()
 8         print("run time :%s"%(stop_time-start_time))
 9     return deco     #返回deco的内存地址
10
11 @timer  #等同于test1 = timer(test1)
12 def test1():
13     time.sleep(3)
14     print('in the test1')
15
16 test1() #run deco
 1  1 #装饰器案例2
 2  2 #实现不定量传参,装饰器更有扩展性
 3  3 def timer(func):    #嵌套函数 timer(test1) func=test1
 4  4     def deco(*arg,**kwargs):     #高阶函数
 5  5         start_time = time.time()
 6  6         func(*arg,**kwargs)      #run test1
 7  7         stop_time = time.time()
 8  8         print("run time :%s"%(stop_time-start_time))
 9  9     return deco     #返回deco的内存地址
10 10
11 11 @timer  #等同于test1 = timer(test1)
12 12 def test1():
13 13     time.sleep(3)
14 14     print('in the test1')
15 15
16 16 @timer  #等同于test2 = timer(test2)=deco test2(name)=deco(name)
17 17 def test2(name):
18 18     print('test2:',name)
19 19
20 20 test1() #run deco
21 21 test2('sam')
 1 #网站认证装饰器-初版
 2 #需求:登录index页面不需要认证,登录home/bbs要认证(使用装饰器)
 3 user,passwd = 'sam','123'
 4 def auth(func):    #装饰器
 5     def wrapper():
 6         username = input("Username:").strip()
 7         password = input("Password:").strip()
 8         if username == user and password == passwd:
 9             print("登录成功!")
10             func()
11         else:
12             print("用户名或密码错误.")
13     return wrapper
14
15 def index():    #不认证
16     print("Welcome to the index page.")
17
18 @auth
19 def home():    #装饰器认证
20     print("Welcome to the home page.")
21
22 @auth
23 def bbs():     #装饰器认证
24     print("Welcome to the bbs page.")
25
26 home()
27 bbs()
 1 #网站认证装饰器-进阶版
 2 #需求:登录index页面不需要认证,登录home/bbs要使用认证方式(使用装饰器),home传参数且有返回值
 3 user,passwd = 'sam','123'
 4 def auth(func):
 5     def wrapper(*args,**kwargs):
 6         username = input("Username:").strip()
 7         password = input("Password:").strip()
 8         if username == user and password == passwd:
 9             print("登录成功!")
10             res = func(*args,**kwargs)
11             #print("---认证之后---")
12             return res
13         else:
14             print("用户名或密码错误.")
15     return wrapper
16
17 def index():
18     print("Welcome to the index page.")
19
20 @auth
21 def home(*args):
22     print("Welcome to the home page.",args)
23     return "From home page"
24
25 @auth
26 def bbs():
27     print("Welcome to the bbs page.")
28
29 #home()
30 print(home('sam'))
 1 #网站认证装饰器-终极版
 2 #需求:登录index页面不需要认证,登录home/bbs要使用不同的认证方式local/ldap(使用装饰器),home传参数且有返回值
 3 user,passwd = 'sam','123'
 4 def auth(auth_type):
 5     #print("auth func:",auth_type)
 6     def outer_wrapper(func):
 7         def wrapper(*args,**kwargs):
 8             #print("wrapper func args:", *args, **kwargs)
 9             if auth_type == 'local':
10                 username = input("Username:").strip()
11                 password = input("Password:").strip()
12                 if username == user and password == passwd:
13                     print("登录成功!")
14                     res = func(*args,**kwargs)
15                     #print("---认证之后---")
16                     return res
17                 else:
18                     print("用户名或密码错误.")
19             elif auth_type == 'ldap':
20                 print("使用Ldap认证")
21         return wrapper
22     return outer_wrapper
23
24 def index():
25     print("Welcome to the index page.")
26
27 @auth(auth_type='local')    #home=auth
28 def home(*args):
29     print("Welcome to the home page.",args)
30     return "From home page"
31
32 @auth(auth_type='ldap')
33 def bbs():
34     print("Welcome to the bbs page.")
35
36 home()
37 bbs()
3.Json & pickle 数据序列化
xml逐渐被json取代
Json不支持函数序列化,只能处理简单的数据类型
#序列化
import json

def sayhi(name):
    print("hello,",name)

info = {
    'name':'alex',
    'age':22,
    #'func':sayhi    #不能序列化函数
}

f = open("test.text","w")
f.write( json.dumps( info) )

info['age'] = 21
f.write( json.dumps( info) )

f.close()

#反序列化
import json

f = open("test.text","r")

#data = json.loads(f.read()) #data = pickle.loads(f.read())

for line in f:
    print(json.loads(line))
Json是不同开发语言都支持的交互方式,pickle是python自有的
pickle可以序列化所有数据类型,但函数不能序列
 1 #序列化
 2 import pickle
 3
 4 def sayhi(name):
 5     print("hello,",name)
 6
 7 info = {
 8     'name':'alex',
 9     'age':22,
10     'func':sayhi
11 }
12
13
14 f = open("test.text","wb")
15
16 pickle.dump(info,f) #和f.write( pickle.dumps( info) )功能一样
17
18 f.close()
19
20 #反序列化
21 def sayhi(name):
22     print("hello2,",name)
23
24 f = open("test.text","rb")
25
26 data = pickle.load(f) #和data = pickle.loads(f.read())功能一样
27
28 print(data["func"]("Alex"))
注:dump一次load一次,不要dump多次
4.软件目录结构规范
假设项目名为Foo
Foo/
|-- bin/
|   |-- foo
|
|-- foo/
|   |-- tests/
|   |   |-- __init__.py
|   |   |-- test_main.py
|   |
|   |-- __init__.py
|   |-- main.py
|
|-- docs/
|   |-- conf.py
|   |-- abc.rst
|
|-- setup.py
|-- requirements.txt
|-- README
简要解释一下:
bin/: 存放项目的一些可执行文件,当然你可以起名script/之类的也行。foo/: 存放项目的所有源代码。(1) 源代码中的所有模块、包都应该放在此目录。不要置于顶层目录。(2) 其子目录tests/存放单元测试代码; (3) 程序的入口最好命名为main.py。docs/: 存放一些文档。setup.py: 安装、部署、打包的脚本。requirements.txt: 存放软件依赖的外部Python包列表。README: 项目说明文件。