基于什么协议?http
get方式:组拼URL地址把数据拼到url上 有大小限制 1kb 4kb
post方式: post方式提交安全 没有大小限制
post方式和get方式区别:
[1]路径不同
[2]请求方式不同
[3]post方式要自己组拼请求体的内容
post方式比get方式多了2个头(content-length和content-type)
get方式提交数据代码如下
new Thread(){public void run() {try{//[2]获取用户名和密码String name = et_username.getText().toString().trim();String pwd = et_password.getText().toString().trim();//[2.1]定义get方式要提交的路径String path = "http://192.168.11.73:8000/login/loginServlet?username=" + name + "&password=" + pwd;//[2]URL url = new URL(path);HttpURLConnection conn = (HttpURLConnection) url.openConnection();conn.setRequestMethod("GET");conn.setConnectTimeout(5000);int code = conn.getResponseCode();if(code == 200){InputStream inputStream = conn.getInputStream();String content = StreamTools.readStream(inputStream);//把服务器的数据展示到Toast上showToast(content);}}catch(Exception e){e.printStackTrace();}};}.start();
post方式提交数据代码如下(主要☆☆☆☆☆处)
new Thread(){public void run() {try{//[2]获取用户名和密码String name = et_username.getText().toString().trim();String pwd = et_password.getText().toString().trim();//☆☆☆☆☆和get方式提交数据区别四:设置请求体//String data = "username=" + name + "&password=" + pwd;//[2.1]定义get方式要提交的路径//☆☆☆☆☆和get方式提交数据区别一:路径不同//String path = "http://192.168.11.73:8000/login/loginServlet";String path = "http://192.168.11.73:8000/login/loginServlet?username=" + name + "&password=" + pwd;//[2]URL url = new URL(path);HttpURLConnection conn = (HttpURLConnection) url.openConnection();//☆☆☆☆☆和get方式提交数据区别二:设置请求方式是post//conn.setRequestMethod("POST");conn.setRequestMethod("GET");conn.setConnectTimeout(5000);//☆☆☆☆☆和get方式提交数据区别三:多设置两个请求头信息//conn.setRequestProperty("Content-Type", "application/x-www-form-urlencoded");//conn.setRequestProperty("Content-Length", data.length() + "");//☆☆☆☆☆和get方式提交数据区别五:向服务器提交数据//设置一个标记 允许输出//conn.setDoOutput(true);//conn.getOutputStream().write(data.getBytes());int code = conn.getResponseCode();if(code == 200){InputStream inputStream = conn.getInputStream();String content = StreamTools.readStream(inputStream);//把服务器的数据展示到Toast上showToast(content);}}catch(Exception e){e.printStackTrace();}};}.start();
2乱码问题解决
3以httpclient方式把数据提交到服务器
[1]开源项目
[2]谷歌一般以 base default simple 进行命名
[3]对http请求的封装
get方式提交数据代码如下
new Thread() {public void run() {try {// [2]获取用户名和密码String name = et_username.getText().toString().trim();String pwd = et_password.getText().toString().trim();name = URLEncoder.encode(name, "utf-8");pwd = URLEncoder.encode(pwd, "utf-8");String path = "http://192.168.11.73:8000/login/loginServlet?username="+ name + "&password=" + pwd;// 获取httpclient实例DefaultHttpClient client = new DefaultHttpClient();// 准备get请求 定义一个httpget实现HttpGet get = new HttpGet(path);// 执行一个get请求HttpResponse response = client.execute(get);// 获取服务器返回的状态码int code = response.getStatusLine().getStatusCode();if (code == 200) {InputStream inputStream = response.getEntity().getContent();String content = StreamTools.readStream(inputStream);showToast(content + "");}} catch (Exception e) {e.printStackTrace();}};}.start();
post方式提交数据代码如下
new Thread() {public void run() {try {// [2]获取用户名和密码String name = et_username.getText().toString().trim();String pwd = et_password.getText().toString().trim();// [3]以httpclient方式进行提交DefaultHttpClient client = new DefaultHttpClient();// [3.1]准备post请求String Path = "http://192.168.11.73:8080/login/LoginServlet";HttpPost post = new HttpPost(Path);//[3.1.0]准备parametersList<NameValuePair> lists = new ArrayList<NameValuePair>();//[3.1.1]准备NameValuePair 实际上就是我们要提交的用户名和密码BasicNameValuePair nameValuePair = new BasicNameValuePair("username", name);BasicNameValuePair pwdValuePair = new BasicNameValuePair("password", pwd);lists.add(nameValuePair);lists.add(pwdValuePair);//[3.1.2]准备entityUrlEncodedFormEntity entity = new UrlEncodedFormEntity(lists);post.setEntity(entity);HttpResponse response = client.execute(post);int code = response.getStatusLine().getStatusCode();if (code == 200) {InputStream inputStream = response.getEntity().getContent();String content = StreamTools.readStream(inputStream);showToast(content + "");}} catch (Exception e) {e.printStackTrace();}};}.start();
4开源项目方式把数据提交到服务器
asynchttpclient
get方式提交数据代码如下
String name = et_username.getText().toString().trim();String pwd = et_password.getText().toString().trim();name = URLEncoder.encode(name, "utf-8");pwd = URLEncoder.encode(pwd, "utf-8");path = "http://192.168.11.73:8000/login/loginServlet?username=" + name+ "&password=" + pwd;// [3]使用开源项目进行get请求// [3.1]创建asynchttpclientAsyncHttpClient client = new AsyncHttpClient();// [3.2]进行get请求client.get(path, new AsyncHttpResponseHandler() {//请求成功public void onSuccess(int statusCode, Header[] headers,byte[] responseBody) {Toast.makeText(getApplicationContext(), new String(responseBody,"gbk"), 1).show();}//请求失败public void onSuccess(int statusCode, Header[] headers,byte[] responseBody, Throwable error) {//Toast.makeText(getApplicationContext(), new String(responseBody,"gbk"), 1).show();}});
post方式提交数据代码如下
String name = et_username.getText().toString().trim();String pwd = et_password.getText().toString().trim();String Path = "http://192.168.11.73:8080/login/LoginServlet";//[3.1]创建asyncHttpClientAsyncHttpClient client = new AsyncHttpClient();//[3.1.0]准备请求体的内容RequestParams params = new RequestParams();params.put("username", name);params.put("password", pwd);//[3.2]进行post请求client.post(Path, params, new AsyncHttpResponseHandler() {//请求成功public void onSuccess(int statusCode, Header[] headers,byte[] responseBody) {Toast.makeText(getApplicationContext(), new String(responseBody,"gbk"), 1).show();}//请求失败public void onSuccess(int statusCode, Header[] headers,byte[] responseBody, Throwable error) {//Toast.makeText(getApplicationContext(), new String(responseBody,"gbk"), 1).show();}});
总结:
[1] httpurlconnection
[2] httpclient (了解 没人用)
[3] 开源项目(asynchttpclient)
5javase多线程下载
设置请求服务器文件的位置
conn.setRequestProperty("Range", "bytes="+startIndex+"-"+endIndex);
为什么多线程能加速下载?
[1]不是说线程开的越多下载越快
[2]还受服务器带宽的影响
[3]获得更多的cup资源

每个线程下载的计算公式
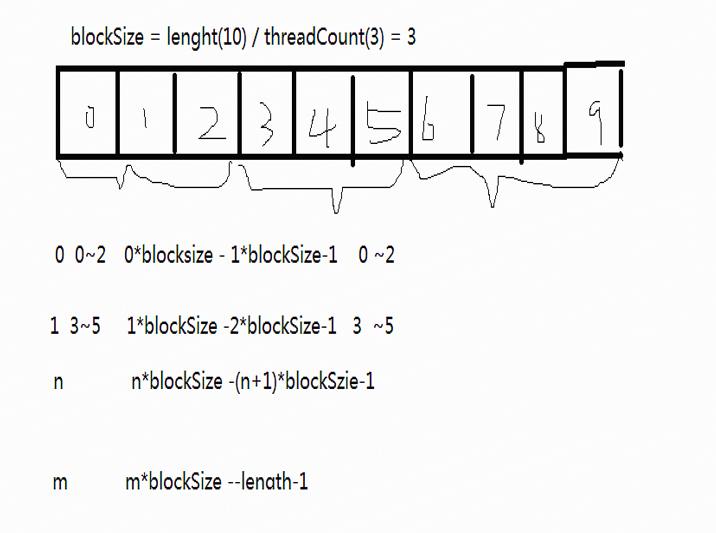
package com.phone.download;import java.io.InputStream;import java.io.RandomAccessFile;import java.net.HttpURLConnection;import java.net.URL;public class MutiDownLoad {// 定义下载路径static String path = "http://192.168.11.73:8080/feiq.exe";private static final int threadCount = 3;//线程数public static void main(String[] args){//[2]获取服务器文件的大小try{URL url = new URL(path);HttpURLConnection conn = (HttpURLConnection) url.openConnection();conn.setRequestMethod("GET");conn.setReadTimeout(5000);int code = conn.getResponseCode();if(code == 200){//[☆☆☆☆]一、获取服务器文件的大小 要计算每个线程下载的开始位置和结束位置int length = conn.getContentLength();//[☆☆☆☆]二、创建一个大小和服务器一模一样的文件 目的是提前把空间申请出来RandomAccessFile rafAccessFile = new RandomAccessFile("temp.exe", "rw");rafAccessFile.setLength(length);//算出每个线程下载的大小int blocksize = length / threadCount;//[☆☆☆☆]三、计算每个线程下载的开始位置和结束位置for(int i=0; i<threadCount; i++){//每个线程下载的开始位置int startIndex = i*blocksize;//每个线程下载的结束位置int endIndex = (i+1)*blocksize - 1;if(i == threadCount - 1){//说明是最后一个线程endIndex = length-1;}//[☆☆☆☆]四、开启线程去服务器下载文件DownLoadThread downLoadThread = new DownLoadThread(startIndex, endIndex, i);downLoadThread.start();}}}catch(Exception e){e.printStackTrace();}}//定义线程去服务器下载文件private static class DownLoadThread extends Thread{//通过构造方法把每个线程下载的开始位置和结束位置传递过来private int startIndex;private int endIndex;private int threadId;public DownLoadThread(int startIndex,int endIndex,int threadId){this.startIndex = startIndex;this.endIndex = endIndex;this.threadId = threadId;}public void run() {//四、开启线程去服务器下载文件try {URL url = new URL(path);HttpURLConnection conn = (HttpURLConnection) url.openConnection();conn.setRequestMethod("GET");conn.setConnectTimeout(5000);//设置一个请求头Range(作用告诉服务器每个线程下载的开始位置和结束位置)conn.setRequestProperty("Range", "bytes=" + startIndex + "-" + endIndex);int code = conn.getResponseCode();//200代表获取服务器资源全部成功//206请求部分资源成功//if(code == 200)if(code == 206){//[6]创建随机读写文件对象RandomAccessFile rafAccessFile = new RandomAccessFile("temp.exe", "rw");//[6]每个线程要从自己的位置开始写rafAccessFile.seek(startIndex);InputStream inputStream = conn.getInputStream();//[7]把数据写到文件中int len = -1;byte[] Buffer = new byte[1024];while((len = inputStream.read(Buffer))!=-1){rafAccessFile.write(Buffer,0,len);}rafAccessFile.close();}} catch (Exception e) {e.printStackTrace();}}}}
6断点续传实现
package com.phone.download;import java.io.BufferedReader;import java.io.File;import java.io.FileInputStream;import java.io.FileOutputStream;import java.io.InputStream;import java.io.InputStreamReader;import java.io.RandomAccessFile;import java.net.HttpURLConnection;import java.net.URL;public class MutiDownLoad {// 定义下载路径static String path = "http://192.168.11.73:8080/feiq.exe";private static final int threadCount = 3;//线程数//代表当前正在运行的线程private static int runningThread;public static void main(String[] args){//[2]获取服务器文件的大小try{URL url = new URL(path);HttpURLConnection conn = (HttpURLConnection) url.openConnection();conn.setRequestMethod("GET");conn.setReadTimeout(5000);int code = conn.getResponseCode();if(code == 200){//[☆☆☆☆]一、获取服务器文件的大小 要计算每个线程下载的开始位置和结束位置int length = conn.getContentLength();//把线程的数量赋值给正在运行的线程runningThread = threadCount;//[☆☆☆☆]二、创建一个大小和服务器一模一样的文件 目的是提前把空间申请出来RandomAccessFile rafAccessFile = new RandomAccessFile("temp.exe", "rw");rafAccessFile.setLength(length);//算出每个线程下载的大小int blocksize = length / threadCount;//[☆☆☆☆]三、计算每个线程下载的开始位置和结束位置for(int i=0; i<threadCount; i++){//每个线程下载的开始位置int startIndex = i*blocksize;//每个线程下载的结束位置int endIndex = (i+1)*blocksize - 1;if(i == threadCount - 1){//说明是最后一个线程endIndex = length-1;}//[☆☆☆☆]四、开启线程去服务器下载文件DownLoadThread downLoadThread = new DownLoadThread(startIndex, endIndex, i);downLoadThread.start();}}}catch(Exception e){e.printStackTrace();}}//定义线程去服务器下载文件private static class DownLoadThread extends Thread{//通过构造方法把每个线程下载的开始位置和结束位置传递过来private int startIndex;private int endIndex;private int threadId;public DownLoadThread(int startIndex,int endIndex,int threadId){this.startIndex = startIndex;this.endIndex = endIndex;this.threadId = threadId;}public void run() {//四、开启线程去服务器下载文件try {URL url = new URL(path);HttpURLConnection conn = (HttpURLConnection) url.openConnection();conn.setRequestMethod("GET");conn.setConnectTimeout(5000);//如果中间断过 继续上次的位置继续下载 从文件中读取上次下载的位置File file = new File(getFilename(path) + threadId + ".txt");if(file.exists() && file.length()>0){FileInputStream fis = new FileInputStream(file);BufferedReader bufr = new BufferedReader(new InputStreamReader(fis));//读取出的内容就是上一次下载的位置String lastPositionn = bufr.readLine();int lastPosition = Integer.parseInt(lastPositionn);//改变startIndex位置startIndex = lastPosition;fis.close();}//设置一个请求头Range(作用告诉服务器每个线程下载的开始位置和结束位置)conn.setRequestProperty("Range", "bytes=" + startIndex + "-" + endIndex);int code = conn.getResponseCode();//200代表获取服务器资源全部成功//206请求部分资源成功//if(code == 200)if(code == 206){//[6]创建随机读写文件对象RandomAccessFile rafAccessFile = new RandomAccessFile(getFilename(path), "rw");//[6]每个线程要从自己的位置开始写rafAccessFile.seek(startIndex);InputStream inputStream = conn.getInputStream();//[7]把数据写到文件中int len = -1;byte[] Buffer = new byte[1024*1024];//代表当前线程下载的大小int total = 0;while((len = inputStream.read(Buffer))!=-1){rafAccessFile.write(Buffer,0,len);total += len;//[8]实现断点续传 就是把当前线程下载的位置给存起来 下次再下载的时候按照上次下载的位置继续下载就可以了//存到一个普通的.txt文本中int currentThreadPosition = startIndex + total;//[9]用来存当前线程下载的位置RandomAccessFile raff = new RandomAccessFile(getFilename(path) + threadId + ".txt", "rwd");raff.write(String.valueOf(currentThreadPosition).getBytes());raff.close();
/** 用这种方法有时候可能存不成功,因为硬盘有个缓存区File file = new File(threadId + ".txt");FileOutputStream fos = new FileOutputStream(file);fos.write(String.valueOf(currentThreadPosition).getBytes());fos.close();*/}rafAccessFile.close();synchronized(DownLoadThread.class){runningThread--;if(runningThread == 0){//说明所有的线程都执行完毕了 就把.txt文件删除for(int i = 0; i < threadCount; i++){File delFile = new File(getFilename(path) + i + ".txt");delFile.delete();}}}}} catch (Exception e) {e.printStackTrace();}}}/** 获取文件的名字*/public static String getFilename(String path){int start = path.lastIndexOf("/");return path.substring(start);}}
7断点续传逻辑移植到Android上
MainActivity.java
package com.phone.download;import java.io.BufferedReader;import java.io.File;import java.io.FileInputStream;import java.io.InputStream;import java.io.InputStreamReader;import java.io.RandomAccessFile;import java.net.HttpURLConnection;import java.net.URL;import java.util.ArrayList;import java.util.List;import android.os.Bundle;import android.os.Environment;import android.support.v7.app.ActionBarActivity;import android.view.View;import android.widget.EditText;import android.widget.LinearLayout;import android.widget.ProgressBar;public class MainActivity extends ActionBarActivity {private EditText et_path;private String path;private EditText et_threadCount;private LinearLayout ll_pb_layout;// 代表当前正在运行的线程private static int runningThread;//用来存进度条的引用private List<ProgressBar> pbLists;@Overrideprotected void onCreate(Bundle savedInstanceState) {super.onCreate(savedInstanceState);setContentView(R.layout.activity_main);// [1]获取控件et_path = (EditText) findViewById(R.id.et_path);et_threadCount = (EditText) findViewById(R.id.et_threadCount);ll_pb_layout = (LinearLayout) findViewById(R.id.ll_pb);pbLists = new ArrayList<ProgressBar>();}// 点击按钮实现下载的逻辑public void click(View v) {// 获取下载的路径path = et_path.getText().toString().trim();// [3]获取线程的数量String threadCountt = et_threadCount.getText().toString().trim();// [3.0]先移除进度条再添加ll_pb_layout.removeAllViews();final int threadCount = Integer.parseInt(threadCountt);pbLists.clear();for (int i = 0; i < threadCount; i++) {// [3.1]把我定义的item布局转换成一个View对象ProgressBar child = (ProgressBar) View.inflate(getApplicationContext(), R.layout.item,null);//把child添加到集合中pbLists.add(child);// [4]动态的添加进度条ll_pb_layout.addView(child);}// [5]开始移植new Thread() {public void run() {// [2]获取服务器文件的大小try {URL url = new URL(path);HttpURLConnection conn = (HttpURLConnection) url.openConnection();conn.setRequestMethod("GET");conn.setReadTimeout(5000);int code = conn.getResponseCode();if (code == 200) {// [☆☆☆☆]一、获取服务器文件的大小 要计算每个线程下载的开始位置和结束位置int length = conn.getContentLength();// 把线程的数量赋值给正在运行的线程runningThread = threadCount;// [☆☆☆☆]二、创建一个大小和服务器一模一样的文件 目的是提前把空间申请出来RandomAccessFile rafAccessFile = new RandomAccessFile("temp.exe", "rw");rafAccessFile.setLength(length);// 算出每个线程下载的大小int blocksize = length / threadCount;// [☆☆☆☆]三、计算每个线程下载的开始位置和结束位置for (int i = 0; i < threadCount; i++) {// 每个线程下载的开始位置int startIndex = i * blocksize;// 每个线程下载的结束位置int endIndex = (i + 1) * blocksize - 1;if (i == threadCount - 1) {// 说明是最后一个线程endIndex = length - 1;}// [☆☆☆☆]四、开启线程去服务器下载文件DownLoadThread downLoadThread = new DownLoadThread(startIndex, endIndex, i);downLoadThread.start();}}} catch (Exception e) {e.printStackTrace();}};}.start();}// 定义线程去服务器下载文件private class DownLoadThread extends Thread {// 通过构造方法把每个线程下载的开始位置和结束位置传递过来private int startIndex;private int endIndex;private int threadId;//代表当前线程下载的最大值private int PbMaxSize;//如果中断过 获取上次下载的位置private int PbLastPosition;public DownLoadThread(int startIndex, int endIndex, int threadId) {this.startIndex = startIndex;this.endIndex = endIndex;this.threadId = threadId;}
public void run() {// 四、开启线程去服务器下载文件try {//计算当前进度条的最大值PbMaxSize = endIndex - startIndex;URL url = new URL(path);HttpURLConnection conn = (HttpURLConnection) url.openConnection();conn.setRequestMethod("GET");conn.setConnectTimeout(5000);// 如果中间断过 继续上次的位置继续下载 从文件中读取上次下载的位置File file = new File(getFilename(path) + threadId + ".txt");if (file.exists() && file.length() > 0) {FileInputStream fis = new FileInputStream(file);BufferedReader bufr = new BufferedReader(new InputStreamReader(fis));// 读取出的内容就是上一次下载的位置String lastPositionn = bufr.readLine();int lastPosition = Integer.parseInt(lastPositionn);//赋值给我们定义的进度条进度位置PbLastPosition = lastPosition - startIndex;// 改变startIndex位置startIndex = lastPosition;fis.close();}// 设置一个请求头Range(作用告诉服务器每个线程下载的开始位置和结束位置)conn.setRequestProperty("Range", "bytes=" + startIndex + "-"+ endIndex);int code = conn.getResponseCode();// 200代表获取服务器资源全部成功// 206请求部分资源成功// if(code == 200)if (code == 206) {// [6]创建随机读写文件对象RandomAccessFile rafAccessFile = new RandomAccessFile(getFilename(path), "rw");// [6]每个线程要从自己的位置开始写rafAccessFile.seek(startIndex);InputStream inputStream = conn.getInputStream();// [7]把数据写到文件中int len = -1;byte[] Buffer = new byte[1024 * 1024];// 代表当前线程下载的大小int total = 0;while ((len = inputStream.read(Buffer)) != -1) {rafAccessFile.write(Buffer, 0, len);total += len;// [8]实现断点续传 就是把当前线程下载的位置给存起来 下次再下载的时候按照上次下载的位置继续下载就可以了// 存到一个普通的.txt文本中int currentThreadPosition = startIndex + total;// [9]用来存当前线程下载的位置RandomAccessFile raff = new RandomAccessFile(getFilename(path) + threadId + ".txt", "rwd");raff.write(String.valueOf(currentThreadPosition).getBytes());raff.close();/** 用这种方法有时候可能存不成功,因为硬盘有个缓存区 File file = new* File(threadId + ".txt"); FileOutputStream fos = new* FileOutputStream(file);* fos.write(String.valueOf(currentThreadPosition* ).getBytes()); fos.close();*///设置当前进度条的最大值和当前进度pbLists.get(threadId).setMax(PbMaxSize);pbLists.get(threadId).setProgress(PbLastPosition+total);}rafAccessFile.close();// 获取线程的数量String threadCountt = et_threadCount.getText().toString().trim();final int threadCount = Integer.parseInt(threadCountt);synchronized (DownLoadThread.class) {runningThread--;if (runningThread == 0) {// 说明所有的线程都执行完毕了 就把.txt文件删除for (int i = 0; i < threadCount; i++) {File delFile = new File(getFilename(path) + i+ ".txt");delFile.delete();}}}}} catch (Exception e) {e.printStackTrace();}}}/** 获取文件的名字*/public static String getFilename(String path){int start = path.lastIndexOf("/");String substring = path.substring(start);String fileName = Environment.getExternalStorageDirectory().getPath() + "/" + substring;return fileName;}}
activity_main.xml
<LinearLayout xmlns:android="http://schemas.android.com/apk/res/android"xmlns:tools="http://schemas.android.com/tools"android:layout_width="match_parent"android:layout_height="match_parent"android:orientation="vertical"tools:context="com.phone.download.MainActivity" ><EditTextandroid:id="@+id/et_path"android:layout_width="match_parent"android:layout_height="wrap_content"android:hint="请输入下载路径"/><EditTextandroid:id="@+id/et_threadCount"android:layout_width="match_parent"android:layout_height="wrap_content"android:hint="请输入线程的数量"/><Buttonandroid:onClick="click"android:layout_width="wrap_content"android:layout_height="wrap_content"android:hint="下载"/><LinearLayoutandroid:id="@+id/ll_pb"android:layout_width="match_parent"android:layout_height="match_parent"android:orientation="vertical"></LinearLayout></LinearLayout>
item.xml
<?xml version="1.0" encoding="utf-8"?><ProgressBar xmlns:android="http://schemas.android.com/apk/res/android"android:id="@+id/progressBar1"style="?android:attr/progressBarStyleHorizontal"android:layout_width="match_parent"android:layout_height="wrap_content" />
8开源项目实现多线程下载(xutils)
package com.phone.opensourcedownload;import java.io.File;import android.app.Activity;import android.os.Bundle;import android.view.View;import android.widget.EditText;import android.widget.ProgressBar;import android.widget.Toast;import com.lidroid.xutils.HttpUtils;import com.lidroid.xutils.exception.HttpException;import com.lidroid.xutils.http.ResponseInfo;import com.lidroid.xutils.http.callback.RequestCallBack;public class MainActivity extends Activity {private EditText et_path;private ProgressBar pb;@Overrideprotected void onCreate(Bundle savedInstanceState) {super.onCreate(savedInstanceState);setContentView(R.layout.activity_main);//[0]获取控件et_path = (EditText) findViewById(R.id.et_path);pb = (ProgressBar) findViewById(R.id.progressBar1);}//点击按钮实现断点续传下载逻辑public void click(View v){//[1]获取下载路径String path = et_path.getText().toString().trim();//[2]创建httputils对象HttpUtils http = new HttpUtils();HttpUtils http = new HttpUtils();//[3]实现断点下载/*** path:路径* target:下载文件的路径,即下载到哪* autoResume:是否支持断点续传的逻辑**/http.download(path, "/mnt/sdcard/haha.exe", true, new RequestCallBack<File>() {//下载成功@Overridepublic void onSuccess(ResponseInfo<File> responseInfo) {Toast.makeText(getApplicationContext(), "下载成功", 1);}@Override/*** total:代表总进度* current:代表当前进度*/public void onLoading(long total, long current, boolean isUploading) {pb.setMax((int)total);pb.setProgress((int)current);}//下载失败的回调函数@Overridepublic void onFailure(HttpException error, String msg) {}});}}
<LinearLayout xmlns:android="http://schemas.android.com/apk/res/android"xmlns:tools="http://schemas.android.com/tools"android:layout_width="match_parent"android:layout_height="match_parent"android:orientation="vertical"tools:context="com.phone.download.MainActivity" ><EditTextandroid:id="@+id/et_path"android:layout_width="match_parent"android:layout_height="wrap_content"android:hint="请输入下载路径" /><Buttonandroid:layout_width="wrap_content"android:layout_height="wrap_content"android:hint="下载"android:onClick="click" /><ProgressBarandroid:id="@+id/progressBar1"style="?android:attr/progressBarStyleHorizontal"android:layout_width="match_parent"android:layout_height="wrap_content" /></LinearLayout>
9今日总结
[1]httpurlConnection 用于发送或者接收数据(掌握)
get 组拼url地址
post 要自己组拼请求正文 请求头信息
[2]httpClient(了解)
[3]asyncHttpClient(掌握)
[4]多线程下载
1.获取文件大小
2.在客户端创建一个大小和服务器一模一样的文件(为了提前申请控件)
3.算出每个线程下载的开始位置和结束位置
需要考虑 最后一个线程 文件长度-1
4.开启一个线程去实现下载逻辑 httpurlConnection
设置Range 还要注意服务器返回的状态码不是200而是206
5.断点的逻辑 就是把当前线程下载的位置给保存起来 RandomAccessFile 直接同步到底层设备
6.移植到Android 算出进度条的进度 集合存进度条的引用
7.与进度有关的都可以在子线程直接更新UI
