SpringBoot整合jdbcTemplate
单数据源
jdbcTemplate是Spring core包的核心类,是对jdbc的简单封装,帮我们简化了对jdbc的使用。在SpringBoot中使用jdbcTemplate无需导入额外的包,只需要添加数据库驱动以及数据源的包就可以了。
        <dependency>
            <groupId>mysql</groupId>
            <artifactId>mysql-connector-java</artifactId>
            <scope>runtime</scope>
            <version>5.1.47</version>
        </dependency>

        <dependency>
            <groupId>com.alibaba</groupId>
            <artifactId>druid-spring-boot-starter</artifactId>
            <version>1.1.10</version>
        </dependency>
配置数据源参数:
spring.datasource.type=com.alibaba.druid.pool.DruidDataSource
spring.datasource.url=jdbc:mysql://localhost:3306/test?useSSL=false
spring.datasource.username=root
spring.datasource.password=
使用方法:
@Service
public class UserInfoService {

    @Autowired
    JdbcTemplate jdbcTemplate;


    /**
     * 添加数据
     * @param userInfo
     */
    public void insertUserInfo(UserInfo userInfo){
        jdbcTemplate.update("insert into user_info(username,password) values(?,?)",userInfo.getUsername(),userInfo.getPassword());
    }

    /**
     * 更新数据
     */
    public void updateUserInfo(UserInfo userInfo){
        jdbcTemplate.update("update user_info set username=? , password=? where id = ?", userInfo.getUsername(), userInfo.getPassword(), userInfo.getId());
    }

    /**
     * 删除数据
     * @param userInfo
     */
    public void deleteUserInfo(UserInfo userInfo){
        jdbcTemplate.update("delete from user_info where id=?", userInfo.getId());
    }

    /**
     * 查询数据
     * @param userInfo
     * @return
     */
    public List<UserInfo> selectUserInfo(UserInfo userInfo){

        return jdbcTemplate.query("select * from user_info", new RowMapper<UserInfo>() {
            @Override
            public UserInfo mapRow(ResultSet resultSet, int i) throws SQLException {
                UserInfo userInfo1 = new UserInfo();
                Integer id = resultSet.getInt("id");
                String username = resultSet.getString("username");
                String password = resultSet.getString("password");
                userInfo1.setId(id);
                userInfo1.setUsername(username);
                userInfo1.setPassword(password);
                return userInfo1;
            }
        });
    }

}
多数据源
目前我使用的SpringBoot版本为:2.3.1.RELEASE,配置多数据源的时候,有几个坑,不同的数据源所需要的参数是不一样的。下面以druid为例
配置文件:
spring.datasource.druid.one.type=com.alibaba.druid.pool.DruidDataSource
spring.datasource.druid.one.driver-class-name=com.mysql.jdbc.Driver
spring.datasource.druid.one.url=jdbc:mysql://localhost:3306/test?useSSL=false
spring.datasource.druid.one.username=root
spring.datasource.druid.one.password=

spring.datasource.druid.two.type=com.alibaba.druid.pool.DruidDataSource
spring.datasource.druid.two.driver-class-name=com.mysql.jdbc.Driver
spring.datasource.druid.two.url=jdbc:mysql://localhost:3306/test2?useSSL=false
spring.datasource.druid.two.username=root
spring.datasource.druid.two.password=
配置类(可以分下来写):
@Configuration
public class DataSoureConfig {

    @Value("${spring.datasource.druid.one.type}")
    private Class<? extends DataSource> dataSourceType;

    @Bean
    @ConfigurationProperties(prefix = "spring.datasource.druid.one")
    DataSource dataSourceOne(){
        return DataSourceBuilder.create().type(dataSourceType).build();
    }

    @Bean
    @ConfigurationProperties(prefix = "spring.datasource.druid.two")
    DataSource dataSourceTwo(){
        return DataSourceBuilder.create().type(dataSourceType).build();
    }

    @Bean
    JdbcTemplate jdbcTemplateOne(@Qualifier("dataSourceOne") DataSource dataSourceOne){
        return new JdbcTemplate(dataSourceOne);
    }

    @Bean
    JdbcTemplate jdbcTemplateTwo(@Qualifier("dataSourceTwo") DataSource dataSourceTwo){
        return new JdbcTemplate(dataSourceTwo);
    }

}
可以看到,需要制定数据源的类型。如果不指定数据源类型:
@Configuration
public class DataSoureConfig {

//    @Value("${spring.datasource.druid.one.type}")
//    private Class<? extends DataSource> dataSourceType;

    @Bean
    @ConfigurationProperties(prefix = "spring.datasource.druid.one")
    DataSource dataSourceOne(){
//        return DataSourceBuilder.create().type(dataSourceType).build();
        return DataSourceBuilder.create().build();
    }

    @Bean
    @ConfigurationProperties(prefix = "spring.datasource.druid.two")
    DataSource dataSourceTwo(){
//        return DataSourceBuilder.create().type(dataSourceType).build();
        return DataSourceBuilder.create().build();
    }

    @Bean
    JdbcTemplate jdbcTemplateOne(@Qualifier("dataSourceOne") DataSource dataSourceOne){
        return new JdbcTemplate(dataSourceOne);
    }

    @Bean
    JdbcTemplate jdbcTemplateTwo(@Qualifier("dataSourceTwo") DataSource dataSourceTwo){
        return new JdbcTemplate(dataSourceTwo);
    }


}
配置文件(注意url的写法,不这么写会报错):
spring.datasource.druid.one.type=com.alibaba.druid.pool.DruidDataSource
spring.datasource.druid.one.driver-class-name=com.mysql.jdbc.Driver
spring.datasource.druid.one.jdbc-url=jdbc:mysql://localhost:3306/test?useSSL=false
spring.datasource.druid.one.username=root
spring.datasource.druid.one.password=Ph0716

spring.datasource.druid.two.type=com.alibaba.druid.pool.DruidDataSource
spring.datasource.druid.two.driver-class-name=com.mysql.jdbc.Driver
spring.datasource.druid.two.jdbc-url=jdbc:mysql://localhost:3306/test2?useSSL=false
spring.datasource.druid.two.username=root
spring.datasource.druid.two.password=Ph0716
启动测试类,控制台打印信息:

可以发现,即使配置了type,也是不解析的,默认使用了hikari数据源。而且hikari要求的url写法为:”jdbc-url“,否则会报错。druid直接写url就可以了。所以说,如果使用其他第三方的数据源,需要考虑路径问题,以及类型注入。
更新一下————————————————————————————————————————————————
上面用的是DataSourceBuilder是SpringBoot自带的,所以除非指定第三方数据源的类型,否则都会用默认的数据源。如果想要使用Druid,可以用阿里提供的builder,就不用特地注入Type了
    @Bean
    @ConfigurationProperties(prefix = "spring.datasource.druid.one")
    DataSource dataSourceOne(){
        return DruidDataSourceBuilder.create().build();
    }
SpringBoot整合Mybatis
单数据源
SpringBoot整合Mybatis还是比较方便的(除了xml文件的位置放法有点坑外)
引包:
 <dependency>
            <groupId>org.mybatis.spring.boot</groupId>
            <artifactId>mybatis-spring-boot-starter</artifactId>
            <version>2.1.3</version>
        </dependency>

        <dependency>
            <groupId>mysql</groupId>
            <artifactId>mysql-connector-java</artifactId>
            <scope>runtime</scope>
        </dependency>

        <dependency>
            <groupId>com.alibaba</groupId>
            <artifactId>druid-spring-boot-starter</artifactId>
            <version>1.1.10</version>
        </dependency>
目录结构:
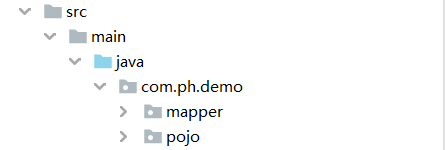
在mapper目录下创建映射接口:
@Mapper
public interface UserInfoMapper {

    List<UserInfo>selectAllUser();

    @Select("select * from user_info")
    List<UserInfo>selectAllUser2();
}
可以通过xml或者注解的方式来配置sql。
如果用xml的方式有以下几种方式:
1、xml文件放在接口所在的mapper文件夹内:

一群java类中冒出来一个xml文件是不和谐的,也不符合maven目录结构的规范,maven在打包的时候会自动忽略java文件夹下的xml文件。所以需要在pom文件的中(build节点内)添加额外的申明:
<resources>
            <resource>
                <directory>src/main/java</directory>
                <includes>
                <include>**/*.xml</include>
            </includes>
            </resource>
            <resource>
                <directory>src/main/resources</directory>
            </resource>
        </resources>
添加完之后就可以正常使用,不会报错了。
2、xml文件放在resources目录下
放在resources目录下,又有两种情况,一种放在与mapper接口所在包相同名称的文件夹里,是不是有点拗口,见图;
文件夹与java包是不一样的,如果创建的时候直接输入com.ph.demo.mapper,那么只会创建一个名为”com.ph.demo.mapper“的文件夹,而不是多个文件夹。所以多层文件夹应该一个一个创建。
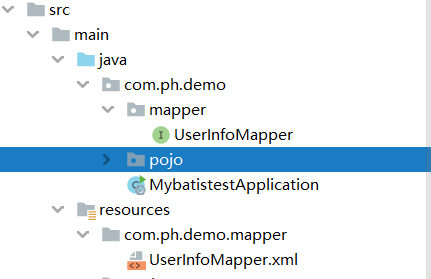
我个人一般喜欢放在mapper文件夹下,如图:

只是这么做的话,需要在配置文件中添加额外的配置:
mybatis.mapper-locations=classpath*:mapper/*.xml
这样就大功告成了,个人推荐还是放在resource目录下,还是规范点比较好。
多数据源
目录结构:
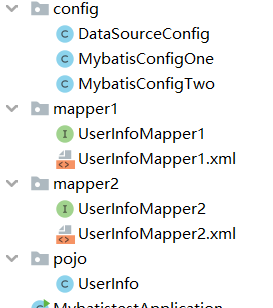
数据源配置类:
@Configuration
public class DataSourceConfig {

    @Bean
    @ConfigurationProperties(prefix = "spring.datasource.druid.one")
    DataSource dataSourceOne(){
        return DruidDataSourceBuilder.create().build();
    }

    @Bean
    @ConfigurationProperties(prefix = "spring.datasource.druid.two")
    DataSource dataSourceTwo(){
        return DruidDataSourceBuilder.create().build();
    }
}
mybatis模板配置类1:
@Configuration
@MapperScan(basePackages = "com.ph.demo.mapper1", sqlSessionFactoryRef = "sessionFactory1")
public class MybatisConfigOne {

    @Resource(name = "dataSourceOne")
    DataSource dataSource;

    @Bean
    SqlSessionFactory sessionFactory1(){
        SqlSessionFactoryBean bean = new SqlSessionFactoryBean();

        try {
            bean.setDataSource(dataSource);
            return bean.getObject();
        } catch (Exception e) {
            e.printStackTrace();
        }
        return null;
    }

    @Bean
    SqlSessionTemplate sqlSessionTemplate1(){
        return new SqlSessionTemplate(sessionFactory1());
    }

}
mybatis模板配置类2:
@Configuration
@MapperScan(value = "com.ph.demo.mapper2", sqlSessionFactoryRef = "sqlSessionFactory2")
public class MybatisConfigTwo {
    @Resource(name = "dataSourceTwo")
    DataSource dataSourceTwo;

    @Bean
    SqlSessionFactory sqlSessionFactory2(){
        SqlSessionFactoryBean sqlSessionFactoryBean = new SqlSessionFactoryBean();

        try{
            sqlSessionFactoryBean.setDataSource(dataSourceTwo);
            return sqlSessionFactoryBean.getObject();
        }catch (Exception e){
            e.printStackTrace();
        }
        return null;
    }

    @Bean
    SqlSessionTemplate sqlSessionTemplate2(){
        return new SqlSessionTemplate(sqlSessionFactory2());
    }
}
测试类:
@SpringBootTest
class MybatistestApplicationTests {

    @Autowired
    UserInfoMapper1 userInfoMapper1;

    @Autowired
    UserInfoMapper2 userInfoMapper2;

    @Test
    void contextLoads() {
        List<UserInfo>list = userInfoMapper1.selectAllUser();
        List<UserInfo>list2 = userInfoMapper2.selectAllUser2();
        System.out.println(list);
        System.out.println(list2);
    }

}