在ASP.NET MVC5 及 Visual Studio 2013 中为Identity账户系统配置数据库链接及Code-First数据库迁移
最近发布的ASP.NET MVC 5 及Visual Studio 2013中为我们带来的最显著的变化就是Identity
账户管理系统(原来使用ASP.NET Forms Membership)。此外,还有一些Entity Framework Code-First数据库迁移的细微变化。
在这篇文章中,我们将回顾Identity账户管理系统的一些细节,它们保存在您指定的外部Sql Server(或您选择的任何其他数据库)中,而不是在App_Data文件夹中默认的本地数据库并且配置Entity Framework迁移带种子数据的数据库迁移。
- 配置数据库连接
- 配置Entity Framework数据库迁移及种子数据库
- 种子数据库的初始用户记录
- 扩展IdentityModel类使其具有附加属性
- 更新数据库以反映实体类的修改
- 更多的资源和感兴趣的项目
- 在ASP.NET MVC5中扩展Identity账户系统及实现基于角色的认证管理系统
ASP.NET Identity系统的基本组件
开箱即用,当你在Visual Studio 2013中使用默认的模板创建一个ASP.NET MVC5项目,您会得到一个已经包括基本的身份和账户管理系统的可以运行的网站。在当前的配置下,当您点击注册账户时,将在您项目的APP_DATA文件夹中创建一个SQL Server CE(.sdf)或SQL Express(.mdf)数据库文件。
在默认的MVC5项目解决方案资源管理器的Identity帐户类:
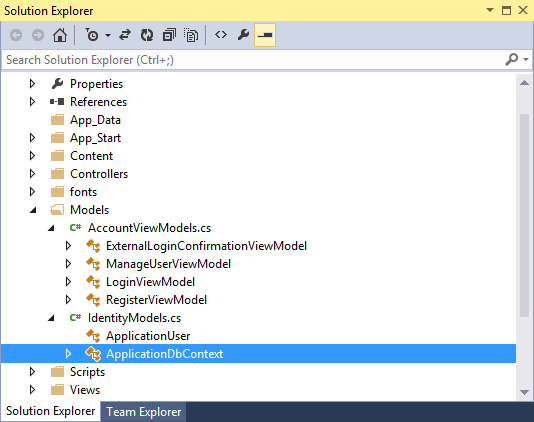
在Identity系统中, IdentityModel.cs是必不可少的。在代码编辑器中打开这个文件,我们将会看到定义了两个类:
在 IdentityModel.cs文件中的代码:
using Microsoft.AspNet.Identity.EntityFramework;
namespace DbMigrationExample.Models
{
	      public class ApplicationUser : IdentityUser
         {
         }

         public class ApplicationDbContext : IdentityDbContext<ApplicationUser>
         {
                public ApplicationDbContext() : base("DefaultConnection")
                {
                }
         }
}
ApplicationUser类,继承自Identity框架的IdentityUser类。这是ASP.NET MVC 5中,身份管理系统的基础单元。这个类在默认的项目代码中定义是空的,因此只能使用基类IdentityUser类公开的基本属性。我们可以通过增加我们自己的属性来扩展ApplicationUser类,并反映在数据库中。更多的相关知识
在这里我们还发现了另一个类ApplicationDbContext,这是用于将我们的程序用户数据与Entity Framework框架互动并持久化数据库(该数据库可能会与应用程序其他部分的数据库并不相同)。需要注意的是,这个类并没有继承自DbContext类(通常使用Entity Framework框架的情况下,会从这个类继承)。换句话说,ApplicationDbContext继承于定义在Microsoft.AspNet.Identity.EntityFramework中包含"Code-First"为基类的Identity系统的一部分。
通过这两个类,MVC框架提供了完整的生成和使用Identity账户的数据库系统。同样的,我们可以通过扩展基类来满足我们自己的需要。
最后,请注意AccountViewModels.cs文件,在这里实际上定义了我们应用程序视图所使用的ViewModels。通过这种设计,使得View获得满足需要的信息来渲染View,避免面向公众的应用程序暴露过多的内部数据信息。ViewModels从架构来看是非常有用的设计组件,并且有效的防止了数据的泄露。
配置数据库连接
正如我们前面所提到的一样,MVC框架默认的会在我们的应用程序的App_Data文件夹中生成Sql CE或Sql Express的数据文件,除非我们明确的告诉框架不需要这样做。我们需要做的就是,改变ApplicationDbContext连接字符串,将其指向我们真正的生产环境数据库。
ApplicationDbContext类在构造函数中向基类传递了一个名为"DefaultConnection"的连接字符串。如果我们打开Web.Config文件,会发现在
Web.Config文件中的连接字符串:
<connectionStrings>
		<add name="DefaultConnection"  connectionString="Data Source=(LocalDb)v110; AttachDbFilename=|DataDirectory|aspnet-DbMigrationExample-20131027114355.mdf;Initial Catalog=aspnet-DbMigrationExample-20131027114355;Integrated  Security=True" providerName="System.Data.SqlClient" />
</connectionStrings>
改变目标数据库的最简单做法就是修改Web.Config文件中的"DefaultConnection"连接字符串的详细信息。在这种情况下,我们将会把链接替换成SQL CE的数据库连接,因为我已经在我的开发机器上部署了这种数据库(但是,您也可以使用你所希望的任何数据库)。
指向本地Sql Server实例的"DefaultConnection":
<connectionStrings>
	<add name="DefaultConnection" connectionString="Data Source=XIVMAINXIVSQL; Initial Catalog=DbMigrationExample;Integrated Security=True" providerName="System.Data.SqlClient" />
</connectionStrings>
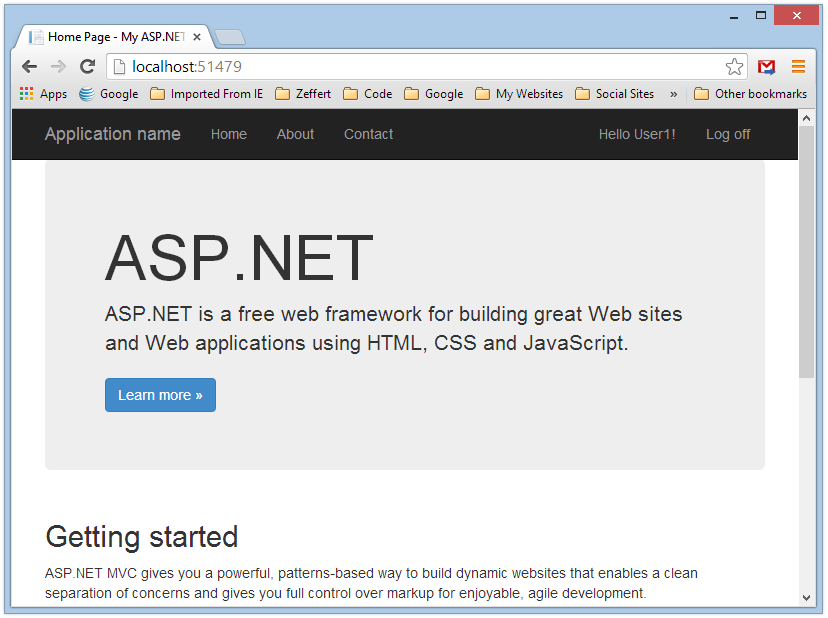
现在,我们来启动这个VS2013 MVC项目,我们将会看到如下的界面
默认MVC项目的模板主页:

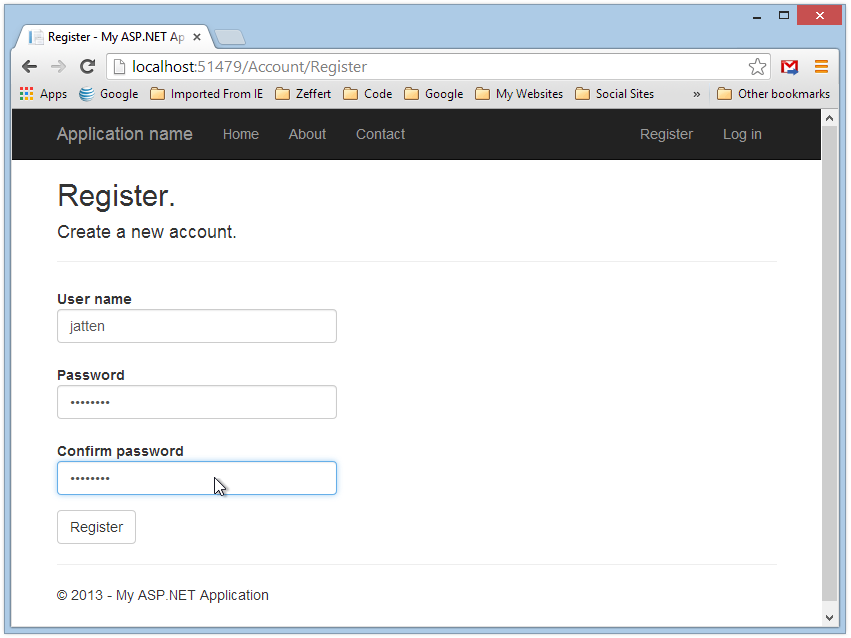
在这个页面上,我点击右上角的“注册”按钮:
默认MVC项目模板的注册页面:
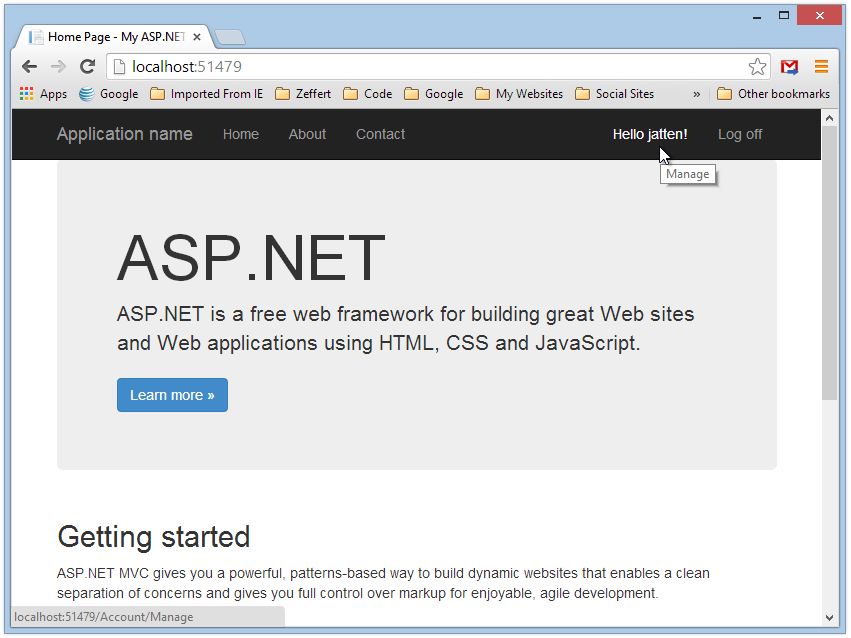
当我填写完注册内容,并点击“Register”按钮,我将会被引导回到主页。主页页面上将显示我已经作为注册用户并且已经登录到系统中了。
这一切都不是令人惊讶的,我们做这些的原因是为了看到我们刚才注册所生成的数据库。打开SQL Server Management Studio (SSMS),我们将会看到一个“DbMigrationExample”的新数据库:
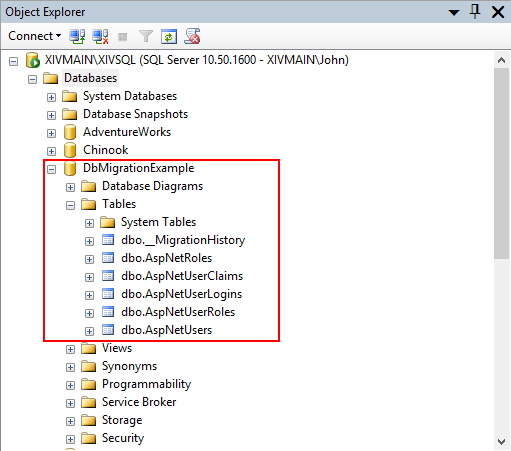
请注意,在这里创建了很多数据表。其实我们只是定义了一个ApplicationUser类,其他的都是由继承自IdentityDbContext类的ApplicationDbContext类所创建。
项目的默认配置实际上只使用了dbo.AspNetUsers数据表,但是,你已经可以看到已经创建了一个全方位的身份管理数据表,包括角色管理和外部授权(使用Google/Facebook/Twitter的账户进行第三方登录)。
配置Entity Framework框架数据迁移和种子数据库
随着我们项目的进展,我们需要将对类的修改及时反映到数据库中。我们也会想部署新的数据库或者发布了新的数据库版本,我们将会需要一些初始数据(种子数据库)。相比于以前的Entity Framework和MVC版本,我们可以使用EF Code First来实现这个目的。
在开始之前,我需要删除注册时创建的数据库,并且重新开始。
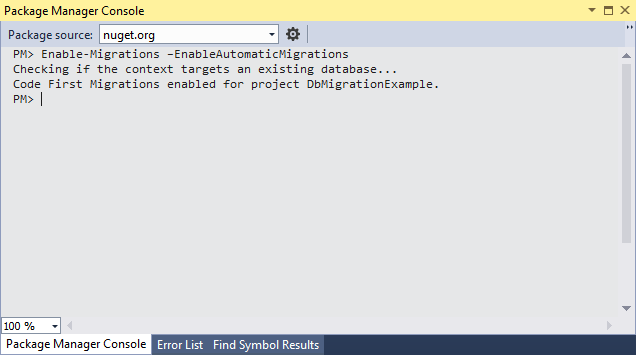
为了开始在你的项目中使用数据迁移,请在Visual Studio中选择工具菜单中的“NuGet程序包管理器”-> " 程序包管理器控制台"。程序包管理器控制台会出现在屏幕底部,我们只需要输入如下代码:
Enable-Migrations –EnableAutomaticMigrations
一旦我们按下回车键,系统将会在忙碌一会,生成Migrations文件夹并进行相关配置。当任务运行完毕后,我们的控制台窗口应该是这样的:
在控制台启用Enable-Migrations命令后:
种子数据库的初始用户记录
由于种种原因,我们可能需要在创建数据库的时候部署一些初步的数据记录。我们可能需要对数据库的某些表预填一些静态值,或者我们可能只是需要用于系统开发工作的一些测试数据。我们将部署一个填充了一对重复的数据记录的数据库。
一旦我们运行Enable-Migrations命令后,在项目的根目录中将会生成一个Migrations文件夹。如果我们打开这个文件夹中的Configuration.cs文件,我们将会看到如下内容:
namespace DbMigrationExample.Migrations
{
    using System;
    using System.Data.Entity;
    using System.Data.Entity.Migrations;
    using System.Linq;

    internal sealed class Configuration  : DbMigrationsConfiguration<DbMigrationExample.Models.ApplicationDbContext>
    {
        public Configuration()
        {
            AutomaticMigrationsEnabled = true;
        }

        protected override void Seed(DbMigrationExample.Models.ApplicationDbContext context)
        {
            //  This method will be called after migrating to the latest version.

            //  You can use the DbSet<T>.AddOrUpdate() helper extension method
            //  to avoid creating duplicate seed data. E.g.
            //
            //    context.People.AddOrUpdate(
            //      p => p.FullName,
            //      new Person { FullName = "Andrew Peters" },
            //      new Person { FullName = "Brice Lambson" },
            //      new Person { FullName = "Rowan Miller" }
            //    );
           //
        }
    }
}
我们需要像下面一样修改Configuration类,这样就会在数据库被创建的同时创建我们的测试数据。请注意,我们增加了一下Using语句,包括Microsoft.AspNet.Identity,Microsoft.AspNet.Identity.EntityFramework以及项目中的Models:
修改Migrations文件夹中的Configuration.cs文件中的代码如下:
using System;
using System.Data.Entity;
using System.Data.Entity.Migrations;
using System.Linq;
using Microsoft.AspNet.Identity;
using Microsoft.AspNet.Identity.EntityFramework;
using DbMigrationExample.Models;

namespace DbMigrationExample.Migrations
{
    internal sealed class Configuration  : DbMigrationsConfiguration<DbMigrationExample.Models.ApplicationDbContext>
    {
        public Configuration()
        {
		   AutomaticMigrationsEnabled = true;
	     }

        protected override void Seed(ApplicationDbContext context)
        {
              var manager = new UserManager<ApplicationUser>(
              new UserStore<ApplicationUser>(
		    new ApplicationDbContext()));

		    for (int i = 0; i < 4; i++)
		    {
			 var user = new ApplicationUser()
			{
				UserName = string.Format("User{0}", i.ToString())
			};
			manager.Create(user, string.Format("Password{0}", i.ToString()));
			}
		}
	 }
}
我们已经在用户数据表中添加了种子数据,现在我们在控制台中输入如下命令:
Enable-Migration初始化命令:
Add-Migration Init
当命令完成运行(这可能需要几秒钟)我们的控制台窗口看起来是这样的:
Enable-Migration Init执行后,控制台的输出:
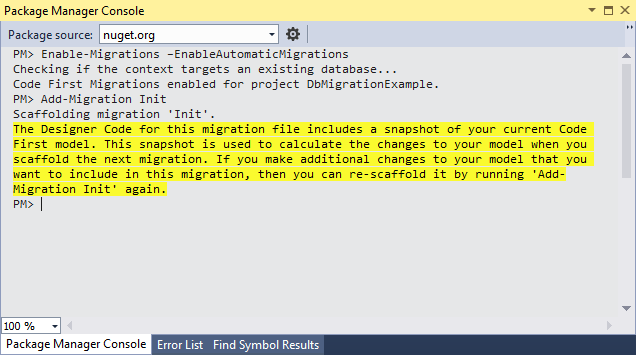
在这个点上我们的Add-Migration Init创建了,我们不再像以前一样需要创建脚手架代码。如果我们打开Migrations文件夹会发现包含测试数据的代码文件已经生成了。然而,我们并没有去修改或创建数据库。
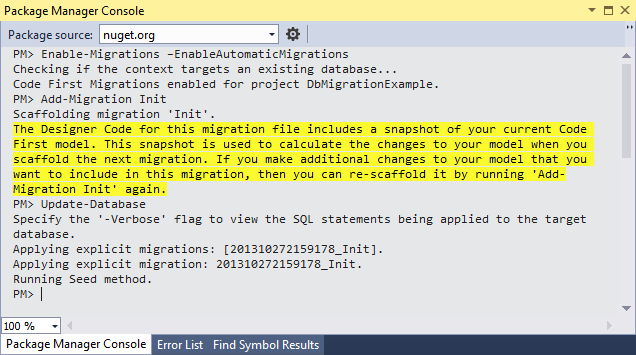
使用Update-Database命令创建或更新种子数据库
当所有工作完成后,我们在控制台输入如下命令:
Update-Database
当命令完成后,控制台应该是这样的:
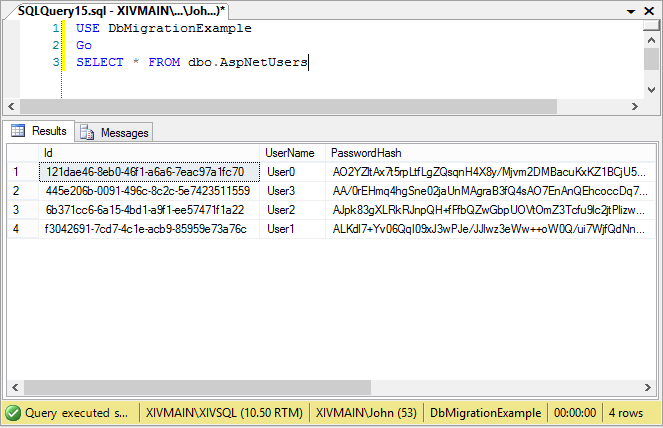
如果一切顺利,我们现在看到的数据库已经重新创建了,所有预期的表像以前一样。此外,如果我们使用SQL命令SELECT * FROM dbo.AspNetUsers就会发现我们现在有四个测试用户:
数据表dbo.AspNetUsers查询的结果:
现在,我们已经制定了基本的迁移策略,让我们来看看扩展ApplicationUser类加入一些额外的数据字段。
扩展IdentityModel类使其具有附加属性
根据新的Asp.Net Identity Model,他扩充了基本的用户信息内容,是我们的应用程序管理相关内容更加容易。例如,假设我们希望我们的用户信息,包含电子邮件地址,以及完整的名字和姓氏。我们可以为这些项目在ApplicationUser类中添加属性。然后更新Controllers, ViewModels, 和Views,使得用户注册时,填写这些新增的内容。
首先,让我们回到ApplicationUser类,并添加我们想要的属性:
using Microsoft.AspNet.Identity.EntityFramework;
// Add this to bring in Data Annotations:
using System.ComponentModel.DataAnnotations;

namespace DbMigrationExample.Models
{
    public class ApplicationUser : IdentityUser
    {
        [Required]
        public string FirstName { get; set; }

        [Required]
        public string LastName { get; set; }

        [Required]
        public string Email { get; set; }
    }

    public class ApplicationDbContext : IdentityDbContext<ApplicationUser>
    {
        public ApplicationDbContext()
            : base("DefaultConnection")
        {
        }
    }
}
在上文中,我们增加了我们所需要的三个属性到ApplicationUser类中,并且增加了[Required]属性。为了实现这个属性的增加,我们必须在类文件的顶部增加 Using System.ComponentModel.DataAnnotations;
更新AccountController的Register方法
我们需要更新AccountController的Register方法。目前,该代码创建ApplicationUser并设置UserName属性:
目前,只设置了用户名属性:
var user = new ApplicationUser() { UserName = model.UserName };
我们需要添加以下内容(以下注释的代码),使我们的控制器正常工作:
更新AccountController的Register方法来设置新的用户属性:
[HttpPost]
[AllowAnonymous]
[ValidateAntiForgeryToken]
public async Task<ActionResult> Register(RegisterViewModel model)
{
    if (ModelState.IsValid)
    {
        // Add the following to populate the new user properties
        // from the ViewModel data:
        var user = new ApplicationUser()
        {
            UserName = model.UserName,
            FirstName = model.FirstName,
            LastName = model.LastName,
            Email = model.Email
        };
        var result = await UserManager.CreateAsync(user, model.Password);
        if (result.Succeeded)
        {
            await SignInAsync(user, isPersistent: false);
            return RedirectToAction("Index", "Home");
        }
        else
        {
            AddErrors(result);
        }
    }

    // If we got this far, something failed, redisplay form
    return View(model);
}
更新Register ViewModel
现在。我们已经为ApplicationUser类添加了新的用户属性。同时我们还需要为用户在注册过程中提供输入值的新的方法。如果我们打开 AccountViewModels.cs文件,我们会看到定义了一些ViewModel类。最底部是RegisterViewModel类,目前它看来是这样的:
默认的RegisterViewModel类:
public class RegisterViewModel
{
    [Required]
    [Display(Name = "User name")]
    public string UserName { get; set; }

    [Required]
    [StringLength(100, ErrorMessage = "The {0} must be at least {2} characters long.", MinimumLength = 6)]
    [DataType(DataType.Password)]
    [Display(Name = "Password")]
    public string Password { get; set; }

    [DataType(DataType.Password)]
    [Display(Name = "Confirm password")]
    [Compare("Password", ErrorMessage = "The password and confirmation password do not match.")]
    public string ConfirmPassword { get; set; }
}
我们要添加我们的新特性,所以我们修改如下:
修改RegisterViewModel类:
public class RegisterViewModel
{
    [Required]
    [Display(Name = "User name")]
    public string UserName { get; set; }

    [Required]
    [StringLength(100, ErrorMessage = "The {0} must be at least {2} characters long.", MinimumLength = 6)]
    [DataType(DataType.Password)]
    [Display(Name = "Password")]
    public string Password { get; set; }

    [DataType(DataType.Password)]
    [Display(Name = "Confirm password")]
    [Compare("Password", ErrorMessage = "The password and confirmation password do not match.")]
    public string ConfirmPassword { get; set; }

    [Required]
    [Display(Name = "First name")]
    public string FirstName { get; set; }

    [Required]
    [Display(Name = "Last name")]
    public string LastName { get; set; }

    [Required]
    [Display(Name = "Email")]
    public string Email { get; set; }
}
更新Register视图
我们还需要修改Register.cshtml来匹配视图,在Views => Account文件夹打开Register.cshtml文件,它应该是这样的:
默认的Register.cshtml文件:
@model DbMigrationExample.Models.RegisterViewModel
@{
    ViewBag.Title = "Register";
}

<h2>@ViewBag.Title.</h2>

@using (Html.BeginForm("Register", "Account", FormMethod.Post, new { @class = "form-horizontal", role = "form" }))
{
    @Html.AntiForgeryToken()
    <h4>Create a new account.</h4>
    <hr />
    @Html.ValidationSummary()
    <div class="form-group">
        @Html.LabelFor(m => m.UserName, new { @class = "col-md-2 control-label" })
        <div class="col-md-10">
            @Html.TextBoxFor(m => m.UserName, new { @class = "form-control" })
        </div>
    </div>
    <div class="form-group">
        @Html.LabelFor(m => m.Password, new { @class = "col-md-2 control-label" })
        <div class="col-md-10">
            @Html.PasswordFor(m => m.Password, new { @class = "form-control" })
        </div>
    </div>
    <div class="form-group">
        @Html.LabelFor(m => m.ConfirmPassword, new { @class = "col-md-2 control-label" })
        <div class="col-md-10">
            @Html.PasswordFor(m => m.ConfirmPassword, new { @class = "form-control" })
        </div>
    </div>
    <div class="form-group">
        <div class="col-md-offset-2 col-md-10">
            <input type="submit" class="btn btn-default" value="Register" />
        </div>
    </div>
}

@section Scripts {
    @Scripts.Render("~/bundles/jqueryval")
}
在“ConfirmPassword”属性后添加新的属性:
修改Register.cshml文件:
<h2>@ViewBag.Title.</h2>

@using (Html.BeginForm("Register", "Account", FormMethod.Post, new { @class = "form-horizontal", role = "form" }))
{
    @Html.AntiForgeryToken()
    <h4>Create a new account.</h4>
    <hr />
    @Html.ValidationSummary()
    <div class="form-group">
        @Html.LabelFor(m => m.UserName, new { @class = "col-md-2 control-label" })
        <div class="col-md-10">
            @Html.TextBoxFor(m => m.UserName, new { @class = "form-control" })
        </div>
    </div>
    <div class="form-group">
        @Html.LabelFor(m => m.Password, new { @class = "col-md-2 control-label" })
        <div class="col-md-10">
            @Html.PasswordFor(m => m.Password, new { @class = "form-control" })
        </div>
    </div>
    <div class="form-group">
        @Html.LabelFor(m => m.ConfirmPassword, new { @class = "col-md-2 control-label" })
        <div class="col-md-10">
            @Html.PasswordFor(m => m.ConfirmPassword, new { @class = "form-control" })
        </div>
    </div>

    // Add new properties here:
    <div class="form-group">
        @Html.LabelFor(m => m.FirstName, new { @class = "col-md-2 control-label" })
        <div class="col-md-10">
            @Html.TextBoxFor(m => m.FirstName, new { @class = "form-control" })
        </div>
    </div>

    <div class="form-group">
        @Html.LabelFor(m => m.LastName, new { @class = "col-md-2 control-label" })
        <div class="col-md-10">
            @Html.TextBoxFor(m => m.LastName, new { @class = "form-control" })
        </div>
    </div>

    <div class="form-group">
        @Html.LabelFor(m => m.Email, new { @class = "col-md-2 control-label" })
        <div class="col-md-10">
            @Html.TextBoxFor(m => m.Email, new { @class = "form-control" })
        </div>
    </div>

    <div class="form-group">
        <div class="col-md-offset-2 col-md-10">
            <input type="submit" class="btn btn-default" value="Register" />
        </div>
    </div>
}

@section Scripts {
    @Scripts.Render("~/bundles/jqueryval")
}
更新数据库以反映实体类的修改
到目前为止,我们已经修改了我们的数据模型实体类,即ApplicationUser类。在我们的应用程序中,EF框架为我们将这个类映射到后端数据库中的dbo.AspNetUsers数据表。为了我们更新的内容我们需要再次运行迁移。在做迁移之前,我们需要做一件事情。我们需要将新的FirstName, LastName和Email属性到我们的种子数据库中。
更新Seed方法:
protected override void Seed(ApplicationDbContext context)
{
    var manager = new UserManager<ApplicationUser>(
        new UserStore<ApplicationUser>(
            new ApplicationDbContext()));

    for (int i = 0; i < 4; i++)
    {
        var user = new ApplicationUser()
        {
            UserName = string.Format("User{0}", i.ToString()),

            // Add the following so our Seed data is complete:
            FirstName = string.Format("FirstName{0}", i.ToString()),
            LastName = string.Format("LastName{0}", i.ToString()),
            Email = string.Format("Email{0}@Example.com", i.ToString()),
        };
        manager.Create(user, string.Format("Password{0}", i.ToString()));
    }
}
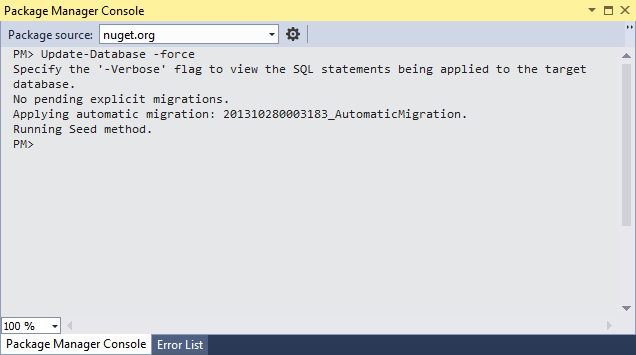
现在,如果我们再次运行Update-Database命令,我们对实体对象的修改将会反应到dbo.AspNetUsers数据表的架构中,但是,我们的种子数据将不会被更新,因为Entity Framework不能这样做,这样做将会导致数据丢失等严重的后果。虽然有很多方法可以完成这种任务,但是这已经超出了本文的探讨范围。在这里,我们将手工删除数据库并且再次运行Update-Database命令。然而,EF框架会认为我们的数据来源于已经存在的迁移命令,所以我们必须执行Update-Database -force命令。
一旦我们手工删除了数据库,并且执行了Update-Database –force命令,我们的控制台输出应该是这样的:
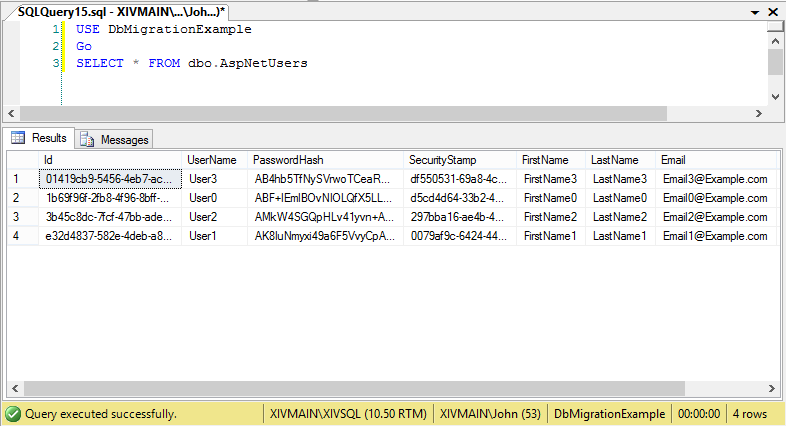
快速重新运行我们的查询表明,事实上,新的字段被添加到我们的表,并且测试数据填充完毕:
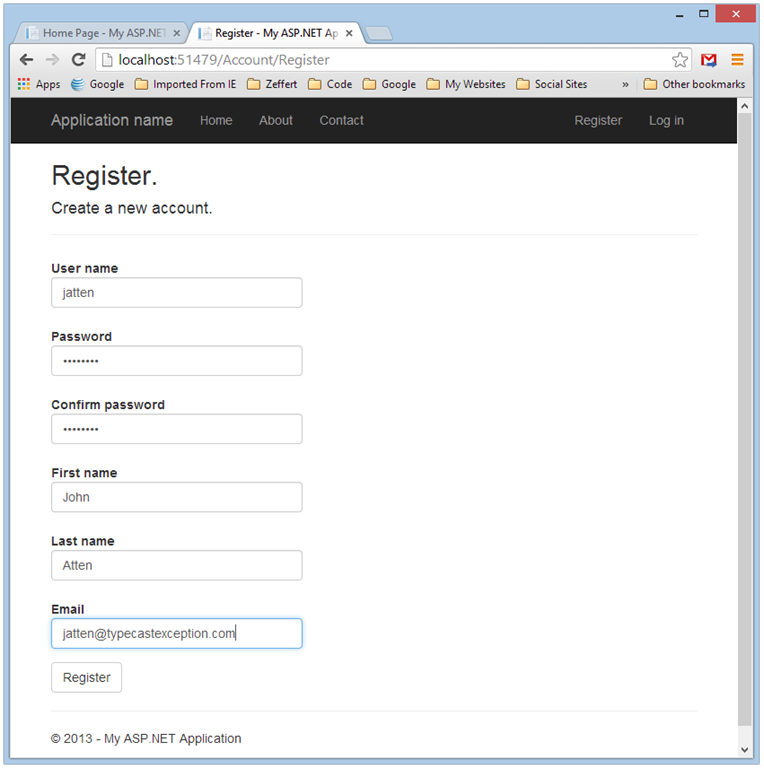
更新用户注册界面
现在,我们已经更新了我们的Registration.cshtml视图,控制器的方法,ViewModel和数据库,当我们运行我们的应用程序,并去注册时,我们看到更新后登记表格界面:
一旦我们完成表单并点击注册按钮,我们成功登录,我们完美的将数据持久化到数据库中,随时在我们的应用中使用。
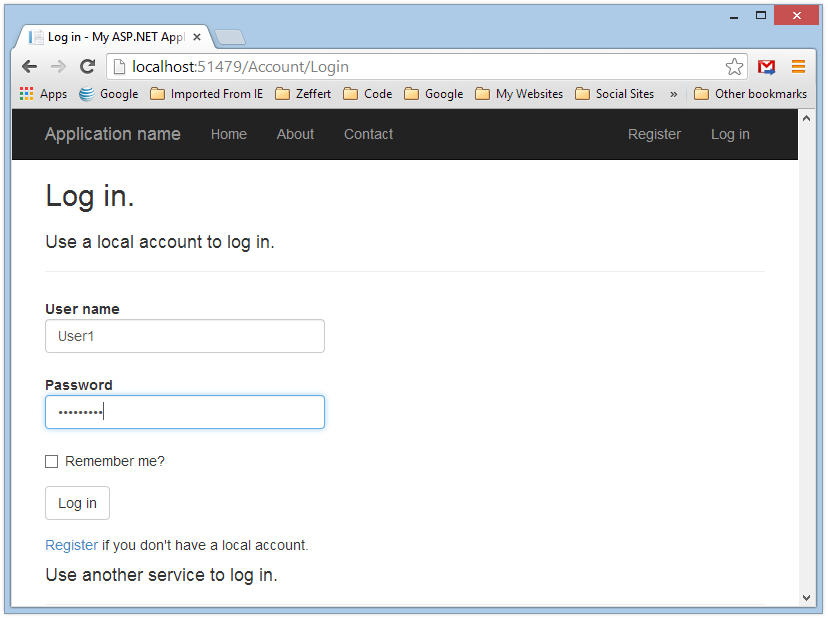
使用种子数据登录
另外,我们也可以注销,并作为我们的测试用户通过点击“登录”链接来测试登录:
成功登录:
仅仅是开始
更新到ASP.NET MVC 5会获得更多的好处并非常酷的。在本文中,我只是介绍基本的更新账户管理的内容。但是ASP.NET和MVC为我们做了恨多的工作,使我们能够很容易的完成基于角色的身份管理,并且可以将社交账号集成进来(例如Google +, Facebook, 和Twitter.)。
后记,写给自己看的
英文不好,这么好的资料,现在才看到。目测改代码在VS2013+mvc5中能够完美重新,只是EF框架及一些组件的小版本变化需要调整。然后,自己将在VS2015 RC + MVC6中测试,调整。加油。