一、首尾式动画
代码示例:
    // beginAnimations表示此后的代码要“参与到”动画中

    [UIView beginAnimations:nil context:nil];
//设置动画时长
    [UIView setAnimationDuration:2.0];

      self.headImageView.bounds = rect;

    // commitAnimations,将beginAnimation之后的所有动画提交并生成动画
    [UIView commitAnimations];
说明:如果只是修改控件的属性,使用首尾式动画还是比较方便的,但是如果需要在动画完成后做后续处理,就不是那么方便了
二、block代码块动画
代码示例:
   //简单的动画效果
    [UIView animateWithDuration:2.0 animations:^{
        showlab.alpha=0;
    } completion:^(BOOL finished) {
        [showlab removeFromSuperview];
    }];
说明:
(1)在实际的开发中更常用的时block代码块来处理动画操作。
(2)块动画相对来说比较灵活,尤为重要的是能够将动画相关的代码编写在一起,便于代码的阅读和理解.
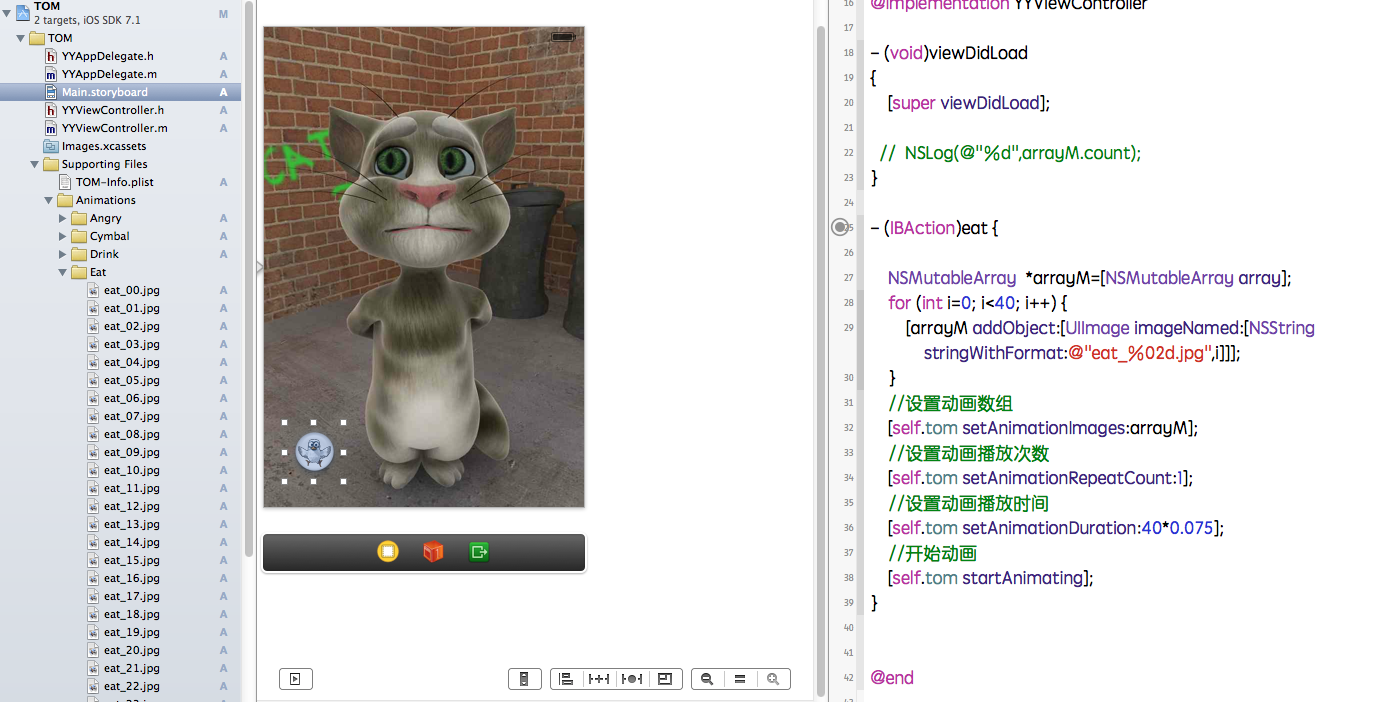
三、序列帧动画(以一个简单的TOM猫动画示例)

导入提前准备好的素材,对UIImageview和button按钮进行连线。
代码示例:
- (IBAction)eat {

    NSMutableArray  *arrayM=[NSMutableArray array];
    for (int i=0; i<40; i++) {
        [arrayM addObject:[UIImage imageNamed:[NSString stringWithFormat:@"eat_%02d.jpg",i]]];
    }
    //设置动画数组
    [self.tom setAnimationImages:arrayM];
    //设置动画播放次数
    [self.tom setAnimationRepeatCount:1];
    //设置动画播放时间
    [self.tom setAnimationDuration:40*0.075];
    //开始动画
    [self.tom startAnimating];
}
点击按钮,即可执行动画,实现效果截图如下:

四、补充知识
1. Images.xcassets中的素材
(1)只支持png格式的图片
(2) 图片只支持[UIImage imageNamed]的方式实例化,但是不能从Bundle中加载
(3) 在编译时,Images.xcassets中的所有文件会被打包为Assets.car的文件
2. UIImageView的序列帧动画(需要考虑程序性能,释放数据)
// 0. 是否正在动画
[self.tom isAnimating];
// 1. 设置图片的数组
[self.tom setAnimationImages:arrayM];
// 2. 设置动画时长,默认每秒播放30张图片
[self.tom setAnimationDuration:arrayM.count * 0.075];
// 3. 设置动画重复次数,默认为0,无限循环
[self.tom setAnimationRepeatCount:1];
// 4. 开始动画
[self.tom startAnimating];
// 5. 动画播放完成后,清空动画数组
[self.tom performSelector:@selector(setAnimationImages:) withObject:nilafterDelay:self.tom.animationDuration];
3. UIImage imageNamed
(1)在图片使用完成后,不会直接被释放掉,具体释放时间由系统决定,适用于图片小,常用的图像处理
(2)如果要释放快速释放图片,可以使用[UIImage imageWithContentsOfFile:path]实例化图像
4. 方法重构的策略
(1) 将具有共性的代码复制到一个新的方法
(2)根据不同的调用情况,增加方法的参数
提示:在写程序时不要着急重构,有时候把代码先写出来,更容易看清楚如何重构才会更好
5. Bundle(包)中的图片素材
往项目中拖拽素材时,通常选择
(1) Destination: 勾选
(2) Folders:
1)选择第一项:黄色文件夹
注意点:Xcode中分文件夹,Bundle中所有所在都在同一个文件夹下,因此,不能出现文件重名的情况
特点:
a.可以直接使用[NSBundle mainBundle]作为资源路径,效率高!
b.可以使用[UIImage imageNamed:]加载图像
2)选择第二项:蓝色文件夹
注意点:Xcode中分文件夹,Bundle中同样分文件夹,因此,可以出现文件重名的情况
特点:
a.需要在[NSBundle mainBundle]的基础上拼接实际的路径,效率较差
b.不能使用[UIImage imageNamed:]加载图
transframe属性(形变)
1. transform属性
在OC中,通过transform属性可以修改对象的平移、缩放比例和旋转角度
常用的创建transform结构体方法分两大类
(1) 创建“基于控件初始位置”的形变
CGAffineTransformMakeTranslation(平移)
CGAffineTransformMakeScale(缩放)
CGAffineTransformMakeRotation(旋转)
(2) 创建“基于transform参数”的形变
CGAffineTransformTranslate
CGAffineTransformScale
CGAffineTransformRotate
补充:
在OC中,所有跟角度相关的数值,都是弧度值,180° = M_PI
正数表示顺时针旋转
负数表示逆时针旋转
提示:由于transform属性可以基于控件的上一次的状态进行叠加形变,例如,先旋转再平移。因此在实际动画开发中,当涉及位置、尺寸形变效果时,大多修改控件的transform属性,而不是frame、bounds、center 。
  1 //
  2 //  YYViewController.m
  3 //  01-练习使用按钮的frame和center属性
  4 //
  5 //  Created by apple on 14-5-21.
  6 //  Copyright (c) 2014年 itcase. All rights reserved.
  7 //
  8
  9 #import "YYViewController.h"
 10
 11 //私有扩展
 12 @interface YYViewController ()
 13
 14 @property(nonatomic,weak)IBOutlet UIButton *headImageView;
 15 @end
 16
 17 @implementation YYViewController
 18
 19 //枚举类型,从1开始
 20 //枚举类型有一个很大的作用,就是用来代替程序中的魔法数字
 21 typedef enum
 22 {
 23     ktopbtntag=1,
 24     kdownbtntag,
 25     krightbtntag,
 26     kleftbtntag
 27 }btntag;
 28
 29 //viewDidLoad是视图加载完成后调用的方法,通常在此方法中执行视图控制器的初始化工作
 30 - (void)viewDidLoad
 31 {
 32
 33     //在viewDidLoad方法中,不要忘记调用父类的方法实现
 34     [super viewDidLoad];
 35
 36
 37     //手写控件代码
 38     //一、写一个按钮控件,上面有一张图片
 39
 40     //1.使用类创建一个按钮对象
 41    // UIButton *headbtn=[[UIButton alloc] initWithFrame:CGRectMake(100 ,100, 100, 100)];
 42     //设置按钮对象为自定义型
 43     UIButton *headbtn=[UIButton buttonWithType:UIButtonTypeCustom];
 44
 45     //2.设置对象的各项属性
 46
 47     //(1)位置等通用属性设置
 48     headbtn.frame=CGRectMake(100, 100, 100, 100);
 49
 50     //(2)设置普通状态下按钮的属性
 51     [headbtn setBackgroundImage:[UIImage imageNamed:@"i"] forState:UIControlStateNormal];
 52     [headbtn setTitle:@"点我!" forState:UIControlStateNormal];
 53     [headbtn setTitleColor:[UIColor redColor] forState:UIControlStateNormal];
 54
 55     //(3)设置高亮状态下按钮的属性
 56     [headbtn setBackgroundImage:[UIImage imageNamed:@"a"] forState:UIControlStateHighlighted];
 57     [headbtn setTitle:@"还行吧~" forState:UIControlStateHighlighted];
 58     [headbtn setTitleColor:[UIColor blueColor] forState:UIControlStateHighlighted];
 59
 60     //3.把对象添加到视图中展现出来
 61     [self.view addSubview:headbtn];
 62     //注意点!
 63     self.headImageView=headbtn;
 64
 65
 66     //二、写四个控制图片左右上下移动方向的按钮控件
 67
 68     /**================向上的按钮=====================*/
 69     //1.创建按钮对象
 70     UIButton *topbtn=[UIButton buttonWithType:UIButtonTypeCustom];
 71
 72     //2.设置对象的属性
 73     topbtn.frame=CGRectMake(100, 250, 40, 40);
 74     [topbtn setBackgroundImage:[UIImage imageNamed:@"top_normal"] forState:UIControlStateNormal];
 75     [topbtn setBackgroundImage:[UIImage imageNamed:@"top_highlighted"] forState:UIControlStateHighlighted];
 76     [topbtn setTag:1];
 77     //3.把控件添加到视图中
 78     [self.view addSubview:topbtn];
 79
 80     //4.按钮的单击控制事件
 81     [topbtn addTarget:self action:@selector(Click:) forControlEvents:UIControlEventTouchUpInside];
 82
 83
 84       /**================向下的按钮=====================*/
 85     //1.创建按钮对象
 86     UIButton *downbtn=[UIButton buttonWithType:UIButtonTypeCustom];
 87     //2.设置对象的属性
 88     downbtn.frame=CGRectMake(100, 350, 40, 40);
 89     [downbtn setBackgroundImage:[UIImage imageNamed:@"bottom_normal"] forState:UIControlStateNormal];
 90     [downbtn setBackgroundImage:[UIImage imageNamed:@"bottom_highlighted"] forState:UIControlStateHighlighted];
 91     [downbtn setTag:2];
 92     //3.把控件添加到视图中
 93     [self.view addSubview:downbtn];
 94
 95     //4.按钮的单击控制事件
 96     [downbtn addTarget:self action:@selector(Click:) forControlEvents:UIControlEventTouchUpInside];
 97
 98
 99      /**================向左的按钮=====================*/
100     //1.创建按钮对象
101     UIButton *leftbtn=[UIButton buttonWithType:UIButtonTypeCustom];
102     //2.设置对象的属性
103     leftbtn.frame=CGRectMake(50, 300, 40, 40);
104     [leftbtn setBackgroundImage:[UIImage imageNamed:@"left_normal"] forState:UIControlStateNormal];
105     [leftbtn setBackgroundImage:[UIImage imageNamed:@"left_highlighted"] forState:UIControlStateHighlighted];
106     [leftbtn setTag:4];
107     //3.把控件添加到视图中
108     [self.view addSubview:leftbtn];
109
110     //4.按钮的单击控制事件
111     [leftbtn addTarget:self action:@selector(Click:) forControlEvents:UIControlEventTouchUpInside];
112
113
114
115     /**================向右的按钮=====================*/
116     //1.创建按钮对象
117     UIButton *rightbtn=[UIButton buttonWithType:UIButtonTypeCustom];
118     //2.设置对象的属性
119     rightbtn.frame=CGRectMake(150, 300, 40, 40);
120     [rightbtn setBackgroundImage:[UIImage imageNamed:@"right_normal"] forState:UIControlStateNormal];
121     [rightbtn setBackgroundImage:[UIImage imageNamed:@"right_highlighted"] forState:UIControlStateHighlighted];
122     [rightbtn setTag:3];
123     //3.把控件添加到视图中
124     [self.view addSubview:rightbtn];
125
126     //4.按钮的单击控制事件
127     [rightbtn addTarget:self action:@selector(Click:) forControlEvents:UIControlEventTouchUpInside];
128
129       //三、写两个缩放按钮
130        /**================放大的按钮=====================*/
131     //1.创建对象
132     UIButton *plusbtn=[UIButton buttonWithType:UIButtonTypeCustom];
133     //2.设置属性
134     plusbtn.frame=CGRectMake(75, 400, 40, 40);
135     [plusbtn setBackgroundImage:[UIImage imageNamed:@"plus_normal"] forState:UIControlStateNormal];
136     [plusbtn setBackgroundImage:[UIImage imageNamed:@"plus_highlighted"] forState:UIControlStateHighlighted];
137     [plusbtn setTag:1];
138     //3.添加到视图
139     [self.view addSubview:plusbtn];
140     //4.单击事件
141     [plusbtn addTarget:self action:@selector(Zoom:) forControlEvents:UIControlEventTouchUpInside];
142
143
144     /**================缩小的按钮=====================*/
145     UIButton *minusbtn=[UIButton buttonWithType:UIButtonTypeCustom];
146     minusbtn.frame=CGRectMake(125, 400, 40, 40);
147     [minusbtn setBackgroundImage:[UIImage imageNamed:@"minus_normal"] forState:UIControlStateNormal];
148     [minusbtn setBackgroundImage:[UIImage imageNamed:@"minus_highlighted"] forState:UIControlStateHighlighted];
149     [minusbtn setTag:0];
150     [self.view addSubview:minusbtn];
151     [minusbtn addTarget:self action:@selector(Zoom:) forControlEvents:UIControlEventTouchUpInside];
152
153     /**================向左旋转按钮=====================*/
154     UIButton *leftrotatebtn=[UIButton buttonWithType:UIButtonTypeCustom];
155     [leftrotatebtn setFrame:CGRectMake(175, 400, 40, 40)];
156     [leftrotatebtn setBackgroundImage:[UIImage imageNamed:@"left_rotate_normal"] forState:UIControlStateNormal];
157     [leftrotatebtn setBackgroundImage:[UIImage imageNamed:@"left_rotate_highlighted"] forState:UIControlStateHighlighted];
158     [leftrotatebtn setTag:1];
159     [self.view addSubview:leftrotatebtn];
160     [leftrotatebtn addTarget:self action:@selector(Rotate:) forControlEvents:UIControlEventTouchUpInside];
161
162     /**================向右旋转按钮=====================*/
163     UIButton *rightrotatebtn=[UIButton buttonWithType:UIButtonTypeCustom];
164     [rightrotatebtn setFrame:CGRectMake(225, 400, 40, 40)];
165     [rightrotatebtn setBackgroundImage:[UIImage imageNamed:@"right_rotate_normal"] forState:UIControlStateNormal];
166     [rightrotatebtn setBackgroundImage:[UIImage imageNamed:@"right_rotate_highlighted"] forState:UIControlStateHighlighted];
167     [rightbtn setTag:0];
168     [self.view addSubview:rightrotatebtn];
169     [rightrotatebtn addTarget:self action:@selector(Rotate:) forControlEvents:UIControlEventTouchUpInside];
170 }
171
172 //控制方向的多个按钮调用同一个方法
173 -(void)Click:(UIButton *)button
174 {
175
176     //练习使用frame属性
177     //CGRect frame=self.headImageView.frame;
178
179     /**注意,这里如果控制位置的两个属性frame和center同时使用的话,会出现很好玩的效果,注意分析*/
180     //练习使用center属性
181     CGPoint center=self.headImageView.center;
182     switch (button.tag) {
183         case ktopbtntag:
184             center.y-=30;
185             break;
186         case kdownbtntag:
187             center.y+=30;
188             break;
189         case kleftbtntag:
190             //发现一个bug,之前的问题是因为少写了break,造成了它们的顺序执行,sorry
191            //center.x=center.x-30;
192             center.x-=50;
193             break;
194         case krightbtntag:
195             center.x+=50;
196             break;
197     }
198
199  //  self.headImageView.frame=frame;
200
201     //首尾式设置动画效果
202     [UIView beginAnimations:nil context:nil];
203     self.headImageView.center=center;
204     //设置时间
205     [UIView setAnimationDuration:2.0];
206     [UIView commitAnimations];
207     NSLog(@"移动!");
208
209 }
210 -(void)Zoom:(UIButton *)btn
211 {
212     //使用bounds,以中心点位原点进行缩放
213     CGRect bounds = self.headImageView.bounds;
214     if (btn.tag) {
215         bounds.size.height+=30;
216         bounds.size.width+=30;
217     }
218     else
219     {
220         bounds.size.height-=50;
221         bounds.size.width-=50;
222     }
223
224     //设置首尾动画
225     [UIView beginAnimations:nil context:nil];
226     self.headImageView.bounds=bounds;
227     [UIView setAnimationDuration:2.0];
228     [UIView commitAnimations];
229 }
230
231 -(void)Rotate:(UIButton *)rotate
232 {
233     //位移(不累加)
234     //self.headImageView.transform=CGAffineTransformMakeTranslation(50, 200);
235     //缩放
236     //self.headImageView.transform=CGAffineTransformMakeScale(1.2, 10);
237     //在原有的基础上位移(是累加的)
238     //self.headImageView.transform=CGAffineTransformTranslate(self.headImageView.transform, 50, 50);
239     //在原有的基础上进行缩放
240     //self.headImageView.transform=CGAffineTransformScale(self.headImageView.transform, 1.5, 1.6);
241
242     //在原有的基础上进行旋转
243     if (rotate.tag) {
244         //旋转角度为1/pi,逆时针
245         self.headImageView.transform=CGAffineTransformRotate(self.headImageView.transform, -M_1_PI);
246     }
247     else
248     {
249         //旋转的角度为pi/2,顺时针
250     self.headImageView.transform=CGAffineTransformRotate(self.headImageView.transform, M_PI_2);
251     }
252
253 }
254 @end
