早先在录制视频的时候一直使用的是 obs-auto-subtitle 作为实时字幕展示功能。不过这个是以 OBS 插件的形式存在,不管是语言和功能上都有一定的限制。故而使用 Blazor server 实现一个。
总体思路
- 实时字幕自然需要语音转文字的功能。考察了一些服务之后,发现同时具备有一定免费额度和有 C# SDK 两个条件的,就只有 Azure Cognitive Service 了。故而选择了它。
- 使用 Blazor server 从服务端实时刷新页面到前端是非常简单的事情。因此,渲染一个简单的列表文本,然后通过 OBS 的 browser 组件接入画面即可。
快乐编码
有了基本的思路,我们就可以开始快乐的编码了。
简要设计
一般来说,语音转文字服务是一个与服务端进行持续交互的过程。因此需要一个对象来保持和服务端之间的沟通。我们可以设计一个ILiveCaptioningProvider来表示这种行为:
using System;
using System.Threading.Tasks;

namespace Newbe.LiveCaptioning.Services
{
    public interface ILiveCaptioningProvider : IAsyncDisposable
    {
        Task StartAsync();

        void AddCallBack(Func<CaptionItem, Task> captionCallBack);
    }
}
为了扩展可能适配不同提供商的可能,我们同样设计一个ILiveCaptioningProviderFactory用于表现创建ILiveCaptioningProvider的行为:
namespace Newbe.LiveCaptioning.Services
{
    public interface ILiveCaptioningProviderFactory
    {
        ILiveCaptioningProvider Create();
    }
}
有了这样两个接口,在页面上只要通过ILiveCaptioningProviderFactory创建ILiveCaptioningProvider,然后不断的接收回调展示在页面上即可。
将内容展示在页面上
有了基本的项目结构和接口,便可以尝试将内容绑定到页面上。要将实时转换的内容展示到界面上需要进行一定的算法转换。
在此之前,我们需要确定一下页面展示的预期:
- 在页面上展示至少两行文本
- 当一句话超过一行文本的宽度时自动进行换行
- 当一句话结束时,下一句话自动换行
例如,上面这句话进行连续阅读时,可能会出现如下效果:
 live caption display
主要需要注意的是,在判断是要更新当前行还是进行换行,这部分逻辑需要注意进行处理。
填充实现
- 通过 Azure SDK 提供的
SpeechRecognizer对象来进行语音识别 - 通过 Subject 将事件转换为一个简单的可观测流,简化业务回调的处理
using System;
using System.Collections.Generic;
using System.Linq;
using System.Reactive.Linq;
using System.Reactive.Subjects;
using System.Threading.Tasks;
using Microsoft.CognitiveServices.Speech;
using Microsoft.CognitiveServices.Speech.Audio;
using Microsoft.Extensions.Logging;
using Microsoft.Extensions.Options;

namespace Newbe.LiveCaptioning.Services
{
    public class AzureLiveCaptioningProvider : ILiveCaptioningProvider
    {
        private readonly ILogger<AzureLiveCaptioningProvider> _logger;
        private readonly IOptions<LiveCaptionOptions> _options;
        private AudioConfig _audioConfig;
        private SpeechRecognizer _recognizer;
        private readonly List<Func<CaptionItem, Task>> _callbacks = new();
        private Subject<CaptionItem> _sub;

        public AzureLiveCaptioningProvider(
            ILogger<AzureLiveCaptioningProvider> logger,
            IOptions<LiveCaptionOptions> options)
        {
            _logger = logger;
            _options = options;
        }

        public async Task StartAsync()
        {
            var azureProviderOptions = _options.Value.Azure;
            var speechConfig = SpeechConfig.FromSubscription(azureProviderOptions.Key, azureProviderOptions.Region);
            speechConfig.SpeechRecognitionLanguage = azureProviderOptions.Language;
            _audioConfig = AudioConfig.FromDefaultMicrophoneInput();
            _recognizer = new SpeechRecognizer(speechConfig, _audioConfig);
            _sub = new Subject<CaptionItem>();
            _sub
                .Select(item => Observable.FromAsync(async () =>
                {
                    try
                    {
                        await Task.WhenAll(_callbacks.Select(f => f.Invoke(item)));
                    }
                    catch (Exception e)
                    {
                        _logger.LogError(e, "failed to recognize");
                    }
                }))
                .Merge()
                .Subscribe();


            _recognizer.Recognizing += (sender, args) =>
            {
                _sub.OnNext(new CaptionItem
                {
                    Text = args.Result.Text,
                    LineEnd = false
                });
            };
            _recognizer.Recognized += (sender, args) =>
            {
                _sub.OnNext(new CaptionItem
                {
                    Text = args.Result.Text,
                    LineEnd = true
                });
            };
            await _recognizer.StartContinuousRecognitionAsync();
        }

        public void AddCallBack(Func<CaptionItem, Task> captionCallBack)
        {
            _callbacks.Add(captionCallBack);
        }

        public ValueTask DisposeAsync()
        {
            _recognizer?.Dispose();
            _audioConfig?.Dispose();
            _sub?.Dispose();
            return ValueTask.CompletedTask;
        }
    }
}
- 实现工厂的方式非常多,这里采用 Autofac 来协助完成对象的创建
using Autofac;
using Microsoft.Extensions.Options;

namespace Newbe.LiveCaptioning.Services
{
    public class LiveCaptioningProviderFactory : ILiveCaptioningProviderFactory
    {
        private readonly ILifetimeScope _lifetimeScope;
        private readonly IOptions<LiveCaptionOptions> _options;

        public LiveCaptioningProviderFactory(
            ILifetimeScope lifetimeScope,
            IOptions<LiveCaptionOptions> options)
        {
            _lifetimeScope = lifetimeScope;
            _options = options;
        }

        public ILiveCaptioningProvider Create()
        {
            var liveCaptionProviderType = _options.Value.Provider;
            switch (liveCaptionProviderType)
            {
                case LiveCaptionProviderType.Azure:
                    var liveCaptioningProvider = _lifetimeScope.Resolve<AzureLiveCaptioningProvider>();
                    return liveCaptioningProvider;
                default:
                    throw new ProviderNotFoundException();
            }
        }
    }
}
- 对页面逻辑进行填充,完成效果
using System;
using System.Collections.Generic;
using System.Linq;
using System.Threading.Tasks;
using Microsoft.AspNetCore.Components;
using Microsoft.Extensions.Logging;
using Newbe.LiveCaptioning.Services;

namespace Newbe.LiveCaptioning.Pages
{
    public partial class Index : IAsyncDisposable
    {
        [Inject] public ILiveCaptioningProviderFactory LiveCaptioningProviderFactory { get; set; }
        [Inject] public ILogger<Index> Logger { get; set; }
        private ILiveCaptioningProvider _liveCaptioningProvider;

        private readonly List<CaptionDisplayItem> _captionList = new();

        protected override async Task OnAfterRenderAsync(bool firstRender)
        {
            await base.OnAfterRenderAsync(firstRender);
            if (firstRender)
            {
                _liveCaptioningProvider = LiveCaptioningProviderFactory.Create();
                _liveCaptioningProvider.AddCallBack(CaptionCallBack);
                await _liveCaptioningProvider.StartAsync();
            }
        }

        private int maxCount = 20;

        private Task CaptionCallBack(CaptionItem arg)
        {
            return InvokeAsync(() =>
            {
                Logger.LogDebug("Received: {Text}", arg.Text);
                var last = _captionList.FirstOrDefault();
                var newLine = false;
                var text = arg.Text;
                var skipPage = 0;
                if (arg.Text.Length > maxCount)
                {
                    skipPage = (int) Math.Floor(text.Length * 1.0 / maxCount);
                    text = arg.Text[(skipPage * maxCount)..];
                }

                if (last == null || skipPage > last.TagCount)
                {
                    newLine = true;
                }

                if (newLine || _captionList.Count == 0)
                {
                    _captionList.Insert(0, new CaptionDisplayItem
                    {
                        Text = text,
                        TagCount = arg.LineEnd ? -1 : skipPage
                    });
                }
                else
                {
                    _captionList[0].Text = text;
                    if (arg.LineEnd)
                    {
                        _captionList[0].TagCount = -1;
                    }
                }


                if (_captionList.Count > 4)
                {
                    _captionList.RemoveRange(4, _captionList.Count - 4);
                }

                StateHasChanged();
            });
        }

        private record CaptionDisplayItem
        {
            public string Text { get; set; }
            public int TagCount { get; set; }
        }

        public async ValueTask DisposeAsync()
        {
            if (_liveCaptioningProvider != null)
            {
                await _liveCaptioningProvider.DisposeAsync();
            }
        }
    }
}
通过以上核心的代码,就可以完成从识别到展示相关的内容。
下载与安装
在尝试进行源码了解之前,你可以通过以下步骤来初步体验一下项目的效果。
首先,你可以从 Release 页面下载和你操作系统对应的版本:
https://github.com/newbe36524/Newbe.LiveCaptioning/releases
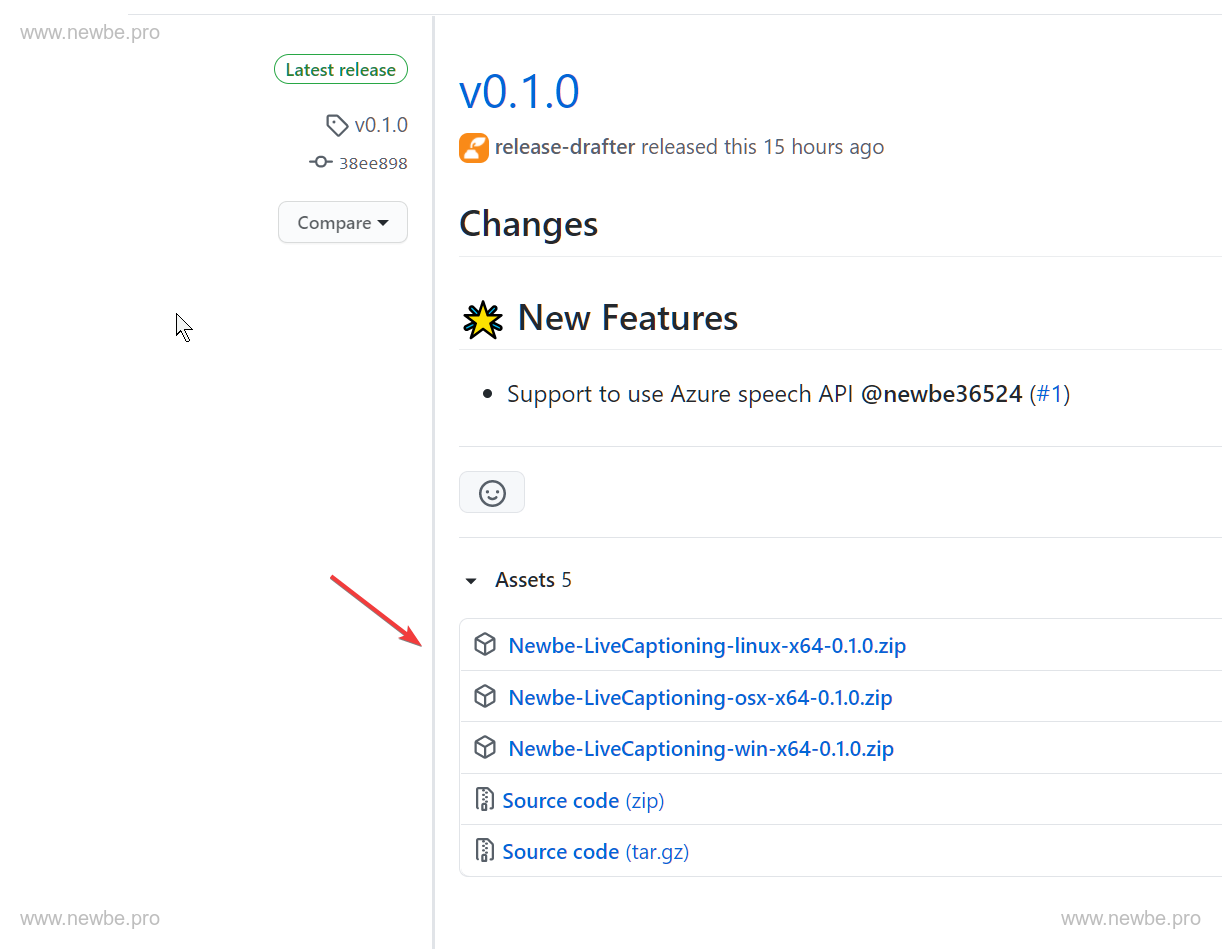 release
然后,将这个软件包解压到预先创建好的文件夹。
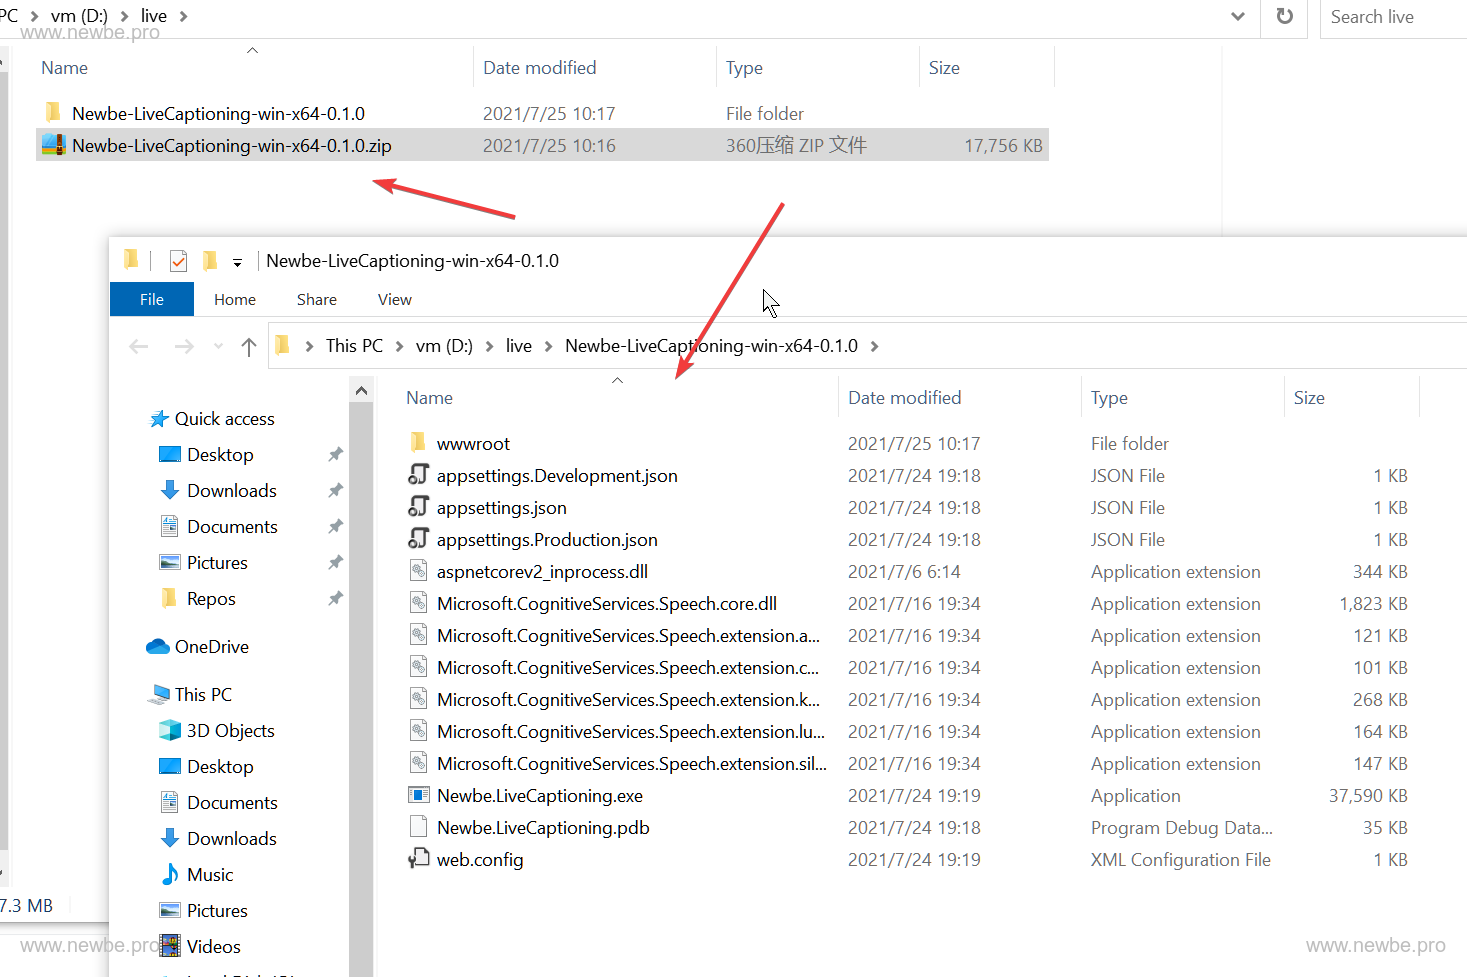 unzip
unzip
接着,在 Azure Portal 中创建一个 Cognitive Services。
提示 1:语音转文字每个月有 5 个小时的免费额度,可以参见
提示 2:你可以通过这个帮助来创建一个免费的 Azure 账号,新账号包含有 12 个月的免费大礼包,参见
 create service
 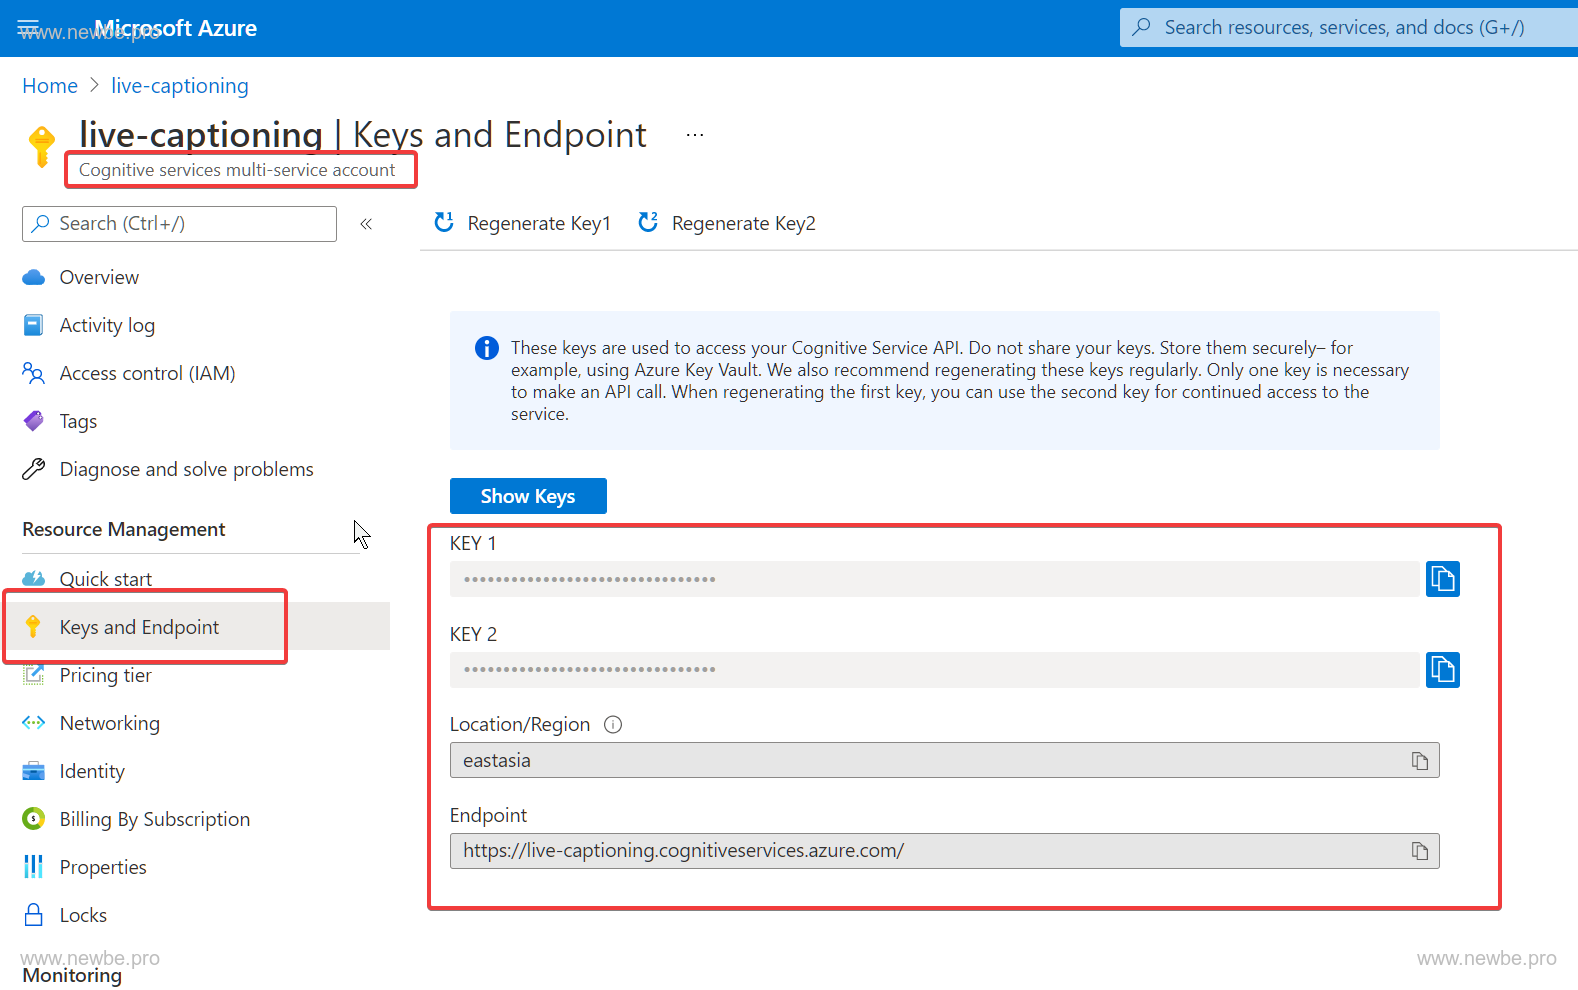 region and key
随后,将生成好的 region 和 key 填入到 appsettings.Production.json 中。
记得同时修改 Language 选项,例如美式英语为 en-us,简体中文为 zh-cn。你可以通过以下链接来查看所有支持的语言:
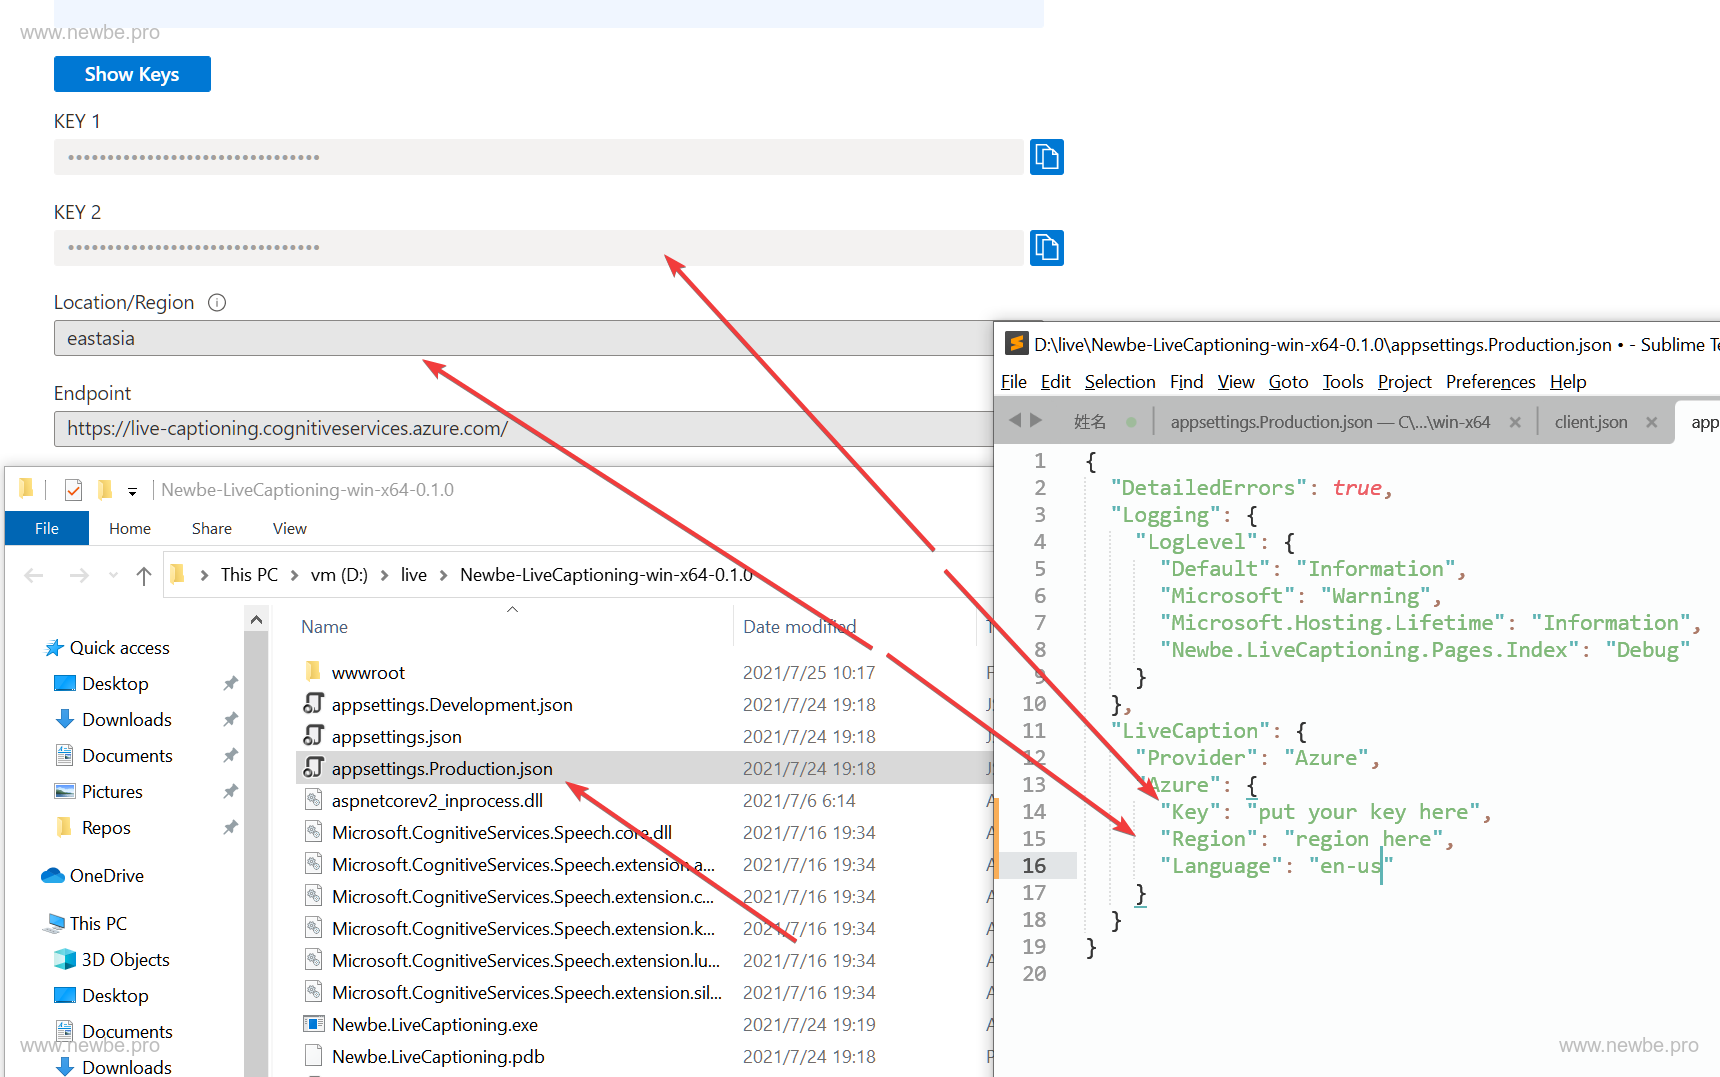 update appsettings.Production.json
继而,启动 Newbe.LiveCaptioning.exe,你可以看到如下这样的提示信息,就说明一切已经正常。
 region and key
最后,你可以使用浏览器打开http://localhost:5000,并对着你的话筒说话,这样便可以实时产生字幕了。
 live caption
在 OBS 中加入字幕
首先,打开你的 OBS,并添加一个 browser 组件。
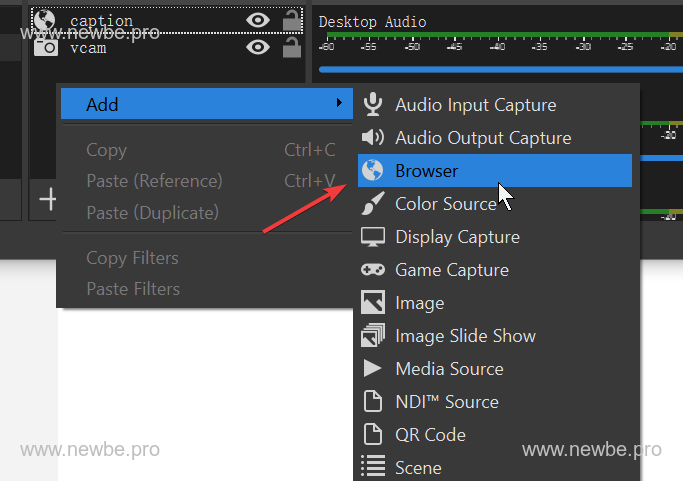 add browser
在组件的 url 中填入 http://localhost:5000,并设置一个合适的宽度和高度。
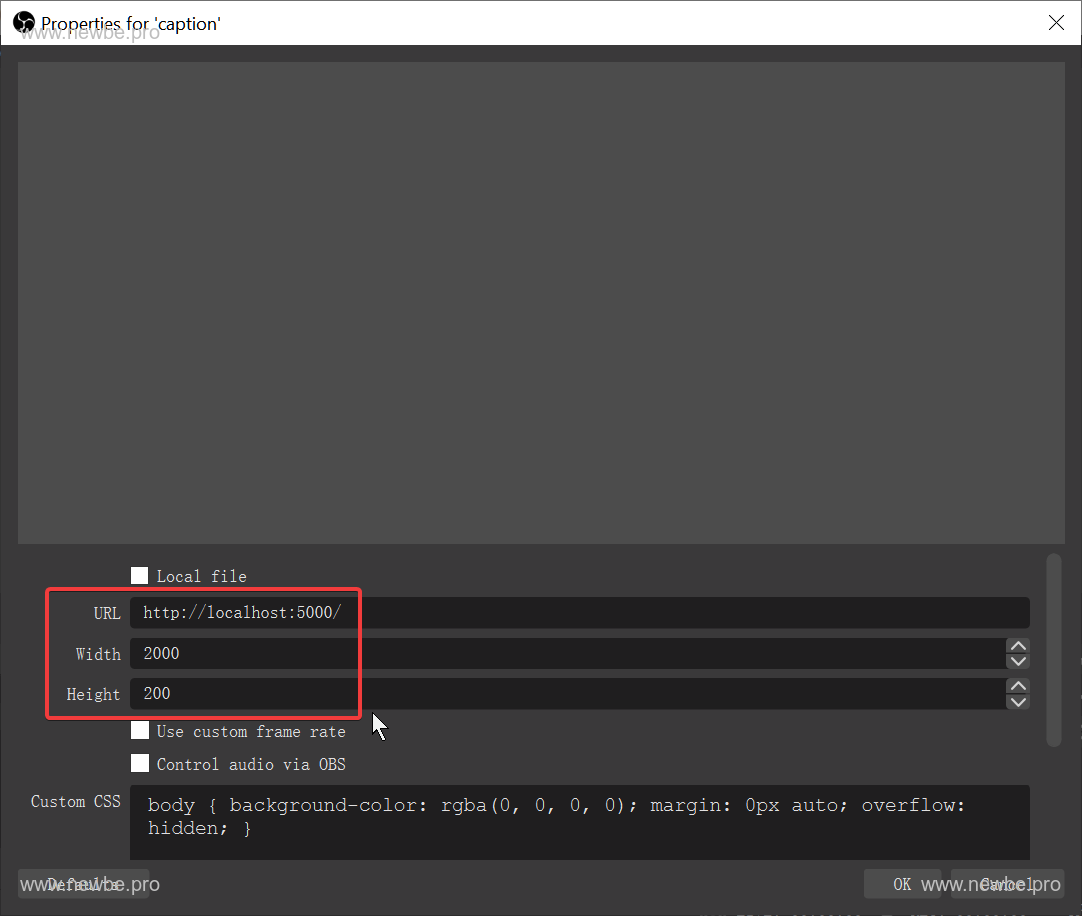 add browser
对着你的话筒话说,字幕就出来了。
 test
test
辅助资料
Azure Speech to Text
可以通过以下链接在初步体验一下识别的效果:
可以通过以下链接找到 C# SDK 的对接方案:
Blazor server
可以通过以下链接来了解,如何通过服务端来推送 UI 变化到前端:
可以通过以下链接来了解,如何在 UI 线程之外来出发 UI 变化(这不就是 winform 再现):
.Net core publish
通过这里了解如何将 dotnet core 程序发布为一个单文件应用
https://docs.microsoft.com/dotnet/core/deploying/single-file?WT.mc_id=DX-MVP-5003606
了解不同操作系统下发布使用的 RID
https://docs.microsoft.com/dotnet/core/rid-catalog?WT.mc_id=DX-MVP-5003606
Github
了解如何通过 github action 打包发布内容到 release 中:
https://github.com/gittools/gitreleasemanager
小结
这是一个非常简单的项目应用,开发者可以通过该项目初步的了解 Blazor 的使用方法。你可以通过以下地址来获取本项目的源代码: