一.简介
官方文档https://identityserver4.readthedocs.io/en/latest/
IdentityServer4是一个框架,IdentityServer4是为ASP.NET CORE量身定制的实现了OpenId Connect和OAuth2.0协议的认证授权中间件。OpenId用于身份认证(Authentication) OAuth2.0 用于授权(Authorization) OpenId Connect = OIDC = (Identity, Authentication) + OAuth2.0。
IdentityServer4功能特性
- Authentication as a Service:可以为你的应用(如网站、本地应用、移动端、服务)做集中式的登录逻辑和工作流控制。IdentityServer是完全实现了OpenID Connect协议标准
- Single Sign-on / Sign-out:在多个应用程序类型上进行单点登录(和单点退出)。
- Access Control for APIs:为不同类型的客户端,例如服务器到服务器、web应用程序、SPAs和本地/移动应用程序,发出api的访问令牌。
- Federation Gateway:支持来自Azure Active Directory, Google, Facebook这些知名应用的身份认证,可以不必关心连接到这些应用的细节就可以保护你的应用。
- Focus on Customization:最重要的是identityserver可以根据需求自行开发来适应应用程序的变化。identityserver不是一个框架、也不是一个盒装产品或一个saas系统,您可以编写代码来适应各种场景。
IdentityServer是将规范兼容的OpenID Connect和OAuth 2.0端点添加到任意ASP.NET Core应用程序的中间件。通常,您构建(或重新使用)包含登录和注销页面的应用程序,IdentityServer中间件会向其添加必要的协议头,以便客户端应用程序可以与其对话 使用这些标准协议。
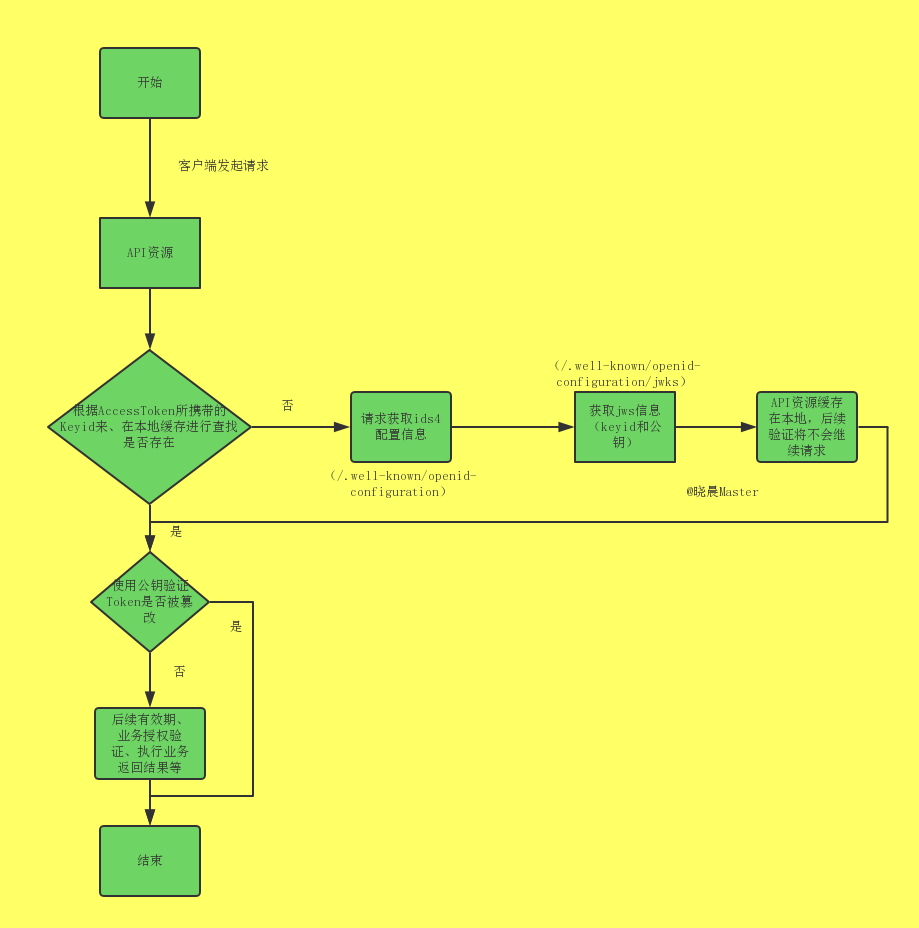
IdentityServer4 默认支持两种类型的 Token,一种是 Reference Token,一种是 JWT Token 。前者的特点是 Token 的有效与否是由 Token 颁发服务集中化控制的,颁发的时候会持久化 Token,然后每次验证都需要将 Token 传递到颁发服务进行验证,是一种中心化的比较传统的验证方式。JWT Token 的特点与前者相反,每个资源服务不需要每次都要都去颁发服务进行验证 Token 的有效性验证,该 Token 由三部分组成,其中最后一部分包含了一个签名,是在颁发的时候采用非对称加密算法(最新的JWT Token)进行数据签名的,保证了 Token 的不可篡改性,保证了安全,与颁发服务的交互,仅仅是获取公钥用于验证签名,且该公钥获取以后可以自己缓存,持续使用,不用再去交互获得,除非Token包含的 keyid 对应的 公钥没被缓存(新的),就会再次向颁发服务获取。流程图:
二.identity server4 五种授权模式
下面介绍4种模式安全性从低到高
客户端模式
客户端模式只对客户端进行授权,不涉及到用户信息。如果你的api需要提供到第三方应用,第三方应用自己做用户授权,不需要用到你的用户资源,就可以用客户端模式,只对客户端进行授权访问api资源。
这是一种最简单的模式,只要client请求,我们就将AccessToken发送给它。这种模式是最方便但最不安全的模式。因此这就要求我们对client完全的信任,而client本身也是安全的
密码模式
需要客户端提供用户名和密码,密码模式相较于客户端凭证模式。通过User的用户名和密码向Identity Server申请访问令牌。
如果你高度信任某个应用,RFC 6749 也允许用户把用户名和密码,直接告诉该应用
(授权码)隐藏模式
密码模式将用户的密码暴露给了客户端,这无疑是不安全的,隐藏模式可以解决这个问题,由用户自己在IdentityServer服务器进行登录验证,客户端不需要知道用户的密码。
有些 Web 应用是前后端分离的纯前端应用,没有后端。这时就不能用上面的授权码模式了,必须将令牌储存在前端。
这种方式没有授权码这个中间步骤,所以称为(授权码)"隐藏式"(implicit)。
一般用的这个,token会直接返回到访问的地方,适用于前后端分离的项目(前后端分离后,只能把token保存到前端了,为他只有前端没有服务器)
授权码模式
授权码模式隐藏码模式最大不同是授权码模式不直接返回token,而是先返回一个授权码,然后再根据这个授权码去请求token。这比隐藏模式更为安全。从应用场景上来区分的话,隐藏模式适应于全前端的应用,授权码模式适用于有后端的应用,因为客户端根据授权码去请求token时是需要把客户端密码转进来的,为了避免客户端密码被暴露,所以请求token这个过程需要放在后台
混合模式(Hybrid),就是基于隐藏模式与授权码模式的结合
OpenIdConnect是OAuth2.0与OpenId的结合,并加入了一个重要的概念:id_token。我们之前所讲的token是用于访问授权的access_token,而id_token是用于身份验证的,作用完全不同,这一点要区分开来。access_token是OAth2.0特性,而id_token是OpenIdConnect方案为改善OAuth2.0方案在身份验证方面的薄弱而加入的特性。
客户端获取Id_token与隐藏模式和授权码模式一样,都是通过redirect_url参数返回的,所以前面的四种模式中的客户端模式与密码模式不支持获取id_token,而授权码模式受限于流程,必需先取得Code才能取到token,所以不能直接支持获取id_token,如果需求是使用授权码模式,同时又需要id_token,OpenIdConnect支持第五种模式:混合模式(Hybrid),就是基于隐藏模式与授权码模式的结合
三.使用
IdentityService4(简称is4)有两种初始化方式:
1使用命令行安装is4模板
1)安装模板命令:dotnet new -i IdentityServer4.Templates
2)安装完成之后执行dotnet new命令如下图所示多出了一些模板
3)使用dotnet new is4empty -n IdentityServer创建一个is4empty模板,is4项目初始化完成
2.手动建立
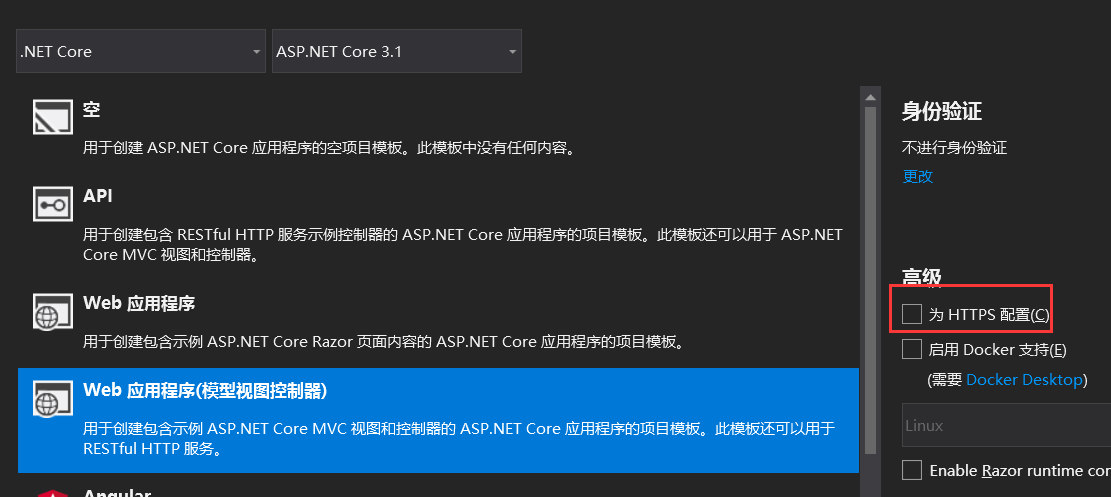
1、创建ASP.NET Core Web应用程序,选择MVC。
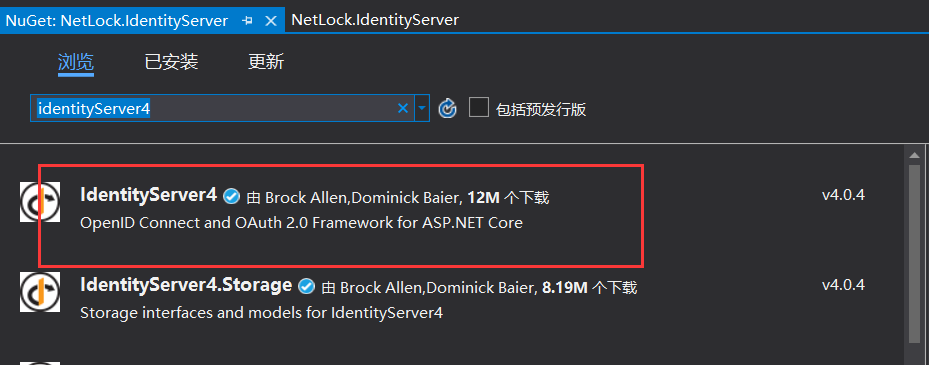
2、添加nuget包:IdentityServer4。
3、添加Config.cs文件作为IdentityServer配置文件,用于定义IdentityServer资源和客户端等。


using IdentityModel;
using IdentityServer4;
using IdentityServer4.Models;
using IdentityServer4.Test;
using System;
using System.Collections.Generic;
using System.Linq;
using System.Security.Claims;
using System.Threading.Tasks;

namespace WebApplication10
{
    public class OAuthConfig
    {
        /// <summary>
        /// token有效时间 过期秒数 //2小时 = 3600 * 2
        /// </summary>
        public static int ExpireIn = 3600;

        /// <summary>
        /// 跨域地址
        /// </summary>

        public static string[] CorUrls = new[] { "http://*:4137", "http://*:5072" };

        /// <summary>
        /// Api资源名称
        /// </summary>

        public static string ApiName = "user_api";

        /// <summary>
        /// 客户端唯一ID
        /// </summary>

        public static string ClientId = "user_clientid";

        /// <summary>
        /// 密钥
        /// </summary>

        public static string Secret = "user_secret";
    }
    /// <summary>
    ///  密码授权模式  分资源分为身份资源(Identity resources)和API资源(API resources)。
    /// </summary>
    public class Config
    {
        #region 定义资源
        // 身份信息授权资源
        public static IEnumerable<IdentityResource> GetIdentityResources() =>
            new IdentityResource[]
            {
                new IdentityResources.OpenId(),
                new IdentityResources.Profile()
            };

        //API访问授权资源
        public static IEnumerable<ApiResource> GetApiResources() =>
            new ApiResource[]
            {
                //标识名称  显示名称(自定义)
                new ApiResource(OAuthConfig.ApiName,"我的Ids4")
                {
                    UserClaims =  { ClaimTypes.Name, JwtClaimTypes.Name },
                    ApiSecrets = new List<Secret>()
                    {
                        new Secret(OAuthConfig.Secret.Sha256())
                    }
                }
            };
        #endregion

        #region 定义客户端Client
        /// <summary>
        /// 4种模式 客户端模式(ClientCredentials) 密码模式(ResourceOwnerPassword)  隐藏模式(Implicit)  授权码模式(Code)
        /// </summary>
        /// <returns></returns>
        public static IEnumerable<Client> GetClients() =>
            new Client[]
            {
                 new Client
                {
                    ClientId = OAuthConfig.ClientId,//客户端的唯一ID
                    ClientName = "隐式模式",//客户端显示名称
                    AllowedGrantTypes = GrantTypes.Implicit,// 隐式模式
                    ClientSecrets = new []{ new Secret(OAuthConfig.Secret.Sha256()) },//客户端加密方式
                    RequireConsent = false, //如果不需要显示否同意授权 页面 这里就设置为false
                    AllowAccessTokensViaBrowser = true,//控制是否通过浏览器传输此客户端的访问令牌
                    AccessTokenLifetime = OAuthConfig.ExpireIn, //过期秒数
                    //登录成功跳转地址
                    RedirectUris =
                    {
                        "http://localhost:4137/oauth2-redirect.html",
                    },
                    //退出登录跳转地址
                    PostLogoutRedirectUris =
                    {
                        $"http://www.taobao.com"
                    },
                    //跨域地址
                    AllowedCorsOrigins = OAuthConfig.CorUrls,
                    //配置授权范围,这里指定哪些API 受此方式保护
                    AllowedScopes =
                    {
                        IdentityServerConstants.StandardScopes.OpenId,
                        IdentityServerConstants.StandardScopes.Profile,
                        OAuthConfig.ApiName
                    }
                }
            };
        #endregion


        /// <summary>
        /// 测试的账号和密码
        /// </summary>
        /// <returns></returns>
        public static List<TestUser> GetTestUsers()
        {
            return new List<TestUser>
            {
                new TestUser()
                {
                     SubjectId = "1",
                     Username = "admin",
                     Password = "123456"
                },
                new TestUser()
                {
                     SubjectId = "2",
                     Username = "test",
                     Password = "123456"
                }
            };
        }
    }
}
4.配置Startup
using System;
using System.Collections.Generic;
using System.IO;
using System.Linq;
using System.Threading.Tasks;
using Admin.IdentityServer.Account;
using IdentityServer4.Configuration;
using Microsoft.AspNetCore.Builder;
using Microsoft.AspNetCore.Hosting;
using Microsoft.Extensions.Configuration;
using Microsoft.Extensions.DependencyInjection;
using Microsoft.Extensions.Hosting;
using Microsoft.OpenApi.Models;
using Newtonsoft.Json;
using Newtonsoft.Json.Serialization;

namespace WebApplication10
{
    public class Startup
    {
        public Startup(IConfiguration configuration)
        {
            Configuration = configuration;
        }

        public IConfiguration Configuration { get; }

        private string basePath => AppContext.BaseDirectory;

        // This method gets called by the runtime. Use this method to add services to the container.
        public void ConfigureServices(IServiceCollection services)
        {
            var builder = services.AddIdentityServer(options =>
            {
                options.UserInteraction = new UserInteractionOptions
                {
                    LoginUrl = "/user/login",
                    LogoutUrl = "/user/logout"
                };
            })
                .AddInMemoryIdentityResources(Config.GetIdentityResources())
                .AddInMemoryApiResources(Config.GetApiResources())//把受保护的Api资源添加到内存中
                .AddInMemoryClients(Config.GetClients())//客户端配置添加到内存中

               .AddProfileService<AdminProfileService>()
               .AddResourceOwnerValidator<AdminResourceOwnerPasswordValidator>();


            //添加证书加密方式,执行该方法,会先判断tempkey.rsa证书文件是否存在,如果不存在的话,就创建一个新的tempkey.rsa证书文件,如果存在的话,就使用此证书文件
            builder.AddDeveloperSigningCredential();

            #region Cors 跨域
            services.AddCors(options =>
            {
                options.AddPolicy("Limit", policy =>
                {
                    policy
                    .WithOrigins(OAuthConfig.CorUrls)
                    .AllowAnyHeader()
                    .AllowAnyMethod()
                    .AllowCredentials();
                });
            });
            #endregion
            services.AddControllersWithViews();

        }

        // This method gets called by the runtime. Use this method to configure the HTTP request pipeline.
        public void Configure(IApplicationBuilder app, IWebHostEnvironment env)
        {
            if (env.IsDevelopment())
            {
                app.UseDeveloperExceptionPage();
            }
            else
            {
                app.UseExceptionHandler("/Home/Error");
            }
            app.UseCors("Limit");

            app.UseStaticFiles();

            app.UseRouting();

            //启动ids4中间件
            app.UseIdentityServer();

            app.UseAuthorization();

            app.UseEndpoints(endpoints =>
            {
                endpoints.MapControllerRoute(
                    name: "default",
                    pattern: "{controller=Home}/{action=Index}/{id?}");
            });

        }
    }
}
5.配置服务端
services.AddAuthentication("Bearer")
           .AddIdentityServerAuthentication(options =>
           {
               options.Authority = "http://localhost:4137";    //配置Identityserver的授权地址
               options.RequireHttpsMetadata = false;           //不需要https
               options.ApiName = "user_api";  //api的name,需要和config的名称相同
           });
参考地址 IdentityServer4之Implicit和纯前端好像很配哦 https://github.com/zyq025/IDS4Demo
live-server安装
npm install -g live-server
live-server
live-server运行在8080端口下,可以通过127.0.0.1:8080来访问静态页面。
npm install --save live-server-https
这是https