http://gamerboom.com/archives/76709
作者:Alex Rose
Unity最近宣布推出额外的2D游戏支持,添加了Box 2D物理和一个精灵管理器。
但这里还是有些技巧需要牢记在心。逐帧更改图像只是动画制作的冰山一角,若要让你的游戏出色运行,你还得使用转换和旋转等功能。
现在让我们先从基本技巧开始。
更改帧
如果你已经准备好了制作动画的纹理,你可能会使用SpriteManager脚本的付费版本,或者Unity的新版本。假设你使用的是2D位面和纹理。这就是一个低效率的方法,但如果你是在制作一个game jam的项目,你可能会想塞入一些可行而好看,但却不一定有效的元素。这也是一种覆盖了所有步骤的全面方法,如果是在精灵管理器中则可能被删除某些步骤。
首先,你将需要一个公开的Texture[] 阵列,所以你可以将纹理拖入到Unity编辑器中的对象,以及一个在Start()中初始化到0的整数currentTexturep。下一步你需要一个像这样运行的NextTexture() 函数:
NextTexture(){
currentTexture++;
if(currentTexture>=textureArray.Length) currentTexture=0;
AnimatedPlane.renderer.material.mainTexture = textureArray[currentTexture];}
有两种简便的方法可以调用这种函数:协同程序递归和固定间隔。
使用固定间隔是最快的方法(但较不精确)。你需要一个整数计数器,在你的Start()函数中初始化到0,以及一个FixedUpdate() 函数(游戏邦注:每次都会更新,你可以在Unity时间管理器中自己调整)。
在FixedUpdate()中放置你的条件句(例如if(walking)),并在其中用conter++增加你的计时器,之后设置如下声明:
if(counter>=animationDelay){
counter=0;
NextTexture();
}
这里的animationDelay可以是你自己选择的任意值。这将以持续速度(取决于你在Unity时间管理器中设置的速度)推进帧。
第二个方法是使用递归。但这一方法的劣势在于不易处理条件句,但你还是能够获得所需要的准确延时。如果你想让特定帧延长或缩短,这一方法就尤其管用。你需要一个IEnumerator TextureChanger() 以及to StartCoroutine(TextureChanger()) in Start().
IEnumerator TextureChanger(){
yield return new WaitForSeconds(timeInterval);
if([conditions]) NextTexture();
}
这里timeInterval也是你自己选择的任意值。有了这些函数,你就可以将任意数量的纹理拖到GameObject,这样只要你提供正确的条件,它就会正确运行动画。
现在让我们做一些更有趣的操作。
平滑移动到一个点
以下公式是制作Unity 2D动画的一个诀窍:
where 0 < slidespeed < 1. I recommend 0.1f as a good slidespeed value.
这个公式允许你把对象完美移动到一个点。在滑动GUI、角色控制、关卡生成、摄像跟随、褪色/移位等操作中尤其管用。
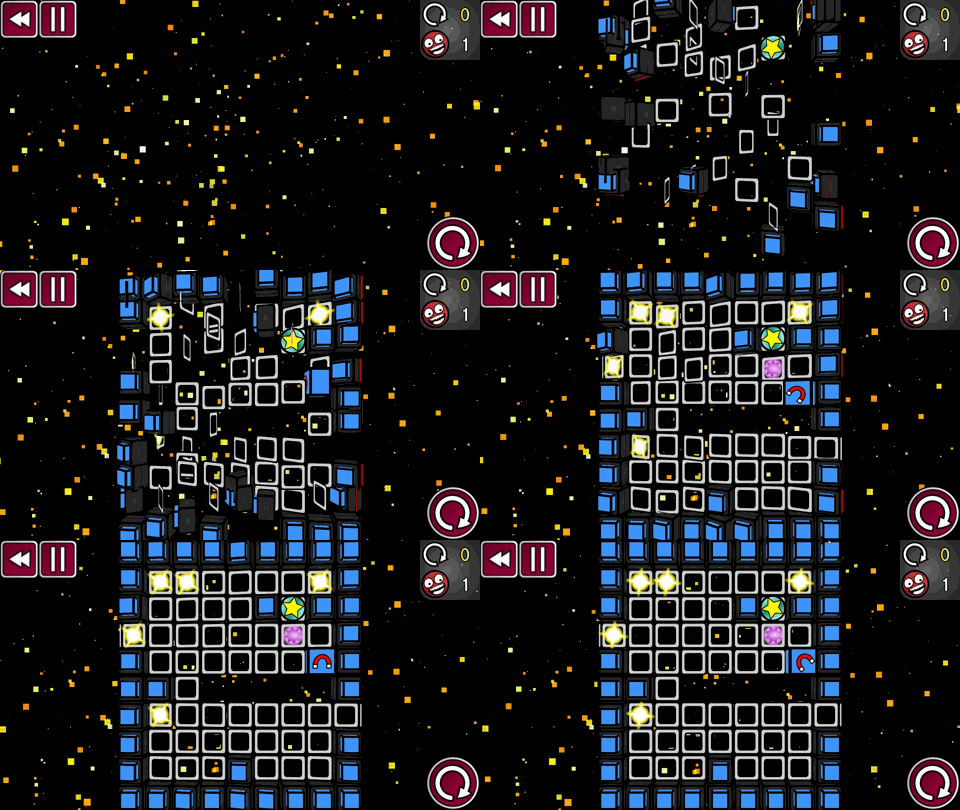
这是我即将发布的新游戏《Rotation Station》中的一个高级版本,是从一个较低点移到一个较高点,最后变成一个小泡。每个贴图都会根据该公司向下移动,但每个贴图都有随机的延时,随机的初始化旋转(也使用这一公式旋转至它所期望的方向)。
关于角色控制的例子可以参考我最近推出的《Rude Bear Radio》,在这个项目中,该公式运用于制作流畅的鼠标控制方法。
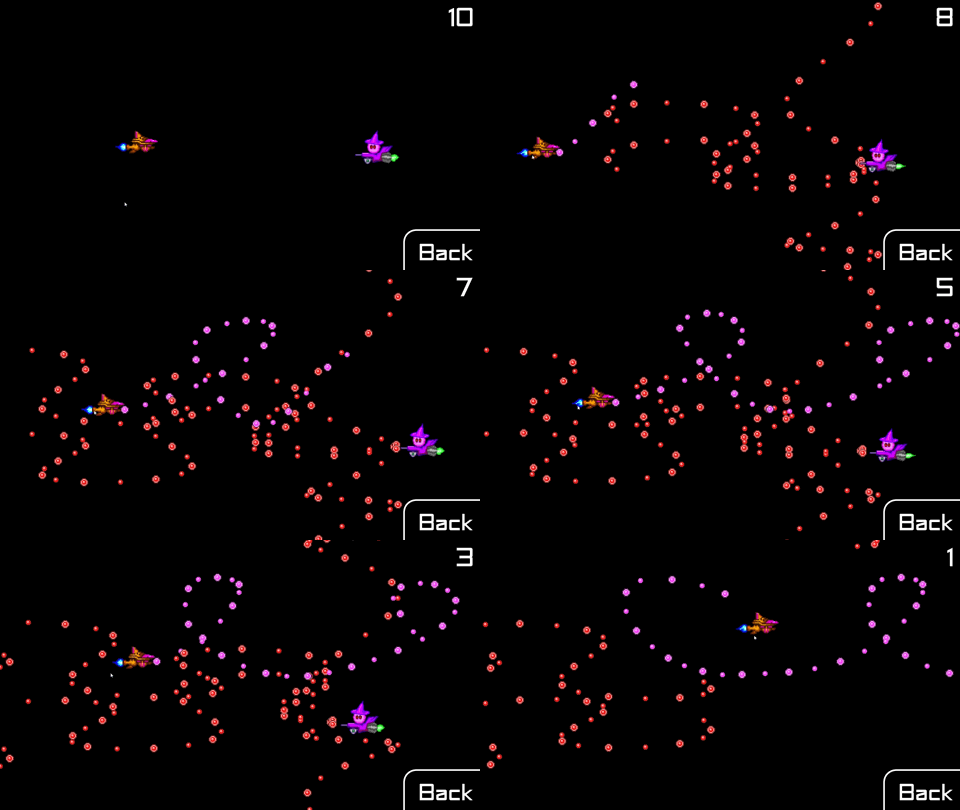
那么,让我们看看如何将其运用于上述例子。
首先,我们需要知道鼠标位于2D区域。为了找到它,我们要先将这个代码放置于滑动GameObject的FixedUpdate()函数中:
Vector3 MousePosition = Camera.main.ScreenToWorldPoint(new Vector3(Input.mousePosition.x,
Input.mousePosition.y, transform.position.z-Camera.main.transform.position.z));
这里使用了鼠标的X和Y轴位置,以及从摄像机到滑动GameObject的距离来确定鼠标的2D位置和3D坐标。现在我们要从这个环节的开端来调整该公式。所以,要记住Unity中的2D步骤。
transform.position += new Vector3((MousePosition.x-transform.position.x),
(MousePosition.y-transform.position.y),0)*slidespeed;
你就只要这两行代码就搞定了!至于GUI这类东西,你可以在之后编写一个声明:
if(Mathf.Abs(finalvalue-currentvalue)
让我们再看另一个例子,《Rude Bear Radio》中的困难模式Mario台阶。
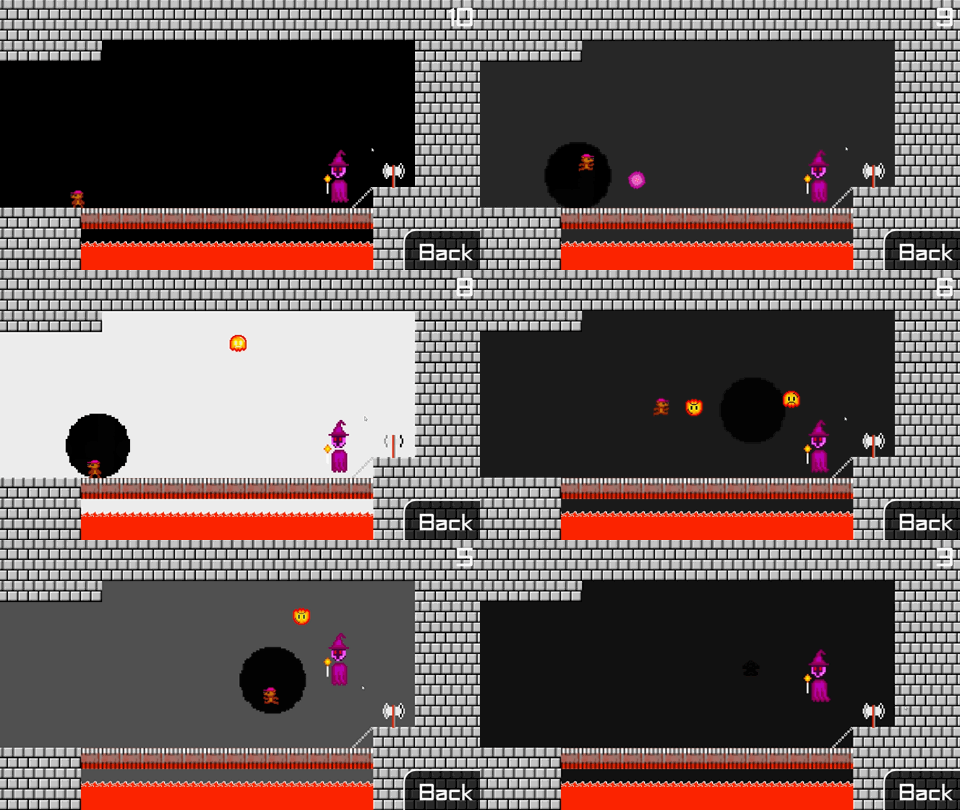
其中的背景使用以下公式由黑变白:
background.renderer.material.color =
(1-factor)*background.renderer.material.color+factor*desiredcolor;
你从中可以看到它遵从的基本形式,简写就是Next = current+(final-current)*factor。代码会检查R值是否处于一定的色彩范围,如果是,它就会更改factor,令其更为迅速地褪色。如果R值非常接近于1,它就会将其所需颜色设置为黑。你还可以检查下R、G和B,并以一个阵列推进颜色。你可以在我的第二个案例项目《Rude Bear Rising》的背景中看到这种例子。
目前来看,这些都很简单,你可以照搬公式做。而下一步操作则需要考虑更多因素。
三角法和数学的重要性
三角法对动画制作来说非常重要。就算有了优秀的帧,也不一定能够令它们看起来生动美丽,有时候你根本不需要帧就能做事。
例如,我首次进入Ludum Dare工作室时,我的室友就给我画了几张图。我至今仍然记得其中的每个角色,用什么方法呢?像木偶一样将角色绑在棍子上操作。
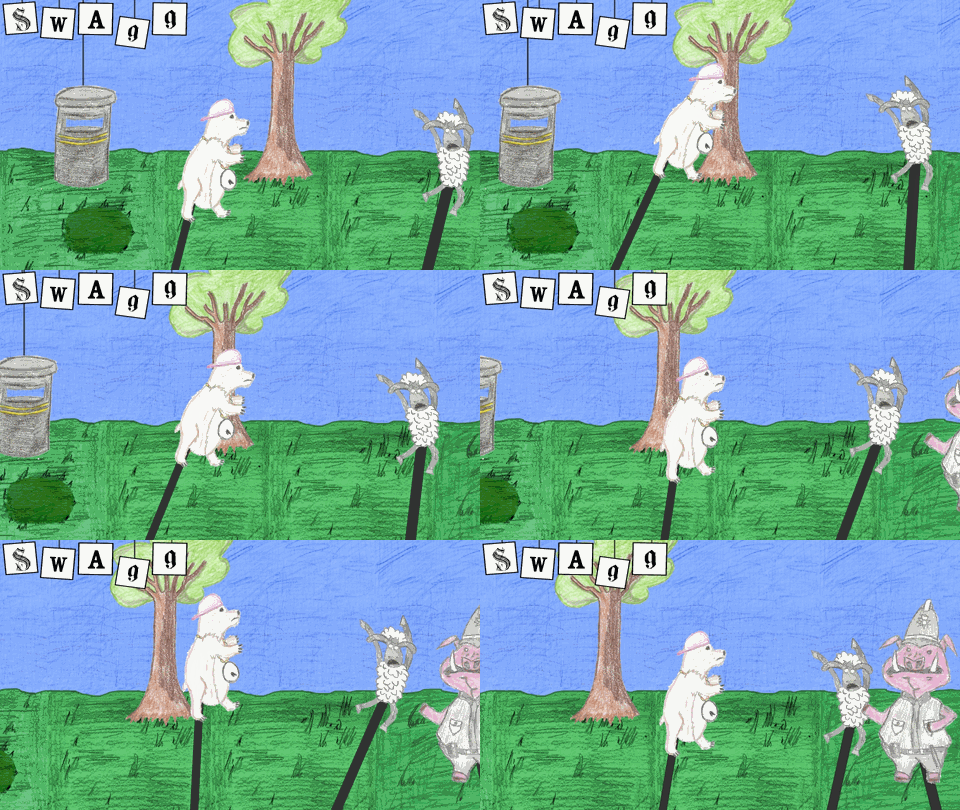
这种移动方式非常简单,转换时用正弦(sin),旋转时用余弦(cos)。
为了创造这种动画,你要让波纹停止并在你松手和输入时继续,否则这种动作就会极端分散。
所以你需要一个首要变量(即我所谓的walkbob),只要对象还在移动,它就会在FixedUpdate中增加Time.deltaTime。之后就制作你的函数:
translation = maxHeight*Mathf.Sin(speed*walkbob);
rotation = maxRoll*Mathf.Cos(speed*walkbob/2);
然后将位置和旋转设为这些值(例如transform.position = new Vector3(transform.position.x,translation,transform.position.y))。
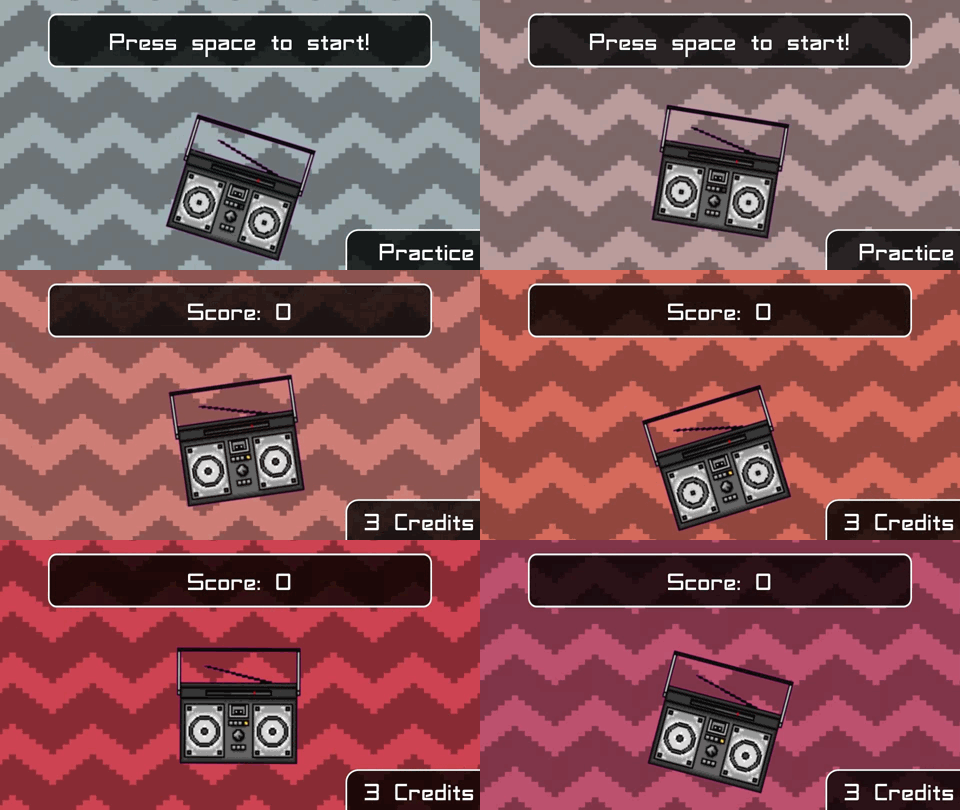
这可以处理类似那种动作,但是还有一种动画需要考虑更多因素,这就是我所谓的三角舞,它用于制作可爱角色随着音乐摇摆起舞,例如下图:
首先,你在打算移动游戏对象时,就要选取一个浮动的initialtime = Time.time,这样你的对象才能以正确的位置和方向开始,并且不会突然跳入动作。
下一步,我们就要想想三角函数的概念。
我们使用简谐运动,其形式如下:
Y是指当前值,A是振幅,f是频率,t是运行时间,phi是指阶段。首先,我们很容易确定振幅。它是我们希望对象所具有的最大化高度或旋转。
下一个就是运行时间和阶段。我们将用(Time.time-initialtime)轻松取代t而一次性处搞定这两者。这会将φ降为0,所以最后我们只需要得到频率。我强烈推荐令此频率与你的音乐频率吻合(如果你是自己作曲,这一点很容易办到)。
如果你还不知道自己音乐的BPM,那就去摸索每个节拍,直到弄懂为止。如果你已经有节奏感,这就很好办了。如果你没有,那也不用担心,我们会利用中心极限定理。持续点触你的整首歌,每欠点触都会减少平均值中的错误。
现在你就知道它每分钟如何打节拍了。你将以60来划分这个值,找到每秒多少拍。如果你只想在半小节或一个完整的小节中使用一次动作,那就可以按2或4数值来划分。这个数值就是频率,你可以从 Mathf.PI获得pi。所以现在你要将对象的位置设为该数值。此时你只是在调整高度:
transform.position = new Vector3(transform.position.x,maxheight*
Mathf.Sin(2*Mathf.PI*frequency*(Time.time-initialtime)),transform.position.z);
但这还不够好。首先,我们要让对象合拍,这样它就得从其最大振幅开始。我们此时要使用余弦。但更重要的是,要让它从一端跳跃到另一端,这样它就不会像波纹一样滑上滑下。这时要用cos^2,这样它才会突然停在0标记,并再次走向正数。因此:
transform.position = new Vector3(transform.position.x,maxheight*Mathf.Pow(Mathf.Cos(
2*Mathf.PI*frequency*(Time.time-initialtime)),2),transform.position.z)
这里要注意舞动的高度。最终旋转要使用正弦,这样其旋转和转化就是异相的。因此:
transform.rotation = Quaternion.EulerAngles(0, maxRotation*
Mathf.Cos(2*Mathf.PI*frequency*Mathf.Sin(Time.time-initialtime)), 0);
这里要记住两件事:如果你使用一个位面,并希望它面对摄像机,这些值就不能是0和0,而必须是pi/2和–pi/2。这里我使用的是EulerAngles而不是Euler,因为Euler使用的是度数,而EulerAngles使用的是弧度。我们要做一些数学运算,我们现在要运用弧度,所以得使用EulerAngles!否则你之扣就得输入一个换算因数。
在此你可以看到我新游戏的一种类似动画,你可以用同种方法更改比例而不是位置。
现在我们要讨论最后一种动画类型:
纹理补偿
你可以用自己所学到的一切来操作2D纹理补偿,以制作美妙的动画背景。你可以在《Rude Bear Radio》及其主界面中看到我对《VVVVVV》的拙劣模仿。抓取一个位面,在其上粘附一个重复纹理,编写一个FixedUpdate() 函数,并根据下属性进行调整:
renderer.material.mainTextureOffset
renderer.material.color
这将导致墙体四处滑动并改变颜色。最后,如果你想让它们看起来更有趣,还可以运用renderer.material.mainTextureScale。这可以制作一个真正有趣的视觉效果,但它很有干扰性,不要让它影响你的主要游戏玩法。
最后,你还得看一下其中的插值。这可以让动画制作更轻松,但我个人认为在第二部分中最好使用公式。(本文为游戏邦/gamerboom.com编译,拒绝任何不保留版权的转载,如需转载请联系:游戏邦)
Animation in 2D Unity Games: In-Depth Starter Guide
by Alex Rose
The following blog post, unless otherwise noted, was written by a member of Gamasutra’s community.
The thoughts and opinions expressed are those of the writer and not Gamasutra or its parent company.
Animation in 2D Unity Games: In-Depth Starter Guide
So, Unity recently announced extra 2D game support, with the addition of Box 2D physics and a sprite manager.
But there’s a few tricks you still need to keep in mind. Changing the images frame by frame is just the tip of the iceberg for animation; to really make your game run beautifully, you have to understand how to use translation and rotation to your advantage.
We’ll start with the basics for now though:
Frame Changing
So, you have your textures ready for animation. You may be using the publicly available SpriteManager script, the paid version, or Unity’s own new version, in which case frame advances should be pretty second nature. Let’s say you’re using 2D planes and textures for now though. It’s an inefficient method, but if you’re doing a game jam for instance, you might want to throw together something that’s functional and good looking, but not necessarily efficient. It’s also a fairly comprehensive method that covers all steps, some of which are cut out by sprite managers.
First of all, you’re going to want a public Texture[] array, so you can drag your textures into the object from Unity’s editor and an integer currentTexture initialised to 0 in Start(). Next you want a NextTexture() function that works like this:
NextTexture(){
currentTexture++;
if(currentTexture>=textureArray.Length) currentTexture=0;
AnimatedPlane.renderer.material.mainTexture = textureArray[currentTexture];}
This will change the plane’s texture to the next frame in the animation.
There are two easy ways to call this function: Coroutine recursion and fixed intervals.
Using fixed intervals is the quickest (but less precise) method. You’re going to need an int counter, initialised to 0 in your Start() function, and a FixedUpdate() function, which updates every Time.deltaTime (you can vary this yourself in Unity’s Time Manager).
Inside FixedUpdate(), place your conditional (e.g. if(walking)), and inside it increment your counter with counter++. Then set the following statement:
if(counter>=animationDelay){
counter=0;
NextTexture();
}
Where animationDelay is an arbitrary value of your own choosing. This will advance the frames at a constant rate (depending on the rate you set in Unity’s Time Manager.
The second method is to use recursion. The downside to this is that it’s clumsier to deal with conditionals, but you’ll get the exact time delay you want. This is especially useful if you want a certain frame to be of a longer or shorter length. You’ll need an IEnumerator TextureChanger() and to StartCoroutine(TextureChanger()) in Start().
IEnumerator TextureChanger(){
yield return new WaitForSeconds(timeInterval);
if([conditions]) NextTexture();
}
Where timeInterval is a float of your choosing. With these functions, you can drag any number of textures onto your GameObject and it’ll animate correctly, provided you give the right conditions.
Now let’s move on to something more interesting.
Smooth Movement to a Point
The following formula is the holy grail of animation:
The holy grail of 2D animation in Unity
where 0 < slidespeed < 1. I recommend 0.1f as a good slidespeed value.
This formula will allow you to animate your objects beautifully to a point. This is extremely
useful in sliding GUIs, character control, level spawning, camera following, colour fading/shifting etc.
Descending 2D Animation from Rotation Station in Unity
Here’s an advanced version of it from my upcoming game Rotation Station that moves towards a lower point first and then back to a higher point to make the little bob at the end. Every tile moves down according to that formula, although each one has a random delay, and a random initial rotation, which also uses this formula to rotate it into its desired orientation.
An example of using this for character controls is in my recent Ludum Dare entry Rude Bear Radio. In this case, the formula is applied to make fluent mouse controls.
2D Animation Towards the Mouse from Rude Bear Radio in Unity
So, let’s look at how to apply it in the above example (a 2D GameObject following the mouse).
First of all, we need to know where the mouse is on the 2D area. In order to find that, we first place this code into the FixedUpdate() function of the sliding GameObject:
Vector3 MousePosition = Camera.main.ScreenToWorldPoint(new Vector3(Input.mousePosition.x,
Input.mousePosition.y, transform.position.z-Camera.main.transform.position.z));
So, this uses the mouse’s x and y position, and the distance from the camera to the sliding GameObject to determine the Mouse’s 2d position in 3d coordinates. Now we’re going to adapt the formula from the start of this section. So, remember,
2D Step animation in Unity
transform.position += new Vector3((MousePosition.x-transform.position.x),
(MousePosition.y-transform.position.y),0)*slidespeed;
And there you are – done! Two lines of code. For something like a GUI, you would then write a statement saying:
if(Mathf.Abs(finalvalue-currentvalue)
Let’s look at another example, which you can see in Rude Bear Radio’s hard mode Mario stage.
2D Animation of Background Colour from Rude Bear Radio in Unity
The background animates from black to white slowly, using this formula:
background.renderer.material.color =
(1-factor)*background.renderer.material.color+factor*desiredcolor;
You can see here that it follows the basic form. Next = current+(final-current)*factor, just via shorthand. The factor starts low. The code checks whether the R value is within a certain range of the color, and if it is, it shifts up the factor so it fades quicker. Once the R value gets really close to 1, it sets the desired colour to black. You could also check for R, G and B, and advance the colours in an array (similar to our NextTexture() function from before). You can see an example of this constantly in the background of my second LD entry Rude Bear Rising (which is a buggy mess, but a good example of this feature, and also uses this formula to focus the camera on the player once they move too far from the screen).
Okay, so this has all been easy so far, you just stick in a formula and it’s done. The next (and possibly most important principle of all) requires a bit more thought than that.
Trigonometry and You (Or: Why you should’ve been paying attention in Maths)
Trigonometry is crucial to animation. Frames are all well and good, but they won’t make things look truly beautiful, and sometimes you can do without the frames at all.
e.g. The first time I entered Ludum Dare, my housemate hand drew the pictures for me. I had one still image for each character. The solution? Use puppets on sticks.
2D Animation Puppet Style from Rude Bear in Unity
Now, the way to achieve motion like this is very simple. Sin for translation, cos for rotation.
To create animation like this, you’re going to want the waves to stop and continue when you let go and input again, otherwise the motion will be extremely sporadic.
So you want an overarching variable (which I called walkbob), which adds Time.deltaTime onto it in FixedUpdate as long as the object is moving. Then you make your functions.
translation = maxHeight*Mathf.Sin(speed*walkbob);
rotation = maxRoll*Mathf.Cos(speed*walkbob/2);
Then you simply set the position and rotation to these values (e.g. transform.position = new Vector3(transform.position.x,translation,transform.position.y)).
This will handle motion like that. However, a kind of animation that requires a bit more thought is what I like to call trig dancing. It’s useful for making cute characters dance to the music. You can see it here in Rude Bear Radio.
2D Animation of a Dancing Radio from Rude Bear Radio in Unity
So, here’s how it works. First of all, as soon as you intend to start moving your object, you want to take a float initialtime = Time.time. This is so that your object starts in the correct position and orientation and doesn’t suddenly leap into action.
Next, we’re going to think properly about trig functions and what they mean.
We’re using simple harmonic motion, and this follows the form:
Sin formula for 2D animation in Unity.
where y is the current value, A is the amplitude, f the frequency, t is the elapsed time and phi is the phase. First of all, the amplitude is easy to determine. That’s the maximum height or rotation we want our object to have.
Next is the elapsed time and phase. We’re going to handle both at once easily by replacing t by (Time.time-initialtime). This reduces φ to 0. So, finally, we just need our frequency. I would heavily recommend fitting the frequency of this to the frequency of your music (which is especially easy if you wrote it yourself).
If you don’t already know the BPM of your music, go here and tap every beat until you know it. If you have rhythm it’ll take no time. If you don’t, no worries, we’ll just take advantage of the central limit theorem. Just keep tapping for the whole duration of your song. The error on the average value will decrease with every tap.
So now you know it in beats per minute. You’ll need to divide this value by 60 to find out how many beats per second. Then you may want to divide it by 2 or 4 (or even more), if you only want to use motion on half a bar, or a full bar. This value is the frequency, and you can get pi from Mathf.PI. So now you just want to set the object’s position to that value. So, say you’re only modifying the height:
transform.position = new Vector3(transform.position.x,maxheight*
Mathf.Sin(2*Mathf.PI*frequency*(Time.time-initialtime)),transform.position.z);
But this isn’t good enough. First of all, we want the object to arrive on the beat, so it should start at its maximum amplitude. We want to use cos in this case. But more importantly, it should be leaping from side to side, so it shouldn’t just slide up and down like a wave. It needs to use cos^2, so it abruptly stops at the 0 mark and becomes positive again. Therefore:
transform.position = new Vector3(transform.position.x,maxheight*Mathf.Pow(Mathf.Cos(
2*Mathf.PI*frequency*(Time.time-initialtime)),2),transform.position.z)
This takes care of the dancing height. Finally the rotation should use sin, such that the rotation and translation are out of phase. So:
transform.rotation = Quaternion.EulerAngles(0, maxRotation*
Mathf.Cos(2*Mathf.PI*frequency*Mathf.Sin(Time.time-initialtime)), 0);
Here there are two things to keep in mind: if you’re using a plane and you want it to face the camera, those values aren’t going to be 0 and 0, but pi/2 and –pi/2 respectively. But also of great importance is that I’ve used EulerAngles rather than Euler here. EulerAngles is deprecated in favour of Euler, because Euler uses degrees (which Unity usually handles) and EulerAngles uses radians. We’re doing proper maths – we’re working in radians, so use EulerAngles! Otherwise you’re going to have to put in a conversion factor too.
Here you can see a similar kind of animation from the title screen of my upcoming game how you can change the scale instead of the position in the same way. You’ll have to use half the period and -cos^2 for this.
2D Animation of Rotation Station’s title screen in Unity
This brings us to the final category of animation I’ll discuss today:
Texture Offsets
You can use everything you’ve learnt so far to manipulate 2d texture offsets to make cool animated backgrounds. You can see this in my VVVVVV parody in Rude Bear Radio, and on its main screen. I’ll leave this one as an exercise. Grab a plane, stick a repeating texture on it, write up a FixedUpdate() function, and fiddle trigonometrically with these properties:
renderer.material.mainTextureOffset
renderer.material.color
This will cause the wall to slide around and change colour. Finally, if you want things to look really interesting, you can also play with renderer.material.mainTextureScale. It makes a really interesting looking effect, but it is rather distracting, and you don’t want this to detract from your main gameplay.
Finally, you may want to look into lerp and slerp. These can make animation easier, but personally, I find it nicer to stick to the formula in the second section.
